BIOS stands for Basic Input Output System. It’s a set of code that resides on a chip on yours system’s motherboard. When a computer boot up, it looks in the chip for BIOS for instructions on where to find the operating system and among many other things, BIOS also further facilitates communication between the operating system and the hardware.
Like drivers and softwares, updates for BIOS are also released occasionally, but you should have a very good reason for updating your BIOS, also called flashing your BIOS. Unless you are having a specific issue like compatibility while installing new hardware that is resolvable through BIOS update, only then you should update your BIOS.
Solution 1: Through Windows Operating System
To update your BIOS on your Dell computer/laptop, you will first have to check which version of BIOS is currently running on your system.
Hold the Windows key + R. In the run window, type msinfo32 and press Enter. System Information window will open. In the window, make sure System Summary is selected in the left pane. In the larger right pane, locate BIOS Version/Date. The value against it will be your BIOS version. Note it down.

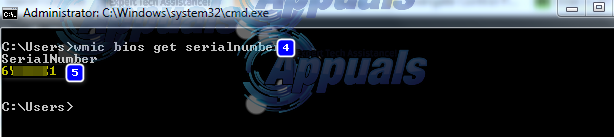
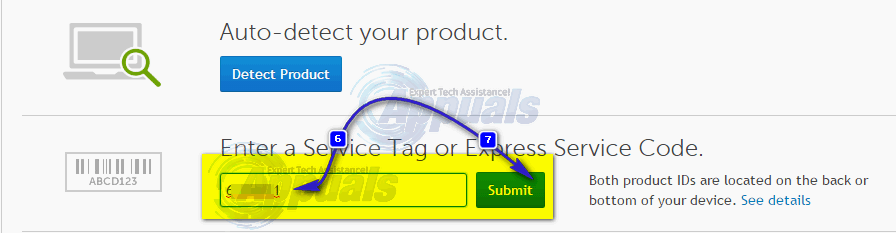
Now go to www.dell.com/support/drivers. Enter your Service Tag or Express Service Code in the required text box usually written on the top or bottom of your desktop or laptop, if not, press Windows key + R. In the Run dialogue box, type cmd and press Enter. In the black window, type the following command:
wmic bios get serialnumber
Press Enter to run the command. Note down the characters under “Serial Number” which is your Service Code.
Type it under Service Tag or Express Service Code’s text box on the webpage and click submit. After submitting your Service tag, your system model should appear on the web page, under Product Support.
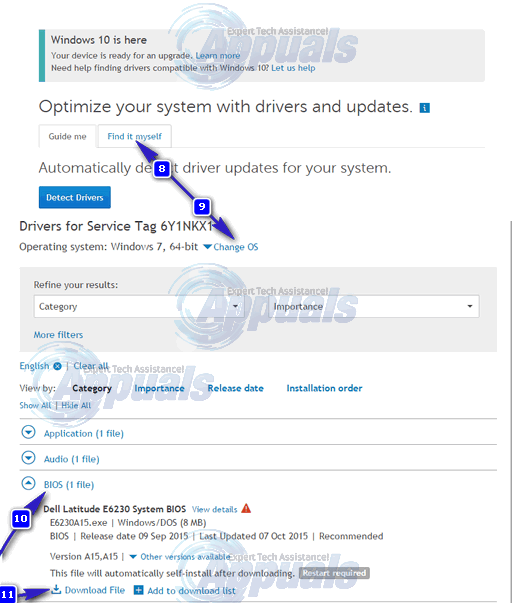
Make sure “Drivers and downloads” is selected on the left. Scroll down, under “Optimize your system with drivers and updates” and click “Find it Myself”. Make sue correct Windows Operating System is listed next to View all available updates. If not, click Change OS to select the correct Microsoft Windows Operating System that is currently installed on your computer. Under “Refine your results:” click on BIOS in the drop down menu to place a check on it. Click on BIOS available for download in the search results to expand its details. If the BIOS version and date is newer than the one currently installed, then click Download File to download it. If not, then you already have the latest BIOS version. Save and close any running applications, and open the downloaded file.
Click Yes to User Account Control warning message. Follow the on screen instruction carefully. Click yes and OK to the confirmation and warning messages that may vary by system model. Do not turn off your computer or laptop in any case during the updating process. In case of laptop, make sure the battery is present in the laptop and the AC adapter is connected with it the whole time.
Solution 2: Through A Bootable Flash drive
If you can’t log onto a system and still have to update its BIOS, you’ll have to do it through booting from your Flash drive. To know the current BIOS version installed, power on your target system, and keep pressing F2 until BIOS setup appears. Your BIOS version will be given next to BIOS Revision.
To check if an updated BIOS version is available, go to www.dell.com/support/drivers from any system that you have access to.
Enter your Service Tag or Express Service Code in the required text box usually written on the top or bottom of the target desktop or laptop whose BIOS you want to update.
If not, scroll down and click “View products” under “Browse for a product.” And select your desktop’s or laptop’s model accordingly.
Use the above given method in Solution 1 to check if newer version of the BIOS is available. If yes, then click Download File to download it. If not, then you already have the latest BIOS version. Connect the Flash drive you’re going to make bootable with your system. Hold Windows Key + E to open windows explorer. Back up the data if any from the Flash drive.
Download Rufus from this link. We will use it to make the Flash drive bootable. Open the downloaded file.
Select your Flash drive under Device. Select FAT32 in the drop down menu under File system and select FreeDOS next to “Create a bootable disk using”. Click Start.
Click close when the process is complete. Copy the updated BIOS file to the Flash drive and that file only. Note down the exact name of the file.
Connect the Flash drive to the target system whose BIOS you want to update. Power it on. Keep tapping F12 until the Boot Menu appears.
Highlight your Flash drive/USB from the boot menu. Press Enter.
A command prompt window will appear. Type C: and press Enter.
Type dir to list the files on the flash drive.
Now type the exact file name of the BIOS update file e.g. E5440A13.exe and press Enter.
Follow the on-screen instructions. Do not turn off your computer or laptop in any case during the updating process. In case of laptop, make sure the battery is present in the laptop and the AC adapter is connected with it the whole time.
The post BEST GUIDE: How to Update Dell BIOS appeared first on Appuals.com.