Quantcast
Channel: Kevin Arrows | Network Engineer | Appuals.com
Viewing all 4499 articles
Browse latest View live

How to Uninstall Bitcoin Core and Remove Data in Linux

$
0
0

Bitcoin Core is now fully compatible with many distributions of Linux, as well as a number of other Unix-based operating systems. Installing precompiled binaries shouldn’t be difficult for that reason, but it can consume quite a bit of space on whatever partition you have mounted to the / directory. You may want to remove it for this reason, or simply because you’ve moved to a different virtual currency. As long as you installed it via a standard Linux package manager, you should find un-installation quite simple.

If you merely want to prevent the Bitcoin Core from starting when you boot your machine, then you can simply disable the bitcoind service without uninstalling it. Doing this keeps you from having to reinstall the service later, and it’s a good option for those who need the core occasionally but don’t always want to use it. Even if you do completely purge the Bitcoin package, you can unpack the precompiled binary packages later.

Method 1: Disabling the bitcoind Service

While it’s easy enough to undo un-installation, you might want to give some thought to keeping the package and resident data on your partition for the time being. Just because something is installed doesn’t actually mean you have to use it. From the CLI prompt, you can issue the command sudo systemctl disable bitcoind to prevent the bitcoind service from starting. You’ll have to enter your administration password if you haven’t preformed a superuser-level command from your terminal lately.

If you have root-level access from your terminal, you can simply issue systemctl disable bitcoind without the use of the sudo prefix. In either case, you’ll probably not see much output, but the service will be disabled after your next system restart. This won’t tamper with your installation, and you could always start it manually from the command line using this function. It simply disables it from running when the system boots. Many users actually follow this procedure not because they want to get rid of the Bitcoin Core, but rather because having many processes start at boot time really hurts system performance.

Method 2: Removing Bitcoin Core Using the yum Package Manager

Users of Red Hat Enterprise Linux, Fedora and CentOS more than likely installed the Bitcoin Core with the RPM Package Manager, which means they can simply enter yum remove bitcoind from the CLI prompt if they have administrator access. If not, then preface the command with sudo or su to gain root access. Once again, you might be asked for your password when performing this action.

The yum package command might move any configuration files you might have had floating around in your home directory to .rpmsave files in the same. You’ll need to clean these out to completely remove the Bitcoin Core data, but rest assured that other programs wouldn’t interfere with them.

Method 3: Removing Bitcoin Core Using the apt-get Package Manager

Debian, Ubuntu and the numerous derivatives thereof allow users to install Bitcoin Core using the Advanced Packaging Tool, which works through the apt-get terminal command. Users who actually installed a discrete .deb file they downloaded from a repository won’t have to worry about removing a PPA, but everyone else should quickly run dpkg -l | grep bitcoin to see what sort of things are installed. Ubuntu-geared repositories have listings for Bitcoin packages, and it’s possible to download .deb files from these.

Likewise, it’s possible to compile these packages from source, but if you want to remove everything make sure you don’t have any trailing PPA references. Once you’re ready, run sudo apt-get remove bitcoind from the terminal to remove the program without deleting data. If you’re absolutely sure that you want to delete the software plus remove all of the related user data, then you can instead run sudo apt-get purge bitcoind while keeping in mind that there’s no going back once you answer yes to the [y/N] prompt apt-get will give to you.

Method 4: Removing Bitcoin User Data

Just in case the prior steps didn’t remove everything that you want to get rid of, you can remove your hidden .bitcoin directory to delete all of the wallets, addresses and pointers to any Bitcoins you might have. It also removed the blockchain history if you have any. Remember that there’s no going back on this either, so you’ll want to back up anything you’re afraid of loosing.

Depending on your setup, bitcoind might have created an additional user on your system, but more than likely it simply stashed the .bitcoin directory underneath your home directory. You can use rm -rf ~/.bitcoin from the terminal to delete this. If you’re having a rough time locating it, however, then you can try sudo updatedb followed by sudo locate .bitcoind to be sure of it’s location. The blocks that actually take up a large amount of space are generally found in ~/.bitcoind/blocks/, which is usually what people are trying to remove if they uninstall this software to make some space. Unfortunately, Bitcoin Core doesn’t really like portable installations, so you’ll have a rough go of it trying to move this data to a separate partition and then run it from there.

You could use the steps in Method 1 to disable it from running on startup and then move the hidden Bitcoin directories to an SD card or a USB memory stick. Whenever you want to run the software, you’ll need to move them back to your ~ directory, which can be something of a hassle, but this method does have the benefit of encouraging you to make regular backup copies of it. Any file system should work for this, but you may feel more secure using an external volume formatted to one of the various native Linux formats.

The post How to Uninstall Bitcoin Core and Remove Data in Linux appeared first on Appuals.com.


How to Fix Microsoft Security Essentials Error 0x80040154

$
0
0

The error code 0x80040154 can be shown without any prior warnings. Most of the victims of this error says that there systems were working fine during the last session. The error 0x80040154 can present itself with messages related to “Microsoft Security Essentials”. The error also prevents the users from opening or uninstalling the Microsoft Security Essentials.  Keep in mind that error code 0x80040154 can be shown at various stages during the use of Windows for example when you open a mail application or skype etc. but this solution is specifically for the users facing the error either when they turn on their computer or when they try to start Microsoft Security Essentials.

The issue is mainly associated with the Microsoft Security Essentials. Sometimes there might be Antivirus applications conflicting with the Microsoft Security Essentials. Usually even if you uninstall the security applications, they still keep conflicting with other security programs because the installer didn’t properly clean the files. Another reason for this might be an infection that changed the file structure of Microsoft Security Essentials.

The problem can be solved by uninstalling the Microsoft Security Essentials. But sometimes you can’t uninstall the program from Windows Programs and Features so first try the method 1 and then go through all the methods until the Microsoft Security Essentials is uninstalled.

Method 1: System Restore

If the error code 0x80040154 just started showing up on your computer then the most likely cause is that you downloaded some infected software. Even if you don’t remember installing something new on the PC it is still advised to do a System Restore.

Doing a System Restore will revert back your computer to an earlier time. In other words, it will undo the system changes that you made after the time that you are restoring to. So if the error is showing because of something that you installed on the PC, the problem should go away.

  1. Hold Windows Key and press R
  2. Type rstrui.exe and press Enter

  3. Click Next

  4. Now select the restore point that you want to go to. You can see the exact time when the system restore point was created. Select the most recent one
  5. Click Next. (you can also click scan for affected programs to check which programs will be affected by this system restore)
  6. Click Finish then click yes.

Now your computer will restart and take some time to restore. Wait for it to finish.

Note: You can only do the System Restore if you have the System Protection turned on. You cannot restore the system if the System Protection was turned off and the system does not have any previously stored Restore Points.

So if you see a screen like this:

Than that means this method won’t work for you.

Method 2: Uninstall other antimalware programs

Make sure you have uninstalled other antimalware programs like Norton and McAfee etc. on your system. If you haven’t or if you don’t remember whether you installed them or not then follow the steps below

  1. Hold Windows Key and press R
  2. Type appwiz.cpl and press Enter
  3. Locate any antimalware program. If you find one then click it
  4. Click Uninstall

Keep in mind, sometimes the antimalware programs comes pre-installed on the system. Even if you have an inactivated trial installed on your computer, uninstall it.

Note: Sometimes there are some residual files left behind on the system even if you uninstall a program. To remove those, go here and download the cleanup tool for your specific antimalware program (that you just uninstalled). Now run the cleanup tool to clean the residual files.

Method 3: Uninstall Microsoft Security Essentials (Usual way)

If the malware infection has changed the file structure of Microsoft Security Essentials then uninstalling and reinstalling the program solves the problem.

Go here and run the tool. The tool has some updates that fixes the Microsoft Security Essentials without having to uninstall and reinstall the program. Once you are done, check if the system still shows the error.

If the above mentioned tool doesn’t solve the problem then uninstall the Microsoft Security Essentials yourself from the Remove Programs and Features

  1. Hold Windows Key and press R
  2. Type appwiz.cpl and press Enter
  3. Locate Windows Security Essentials and click it
  4. Click Uninstall

Follow the screen instructions to uninstall the program.

Method 4: Remove Microsoft Security Essentials with mseremoval.bat

  1. Hold Windows key and press R
  2. Type notepad and press Enter

  3. Copy and Paste the lines below in the Notepad

cd /d “%ProgramFiles%\Microsoft Security Client”

setup.exe /x

TASKKILL /f /im MsMpEng.exe

TASKKILL /f /im msseces.exe

net stop MsMpSvc

sc delete MsMpSvc

REG DELETE “HKEY_LOCAL_MACHINE\SYSTEM\CurrentControlSet\services\MsMpSvc” /f

REG DELETE “HKEY_LOCAL_MACHINE\SOFTWARE\Microsoft\Microsoft Antimalware” /f

REG DELETE “HKEY_LOCAL_MACHINE\SOFTWARE\Microsoft\Microsoft Security Client” /f

REG DELETE “HKEY_LOCAL_MACHINE\SOFTWARE\Policies\Microsoft\Microsoft Antimalware” /f

REG DELETE “HKEY_LOCAL_MACHINE\Software\Microsoft\Windows\Current Version\Run\MSC” /f

REG DELETE “HKEY_CLASSES_ROOT\Installer\Products\4C677A77F01DD614880F352F9DCD9D3B” /f

REG DELETE “HKEY_CLASSES_ROOT\Installer\Products\4D880477777087D409D44E533B815F2D” /f

REG DELETE “HKEY_LOCAL_MACHINE\SOFTWARE\Microsoft\Windows\CurrentVersion\Uninstall\Microsoft Security Client” /f

REG DELETE “HKEY_LOCAL_MACHINE\SOFTWARE\Microsoft\Windows\CurrentVersion\Uninstall\{774088D4-0777-4D78-904D-E435B318F5D2}” /f

REG DELETE “HKEY_LOCAL_MACHINE\SOFTWARE\Microsoft\Windows\CurrentVersion\Uninstall\{77A776C4-D10F-416D-88F0-53F2D9DCD9B3}” /f

REG DELETE “HKEY_CLASSES_ROOT\Installer\UpgradeCodes\1F69ACF0D1CF2B7418F292F0E05EC20B” /f

REG DELETE “HKEY_CLASSES_ROOT\Installer\UpgradeCodes\11BB99F8B7FD53D4398442FBBAEF050F” /f

REG DELETE “HKEY_LOCAL_MACHINE\SOFTWARE\Microsoft\Windows\CurrentVersion\Installer\UserData\S-1-5-18\Products\4C677A77F01DD614880F352F9DCD9D3B” /f

REG DELETE “HKEY_LOCAL_MACHINE\SOFTWARE\Microsoft\Windows\CurrentVersion\Installer\UserData\S-1-5-18\Products\4D880477777087D409D44E533B815F2D” /f

REG DELETE “HKEY_LOCAL_MACHINE\SOFTWARE\Microsoft\Windows\CurrentVersion\Installer\UpgradeCodes\11BB99F8B7FD53D4398442FBBAEF050F” /f

REG DELETE “HKEY_LOCAL_MACHINE\SOFTWARE\Microsoft\Windows\CurrentVersion\Installer\UpgradeCodes\1F69ACF0D1CF2B7418F292F0E05EC20B” /f

takeown /f “%ProgramData%\Microsoft\Microsoft Antimalware” /a /r

takeown /f “%ProgramData%\Microsoft\Microsoft Security Client” /a /r

takeown /f “%ProgramFiles%\Microsoft Security Client” /a /r

REM Delete the MSE folders.

rmdir /s /q “%ProgramData%\Microsoft\Microsoft Antimalware”

rmdir /s /q “%ProgramData%\Microsoft\Microsoft Security Client”

rmdir /s /q “%ProgramFiles%\Microsoft Security Client”

REM Stop the WMI and its dependency services

sc stop sharedaccess

sc stop mpssvc

sc stop wscsvc

sc stop iphlpsvc

sc stop winmgmt

REM Delete the Repository folder.

rmdir /s /q “C:\Windows\System32\wbem\Repository”

sc stop

EXIT

  1. Now click File then select Save

  2. Type “mseremoval.bat” WITH QOUTES in the section File name
  3. Select All Files from the drop down list in the section Save As Type
  4. Click Save and close the Notepad
  5. Go to the location where you saved the Notepad file.
  6. Right click the file and select Run

Wait for the file to finish running. You will be able to see a black windows appear and disappear once it is finished. Now restart your computer and check if error still appears or not. You can reinstall the Microsoft Security Essentials by going to the Microsoft website if you want.

Method 5: Remove Microsoft Security Essentials with Command Prompt

  1. Hold Windows Key and press R
  2. Type regedit.exe and press Enter

  3. Go to this path HKEY_LOCAL_MACHINE\SOFTWARE\Microsoft\Windows\CurrentVersion\Uninstall\Microsoft Security Essentials. If you don’t know how to do this then follow the below given steps. Perform these steps in the left pane of the window.
    1. Locate and double click HKEY_LOCAL_MACHINE folder
    2. Locate and double click SOFTWARE folder
    3. Locate and double click Microsoft folder
    4. Locate and double click Windows folder
    5. Locate and double click CurrentVersion folder
    6. Locate and double click Uninstall folder

  4. Right click Microsoft Security Essentials and select Delete. Now close the windows
  5. Press Windows Key once and type cmd in the Start Search box
  6. Press CTRL, SHIFT and ENTER simultaneously (CTRL + SHIFT + ENTER)
  7. Type CD C:\program files\microsoft security client\backup\x86 and press Enter if you are using Windows XP. Type CD C:\Program Files\Microsoft Security Essentials\Backup\x86 for 32-bit version or type CD C:\Program Files\Microsoft Security Essentials\Backup\amd64 for 64-bit version and press Enter.
  8. Type exe /u and press Enter

This will uninstall Microsoft Security Essentials. Now check if the system still gives the error.

Method 6: Microsoft Fixit Tool for removing Microsoft Security Essentials

  1. Go here and click on the download
  2. Once downloaded, run the file by going to the folder that you downloaded it (Usually Downloads) and double clicking it.
  3. Select Detect problems and let me select the files to apply
  4. Click Uninstalling
  5. Select Microsoft Security Client (or Essentials) and click Next
  6. Repeat the steps from 2-4 and now select Microsoft Antimalware. Now click Next

Now restart your computer for the changes to save and check if the issue is still there.

Method 7: Reset the system

The last option for you, unfortunately, is resetting the Windows. You need to format the HDD to get rid of the infected software and do a clean install of the Windows. Do not repair the Windows as it might not solve the problem, you have to perform a complete reinstall.

Note: This will erase all the data from your system so proceed on your own risk.

Backup data

Backing up your data is a good way to make your personal files safe but at this point, when you are resetting the Windows to get rid of the malware, it’s not advised to do a backup because your data might already be infected. So back up your files on your own risk.

Go here for instructions to backing up your files.

You can reinstall the Windows with 2 ways. Either use your Windows CD/DVD to install the Windows or use a recovery partition if you don’t have a CD/DVD.

Reinstall from CD/DVD

  1. Insert the Windows Disc in the CD ROM
  2. Restart your computer
  3. Your computer might ask you to press any key to boot from the disc. When it does, press any key or a specific key that the computer is asking for.
  4. Now select Install Now. (If you are asked whether to repair or do a complete install, DO NOT select the repair Windows option as it won’t solve this problem)

Follow the instructions on the screen to install your fresh copy of Windows

Reinstall from Recovery partition

Sometimes the Windows come preinstalled on your computer and you might not have a Windows disc. In that case you have an option to install Windows from recovery partition

Restart your computer and look for an instruction saying press X key to go to boot menu. The X key might be F10, F12 or it can be anything. It depends on the manufacturer.

The instruction will come up when the manufacturer’s logo appears on the screen

When in boot menu, look for something that says boot from recovery. The name might change depending on your manufacturer

You can then select the recovery volume and follow the instructions on the screen. The instructions will vary from brand to brand but if you aren’t sure then go to your manufacturer’s website and look for the instructions to use recovery partition

Once you are done, follow these steps to make sure your system is secure. Do not connect your computer to the internet or do not connect any external drive before following these steps

Turn Windows Firewall On

  1. Hold Windows key and press R
  2. Type firewall.cpl and press Enter

  3. Select Turn Windows Firewall On or Off

  4. Click Turn on Windows Firewall (if it’s not already) from both Public and Private Sections and press Ok

Uninstall other antivirus programs

Follow method 2 to uninstall the programs

Check Windows updates

  1. Hold Windows key and press R
  2. Type wuapp and press Enter

  3. Select Check for updates

Turn on Windows Defender

  1. Press Windows key once
  2. Type windows defender in the Start Search box and select Windows Defender
  3. Make sure it is on and updated. If you aren’t sure, click tools > select Options > select Real-time protection. Make sure the Turn on Real-time protection is checked.

Now your computer should be clean and secure.

The post How to Fix Microsoft Security Essentials Error 0x80040154 appeared first on Appuals.com.

How to Remove a User from a Group in Ubuntu

$
0
0

If you’ve accidentally added a user to the admin group or any of the other groups on a multiple user system in Ubuntu, then deleting them from it without loosing their account is actually fairly easy. The problem comes from how easy it is to delete the actual user in the process. Care should be taken before entering any of the following commands. While there are ways to undo actions taken here, it’s very difficult if a user gets deleted.

Some system administrators have suggested adding an octothorpe mark (#) before any of these commands. This effectively comments them out, so bash will throw them out if you accidentally push enter before properly typing them. For instance, if you typed #deluser bobby and pushed enter, then nothing would actually happen. Once you’re sure that you have the command properly entered, then you can push the home key, delete the octothorpe mark and push enter.

Method 1: Using deluser to Remove the Group Association

Some system administrators, especially those who previously worked with one of the various BSD distributions, recommended editing the  file as root. This is possible to do, but if you make any errors while editing the file you can make the system quite unstable. This is especially true if you make a mistake in regards to the admin group itself. While we will demonstrate how this should be done, using the deluser command is considered a safer option in many cases.

From the CLI prompt, which can be either in a graphical terminal or from a virtual console, type the command deluser userName groupName, replacing userName with the name of the user you want to remove the association of and groupName with the name of the group you want to remove the user from. This command will remove the specified user from the group in question, though at the risk of committing an error of omission, it’s best to login in again to view the effect. This will not delete the user itself nor the group, but rather only the association of the two.

Be very careful when entering this command, since if you type in a user name and push enter before typing in a group name you will actually delete the user completely. This is where the trick involving an octothorpe comes in handy, and you may wish to apply this any time that you’re editing group policies in Ubuntu, since it can be quite helpful. Say you had wanted to remove a user named billy from the admin group. The command would be as simple as deluser billy admin if you had administrative privileges. Since Ubuntu hashes out the root user, you may actually be running from something other than an elevated shell. If this is the case, then you can instead use sudo deluser billy admin for the same. In either case, though, you’re risking a typo.

If you were to type #deluser billy admin and then push enter, then nothing will happen. You’re forced to look over the command before removing the octothorpe from the beginning of the line. While this might not seem like much to those who are uninitiated, you usually have to issue these commands while doing something unrelated as you might realize that you made some sort of mistake or found that someone had too high of privileges. It’s very easy in that sort of situation to remove an entire user from the system.

This trick prevents this from happening even if you happen to be working on many different things at once, which is particularly true of implementations of the Ubuntu server architecture where you’re more likely to find multiple groups. In those situations, you have nothing but a virtual console to work with.

Method 2: Using the vipw -g or vigr Commands to Edit 

If you want to actually edit the  file, then you shouldn’t type sudo nano  and push enter like you might have been thinking. While Ubuntu will actually allow this command, it’s a bad idea in the same way that editing the sudo configuration file is a bad idea. Type sudo vipw -g and then enter your administration password to open up the file in a text editor. While the name of the command dates to a time when vi was essentially the only rational choice for a Unix text editor, Ubuntu actually defaults to nano on a majority of systems. If you have vi, emacs or something else configured as your default terminal text editor, however, then it will instead default to this.

While it was at one point technically a different command, Ubuntu also provides the vigr command as a symbolic link to vipw, which means you can use sudo vigr -g instead if you’re more used to editing the  file in this manner. You can now locate the line that indicates the assignment to a specific group that your user account has and remove it. Don’t remove the entire line. Locate the admin group, or whatever other group is in question, and merely remove the user name and the trailing comma before it. Once you’re satisfied with your changes, which you should look over more than once, hold down Ctrl and push O to save it in nano, or push Esc and then type :wq if you happened instead to load up the vi editor. You could theoretically edit it with a graphical text editor as well, but this isn’t recommended.

Once again, you’ll probably need to either logout or even restart the system to make it take full effect on smaller systems, but if the other user attempts to log in immediately after you’ve made these changes, then they should already come into play, even if you’re running an implementation of Ubuntu Server with dozens of different home directories. Users who are currently logged in, however, will continue to operate with their previous privileges until they exit their session.

The post How to Remove a User from a Group in Ubuntu appeared first on Appuals.com.

How to Fix pulseaudio issues in Linux

$
0
0

Ocassionally the pulseaudio service stops for various reasons. Most commonly it suddenly stops working after playing certain sorts of full-screen games or playing certain videos. If one of these applications were to suddenly stop or if you had to use xkill to force it to stop, then you might need to restart the pulseaudio service. You don’t have to completely reboot your Linux PC or tablet to achieve this.

The most common way is to log your desktop environment out and then log back in again, but this is annoying and it doesn’t always work. It also requires you to close many programs you already have running inside of this environment. A couple of terminal commands are all that you’ll need to restart the audi daemon and hear clear sound once again. You might still have to restart an application or two if they don’t respond to the restart, however.

Restarting the pulseaudio Service Without Logging Out

Open a terminal window by holding down CTRL, ALT and T or select it from the application or Dash menu appropriate for the type of graphical user interface you’re using. You won’t need administrator access for most of these commands, so make sure that you have a $ prompt if you’re using the bash shell. Users of tcsh might want to type in whoami to make sure they’re not going to start the pulseaudio service as root.

Check if any instance is currently running by typing pulseaudio –check and pushing return. You’ll usually see no output at all. You may also see a zero, which is the same as receiving no output. This indicates that there’s no instance running. If you got any message about an instance presently running, then you could issue the command pulseaudio -k to kill the existing one. Once you’ve done this, or if you had no previous instance running anyway, you can type pulseaudio -D to start a new instance, and the process will launch automatically before it returns you to the command line.

You don’t even need the terminal if you know for sure you don’t have an instance running. You could hold down the Super or Windows key and push R to open up the run box and then type pulseaudio -D into it. Push the enter key or click the button to issue the command.

Technically you could even use this box to kill an existing pulseaudio instance with pulseaudio -k, which is useful if you have no other reason to bring up a terminal. Some people actually write a short bash script to automate this process, but these commands are so short that it’s hardly necessary to do so.

Start your video, your MMORPG or your FPS again and enjoy now that you have full sound coverage once again. Any user-defined setting in ~/.pulse or ~/.config/pulse will override the system-wide settings, so you may wish to look into these configuration files if you constantly have problems.

If you never hear sound when you’re running a program, then you might need to start it with padsp in front of it to make sure that it can jack into the pulseaudio process. You might also want to start alsamixer in your terminal to make sure the audio level settings are correct. If the padsp fix helps you launch it from the Super+R command line or the terminal, then you’ll want to modify the .desktop file that starts the program. You could also put padsp nameOfGame into a bash or tcsh script. Replace nameOfGame with the actual command name of the program that you’re trying to run.

When all else fails, you can actually start the pulseaudio service on a system-wide level with the sudo service pulseaudio restart command. Since this begins with sudo, the CLI prompt will ask you to enter your password if you haven’t issued any commands using sudo recently. Since this does activate the service on a wide scale, you shouldn’t use it as a first resort. You can actually use top or busybox top in your terminal to see what pulseaudio usually runs as. If you don’t see it at all, then you know that it’s not starting properly to begin with.

Use the Page Up and Page Down keys to scroll through the top listings, looking at each bracketed service to see if pulseaudio starts with the system. Usually the pulseaudio -k command tells you if it is anyway, but this is an excellent way to be sure. If nothing else seems to be working and you’re using Xubuntu or another Xfce4-based distribution, then there’s an error you might have fallen prey to that doesn’t influence LXDE, KDE or Unity users. When you go to shut down the machine, a check box asks to save your session.

This is especially true if you use Alt+F4 from an empty Xubuntu desktop to shut the system down. This could constantly save an incorrect pulseaudio setting, at least in theory anyway. You could try un-checking it and restarting the system. While this does require a restart, which you were more than likely attempting to avoid in the first place, it might prevent future problems. Once you have it working well, you can select that checkbox again to save the other schemes you have in place. You won’t have to restart again in the future, and can simply use the pulseaudio -D command if this did indeed fix the problem you were having.

A very few users, especially those running Linux on ASUS eeePC mobile devices, say that after restarting pulseaudio they suddenly hear a crackling noise. This is an unusual driver problem, but you can fix the issue with relative ease. Try plugging any USB device into a USB port and then restart the puleaudio daemon. You might also try plugging and unplugging something into the headphone jack. Apparently, this inadvertently sends a signal that the open-source driver interprets and corrects the issue. This isn’t a problem for those running pulseaudio with proprietary drivers installed.

The post How to Fix pulseaudio issues in Linux appeared first on Appuals.com.

How to Fix Software Updater Error in Ubuntu

$
0
0

Occasionally, you might try to run the Software Updater program on an Ubuntu machine, only to find that you get a “Failed to download repository information” message. It might remind you to check your Internet connection. If you were instead attempting to use the terminal to update Ubuntu, then you might have received some other sort of software updater error from the apt-get package management utility. This problem is found on all Ubuntu derivatives as well, including Lubuntu, Xubuntu and Kubuntu as well as Ubuntu Mate. Users of Ubuntu Server editions that don’t include a graphical user interface or an X Server will still see the same warnings in the virtual console.

While it might be considered a tad embarrassing, the first step is always to check your Internet connection. If you can’t access the repositories, then you might not be able to access anything online. Open Mozilla Firefox, or w3m if you’re unable or unwilling to access an X Server, and then try visiting any page that you don’t have cached. Make sure your Ethernet cable or WiFi connection is working, and if you have physical access to the modem then also check the indicators on it. It’s very easy to overlook something, and taking these steps now can save a little time later. Once you’ve done so, try running sudo apt-get update again from the terminal before proceeding.

Method 1: Checking Your Connection with the ping Command

If you still didn’t get an affirmative response, then you’ll want to use the ping commands to check if you can access the repositories at all. You should also do so if the sudo apt-get update command gave you a line that reads something like “The repository ‘http://archive.canonical.com/ubuntu releaseName’ does not have a Release file.” The term releaseName would get replaced with the release you’re currently running from. If you try to run the graphical updater, then you might get an error or even a message that the software on your machine is up to date when you know this isn’t actually correct.

At the terminal, type ping -c4 archive.canonical.com and push return. If you’re getting a positive response, then try ping6 -c4 archive.canonical.com and see if you get the same. If you’re not getting one, then there’s a chance that the official Ubuntu software repositories are down for whatever reason. This can happen, though it’s actually quite rare. On the other hand, more than likely it means that your IP or IPv6 addresses aren’t getting passed through correctly. Check your Internet connection again to make sure it’s stable, and then take a look at the  file to see if your hostname is correctly set. You can look at this file as a normal user, but you’ll need root permissions to actually edit it.

You’ll need to make sure that the first line reads 127.0.0.1 localhost and then the second reads 127.0.1.1 followed by your hostname. Edit the file if there’s any mistaken setting. You might want to try rebooting if you’ve not already done so. Try loading the apt-get repository data once again as soon as you complete the reboot. Should you have any need to edit this file, you can do so using nano, vi or any other terminal editor. You could also theoretically use a graphical one, but make sure to preface gedit or mousepad with gksu before you launch it rather than using sudo. You may also prefer to use gksudo instead of gksu depending on how you run things.

Method 2: Removing Faulty PPA Entries

If your connection has no further issues and the Canonical servers that feed Ubuntu updates are completely accessible, you should look at any repositories that are giving you issues. Let’s assume you were working with the ffmulticonverter PPA, which doesn’t have a repository for Xenial. Users of Ubuntu Xenial, or any of the other official spins that use it as a basis, will get an error if they have this PPA installed. Use sudo ppa-purge ppa:ffmulticonverter to remove it and then run sudo apt-get update to update the repositories again. Once the update completes, which it should now be able to do successfully without errors, you can use sudo apt-get upgrade to update the packages on your system properly.

You may want to check the PPA that caused you problems through a Web browser. Note that most of these show a folder listing that may or may not be directly mapped to physical directories somewhere. What the repository’s custodians map the folders to is unimportant, despite what some users might say. What’s important is whether one of them reads the name of the release you’re working with. Notice in the example that the folder listing for ppa:ffmulticonverter doesn’t actually show Xenial, which was the cause of the problem here. Repositories not geared to work with the way that Ubuntu sets releases might also cause a similar problem, since the software might make mistakes regarding the naming of certain packages.

Once you’ve isolated the issue, you can actually elect to eliminate the program if you so choose. If you no longer need it, then you can use sudo apt-get purge ffmulticonverter, replacing that name with whatever package you want gone. You may then wish to run sudo apt-get autoremove and sudo apt-get autoclean to clean up the mess that might have been left behind. Running bleachbit can also fix this problem, providing that you have it installed and all of the settings ticked correctly.

Should you find yourself often dealing with cases where you have packages that are sorely out of date and link to older repositories, you might want to search through the official Ubuntu ones for replacements. These are updated automatically with your operating system, so you won’t have to worry about this problem nearly as much, at least in theory. You may also consider using Web apps instead of installed applications if possible, since these don’t require updates whatsoever as long as they remain online.

The post How to Fix Software Updater Error in Ubuntu appeared first on Appuals.com.

How to Fix OLE Error 8004013F on Linux

$
0
0

If you’re attempting to run any sort of database or macro in a Wine-based environment on any sort of GNU/Linux implementation, then you might experience some sort of error message. At some point during the program flow, you might ultimately see an OLE Error 8004013F box. Your script will then immediately cease execution. If this were to happen, then you’re more than likely missing a library that your script needs to run. In a native Windows client, these libraries are used to match objects inside of files with their parent host. Linux doesn’t have this capability, since each program running in an X Server manages things in its own way.

Under a native Microsoft Windows environment, Delphi can use a small bit of code to open Excel. If you wanted an embedded and linked instance of Excel to work with different objects, then you might have used eclApp:=CreateOleObject(‘Excel.Application’); to do so. Inside of Linux, you might have even tried to use OpenOffice this way. Should you find Delphi throwing the dreaded 8004013F error at you after you attempt to create an OLE object with an instance of the eclApp:=CreateOleObject(‘com.sun.star.ServiceManager’); snippet, then you’re probably suffering from the same dependency problem. First, look over your code for any misspellings. These are the most common causes of errors even before dependencies are involved. Once you’re sure that you’ve written everything correctly, and then you can proceed to recover the needed libraries.

Necessary OLE Libraries

You may also experience the same error if you were attempting to use a Windows organizer application called keynote-nf, and if that’s the case then you can use the same process to remedy it. The keynote.exe file doesn’t come with an installer, so it’s common to copy it over to the Program Files directory. While it might run, you could experience either the abovementioned 8004013F error or a different 80004001 exception. In either case, make a directory inside of Program Files with either the mkdir command or your graphical file manager. Call it KeyNote-NF, and move the keynote.exe binary over to it.

If you have access to a Windows XP, Vista, 7, 8, 8.1 or 10 partition, then you might want to try copying the msftedit.dll file from the C:\Windows\system32\ directory to the KeyNote-NF directory you made. You should also copy the msls31.dll file. You could acquire both of these from an installation CD as well, but you’ll need to use the expand command in order to inflate them. In either case, run the program and you should find that it works fine.

Thunar, Nautilus and other similar file managers will identify keynote.exe as a DOS executable, which you can safely ignore. Simply run it like you had previously. When you right-click to access a context menu, you might actually get an option encouraging you to run it under Wine. Select this option to start it. Running the program from the terminal instead will allow you to see any error messages that might rear their head in the process. In some cases, you might actually get a warning about a different file name than either msftedit.dll or msls31.dll, which you should instead acquire. Much like a Unix dependency rabbit hole, you could theoretically spend some time acquiring a directory full of different files.

When you’re having the same problem with Excel or Delphi code, navigate to the directory that contains the executable you’re attempting to run and place the two dynamically linked library files in that directory. You can give Wine total access to these by putting them in ~/.wine/drive_c/Windows/system32 as well, but this might overwrite some of the files that Wine installs by default.

Since these DLLs are superior in some ways to the open-source solutions that Wine uses, they can also aid in linking objects in other programs you might run, but many users don’t like the idea of polluting their Linux installation with closed-source files. Putting them only in the directories your programs actually use is the best way to solve this problem. You can even create directories for actual Windows accessories you’ve copied over from another partition. For instance, some users experience these sorts of problems if they’re using a bash script or Delphi code to start traditional WordPad instances. Wine might have installed it’s own version of write.exe, but there’s nothing stopping you from creating a directory in “~/.wine/drive_c/Program Files/” and placing write.exe, msftedit.dll and msls31.dll to it, then referencing that directory with your code. Since Wine does include a primitive version of the cmd interpreter from Microsoft Windows NT, you can also reference these programs in Batch script files if you prefer. Make sure to preface these with @ECHO OFF, or else each command will appear as though you’ve typed it at a command line and then pushed enter to execute it one after another.

Many sites on the Internet offer DLL objects for download, and it might be tempting to go with one of these repositories if you don’t have a Windows installation on another partition. While they can indeed be certainly convenient, make sure you perform a malware scan on msftedit.dll and msls31.dll if you’re forced to acquire them this way. You shouldn’t treat these repositories the same way that you treat the official ones sponsored by the Ubuntu, Debian and Fedora projects.

Keep in mind too that if you’re forced to acquire them in this manner that it may cause licensing concerns if you’re redistributing your code. Don’t install any executable that any such repository asks about either, since these executables are more often than not a form of adware designed to influence users of actual official Microsoft Windows software environments. The same goes for any case where you might have been required to download a number of different libraries outside of these two, since they can fall prey to the same sort of adware invasion.

The post How to Fix OLE Error 8004013F on Linux appeared first on Appuals.com.

How to Install the Hardened Tor Browser Bundle in Ubuntu’s Terminal

$
0
0

Installing the hardened version of Tor in the Ubuntu terminal is actually much faster and easier than installing the sand boxed version and it requires far fewer steps. These steps are identical regardless of which version of Ubuntu you might be using. Any of the official spins like Kubuntu, Xubuntu and Lubuntu follow the same process. While it’s not quite as incredibly locked down as the sand boxed version, the hardened Tor client is still remarkably secure, especially when compared to a standard browser.

Generally, all that’s involved in the installation process is extracting the files to ensure that they’re in a recreated directory structure. After this, you can run the Tor browser easily. You won’t be installing it through the usual apt-get install command, because the Tor project prefers to avoid repository structures completely. Ironically, this means verifying the package is more difficult than going through the actual process of installation.

Installing the Tor Browser Bundle in the Ubuntu Terminal

You will first have to acquire a package with a name like tor-browser-linux64-6.5a6-hardened_ALL.tar.xz, which might instead feature a linux32 label if you’re working from a 32-bit distribution of Linux. Naturally, the version numbers are always appreciating with new revisions, but you may wish to acquire a slightly older version for compatibility reasons. Remember that the newest browser versions are more than often the most secure. The closest thing to an official repository you’ll usually find is one maintained by Arch Linux at https://aur.archlinux.org/packages/tor-browser-hardened/, which has the packages in a slightly different format. This is one of those situations where your mileage may vary.

One fortunate aspect is that since Ubuntu usually installs Firefox by default, pretty much all of your dependencies are already settled when you get ready to install it. While the tor-browser-linux64-6.5a6-hardened_ALL.tar.xz file name is used here as an example, be sure to replace it with the archive you’ve actually acquired. Be sure too that you’ve properly malware scanned the package you downloaded before attempting installation.

Remember that there’s no official Canonical-backed PPA, which allows you to automatically update the Tor Browser Bundle in any particular version of Ubuntu. Most of the repositories that claim to be official actually just offer some out of date version of the software. You’ll need to manually replace these archives occasionally if you want updates. Tor Bundle binaries don’t update themselves, so you’ll want to go through this same procedure when it’s time to upgrade. A few users take security to another level by periodically removing their Tor directory and reinstalling it in the hopes that further traces of their browsing activity will be gone.

More than likely tor-browser-linux64-6.5a6-hardened_ALL.tar.xz is in your ~/Downloads directory, so you’ll want to make a directory for it. You could make one right underneath your home directory by typing cd ~ and then typing mkdir Tor or whatever else you wished to name it. This is a portable package, so you won’t have to worry about the exact installation location as long as it’s an area on your partition where you have a volume.

Assume for the sake of discussion you created a directory at ~/Tor, then you could issue the command mv tor-browser-linux64-6.5a6-hardened_ALL.tar.xz to enter this new directory. Once you’re there, simply decompress the files by using tar -xvJf tor-browser-linux64-6.5a6-hardened_ALL.tar.xz, and it will automatically recreate the entire installation directory structure. Unfortunately, this command provides no output at all. You won’t know how close tar is to the finish line until it’s done and returned you to the command prompt.

Some users prefer to create a hidden .tor directory in their ~ directory. Others prefer to decompress that directory straight into ~ to create a single tor-browser directory. The choice is yours, but in any case enter it with cd tor-browser and push the enter key.

You can now easily start the browser with the command ./start-tor-browser.desktop, which should bring up a browser window with a page featuring an icon of an onion or something similar. Once again, this will depend almost completely on the age of the package that you have installed. You can now use the browser as normal, and visit any pages you’d like to. They’ll still render in the same manner as pages generally would in traditional Firefox, though you may wish to set further configuration settings before doing so. If the extraction process didn’t preserve file execution permissions, then you might want to use chmod +X start-tor-browser.desktop and see if that allows you to execute it directly.

While your installation of the Tor Browser Bundle is stable, it’s now mapped to your user account. The organization that develops this software explicitly reminds it’s users never to run Tor as root. You should never use sudo or gksu when launching the browser, and you shouldn’t ever run it from a root shell. As well as being a potential source of danger, this could also hypothetically defeat some of the layers of security you gain by working with this browser bundle in the first place.

The post How to Install the Hardened Tor Browser Bundle in Ubuntu’s Terminal appeared first on Appuals.com.

How to Fix ‘cannot execute binary file: Exec format error’ on Ubuntu

$
0
0

While it shouldn’t happen when using the official apt-get repositories, if you download software off the Internet and run it then there’s a chance that you’ll see the dreaded bash: ./nameOfProgram: cannot execute binary file: Exec format error. This error, which is usually followed by bash: ./nameOfProgram.sh: Permission denied or something like it, indicates that Ubuntu wasn’t able to interface correctly with the binary you downloaded. This is because while it’s apparently a valid Linux binary, it’s designed for a different chipset than your kernel currently supports.

Most people using Ubuntu are on 32-bit or 64-bit processors based around a standard architecture that Intel released, regardless of who actually made their microchips. It’s important to remember that 64-bit processors can run in 32-bit mode, so if you’re getting this error even though you have a 64-bit processor there’s a chance you’re running a 32-bit version of Ubuntu. A few simple commands are all it takes to tell what your chip is operating as.

Method 1: Using the arch Command

If you’re not familiar with the type of microprocessor that you have installed on your machine, then you’ll first want to use the arch command from the command line. You’ll only see a single line of output returned to you after running this command. In many cases, you’ll see i686, which means that you’re on a 32-bit processor and therefore can’t run x86_64 binaries. If you instead see amd64 or something similar, then you’re on an x86_64 processor, and should at least theoretically be able to run most 32-bit and 64-bit binaries. Unlike Microsoft Windows, Ubuntu Linux actually contains the proper tools to permit users of 644-bit chipsets to run 16-bit Windows programs in their operating system in many cases as well.

These terms are still true even if you’re not actually using that particular model of microchip. For instance, i686 is how Linux refers to many 32-bit processors even if they aren’t actually Intel 80686 chips. Even if you’re using 64-bit Intel technology, arch might still call your processor an amd64 chip. This doesn’t indicate an error, and can be safely ignored. You can use cat /proc/cpuinfo or more /proc/cpuinfo to find out the exact type of processor you’re using. Since the lines in this file are long, you might want to push F11 before issuing it if you’re using a graphical terminal window. Users of a virtual console, especially those working with Ubuntu server, won’t have to worry quite as much.

You may see some other types of output, which might further restrict your options when it comes to running software. Ubuntu supported PowerPC architecture for the longest time, which is found in some workstations as well as many Classic Macintosh and older OS X Macintosh machines. You can actually still find Ubuntu repositories for these architectures, though they receive little support today. However, you more than likely won’t be able to run many Linux binaries you download from the Internet outside of the official repositories in this case. That doesn’t mean that Ubuntu doesn’t work on these machines, though you may want to look at the lighter Lubuntu distribution.

Method 2: Using the file Command

The file command identifies what different files contain, and it’s usually very accurate. Try identifying the file in question by typing file nameOfProgram to see if you get ELF 32-bit or ELF 64-bit as output. If it tells you that it’s an ELF 64-bit binary and you received i686 as output from the arch command, then there’s no way you can reasonably run it on your machine. If you’re on a 64-bit microprocessor running 32-bit Ubuntu, then you could technically reinstall the operating system, though this is a bit of an extreme step in order to run a single program.

There is also the very real possibility, however slight, that you might instead come across a binary that when you attempt to run it spews out junk characters to the terminal even if you’ve run a malware scan on it. These characters usually take the form of either lozenge-shaped blocks, or alternatively rectangular cubes that have numerical values in them. Some computer scientists call the latter tofu, and represent the Unicode values of characters that your currently installed typefaces won’t be able to display. If the terminal is displaying them like this, then you can rest assured that this is neither a font error nor anything having to do with malware. Rather, this is simply because the compiled microprocessor opcode inside of the binary is so alien to your system that it doesn’t know how to interpret some of the code.

The best way to fix this is to install the proper package for your architecture. If you’re installing packages from inside Ubuntu, then the apt-get system or the graphical Synaptic manager has you covered without any problems. If you’re downloading packages from another distribution, then you’ll need to find the right one for your architecture. Take, for example, Arch Linux’s listing of the gvim package. While the default package features the x86_64 architecture, there’s also one for the i686 chipset. This one will work on 32-bit machines that work with the Intel interrupt structure, but remember that the terms i686 and 32-bit are not mutually inclusive all the time since other chipsets Linux supports actually do feature their own 32-bit implementations.

Users exploring the whole GNU/Linux scene might come across binaries compiled for far more exotic technologies than these. Linux is truly a cross-platform code scene, so you’ll see OpenRISC, MIPS, SPARC, M32R, MN103, ARM, ARC, Alpha and many other standards binaries are compiled to work with. More than likely, you won’t be able to run any of these, though ARM is an extremely popular tablet and smartphone platform. It’s also the platform that the Raspberry Pi is based around, which means if you’re actually running Ubuntu on a mobile device or the Ubuntu MATE distribution for Raspberry Pi you’ll actually need these instead of Intel 32-bit or x86_64 binaries.

The post How to Fix ‘cannot execute binary file: Exec format error’ on Ubuntu appeared first on Appuals.com.


How to Run xset Commands at Startup in Xubuntu

$
0
0

Certain special hardware configurations require a few special commands to run whenever you start Xubuntu, and it’s easy to automate these. Generally, these should work regardless of how you run them. Unfortunately, there are some situations where you might find that it works fine if you run them individually but not automatically. The program has to do with the way Xubuntu interacts with the X11 graphical user interface, but you should find that it’s a easy fix.

Assume, for instance, that you’re running a pair of commands each time Xubuntu starts to configure your mouse. Both of these commands work if you run them inside of the terminal or perhaps by holding down the Super or Windows key and pushing R to open the Xfce4 Application Finder. In either case, these work fine. Sometimes if you attempt to run them at startup with the “Sessions and Startup” app, only one of these two will actually take effect. Reconfiguring xset and then setting a checkbox in Xubuntu might be all you need to get it working.

Running xset or xinput Commands at Startup

Make sure that the hardware configuration commands you’re working with run just fine in the terminal before proceeding. Occasionally, the problem is the result of a typographical error rather than any strangeness in Xubuntu. If you’re completely sure that you have everything configured properly, then open the Sessions and Startup program again. Navigate to the “Application Autostart” tab, and then either select Add to double-click on an entry to edit it. Assume you’re working with a mouse configuration command like xset m 2 16, try sleeping it for several seconds. You’ll still want to make sure that the xset command itself is correct, and you’ll probably want to reevaluate your reasons for setting this manually. Some of the advanced settings users put through with xset can instead be more easily accomplished through the tools that Xubuntu itself uses.

Users who have worked with bash scripts before are probably already familiar with how to do this, but those who aren’t can delay the command from executing, which gives it time to run only after Xubuntu loads a bunch of Xfce4 defaults. Using the above command, you can sleep it for 10 seconds by changing it to:

bash -c ‘sleep 10 && xset m 2 16’

When you start Xubuntu, the installed desktop interface attempts to load a number of what it considers rational defaults. For most hardware, these are correct, but they can override some custom settings that get carried out before they do. This can ultimately result in the types of conflicts you might have been seeing. By delaying execution, that code runs the specific command only after Xubuntu is done. You might find you need to change the 10 in that command to an even longer delay. It depends on how long Xubuntu takes to boot your machine, and a little bit of experimentation could be involved. You shouldn’t ever have to set the command to sleep for more than 20 seconds. If you do, then more than likely something is making Xubuntu boot very slowly. In these cases, you might have too many processes launching on startup.

Perhaps you have too many packages installed that you’re no longer using. Ironically, you might find it easiest to rectify this situation by installing the Synaptic package manager if you haven’t already. Use sudo apt-get install synaptic and then run the program once it’s installed. You might find some programs that you’re no longer using and therefore you can get rid of. This can aid startup performance. Any other performance tweaks you might attempt could also help to reduce the amount of time needed to delay the xset command. In our example images, Xubuntu was running a custom theme from xfce-look, and if this is the case on your system, you might want to see how heavy the theme is. Some custom Xubuntu themes take a while to load and might degrade overall performance over time anyway.

Whenever you power your machine off, you might want to make sure that the “Save Session” checkbox is checked to make sure that Xubuntu saves your your settings, which might have to alleviate this issue as well. Reboot the machine after doing this only after you’ve gotten the xset command to stick and see if it now starts everything up correctly. If it does so, then you shouldn’t have any further problems.

Keep in mind that while you’d need to replace the code between the two ampersands and the single quote, you could also use this if you find that Xubuntu is overriding a xinput command used to configure your mouse or keyboard. Technically, you could put any code there you want Xubuntu to execute when it boots, but it’s default settings won’t replace most other types of commands. These defaults only point to basic input devices, and they won’t get applied when you switch back and forth between virtual consoles.

Some users say that the bash delay code should be hidden inside of an executable shell script, but this generally isn’t necessary. The Sessions and Startup program can run run anything that you throw at it. Other users suggest that these commands should be mapped to a keyboard shortcut using the Xfce4 keyboard shortcut tools that come with Xubuntu. While setting it up this way won’t cause any harm, this too is technically unnecessary. Simply using the Sessions and Startup app with an appropriate bash delay should work in the overwhelming majority of situations.

Check your xset command to ensure that you’re not using -bc compatibility option settings for the server. Xubuntu will always override these, since the type of legacy hardware they’re designed to support doesn’t quite mesh with the Xfce desktop interface that Xubuntu uses.

The post How to Run xset Commands at Startup in Xubuntu appeared first on Appuals.com.

How to Close Hidden Properties Windows in Linux

$
0
0

Sometimes opening a storage volume’s properties sheet will force part of the resulting dialog box off the screen. Occasionally you’ll accidentally move any type of application or browser window off the screen in the same fashion. It might end up on an alternate desktop, or even get pushed over the top boundary of your screen so you can’t reach any of the window controls.

Ubuntu’s Unity desktop puts the window controls on the left-hand side in the OS X style while KDE Plasma, LXDE and many Xfce4 themes put the window controls on the right-hand side in the Windows 95 style. While it’s possible to push windows out of the way in either direction, the extremely fast and simple fix will work with pretty much any modern desktop environment. Once you learn these tricks, you might start using them all the time for superior window management.

Method 1: Using the Alt Key

Assume you’ve pushed a window so far off the screen that you can’t close it, but for whatever reason you can’t just click on the title bar and drag it around. Hold down the Alt key on your keyboard and then position the mouse cursor over the window. Without letting up on the Alt key, push and hold the left mouse button. Your cursor will change to that of a hand, and it will let you drag the window around the screen. Drag it back onto the main part of the desktop and you’ll be able to use any of the window controls you’d like.

Feel free to release Alt and the left button when you’re comfortable with the placement. You’ll probably want to use this trick to move windows around even when you don’t necessarily need it once you’ve learned it. You can position the window anywhere you’d like before you release the keys. Note that while this often happens to properties sheets, you could use it for any window, including browser ones like the example.

Method 2: With the Window Menu

Users of window managers like Openbox, xfwm4, KDE Plasma, certain forms of GNOME, MATE and Cinnamon often find they have an icon on the opposite side of the title bar from where the window controls are. Clicking on this, or right clicking on the title bar, will bring up a menu. Select move from this menu and then release the mouse button. The window in question will now move along with your mouse button. Once you have it placed correctly, click again and it will stay there. This is especially useful on small mobile netbooks and other modern devices with tiny screens.

Keep in mind that you could always drag the title bar if you can see it, but if you can’t then you have to use the special Alt+Left Mouse Button trick offered in the first method. A further trick can prevent this problem from happening in the first place in many cases.

You may also want to use the layer option on this menu. Select layer, and then if you hit “Always on Top” the window will remain on top of others even if you move something behind it. If you instead select “Always on Bottom,” then it will float in the other direction. This will potentially cut down on the risk of this window border issue. Pushing the F11 key in most modern desktop environments will switch you over to a full screen mode whether or not the application you’re running actually features this. You might be able to find an alternate method of closing a partially obscured window in this way.

Method 3: Increasing Window Resistance

Windows can snap to the edges of the screen, and if you drag trem beyond them, they usually switch to the next virtual desktop over. Increasing the amount of resistance can keep them from being hidden. How this is done differs between different desktop environments, but it’s generally in the window management setup. Those using Xfce, especially Xubuntu users, have an option on the Whisker Menu that’s called Window Manager settings, and there’s something similar offered to those with Cinnamon, MATE and GNOME on the menu. Unity users aren’t given as many options, but those who opted for the lightweight Lubuntu installation of Ubuntu can select the Applications menu, head to Preferences and click on the Openbox Configuration Manager.

Regardless of the method used to open the window, once you’re in it you’ll need to look for a setting that reads something like “Amount of resistance against other windows” and another that reads something like “Amount of resistance against screen edges,” and then turn both of them up to the maximum setting. You may also wish to adjust the amount of time your window manager pauses before switching to another desktop when a window moves beyond the screen edge.

The maximum setting, which is either 100 px or slightly more, may be too much for some users and could cause you to feel like you’re running into a brick wall each time you move a window. If this is the case, then try reducing it in 10 pixel increments until you’ve found the perfect setting for you. Once you have, you can usually be sure that you won’t run into the problem of properties sheets and other windows running off the desktop without any ability to move them back onto it.

The post How to Close Hidden Properties Windows in Linux appeared first on Appuals.com.

How to Remove Duba Virus/Homepage from Windows

$
0
0

Some Windows 10 users may experience a problem whereby their Microsoft Edge browser homepage switches from the standard MSN (or other website they have chosen) and redirect to a site called Duba.

When this occurs, it means that the user has been exposed to a browser hijacker that could have been downloaded alongside a piece of software, or accidentally through a fraudulent email. A browser hijacker is a piece of computer malware that changes your homepage and search engine, and in this instance, it changes your search engine to www.duba.com.

While this virus isn’t technically malicious, and won’t steal any of your personal data, it will be extremely difficult to remove for novice Windows users.

Using some popular freeware, however, it is possible to remove the Duba virus and set your homepage and default search engine back to its original settings.

Remove the Duba Virus

  1. You must first download a piece of freeware called Zemena Antimalware. You can use other antimalware software, but this one is a popular free trial option. The software can be downloaded from this link.
  2. Navigate to your Downloads folder by pressing the Windows Explorer icon on your taskbar, and locating the Downloads menu on the list. In here, you should find a file titled Antimalware. Double click this file and you will enter setup.
  3. You will be asked ‘Do you want to allow this app to make changes to your device?’. Select
  4. Shortly, the Zemena window should appear, and at the bottom of the screen you will see a green Scan Click this.
  5. Zemena will now scan your PC, looking for malicious malware. It can take anywhere between 5 and 10 minutes, so be patient.
  6. At the end of the scan, Zemena will show you a list of harmful objects that it has detected. This should include the Duba virus but could also include other pieces of malware you may have inadvertently downloaded in the past. Click Next and the software will remove all the harmful files.
  7. After Zemena has removed your files, you should now begin the process of cleaning your PC of any further harmful software using another piece of free software, Again, you can use any software you like, but this is a popular piece of freeware that does the job.
  8. Download Malwarebytes from this link. Underneath the free option, click Download.
  9. Go back to your Downloads folder and double click the mb3-setup-consumer
  10. When asked Do you want to allow this app to make changes to your device, click
  11. Malwarebytes will then open an installation wizard. In the first screen, click Next and then click
  12. Malwarebytes should then open up a new window, where you will need to click the blue Scan Now
  13. The process of scanning your device will now begin, looking for malicious software that the previous scan may have accidentally left behind. This can take a few minutes, so be sure to leave it alone until you are presented with a list of potentially unwanted programs and malware.
  14. At the bottom of the screen, click the blue Quarantine Selected Malwarebytes will then quarantine all malicious files or registry keys to ensure that they cannot do any further damage to your PC.
  15. In order to remove the files that have been quarantined, Malwarebytes will ask you to restart your computer. Do this.
  16. Once your PC has restarted, open your Edge browser and click the three-dot button that opens your menu, in the top right-hand side of your page.
  17. Select Settings and under Open with, select A specific page or pages.
  18. In the drop-down menu that opens, choose MSN or add a URL you prefer.
  19. Restart your browser and the problem should be solved.

The post How to Remove Duba Virus/Homepage from Windows appeared first on Appuals.com.

How to Free Up Space from an Older Ubuntu Partition

$
0
0

Linux installation programs, including those used to install Ubuntu and its various derivatives, have a tendency to create many partitions. Some users install multiple versions of the operating system on a single physical disk, which creates multiple volumes that partition their drive so much that it looks like it’s sliced pizza. While it’s possible to remove partitions and restructure them, it’s important to understand the difference between different types of partition tables before proceeding.

Older Master Boot Record (MBR) partition tables feature both primary and extended partition types. Extended partitions are actually a container that other Volume Boot Record (VBR) entries are placed inside of to get around an MS-DOS-era four primary partition area restriction. By default, if you’re installing Ubuntu on an MBR table, it creates an extended partition and then a logical drive inside of it to store your swap space. Extended partitions should be clear before removing them. Keep this in mind as you proceed in order to prevent loss of important data.

Freeing Up Space from Older Ubuntu Partitions

Let’s assume that you’ve either created partitions in order to install different variants of Ubuntu as well as a swap area on a volume. You might have Ubuntu, Ubuntu MATE, Xubuntu, Lubuntu and Kubuntu installed on separate partitions of a huge pair of hard drives or SSDs. You could also theoretically have some area reserved for Microsoft Windows or even OS X.

On an MBR system, the first logical partition inside of an extended partition receives the name /dev/sda5, which can be confusing on a single-user system. Ubuntu defaults to /dev/sda1 serving as the root directory mount space, /dev/sda2 serving as the extended partition and /dev/sda5 serving as the Linux swap space area. The reason for this has to do with the way that MS-DOS constructed partition tables. If you’re using a GUID partition structure, then you won’t have to deal with this. While it might seem obtuse, the reasoning behind this is actually quite logical in the context of MS-DOS partition structures.

Ubuntu live USB boots give you a “Delete Other Version and Install” option when you’re installing an operating system, and you could use this if you wanted to install a new version of the operating system on one of the partitions that you’ve created. However, you have to be exceptionally careful while doing so. Make sure you select a single partition when doing so and not the whole device. While /dev/sda6 might be a single partition, selecting /dev/sda instead will completely restructure your partition table in favor of the Ubuntu installer’s new matrix. This can have disastorous consequences.

One thing that trips up new users is the fact that you don’t actually have to uninstall an operating system the same way you would any other piece of software. You simply delete the partition the operating system was installed to, but if you’re dual booting Windows and Ubuntu with MBR partition structures, then you’ll need to reinstall the Windows bootloader after working.

Make sure any partition you want to remove is unmounted first. Even if you booted off an Ubuntu live USB or something similiar, you might find that your swap partition still came up when you restarted the computer. There’s a few different ways you could remove old Ubuntu partitions that you no longer need. The easiest if you’re already familiar with the terminal is through the cfdisk command.

Let’s assume the physical drive you’re working with is called /dev/sda, but you could replace that device file moniker with any other name if need be. Type sudo cfdisk /dev/sda at the CLI prompt and push the return key. You may have to enter your administrator password after doing so.

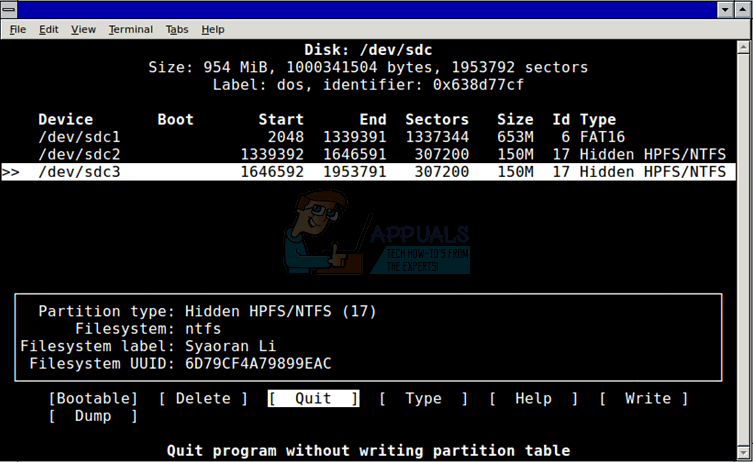
You could also open up a root terminal window in Xubuntu or what have you for the sake of discussion. Use the arrow keys to navigate up and down, then move over to [ Delete ] to clear out the partition. You can then select the newly unallocated space and then create a new partition there, if you were trying to merge two older Ubuntu partitions into one. Keep in mind that unlike Windows or OS X, Ubuntu lets you partition many types of block devices, so you could use this same scheme on a USB memory stick or even an SDXC or microSDXC card. For the sake of an example, images were even taken clearing out old partitions on a small Kingston Datatraveler memory stick created in Ubuntu, some of which were designed to communicate with Windows and therefore featured the NTFS structure.

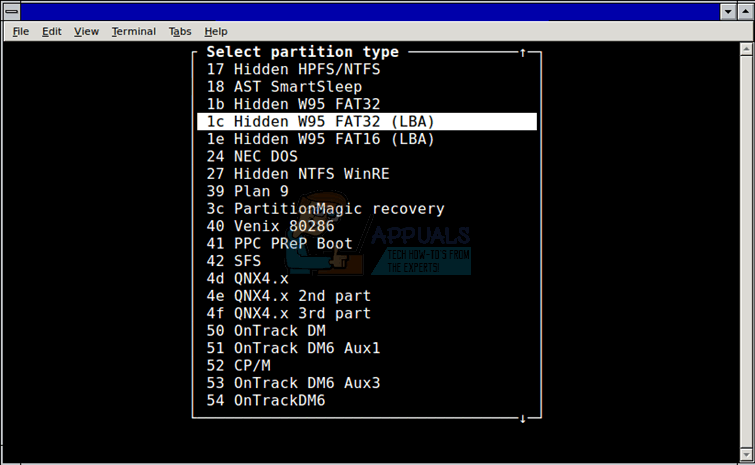
If you create new partitions to fill the space of the old Ubuntu ones, then you’ll be able to select the partition type with the arrow keys. Some of these types are exceptionally exotic, and even include settings for the CP/M and QNX operating systems. You should usually leave them as type 83 if you’re using a native Linux file system. The FAT and NTFS types are equally applicable to Microsoft Windows partitions, if you’re dual booting your system. Once you’re satisfied with your changes, use the arrow keys to select [ Write ] and then type yes before pushing the enter key. You may wish to reboot if you were working on a primary boot drive.

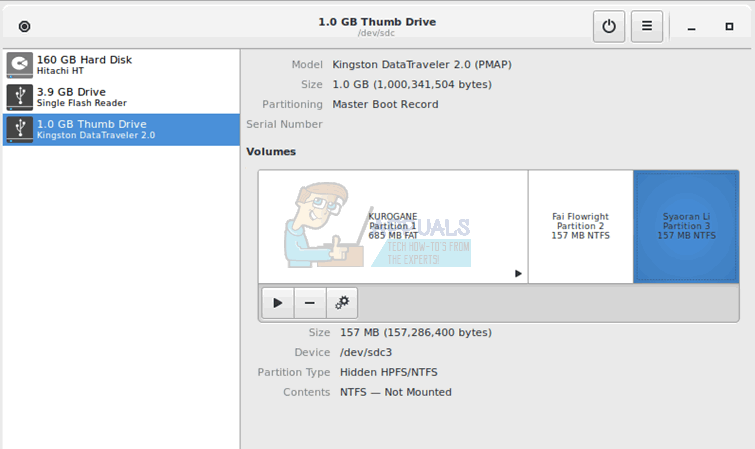
You could also use the Disks utility found in the Ubuntu Dash if you wanted. Select the partition you’d like to delete and then click on the minus button to delete it. Make sure that you’re certain that you want to remove it before doing so. As with the cfdisk utility, the Disks app can remove Ubuntu and Windows partitions of any type. It can even delete a partition that Ubuntu created for a non-native partition type. When you create new partitions, if you boot to Windows they should appear as separate disks, but make sure to not format any it tells you are unformatted because this is how it might handle volumes carrying an unfamiliar file system.

Some gamers using Ubuntu have complained about the partitioning system, but a simple rule of thumb should keep things clear. Steam users should be able to select which partition they’d like to install new games to, but you’ll have a problem if you delete an older Ubuntu partition and simply move your game files elsewhere. This isn’t a problem if you’re using Windows games through Wine that you’re putting into a drive_c directory or portable native Linux games. You’ll need to download games through apt-get again if you’re using them through the native Ubuntu package manager, but you can move saved games out of your ~/ directory before deleting the partition and move them to the new home directory on your new installation.

The post How to Free Up Space from an Older Ubuntu Partition appeared first on Appuals.com.

How to Fix Unexpected Inconsistencies on Linux Partitions

$
0
0

In a manner of speaking, all file system inconsistencies are unexpected. No one actually wants to go out and find that their file structure is damaged in some way. However, the term “unexpected inconsistency” will sometimes actually show up as a specific type of error message. Since this error message comes from the base GNU and Linux tools, you can unfortunately expect most distributions to handle it the same way. This is probably true even if they’re older ones.

You may also theoretically experience unexpected inconsistencies in a somewhat similar fashion on FreeBSD, NetBSD and other Unix-like operating systems. More than likely, you’d only receive these messages on boot. Linux, by default, preens your / file system of any irregularities when it starts up, but this means that it wasn’t able to for some reason. Crossing your fingers and issuing a simple fsck command might be all it takes to bring your file structure right back into alignment again.

Using fsck to Repair Unexpected Inconsistencies

Upon booting your machine, you might receive an error that reads something like “/dev/sda1 contains a file system with errors, check forced” or “/dev/sda1: Inodes that were part of a corrupted orphan linked list found.” The error is usually followed with a big warning message that reads something like “/dev/sda1: UNEXPECTED INCONSISTENCY; RUN fsck MANUALLY,” though the exact device file and partition number in question may be different depending on how you installed Linux to begin with.

Since e2fsck or whatever version of fsck your system runs on system startup runs with the -p or -a option to simply preen the inodes and look for orphans, the error message will remind you not to do that. Users running Ubuntu might be dropped into a busybox shell while others might just find that their system is completely hung. It’s waiting for them to restart it. You can run a file system consistency check from the (initramfs) _ prompt if you’re given one. Simply type fsck /dev/sda1 or whatever partition you might have seen in the previous error message. Don’t add the -a option to the command even if you’ve gotten into the habit of doing this before.

You need to run things interactively for the time being. While you could add -c to check for bad blocks if you fear some of this is caused by a hardware error, this can slow things down quite a bit and cause it to hang, so you may wish to hold off for the time being. You could also add the -f switch to force fsck to run if it doesn’t want to, which is perhaps a better idea in this case. Usually the unexpected inconsistency error itself will force checking, but sometimes some sort of irregularity will prevent it from doing so. While the shell you were previously operating at might have attempted to get you to type help to see further options, you don’t really need to. You may want to run fsck -f / as well as fsck -f /dev/sda1, however, just in case the damaged partition and the boot partition are different. You’ll need to replace the name and number with the actual partition device file once again.

You should have root access from this prompt in a majority of cases, but for security reasons you might not. Use sudo in front of any fsck command you’re trying to run if you can’t seem to get something working. Enter your administrative password if asked for it.

Should you be unable to view the comparatively primitive busybox ash shell in this manner, you could boot to the GRUB menu that allows you to select which operating system you wanted to start. You can generally do this by pushing the Esc key while starting. Once you’re in the GRUB menu, choose Advanced Options and then select Recovery Mode from the menu. You’ll be given a choice of access patterns, and you should select Root access when given the choice.

You’ll receive a very simple # prompt. While it’s still quite serviceable, this prompt will seem quite primitive if you’re used to working with the bash or even the tcsh shells inside Linux. Type fsck -f / and follow the prompts after you push the enter key, and then type fsck -f /dev/sda1 or whatever other device file needs checking afterwards. You may need to run fsck more than once, just like in the previous example. Since this is a busybox shell rather than something more sophisticated, you’ll be locked out of some bash niceties like the ability to move up and down through your command list with the arrow keys. Simply retype the fsck commands if you need to run them more than once. This is technically a variation of the Almquist shell, which DASH is based on, so you may have some experience working with it from within Ubuntu.

Users booting their systems from something other than an ext# file system will of course need to substitute their preferred command. In most cases, fsck can call fsck.f2fs without a problem, but since fsck.xfs doesn’t do anything, you’ll need to run xfs_repair or xfs_check without the -f switch. This is actually a different option when it comes to these commands, and you should always avoid doing this.

As soon as you have a bootable system again, you’ll want to look in the /lost+found directory. You’ll probably need root access to do so. All of the various fsck commands use this directory to shove damaged and orphaned files after it finds them, in the same manner that chkdsk creates .CHK files when repairing damaged NTFS volumes. You may find lost files in here that represent personal documents you’d like to restore. Depending on which version of fsck you ran, what these files are named could be different. Use the file command to figure out what they actually are.

The post How to Fix Unexpected Inconsistencies on Linux Partitions appeared first on Appuals.com.

How to Fix hd0 Out of Disk Error on Linux

$
0
0

One of the errors Linux users dread more than any other reads something like error: hd0 out of disk. Press any key to continue… at boot time. This error makes it seem as though your boot volume is physically not present in your system. While this does indicate that there has been some sort of massive accounting problem, it isn’t nearly as bad as the verbiage in question might make it sound. Booting from a live USB ISO may be all that you need to recover your main installation and restore the ability to boot from your primary / mounted root partition.

Assuming you’ve been able to restore your file structure with these steps, you’ll need to update your package mangers. Use, for instance, the sudo apt-get update command in Ubuntu or Debian to do so. Damage to the file structure can, in turn, cause damage to the repository lists and therefore make it so that your installation either believes it’s up to date when it’s not or vice versa. Updating and then upgrading your packages will also potentially help to overwrite damaged files with safe pieces of system software.

Recovering From hd0 Out of Disk Errors

On boot time you might find your Linux installation hangs with an error that reads something like error: hd0 out of disk, though the device file and partition number may be different depending on your configuration. This can change if different partitions are damaged, and it might also show the name of a higher-level sd# device rather than a lower-level more classic hd# device file.

While the system will prompt you to push any key to continue, these generally won’t work. At times you can either drop down to the GRUB terminal or an emergency recovery prompt, but often you’ll need to boot from a live CD or USB installation. You could also attempt to boot from another partition on your physical machine if you happen to have a second volume with Linux or FreeBSD installed on it.

If you insert a live USB ISO-written device into one of the slots on your machine, then you’ll probably need to push a specific key when starting your machine to boot from it. This depends on your hardware, but make sure to select removable storage when asked for the type of device you’re booting. You may have received a message before about being in a busybox ash shell if you were able to boot your system somewhat successfully. In either case, you need to get to a prompt and you should make sure you have root access before proceeding. Otherwise, preface each individual command name with sudo before issuing it. You could also try sudo -i, sudo bash, sudo tcsh or sudo busybox ash to get a root shell from the prompt.

You may want to copy your entire ~/ home directory to a removable device, just in case you have serious damage, but you should preform an fsck operation first. We’ll assume that /dev/sda1 is the damaged partition for the sake of discussion, but replace the device file with the correct name of the one on your system. Start with umount /dev/sda1 and then fsck.ext4 -f /dev/sda1 to make sure the file system isn’t damaged. If you have any other partitions you’d like to check, then do so now. You may wish to use e2fsck or fsck.ext3 depending on the file system you were booting. Make sure to always umount the partitions before running fsck.

Multiple kernels competing with each other on the same device might cause this error. In some cases, the fsck command could have fixed the issue, but assuming there’s more issue the following commands to mount portions of the file structure in your live USB environment:

mount /dev/sda1 /mnt

mount –bind /dev /mnt/dev

mount –bind /dev/pts /mnt/dev/pts

mount –bind /proc /mnt/proc

mount –bind /sys /mnt/sys

chroot /mnt

Now you’ll need to run apt-get update, apt-get autoremove and apt-get clean to clean things up. Once again, this could have fixed the issue and you might find that the operating system will now boot properly. If it doesn’t, then try using this to set an environment variable:

UNUSCONF=$(dpkg -l|grep “^rc”|awk ‘{print $2}’)

Run:

apt-get remove –purge $UNUSCONF

NEWKERNEL=$(uname -r|sed ‘s/-*[a-z]//g’|sed ‘s/-amd64//g’)

ADDKERNEL=”linux-(image|headers|debian-modules|restricted-modules)”

METAKERNEL=”linux-(image|headers|restricted-modules)-(generic|amd64|server|common|rt|xen)”

UNUSKERNELS=$(dpkg -l|awk ‘{print $2}’|grep -E $ADDKERNEL |grep -vE $METAKERNEL|grep -v $NEWKERNEL)

Though you might have to change the amd64 references to 386 or i386 and the debian-modules reference to ubuntu-modules if you’re not on pure Debian. Finally run:

apt-get remove –purge $UNUSKERNELS

grub-install –root-directory=/mnt /dev/sda

grub-install –recheck /dev/sda

umount /mnt

Then reboot your system from the primary partition and see if GRUB now works correctly. This will actually install an entirely fresh copy of GRUB on your partition, removing the waste products of any issues of the Linux kernel that you might no longer use. In some cases, you might now receive an entirely different error that has to do with GRUB’s installation being faulty, but this isn’t related to the same problem you were having before and further troubleshooting along these lines may actually turn out to be fruitless.

Should you still have the error upon reboot after running fsck and the kernel cleaning routines, then you may actually have a more serious hardware failure that prevents Linux from starting. Check the connections to your disk, and make sure that the power adapter is attached snugly. This is more of a problem with ancient IDE Molex connectors than it is with SATA and pretty much everything more modern than that. You may also wish to consider the age of your boot volume if you were working with any type of SSD. NAND memory chips eventually wear out, and this may prompt the need to run a badblocks check. A few people might be booting from either an SD card slot or an SD to PATA or SATA adapter. These cards can sometimes slip out and humidity can wreak havoc on the contacts, so you may wish to shut the system down, eject the card and reposition it before trying again.

The post How to Fix hd0 Out of Disk Error on Linux appeared first on Appuals.com.

Fix: Surface Pro 3 Cursor Disappears

$
0
0

All things considered, the Surface Pro 3 was a pretty decent success. However, unfortunately, many Surface Pro 3 users have been complaining and continue to complain about an issue where the tablet’s cursor (mouse pointer) occasionally disappears. Some affected users believe this to be a software-related issue, while others believe it to be a hardware-related issue. However, in truth, it is neither – in actuality, this problem is caused by the fact that the Surface Pro 3 doubles as a digitizing tablet and works with a wireless pen.

The Surface Pro 3 is capable of detecting the presence of its pen without their being any physical contact between the two objects whatsoever, meaning that the Surface Pro 3 and its pen communicate with each other wirelessly using a force that isn’t visible to the naked eye – a force that is believed to be an electromagnetic field in popular opinion. When a Surface Pro 3 detects the electromagnetic field projected by its pen, it goes into digitizing tablet mode and its cursor turns into a little dot. This is the phenomenon experienced by users affected by this problem who see their Surface Pro 3’s cursor disappear before their very eyes.

However, in the case of almost all affected users, the cursor disappears when their Surface Pro 3’s pen is nowhere near the tablet itself. So what actually causes this problem? Well, the prevailing theory is that a Surface Pro 3’s cursor can also be turned into a little dot by electromagnetic fields projected by objects other than a Surface Pro 3’s pen that are similar to the one projected by the actual pen itself. For example, if you use your Surface Pro 3 near a source of fluorescent light that emits an electromagnetic field, the tablet may mistake the field for the one projected by its pen and turn its cursor into a little dot.

In addition, if the “dubious” electromagnetic field is strong enough, the object or appliance projecting it could be a good few feet away from the Surface Pro 3 and still cause the problem. If your Surface Pro 3’s cursor occasionally disappears without warning while you are using it in one specific spot, simply move the tablet away from that spot and use it or unplug/remove any objects or appliances in the vicinity of that spot which are capable of projecting electromagnetic fields.

The post Fix: Surface Pro 3 Cursor Disappears appeared first on Appuals.com.


How to Install Kali Linux On Android

$
0
0

Kali Linux is one of the best operating systems hackers, security researchers and pentesters use. It provides hundreds of pentest tools and it’s ease of use suggests why it’s part of every security professional’s toolbox.

Fortunately, Android is based on Linux, which makes it quite possible for Kali to be installed on almost any ARM-based Android device. Kali on Android phones and tabs can grant users the ability to carry out their activities on-the-go.

The following methods demonstrate how to install Kali Linux on your Android phone. The basic requirements include a fully charged Android device, at least 4GB free space and internet connection.

Using Linux Deploy

Before you proceed with this method, you should have the following:

  1. Launch the Linux Deploy app from your device and tap the Download button at the bottom. You’ll be taken to the properties page.
  2. In the Properties, tap Distribution and select Kali Linux. Scroll down and change your username and password under the User name and User password You can leave it as it is if you don’t mind. Also, if you prefer to use SSH and GUI, you can enable them in the same list of options.
  3. Go back to the main page, tap options (3-dot menu) and then tap Install. Tap OK when the confirmation screen pops up.
  4. It’s going to take a while to download based on your Internet speed. The Kali Linux image should be somewhere around 4GB or less. Once the installation is complete, you can have Linux Deploy mount your Kali Linux image.
  5. After the download is complete, tap Start. At this point Linux deploy will star VNC and SSH server inside your chrooted Kali image.
    If you’ve enabled GUI, you should have a graphical interface instead of a text-based interface from which you can operate from.
  6. Optionally, launch the VNC Viewer App on your Android. The IP address for your Kali instance will be displayed at the top of your screen with which you’ll use to establish the connection.
  7. Login with the username and password defined in the properties. If it doesn’t work, try the credentials as follows:Username: localhost
    Password: changeme

You can also use ssh to access your Kali Linux installation.

The post How to Install Kali Linux On Android appeared first on Appuals.com.

Fix: Windows 10 Login Issues After Changing TrustedInstaller Ownership

$
0
0

If you recently changed your ownership from Trusted Installer to your account in C drive then you might be facing multiple issues. Even if you aren’t facing any issues right now, there’s a high chance that you will in a while especially when you restart your computer. The need for changing the ownership of C drive from the trusted Installer to your own account usually arise because of proper permission issues. There are some scenarios where you would require admin privileges and the solution to that is recommended as changing the ownership of C drive from Trusted Installer to your own account. The solution can be seen on various websites and it is very dangerous.

The problems that you might face after changing the ownership can be errors saying recycle bin is corrupt, Non accessible Windows apps, no access to Start or taskbar and various other problems in Windows features. If you restart your computer then you might get stuck at the Windows login screen as well with the circle spinning. The reason for that is the Windows is changing permissions of all files to your account which takes a lot of time considering there maybe thousands of files in your C drive. You will be able to sign into Windows but only after a couple of hours depending on the number of files you have in your C drive.

The reason for these problems arises from the fact that you changed the ownership of the files to your account. This means that your computer needs permission to access and, therefore, run apps and files that would not be granted now. So you won’t be able to use Windows apps and features.

The easiest and the most reliable solution to this is either a system restore or a complete fresh install of the operating system. There are other ways like Windows repair tools and In-place Upgrade but those aren’t reliable. These might solve the ownership issue but you cannot confirm if all the changes are reverted back. So it’s advised to perform a clean install or a system restore.

Method 1: Perform a System Restore

The safest approach without compromising your personal files will be to restore your system to an earlier point where the ownership was still in Trusted Installer’s hand.

Check this guide for a proper step by step instructions for a System Restore.

Method 2: Reinstall Windows

Unfortunately, once you have taken ownership from Trusted Installer then there’s no going back. Even if you give the ownership back to Trusted Installer either through safe mode or booting via windows image it still wouldn’t work.

If you don’t have anything useful in your PC then performing a complete fresh install of Windows won’t be a problem but if you do have some personal files that you would like to keep then you should perform a backup.

Backup data

If you can access Windows then use Comodo Backup (or any other backup tool you prefer) to perform a backup of important data. Once downloaded, follow these steps to back up the data. Run the downloaded file and follow the screen instructions to install Comodo Backup. Now go here to follow the steps to use the Comodo Backup. It is pretty self-explanatory.

Backup Data from Safe Mode

If you cannot access the Windows easily then use the Windows Safe Mode to backup data by following the steps given below.

  1. Once you are at the login screen, click the Power button
  2. Click Restart. Hold Shift key while clicking
  3. Once the blue screen appears with multiple options. Select Troubleshoot
  4. Select Advanced Options
  5. Select Startup Settings
  6. Select Restart
  7. Press 5 to select Safe Mode with Networking

Once you are in Safe Mode, all you have to do is connect your external hard drive (on which you want to save your data) and use the Windows Explorer to locate and copy the files from the PC to the hard drive. Repeat the steps from 1-6 and then press Enter to go to your normal Windows if you want.

Backup Data from a Live USB

If you can’t even get to the login screen then you can recover your data with the help of a Live Ubuntu USB or CD. Basically this means that you will use another operating system, in this case Ubuntu, from a USB to access your files and then copy them to an external hard drive. Go here and follow the steps given in the Solution 1 to recover your data.

Once you have saved your personal files, you can do a fresh install on your computer which will solve the ownership issue. You can go here for a complete guide on how to install Windows 10.

Method 3: Windows Repair Tool

There is a Windows Repair tool that you can use to solve this problem. The tool is used to solve problems with Windows registry files, Windows system files and a lot more. It also resets a lot of Windows settings back to default so it’s a good option if you want to revert to the default settings and ownerships without having to lose your personal files.

Go here and download the tool. Once downloaded, run the tool and follow the on-screen instructions.

Keep in mind that this isn’t a recommended option because it might leave some files still in the ownership of your account which might create a problem for you in the upcoming days.

The post Fix: Windows 10 Login Issues After Changing TrustedInstaller Ownership appeared first on Appuals.com.

How to Watch Amazon Prime Videos with Firefox in Ubuntu

$
0
0

When you try to watch Amazon Prime videos while using Mozilla Firefox on Linux, you might end up getting a Digital Rights error message. You may be told that your web browser is missing a digital rights component, and it will then provide you with some information about a Widevine content decryption module. Fortunately, this error is quite easy to fix, and in many ways isn’t actually an error. This is actually an expected default behavior that’s designed to protect certain freedoms enjoyed by the free software community at large.

Mozilla Firefox running under Ubuntu doesn’t actually install the Widevine decryption software by default, which is needed to decode the types of videos that Amazon Prime feeds. Many Linux users don’t want close-sourced code introduced into their open-source operating system. However, it’s easily installed and rectified. Since Amazon has contracts with content providers, they don’t want people illegally copying these videos. This codec will allow you to safely watch video without being able to duplicate it. Firefox provides you the choice with whether you want to consent to install these libraries, because they’re closed source, though some people believe that an open-source encryption algorithm might be available at some point in the future.

Installing Widevine to Watch Amazon Prime Videos

Amazon Prime’s message will tell you to go to your web browser’s address bar and type about:addons then push the enter key. This is a good piece of advice, and a decent place to start. Do so, and then click on Plugins. Find the space labeled Widevine Content Decryption Module and make sure that Always Activate is selected. Refresh the video’s page and try watching the video again. In some cases, this might be enough to get things working. Give it a few moments, since it might need to buffer the entire video stream again.

You can also access that screen by holding down Ctrl, Shift and A at the same time, or alternatively going to the Tools menu and selecting Add-ons. You’ll also want to head over to Extensions and ensure that Ubuntu Modifications is enabled. There will be a button next to this item marked Disable if the modifications are enabled, although this probably seems slightly counterintuitive. If the button reads Enable, then you haven’t turned on these modifications and you should click on it. If you have an OpenH254 Video Codec, then you’ll probably not have to worry about what setting this is on. While you can turn it on if it’s currently off, it shouldn’t actually have any influence on the Amazon Prime video player in spite of it’s name.

In most cases, this should have already fixed the problem, but if you’re still having trouble go to Help and select About Firefox. You need to be on at least Firefox 49 for this work, but if you’ve been keeping up with Ubuntu’s repository updates, you should be well beyond this by now anyway. You may want to use either the Software & Updates box in Ubuntu you can open from the Dash in Unity, or alternatively use the terminal and type sudo apt-get update followed by sudo apt-get upgrade to ensure that all packages you’ve installed on your system, including Firefox, are currently at the highest version they could possibly have. You’ll probably want to restart after this, in case any sort of kernel update went through, though this is very irrelevant to the playing of Amazon Prime videos. It’s just something that sometimes happens when updating all packages in Ubuntu, and now is as good a time as any to do so.

Some advice you might have come across might have suggested that you add the Official PPA for Firefox Beta Releases and update your apt-get repositories. This is no longer necessary, and now in the modern era of Ubuntu can be potentially dangerous. Simply try those above steps and see if it allows you to stream online video. Likewise, you might be told to use a User Agent Switcher, and while this is still required in many cases for Netflix in Linux, you probably won’t need it for Amazon Prime, and shouldn’t have to try. Amazon Prime should accept Ubuntu connections, and it probably will select other Linux distributions including Debian, Fedora and Arch just as easily.

Once you update your browser by using Ubuntu’s own repositories, if you were using an older version, head back to Amazon Prime Video. You’ll now see a ribbon that asks if you want to allow DRM content to play. You could also select the Edit menu, go to Preferences and then make sure that “Play DRM content” is checked. In either case, Firefox may or may not prompt you to approve a download, which you should agree to. This won’t actually go into your ~/Downloads directory, but instead get installed like a regular Firefox add-on.

Once everything seems to be running smoothly, try refreshing Amazon Prime Video again. If nothing else happens, then you may wish to either try restarting Firefox or, alternatively, clearing out your cache. Clearing the cache can also make things move much more quickly when you start to play online videos seriously. Should this still not let you play videos, then you might have to restart the machine, but after doing so, you should finally be in the clear. Hover your mouse cursor at the bottom of the screen to get the controls for the video, and you can click on the full screen button to hide the rest of your Ubuntu interface. You could also more than likely push the F11 key to do so. When you’re in full screen, you can push the Esc key to return to Ubuntu, or hover your mouse cursor once more to the bottom to get the controls again. If you find that your mouse pointer won’t vanish when watching videos, move it to the direct center of the video or one of the vertical edges and wait several seconds. It should vanish along with the video controls, which is important when watching full movies.

The post How to Watch Amazon Prime Videos with Firefox in Ubuntu appeared first on Appuals.com.

How to Install VLC Extensions on Linux

$
0
0

The VLC player allows you to install extensions, plugins and skins without the need of the Debian, Ubuntu, Arch or Fedora package managers. You simply install .lua files by copying them into a directory. These .lua files work as extensions on most versions of the VLC media player and some users actually trade ones that they’ve made, similar to themes for most other pieces of software. Some plugins are simply artistic skins, while others provide additional functionality like music matching, lyrics finding and subtitling for videos. Subtitles often come as separate files that accompany videos themselves.

While it can be tempting to install many of these plugins, you may wish to go through and remove some of them when you’re done with testing them out. Only leaving ones installed that you actually use will ensure that the VLC media player window always starts up very quickly. That being said, a minimal interface theme or a small skin may actually help you start your player faster. Keep this tip in mind while you install VLC extensions on your Linux system.

Installing .lua Extensions on VLC

Make sure that the extensions you’ve downloaded end with .lua, because otherwise VLC might not be able to read them properly. Once you’re sure that they’re correctly formatted and are safe to use, you’ll need to decide whether you want to install the extensions for all users or just for yourself. You’ll have to extract the .lua files if they’re in an archive. You can use a graphical tool to perform this or gunzip if they’re in .gz format. If you receive a tar file after using gunzip on the archive, then you can simply extract this a second time to find the extensions in question.

Move the .lua files, using either a graphical tool or the mv command, to the ~/.local/share/vlc/lua/extensions/ if you only want to use them for yourself. This is the preferred way of doing it on a single-user system, because there’s no chance you’re going to be running VLC through gksu or anything of the sort.

Extensions for all users go in /usr/lib/vlc/lua/extensions/, but you’ll probably need root access to get there. You may wish to hold down the Windows or Super key and push R then enter gksu nautilus or gksu thunar to get a root-accessible file manager. Dragging them over from a window you have user access to might create extensions with regular user permissions, which you probably don’t want on a /usr/lib/ scale, so you can instead use a simple command to fix it. Issue sudo chown -R root /usr/lib/vlc/lua/; sudo sudo chown -R root: /usr/lib/vlc/lua/ from a CLI prompt once you’re done to make sure they have root permissions. You won’t need to do this if you’re only using them in your home directory at ~/.local/share/vlc/lua/extensions/, however, since you want these to have normal user permissions anyway.

Once they’re installed, start up VLC and click on the View menu. You should be able to find VLsub, Lyrics Finder, Add Similar, Subtitles, Media Context, musiXmatch, Show Me the Meaning and any other extension you’ve installed right there in that menu. When you install custom skins, you’ll need to go to the Tools menu and then select preferences. Click on the Use Custom Skin option and then select the skin file you’re using.

Technically, you could put these in other directories, since this window gives you the option to browse, but doing so just creates clutter so you’ll probably not want to. You may wish occasionally to try one that’s in your ~/Downloads directory before installing it permanently just to see what it looks like. This widget is perfect for that. Select the custom skin you want to use from here, and then click on okay.

Try the skin out by playing a video and watch if the resolution is low or the video quality is poor. You might not want to use a skin that causes either of these, but try dragging and resizing the window before giving up. Alternatively, you could push the F11 key or double click on the center of the video to go into full-screen mode and see how it plays.

Some skins don’t have visible controls or they’re vanishing. A few skins alternatively mimic the video player style of other programs, like GNOME Player.

Once you’re satisfied, you can remove the skins you don’t plan to use from the same directories that you’ve installed them. While some of these skins can make the program more bloated, some might actually instead make VLC player move even faster. A good rule of thumb is that the lighter and more minimalist any given skin is, the faster it will run.

Very few of the VLSub extensions are actively working, and few are actively developed, but VLSub and a few others are worth adding. If you’ve upgraded to VLC 2.2 or higher, then you have the capability to search for and install extensions under the Tools menu. Select plugins and then head to extensions under it. Once you select a plugin that you like, you can click on the Install button and the program will do the work for you. This is just like the same system that installs these plugins inside of Mozilla Firefox. Pay special attention to the version numbers when you install a plugin, however, since some of these versions aren’t actually the latest and you’ll need to look through the program’s on-board repository to find a later one. Then again, the older versions might actually work a bit better with your installation depending.

Sometimes you’ll need to replace existing extensions under the /usr/lib/vlc/lua/extensions/, and the program can’t do so automatically. Find out the .lua file’s name, and then issue the command sudo rm /usr/lib/vlc/lua/extensions/filename.lua, replacing the file with the actual name in question. Since you’ll be operating as root in order to do so, you’ll want to double-check and make sure that the command name you wrote is indeed correct.

The post How to Install VLC Extensions on Linux appeared first on Appuals.com.

How to Root the Huawei Y3II (LUA-U22)

$
0
0

In this guide we’ll take you through the necessary steps to root the Huawei Y3II (LUA-U22) successfully. Follow the steps carefully to avoid any mistakes and you’ll be rooted and on your way to new customization in no time.

For this guide, you will need the following equipment and software.

Once you have prepared your hardware and downloaded the necessary software from the list above, you can begin the rooting process listed below.

Steps for Rooting the Huawei Y3II (LUA-U22)

Before starting, please be aware that this method only works for the LUA-U22 variant of the Huawei Y3II.

Firstly you’ll need to enable USB debugging on your Huawei Y3II.

  1. Go to Settings > About Phone
  2. Tap Build Number Repeatedly
  3. Once you’ve tapped it enough times, a pop-up will appear stating that you’ve accessed developer options
  4. Press the Back button
  5. Tap Developer Options
  6. Tap to enable USB Debugging

Once you’ve followed these steps you’ll now need to turn to your PC and open the Kingroot application. You’ll be using Kingroot to root your Huawei Y3II. Make sure to follow the next steps very carefully.

  1. Open Kingroot on your PC or laptop
  2. Attach your Huawei Y3II to your PC via USB cable
  3. Wait for the device status to appear on Kingroot
  4. Once the device status has appeared, click the ‘root’ button
  5. The root process will begin – this will take some time so make sure not to disconnect your Huawei Y3II whilst the root process is taking place
  6. Once the rooting has been completed, Kingroot will notify you that the root process was successful
  7. You can now exit Kingroot and disconnect your Huawei Y3II

You’ll now be able to perform tasks such as uninstalling system apps, using root-only apps or underclocking and overclocking your hardware.

To check that the root process has completed successfully, you can follow the steps below. Whilst this step is optional, it’s useful to double check that everything has worked as expected.

  1. Visit the Google Play Store
  2. Download SuperSU
  3. Download Root Checker
  4. Open Root Checker
  5. Tap the ‘verify root status’ button
  6. A pop-up for SuperSU should appear – make sure to allow permissions
  7. The Root Checker app should display your device as being rooted

Custom ROMS on the Huawei Y3II

Currently there is little community interest in the Huawei Y3II so there are no custom ROMs available. Whilst ROMS like CyanogenMod aren’t ruled out, it’s unlikely that any ROMs will make their way to the Huawei Y3II.

Fortunately rooting your smartphone still comes with a variety of benefits so you’ll have access to new features even without a custom ROM for the Huawei Y3II.

The post How to Root the Huawei Y3II (LUA-U22) appeared first on Appuals.com.

Viewing all 4499 articles
Browse latest View live