Quantcast
Channel: Kevin Arrows | Network Engineer | Appuals.com
Viewing all 4495 articles
Browse latest View live

Fix: SteamVR Error 308

$
0
0

Users experience the error message “Error 308” when their SteamVR application fails to start successfully. The full error message is “SteamVR wasn’t able to start because of unknown reasons. (Error: Unknown Error (308))”.

SteamVR Error 308

This error message can occur on the initial installation or when the application is in frequent use. There some rare cases where the error message occurs when the installation drive was either changed or the data was transferred to another location. Steam officials officially acknowledged the error released an update which only fixed some of the users’ issue.

What causes SteamVR Error 308?

Since SteamVR makes use of a lot of components on your computer as compared to the normal Steam, there are instances where some modules go in an error state and conflict which causes the error message. Here are some of the reasons why this might happen:

  • Administrative privileges: SteamVR requires that you grant it elevated access when it runs. If it doesn’t get them, it fails to initialize.
  • Launching wrong executable: There are instances where after a transfer of files, the shortcut/executable on your Desktop might not point to the correct installation files.
  • Corrupt temporary files: SteamVR creates temporary files in a specific directory. If these files are corrupt, the application will fail to initialize.
  • Process in error state: The Steam and Vice services might have gotten into an error state which affects the startup. Refreshing these processes usually fixes the problem.

Before you move on with the solutions, make sure that you are logged in as an administrator on your computer and have an active open internet connection without the use of proxies and VPNs.

Solution 1: Granting Elevated Access

All applications running on Windows require that you grant them elevated access so they can gain full control of the computer resources and use them to operate. If you have not granted elevated access to SteamVR, it will fail to initialize. Here we will navigate to the properties of the executable and grant it permissions.

  1. Navigate to the installation directory of SteamVR.
  2. Right-click on the application’s executable and select Properties.
Properties of SteamVR
  1. Once in Properties, select the Compatibility
  2. Now check the option “Run this program as an administrator”.
Granting Administrative Access to Steam
  1. Click Apply and exit. Restart your computer and try running SteamVR again.

Solution 2: Ending all SteamVR and Vice Processes

All applications have background services running which carry out all the tasks of it. There are some rare cases where the background processes go into an error state and fail to respond. These processes are mostly hidden from view so you might think you are restarting SteamVR but it never closed in the first place. In this solution, we will open the task manager and end all processes related to SteamVR and Vice.

  1. Press Windows + R, type “taskmgr” in the dialogue box and press Enter.
  2. Once in the task manager, select the tab of Processes.
Ending all SteamVR and Vice Processes
  1. Now select all processes of SteamVR and Vice. Select them one by one, right-click on them and select End task.
  2. After finishing all the process, try launching SteamVR again and check if the error message is resolved.

Solution 3: Deleting Temporary files

Steam like all other applications, store temporary profile data in your computer’s directory. This will most probably different than other profiles on your computer. If any of these configuration files get corrupt or unusable, SteamVR will not be able to fetch the required information on startup and fail to launch. In this solution, we will navigate to Steam’s installation directory and delete the temporary files.

  1. Make sure that you Exit Steam properly using the task manager before proceeding.
  2. Press Windows + E and navigate to the following directory:
C:\Users\Strix\AppData\Local\openvr\openvrpaths.vrpath

If you are not able to see AppData folder on your computer, you need to enable hidden files. Select View from the top of your Windows Explorer and select Options > Change folder and search options.

Folder options – Windows Explorer

Select the tab View and then check the option Show hidden files, folders and drives underneath the heading Hidden files and folders. Click Apply to save changes.

Enabling Hidden Devices – Windows Explorer
  1. Now right-click on openvr\openvrpaths.vrpath and select Delete.
Deleting openvrpaths.vrpath
  1. Restart your computer and launch the application again. Check if the issue is resolved.

Solution 4: Reinstalling SteamVR

If all the above methods don’t work and you are still unable to launch SteamVR on your computer successfully, it is possible that your installation files are corrupt or incomplete. This is a very common scenario and mostly occurs if you have shifted your data from one location to another. In this solution, we will uninstall SteamVR and then reinstall it. This will help clear bad installation data and fix our problem.

  1. Press Windows + R, type “appwiz.cpl” in the dialogue box and press Enter.
  2. Once in the application manager, search for SteamVR. Right-click on the application and select Uninstall. You can also navigate to the installation directory and run the uninstaller from there.
Uninstalling SteamVR
  1. Restart your computer. Now navigate to Steam’s official website and download the installation files for the application. Run the executable as an administrator and let the installation process finish.
  2. Restart your computer again and then launch SteamVR as an administrator. Check if the issue is resolved.

The post Fix: SteamVR Error 308 appeared first on Appuals.com.


Fix: Rainbow Six Siege Error Code 6-0x00001000

$
0
0

The error code “6-0x00001000” appears on Rainbow Six Siege when trying to enter a multiplayer game using the matchmaking mechanism. According to the official documentation from Rainbow Six Siege, this error message primarily means that the connection to the matchmaking servers timed out.

Rainbow Six Siege Error Code 6-0x00001000

Users started experiencing this error code at a large scale from around August 2018. Since then, players experience this error either indefinitely or every now and then. This error message is not limited to consoles only; it also occurs on Windows application of the game.

What causes Rainbow Six Siege Error Code 6-0x00001000?

Officials of the game have acknowledged the error message more than once in social media forums and reportedly worked on a fix which was later released. Here are some of the major reasons why you might experience this issue:

  • Xbox Account Issue: There seems to be a bug in Xbox consoles. Some user profiles are able to connect to the matchmaking servers while some cannot.
  • Bad internet connection: This is the most common factor for why you see this error while playing. If your internet connection is unstable, the servers will not be able to connect with your game.
  • Console in an error state: There are cases where your internet connection is working perfectly but your console refuses to connect. In this case, a simple power cycle usually fixes the issue.
  • Server maintenance: Every game turns off their servers for routine maintenance. If the server is down, you will not be able to connect to matchmaking services. You have to wait this one out.
  • DNS Server: Matching making process also makes use of your computer’s DNS address. If the DNS server is not accessible, you will not be able to use the multiplayer mode.
  • NAT Settings: The NAT settings on your Xbox or PlayStation might be set incorrectly.
Rainbow Siege Official Statement

Solution 1: Checking your Internet Connection

If the internet connection on your computer or console is unstable or limited, the device will not be able to access the matchmaking servers and pop the error message on your screen. Now there are several ways through which you can check your internet; you can use another device, connect it to the same network and check if you have access.

If you do have access on your other device but not your console/computer, we can try power cycling your router. There are several cases where the router goes into an error state. Power cycling refreshes all the configurations and allows correct transmission of the network again.

  1. Turn off your router and console/computer.
  2. Take out the power cable of each device. Now press and hold the power button of each device for around 4 seconds so all the energy is drained.
  3. Now, wait 2-3 minutes before plugging everything back in. Now turn all the devices on and check if the error message is resolved.

Note: If you are using any proxy server, make sure that you remove it and try again. Proxy servers sometimes have settings which block several services/websites from running. This happens especially in organizations and public places such as hospitals etc.

Solution 2: Checking for Updates

Like mentioned before, Rainbow Six Siege acknowledged the issue of devices not being able to connect and commented that a fix is underway. That fix got released as an update to the game and for the majority of the users, it fixed the issue. Here we will navigate to the applications page in your Xbox and update the game to the latest build available. You can use the PC method to update the game on your PC.

  1. Navigate to the Applications page on your Xbox and select the Update button present at the left navigation bar.
Rainbow Siege Update – Xbox
  1. Now locate Rainbow Siege Six and make sure that you update the application fully to the latest build.
  2. Restart your computer and check if the error message is resolved.

Solution 3: Changing User Profile in Xbox

Xbox user profiles are known to get induced with several bugs and errors. We came across some cases where some profiles were greeted with the Error Code 6-0x00001000 while some were able to successfully use the matchmaking mechanism for multiplayer. Here we will try to change the user profile on your Xbox console and see if this fixes the issue.

  1. Navigate to your Xbox home page. Now select the heading Social from the top of the page.
Signing out – Xbox
  1. Here you will see a button named Sign In or Out. Click it and sign out of your profile.
  2. After you are signed out, you can either create a new profile or sign in using an existing profile.
  3. Now launch Rainbow Six Siege and see if the error got resolved and the matchmaking is successful.

Solution 4: Using a VPN

This may seem bizarre but we came across several cases where users were able to use matchmaking and connect to multiplayer games using a VPN. A VPN (Virtual Private Network) makes use of tunnels and disguises your location. VPNs are used to access content which might not be available to you through normal network channels. You can ‘try’ this workaround but there is no strict guarantee that this will work.

CyberGhost VPN

You can check our article on How to Watch Netflix with VPN and follow the steps on how to install CyberGhost VPN. The steps are the same except that you don’t have to choose the streaming category. After installing the VPN on your computer, try connecting to the matchmaking servers again and check if the error message is resolved.

Solution 5: Changing DNS Settings

DNS (Domain Name Systems) are used by applications and games alike to connect to their servers or services. If the DNS on your computer is not working properly, you will not be able to connect with Rainbow Six Siege servers. ISP’s usually allocate a default DNS server but it doesn’t work in some instances. Here in this solution we will set Google’s DNS and see if this fixes the issue.

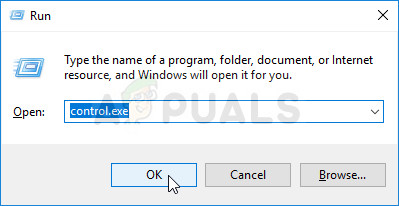
  1. Press Windows + R, type “control panel” in the dialogue box and press Enter.
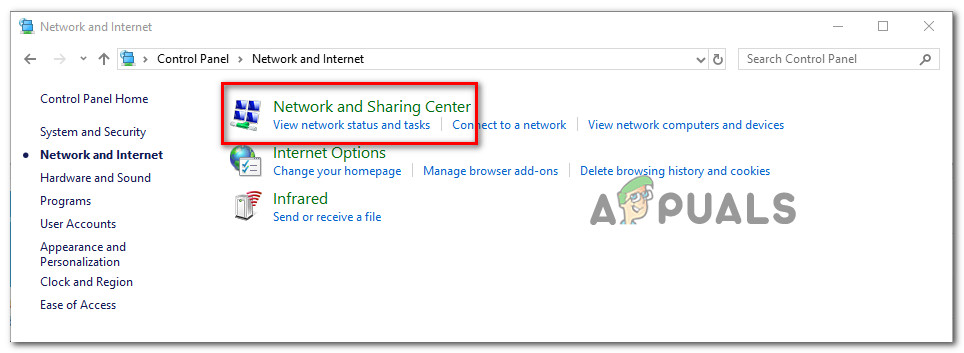
  2. Once in the control panel, click on the sub-heading “Network and Internet”.
Network and Internet – Control Panel
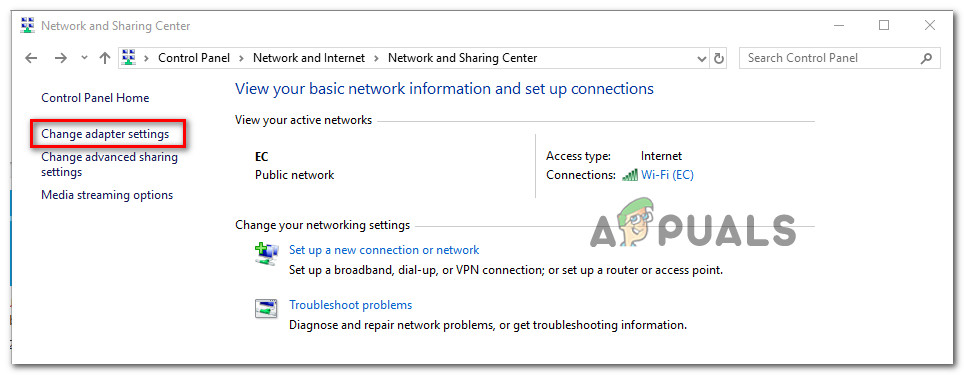
  1. Select “Network and Sharing Center” from the next window you are navigated to.
Network and sharing center – Control Panel
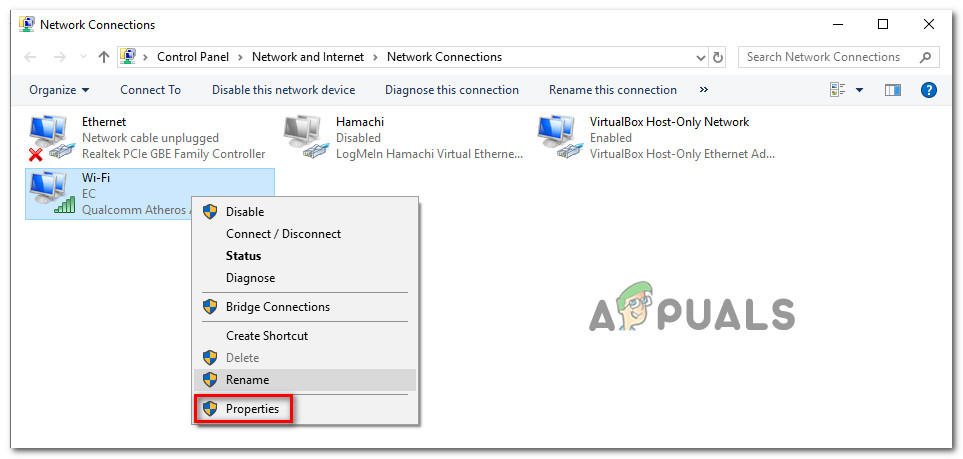
  1. Here you will find the network to which you are connected to. Click on the network present in form of “Connections” as shown in the screenshot below.
Selecting Connected Network
  1. Now click on “Properties” present at the near bottom of the small window which pops up.
Properties of Network
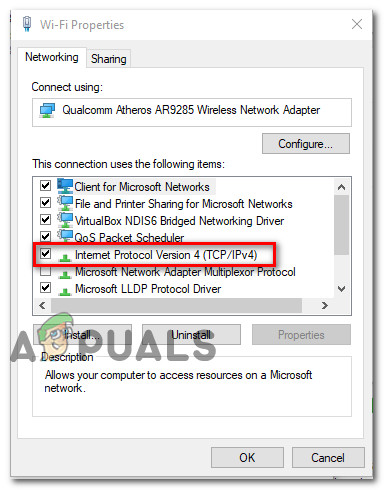
  1. Double-click on “Internet Protocol Version 4 (TCP/IPv4)” so we can change the DNS server.
Opening IPV4 Settings
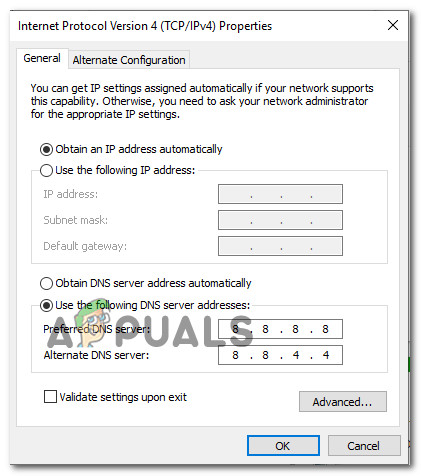
  1. Click on “Use the following DNS server addresses:” so the dialogue boxes below become editable. Now set the values as following:
Preferred DNS server: 8.8.8.8

Alternate DNS server: 8.8.4.4
Changing DNS Settings
  1. Press OK to save changes and exit. Restart your computer and check if you can connect properly to Rainbow Six Siege matchmaking servers.

Solution 6: Changing NAT Type (for consoles)

Xbox and PlayStation consoles use NAT (Network Address Translation) in order to communicate on the internet. There are several NAT types which vary according the level of security. If you have a strict NAT type in your console, the game might not be able to connect to its servers. In this solution, we will navigate to your network settings and change the NAT type manually.

  1. Navigate to your Settings and then select Network.
  2. Select Network Settings when the option becomes visible.
Network Settings – Xbox
  1. Now edit your network settings. Make sure that you change the NAT Type to Open.
Changing NAT Type
  1. Save your changes and exit. Restart your computer and try matchmaking again.

Solution 7: Checking Server Status

Every game takes it server offline for routine maintenance. This maintenance can go on from several hours to minutes. There is no fixed time. Hence if you were able to use the matchmaking mechanism recently but aren’t able to now, it probably means that the servers are down for maintenance. You have no option but to wait it out.

Rainbow Siege Server Status

You can navigate to Tom Clancy’s Rainbow Six Siege – Service Status website and check the server status. As you can see in the image above, there are icons for the server status. If there is anything wrong with the server, wait it out until it is fixed.

The post Fix: Rainbow Six Siege Error Code 6-0x00001000 appeared first on Appuals.com.

Fix: Invalid File Handle on Windows 10

$
0
0

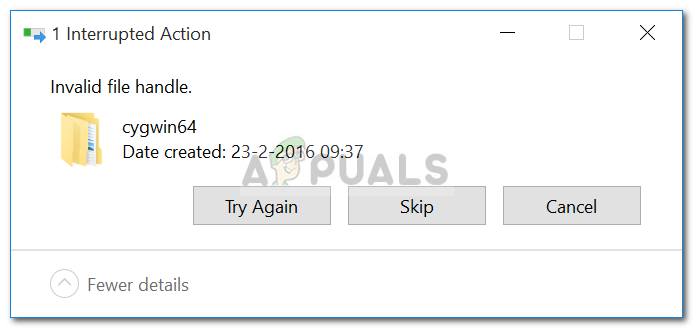
When you are trying to delete a file or folder on your system, you might come across the error message ‘Invalid file handle’. This error message occurs when the name of the folder or the file that you are trying to delete is a reserved name. The Windows operating system doesn’t deal with certain names/nicks due to which the File Explorer prevents you from giving your folder or file a reserved name. However, in case you get the file from your smartphone or another operating system like Linux, you will be prompted the said error message upon trying to delete it.

Invalid File Handle

Microsoft Naming Conventions

The Microsoft Naming Conventions provide that files or folders on your system should not be named CON, PRN, AUX, NUL, COM1, COM2, COM3, COM4, COM5, COM6, COM7, COM8, COM9, LPT1, LPT2, LPT3, LPT4, LPT5, LPT6, LPT7, LPT8, and LPT9. This is because these names are reserved names in the Windows operating system, meaning they are used for a specific purpose by the Windows operating system and should not be used anywhere else. You should also avoid following the above names immediately by an extension, for example, NUL.txt. In case you want some more details, you can refer to this article on Microsoft’s website.

What causes the ‘Invalid File Handle’ Error Message on Windows 10?

Well, the reason for the emergence of the said error is quite clear after giving the Naming Conventions provided by Microsoft a read.

  • The Name of the File/Folder is a Reserved Name: The error message occurs appears when the file you are trying to delete is given a reserved name. Using reserved names is prohibited by Microsoft and should not be trifled with.

Now that you are aware of the Microsoft Naming Conventions and the cause of the error message, you can overcome it by following the solution given down below.

Deleting the File or Folder

The files that are given a reserved name can be rendered useless because you can’t use them neither are you able to delete them using the standard procedure. To delete the file or folder, you will need to rely on some command prompt commands.

If you are facing the error message while deleting a directory, you can do so by following the steps given down below:

  1. Press Windows Key + X and select Command Prompt (Admin) from the list to open an elevated command prompt.
  2. Once the elevated command prompt opens up, type in the following command:
    rd \\.\c:\documents\con /S /Q
    Deleting a Folder with a Reserved Name
  3. In the above command, replace the path accordingly, however, make sure you do not remove the ‘\\.’ before the path. Another example would be:
    rd \\.\E:\con /S /Q
Note:

The parameter /S is used to tell the rd command to remove all the sub-directories found in the specified directory while the /Q parameter is used to tell the command to remove contents of the specified directory silently (you won’t be given any prompts). Moreover, \\. is used to refer to the current system.

In case you are trying to delete a file, do the following:

  1. Open an elevated command prompt as shown above.
  2. Type in the following command and then hit Enter:
    del \\.\c:\Temp\con.txt
    Deleting a File with a Reserved Name
  3. To delete a file, you will just have to specify the extension of the file and use the command del instead of rd.

That’s it, you have probably deleted the file/folder from your system.

The post Fix: Invalid File Handle on Windows 10 appeared first on Appuals.com.

Fix: Steam Error Code 503 ‘Service Unavailable’

$
0
0

Users experience the Error message 503 Service Unavailable when they try to load the Steam Store or Community from within the Steam application. Error 503 is a generic HTTP error which signifies that the problem is with the server and not your computer (in most cases).

Steam Error 503

In detail, this error message means that the server is unable to handle the HTTP request because of either temporary overloading or the maintenance of the server is underway. Also, it signifies that the issue is temporary and will probably be fixed in a while.

What causes the Service Unavailable Error 503 on Steam?

Even though the error code itself tells us that this is a server side error, there can be many culprits in your own system. Here are some of the reasons why you experience Error 503 when trying to access Steam pages from the application:

  • Bad internet connection: If you have a limited/bad internet connection, chances are that you will not be able to access web pages like these properly.
  • Server-side issue: The Steam servers could be temporarily down or be undergoing maintenance. You can only wait this out.
  • Proxy servers: If you are using a proxy server on your computer while connecting, chances are that you will experience this issue.

Before we move on to the implementation of the solutions, you should make sure that you are logged in as an administrator on your computer.

Solution 1: Checking Internet Connection

If you have limited or unstable internet connection on your computer, the application will not be able to access the Steam servers properly and cause the error. You should make sure that you make use of several ways in checking your connection; you should use another computer and connect it to the same network to check if you have access there.

If you do have access on your other device but not your console/computer, we can try power cycling your router. There are several cases where the router goes into an error state. Power cycling refreshes all the configurations and allows correct transmission of the network again.

  1. Turn off your router and computer.
  2. Take out the power cable of each device. Now press and hold the power button of each device for around 4 seconds so all the energy is drained.
  3. Now, wait 2-3 minutes before plugging everything back in. Now start your computer again and launch the Steam application. Check if the issue is resolved.

Solution 2: Checking Proxy Servers

Proxy servers are used in some networks (most organizations or public places) where they are used to provide faster internet by caching elements which are accessed. This mechanism can sometimes revoke access of the Steam application to Steam servers. In this solution, we will navigate to your network settings and disable any proxy servers.

  1. Press Windows + R, type “inetcpl.cpl” in the dialogue box and press Enter.
  2. Now Internet Properties will be opened. Click on the tab Connections and then LAN settings.
Disabling Proxy Servers
  1. Now if you are using a proxy server, the field will be checked with the details inside. Uncheck any proxy servers if enabled. Now restart the application/webpage and check if the issue is resolved.

Solution 3: Checking Steam Server Status

If both the above solutions don’t fix the issue, it probably means that the Steam servers are indeed inaccessible. Servers get a little downtime every now and then depending on the load and maintenance schedule.

Checking Steam Server Status

You should navigate to the Steam status website and see if the page you are accessing is indeed down. There should be a separate status for the Steam community and the market. If those are indeed inaccessible, there nothing you can do except wait the outrage out.

Solution 4: Reinstalling Steam

If the error message still doesn’t go away, it probably means that there is some problem with the Steam application. If there are indeed such corruptions or issues, you will not be able to use the application to its full potential and get errors like there.

When we refresh Steam files, we are not deleting your downloaded games. Your Steam user data will also be preserved. Only the bad files or outdated ones will get replaced by the application itself. Have your credentials at hand because you might be asked to input them.

You can read our article on how to refresh your Steam files. Als,o update all your Microsoft redistributables using the official Microsoft website (C++ and .NET framework).

The post Fix: Steam Error Code 503 ‘Service Unavailable’ appeared first on Appuals.com.

Fix: Your Credentials Did not Work in Remote Desktop

$
0
0

The error message ‘Your credentials did not work’ appears when you fail to connect to the remote system using Remote Desktop connection. This error is often caused by Windows policies that prevent incoming RDP connections, or simply your system’s username. Dealing with this particular error can be infuriating as the fault isn’t in the credentials but rather somewhere else. Such an error message might appear even if you are entering the correct credentials, thus, making it an ordeal.

Your Credentials Did not Work

If you are receiving the error message after installing a fresh copy of Windows 10, then you are not the only victim. Many users depend on Remote Desktop Connections and such errors are usually a nightmare to them, however, do not worry as you will be able to get over the issue after following this guide.

What causes the ‘Remote Desktop Your Credentials Did not Work’ Error Message on Windows 10?

The following factors are often found to be the cause of the said error message —

  • Username Change: Sometimes, when you freshly install Windows or rename your current user account, it can cause such an issue. Actually, when you change your username, it doesn’t get changed for the Remote Desktop Connection due to which the error message is generated.
  • Windows Policy: In some cases, the error message is because of a Windows Security Policy which prevents non-admin users from signing in.

Now that you know the causes of the error message, you can follow the solutions provided down below to resolve your issue. Please make sure you follow the given solutions in the same order as provided.

Solution 1: Reverting Username

As we have mentioned, the error message is sometimes caused because the user you are trying to connect from does not exist on the Remote Desktop server. This happens when you try to change your username or install a fresh copy of Windows. Changing your username does not necessarily change it for Remote Desktop Connection and thus, your credentials will be incorrect as the user is not on the server. Thus, to isolate the issue, you will have to revert to the username that you had been using prior to the appearance of the error message.

Solution 2: Editing Windows Security Policy

There is a Windows Security Policy for Remote Desktop Connection that does not allow non-Admin users to log in using RDP. Thus, if you want to login using a non-admin user account, you will have to grant the remote desktop users access. Here is how to do it:

  1. Press Windows Key + R to open the Run dialog box.
  2. Type in ‘secpol.msc’ and press Enter. This will open up the Local Security Policy window.
  3. Expand Local Policies and then select User Rights Assignment.
  4. On the right-hand side, locate and double-click either ‘Allow log on through Remote Desktop Services’ or ‘Allow log on through Terminal Services’.
  5. Click Add User or Group and then type in Remote Desktop Users.
    Adding User to Grant Access
  6. Click OK, hit Apply and then click OK again.
    Allowing Remote Desktop Users Access
  7. Restart your system for the change to take effect.
  8. Check if it isolates the issue.

Solution 3: Editing Local Group Policy

If the above-mentioned solutions do not work out for you, you can try to isolate the issue by modifying a few Local Group Policies. Basically what you will have to do is give a set of Credential Delegation policies a specific value which will most likely fix your issue. Here’s how to do it:

  1. Press Windows Key + R to open Run.
  2. Type in ‘gpedit.msc’ to open the Local Group Policy Editor.
  3. Afterward, navigate to the following path:
    Computer Configuration > Administrative Templates > System > Credentials Delegation
  4. Double-click the ‘Allow delegating default credentials with NTLM-only server authentication’ policy to edit it.
  5. Set it to Enabled and then click Show.
    Editing Local Group Policy
  6. Double-click under Value, type in TERMSRV/* and then click OK.
    Adding Server to the List
  7. Do the same for the following policies as well:
    Allow delegating default credentials
    Allow delegating saved credentials
    Allow delegating saved credentials with NTLM-only server authentication
  8. Finally, close the Local Group Policy Editor and restart your system.
  9. Check if the issue persists.

The post Fix: Your Credentials Did not Work in Remote Desktop appeared first on Appuals.com.

Fix: An Error Occurred while Applying Security Information

$
0
0

This error usually appears when trying to change various security settings of a file or folder located on your computer or on an external media connected to it. The error message is usually preceded by an ‘access denied’ message appearing when trying to move, copy, or delete the files you don’t have proper access to.

An Error Occurred while Applying Security Information

The error appears problematic because it prevents users from adding proper permissions for making the file available for use and it seems like there is no way out. Still, we have prepared several working methods for you to check out and we hope they will help you out!

What Causes the An Error Occurred while Applying Security Information?

  • Read Only mode may be turned on, preventing any access to the file or folder
  • You may need to be the owner of the file before you can perform any valid action over it

Solution 1: Disable the Read-Only Mode

Sometimes the file’s properties prevent it from being freely accessed, especially if the Read Only mode is active in the file’s or folder’s properties. The easiest way to resolve this specific error code is to disable the Read Only mode. It might not work for everyone but it’s the easiest way of resolving this issue.

  1. Open your Libraries entry on your PC or open any folder on your computer and click on This PC option from the left side menu.
  2. Navigate to the location where your problematic file or folder is located.
Opening This PC in Libraries
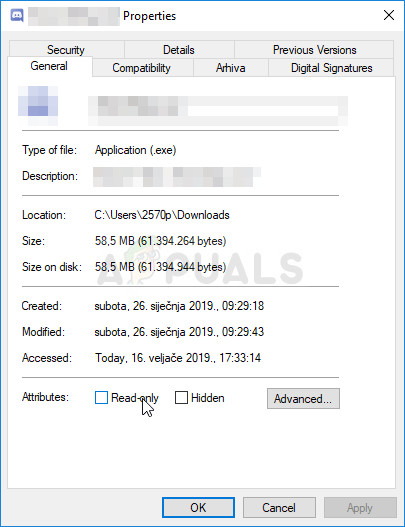
  1. Right-click on the problematic folder and click the Properties option from the context menu. Stay in the General tab and locate the Attributes section at the bottom. Clear the box next to the Read-only option and click on Apply before exiting. Check to see if the problem still appears.
Disabling read-only in file’s Properties

Solution 2: Take Ownership of the File

Taking ownership of the file is sometimes vital if you want to add permissions to various user accounts to edit or copy the file. Changing the owner is generally an easy process and it will grant you full access to security properties of the file if you follow the instructions we have prepared below with great care.

  1. Open your Libraries entry on your PC or open any folder on your computer and click on This PC option from the left side menu.
  2. Navigate to the location where your problematic file or folder is located.

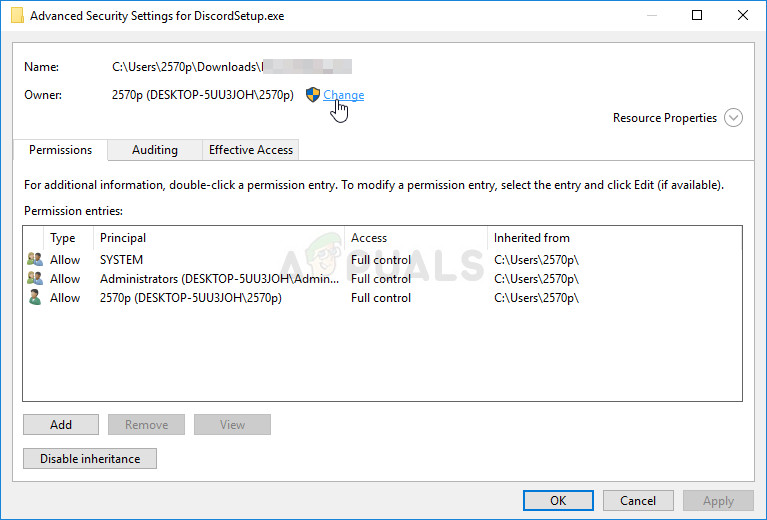
  1. You will need to take ownership of the file or folder located inside. Right-click the folder, click Properties, and then click the Security Click the Advanced button. The “Advanced Security Settings” window will appear. Here you need to change the Owner of the key.
  2. Click the Change link next to the “Owner:” label The Select User or Group window will appear.
Changing the ownership of the file
  1. Select the user account via the Advanced button or just type your user account in the area which says ‘Enter the object name to select’ and click OK. Add your user account.
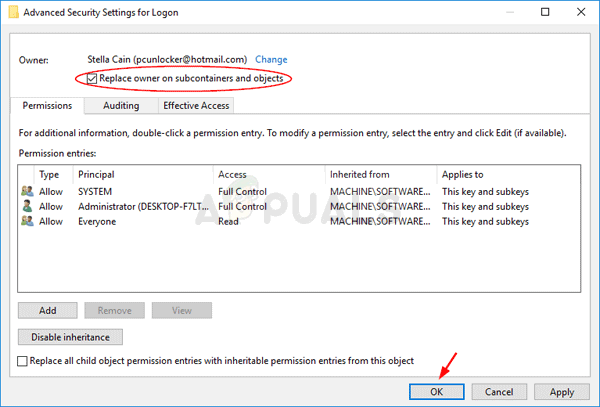
  2. Optionally, to change the owner of all subfolders and files inside the folder, select the check box “Replace owner on subcontainers and objects” in the “Advanced Security Settings” window. Click OK to change the ownership.
Replace owner on subcontainers and objects
  1. Now that you have complete control over the folder, open it, select everything you find inside and access the files properly. Restart your computer and the problem should be resolved.

Alternative: Since some users have still failed to take ownership of the file or folder via the means explained above because of lack of permissions or administrator access, the best alternative thing you can do is to use Command Prompt to resolve the problem. The end result is essentially the same!

  1. Search for “Command Prompt” by typing it either right in the Start menu or by pressing the search button right next to it. Right-click the first entry which will pop up as a search result and select the “Run as administrator” context menu entry.
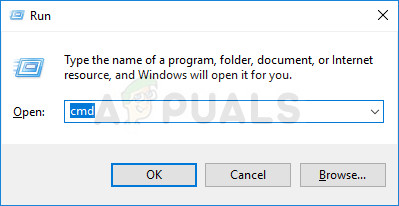
  2. Additionally, you can also use the Windows Logo Key + R key combination in order to bring up the Run dialog box. Type in “cmd” in the dialog box which appears and use the Ctrl + Shift + Enter key combination for admin Command Prompt.
Running CMD as an admin
  1. Type in the following commands in the window and make sure you press Enter after typing each one. Wait for the “Operation completed successfully” message or something similar to know that the method worked.
takeown  /f   "F:\ProblemFolder"   /a   /r   /d y
icacls "F:\ProblemFolder"  /t /c /grant administrators:F  System:F  everyone:F
  1. If the commands above report no errors, then you have managed to change the permissions and the ownership of the file or folder!

 Solution 3: Changing Drive Ownership

If the whole external or internal is refusing to cooperate by displaying this exact same error message, you can try the fix below which will essentially use hidden administrator permissions in order to give ownership to the administrator account and fix things. The solution is lengthy but it worked for plenty of people!

  1. On the login screen of your computer, when the computer boots or after you log out, click on the Power icon and hold the Shift key while clicking restart.
  2. Instead of restarting, a blue screen will appear with a couple of options. Choose Troubleshoot >> Advanced Options >> Command Prompt.
  3. Of course, you can open Command Prompt simply by using the Windows Key + R key combination and typing “cmd” before clicking OK or by searching for it.
Run CMD as an admin
  1. Copy and paste the following command in Command Prompt and click Enter. You should be able to see the “The command completed successfully” message in no time.
net user administrator /active:yes
  1. Log into this admin account and wait for a couple of minutes before everything is ready.
  2. Open the Disk Management utility by searching for it in the Start menu or the search bar and clicking the first option.
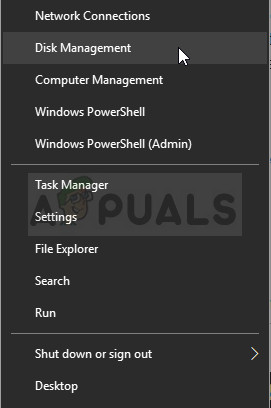
  3. The alternative is to either use the Windows Key + X key combination or right-click on the Start menu and choose the Disk Management option in order to open its console.
Opening Disk Management from within the Start Menu
  1. Locate the drive you want to fix by checking out its name under the Volume column or by checking under for it. Right-click on it and choose the Properties option from within the context menu which will appear.
  2. Navigate to the Security tab. Click the Advanced button. The “Advanced Security Settings” window will appear. Here you need to change the Owner of the key.
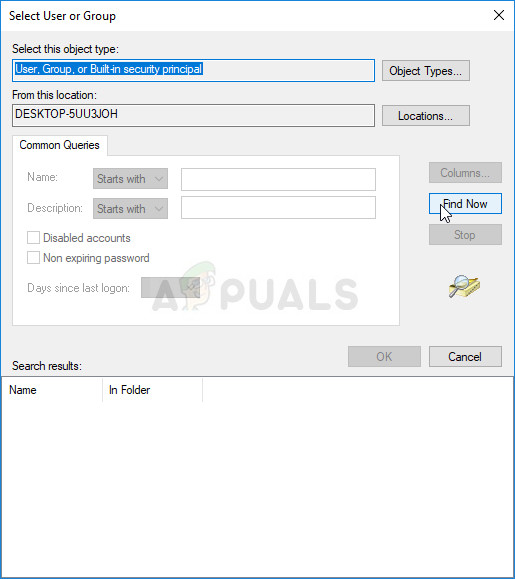
  3. Click the Change link next to the “Owner:” label The Select User or Group window will appear. Navigate to the Advanced tab and click Find Now.
Find Now
  1. Select the Administrator user account via the Advanced button under your computer name and not your username.
  2. Also, to change the owner of all subfolders and files inside the folder, select the check box “Replace owner on subcontainers and objects” in the “Advanced Security Settings” window. Make sure you check the “Replace all child object permission entries with inheritable permission entries from this object” option at the bottom.
Make sure you check both boxes!
  1. Click OK and you’ll see a security window pop up but make sure you click yes for each appearance.

The post Fix: An Error Occurred while Applying Security Information appeared first on Appuals.com.

Fix: Windows was Unable to Complete the Formatting

$
0
0

As you might have guessed, this error appears when trying to format your drive inside This PC, after right-clicking the drive. The error prevents users from formatting the drive (deleting everything on it) or changing the file system the drive uses which can be important in many different applications.

Windows was Unable to Complete the Format

The causes for this problem vary and it can even include physical damage to the disk. If you can normally access files on the drive, the problem shouldn’t be physical and it should be resolved by one of the methods we have prepared below. Good luck!

What Causes the Windows was Unable to Complete the Format Error?

The error is caused by a variety of different reasons and the whole troubleshooting process depends on how the problem actually started to occur in the first place. Here is the list:

  • Simple bugs preventing you from formatting your drive normally inside This PC.
  • Lack of permissions meaning you need admin access to format drives inside This PC. This can be resolved by using Command Prompt or Disk Management.
  • Write protection for your drive may have been turned on, preventing you from formatting it.

Solution 1: Using Disk Management

The first solution on our list is more of a workaround you can use if a simple bug is preventing you from formatting the drive you want using the disk list in This PC. This method involves using Disk Management, a helpful utility preinstalled into Windows which deals with everything disk-related. Follow the instructions below!

  1. Open the Disk Management utility by searching for it in the Start menu or the search bar and clicking the first option.
  2. The alternative is to either use the Windows Key + X key combination or right-click on the Start menu and choose the Disk Management option in order to open its console.
Opening Disk Management
  1. Locate the partition you want to format by checking out its name under the Volume column or by checking under for it. Right-click on it and choose the Format option from within the context menu which will appear.
Formatting the drive using Disk Management
  1. Confirm any dialog prompts and confirm your changes. Restart your computer and check to see if the “Windows was unable to complete the format” error message still appears.
  2. If this method doesn’t work out for you, right-click on your device and choose the New Simple Volume option from the context menu.
New Simple Volume
  1. This will open the New Simple Volume Wizard which will guide you throughout the partition if your drive. Follow the instructions on-screen and your drive should be formatted properly.

Solution 2: Using DISKPART

DISKPART is an amazing utility you can access using Command Prompt and you can use it to easily manage your partitions and volumes. This time, we will use it to make the drive your want to format active and then we will format it using the same utility.

Users who haven’t been able to format their drives using This PC or Disk Management have reported that this method yielded success!

  1. If your computer’s system is down, you will have to use the installation media used to install windows for this process. Insert the installation drive you own or which you have just created and boot your computer.
  2. You will see a Choose your keyboard layout window so choose the one you want to use. The Choose an option screen will appear so navigate to Troubleshoot >> Advanced Options >> Command Prompt.
Command Prompt in Advanced options
  1. Otherwise, simply search for Command Prompt, right-click on it, and choose Run as administrator. At the command prompt window, type in simply “diskpart” in a new line and click the Enter key in order to run this command.
  2. This will change the Command Prompt window to enable you to run various Diskpart The first one you will run is the one which will enable you to see the complete list of all available drives. Type this in and make sure you click Enter afterwards:
DISKPART> list disk
Selecting the proper disk in DISKPART
  1. Make sure you choose your drive carefully, depending on which number is assigned to it in the list of volumes. Let’s say that its number is 1. Now run the following command in order to select your required drive:
DISKPART> select disk 1
  1. A message should appear saying something like “Disk 1 is the selected disk”.

Note: If you are unsure about which drive number belongs to your USB device, the easiest way to do so is to check its size at the right pane. Additionally, it’s the same number which appears in the “Where do you want to install Windows?” window where the error originally occurs.

  1. In order to clean this volume, all you need to do is to type in the command displayed below, click the Enter key afterward, and stay patient for the process to complete. The process should now be successful for a change. This set of commands will also create a Primary Partition and make it active so that you can format it without problems.
Clean
Create Partition Primary
Active
Using the commands above to create an active partition
  1. Finally, this last command will format the drive in the file system you choose. When considering the file system, the rule of thumb is to choose FAT32 for drives up to 4 GB of storage and NTFS for larger volumes. Let’s say you chose NTFS! Type in the following command and tap Enter afterwards:
format fs=fat32
  1. Exit Command Prompt and check to see if your device has been successfully formatted!

Solution 3: Changing Write Protection

Several users have reported experiencing the problem because write protection has been turned on for their drive. This is usually the case for SD cards and USB drives. The problem can be resolved by removing the write protection physically. Look for the lock on the drive and switch to unlocked mode.

If you are unable to flip the switch or if there is none, you can use the software approach and edit the registry in order to remove the write protection.

  1. Since you are going to delete a registry key, we recommend you check out this article we have published for you to safely backup your registry to prevent other problems. Still, nothing wrong will occur if you follow the steps carefully and correctly.
  2. Open the Registry Editor window by typing “regedit” in either the search bar, the Start menu, or the Run dialog box which can be accessed with the Windows Key + R key combination. Navigate to the following key in your registry by navigating at the left pane:
HKEY_LOCAL_MACHINE\System\CurrentControlSet\Control\StorageDevicePolicies
Creating the required key in registry
  1. If you fail to locate this key, right-click on Control in the right-side navigation menu and choose New >> Key. Make sure you name the key
  2. Click on this key and try to create a REG_DWORD entry called WriteProtect by right-clicking at the right side of the window and choosing New >> DWORD (32-bit) Value. Right-click on it, and choose the Modify option from the context menu.
Creating the WriteProtect registry entry
  1. In the Edit window, under the Value data section change the value to 0 and apply the changes you have made. Confirm any security dialogs which may appear during this process.
  2. You can now manually restart your computer by clicking Start menu >> Power button >> Restart and check to see if the problem is gone.

The post Fix: Windows was Unable to Complete the Formatting appeared first on Appuals.com.

Fix: uBlock Origin has prevented the Following Page from Loading

$
0
0

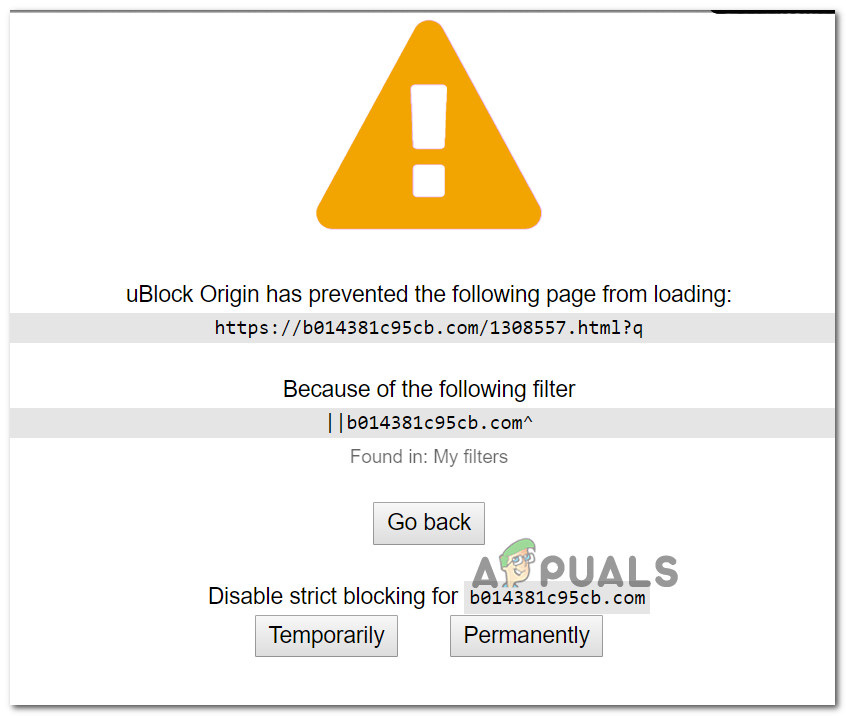
Several users that are using the uBlock Origin (on Chrome, Firefox, and Opera) are reporting that sometimes, the extension blocks an entire page with the message: “uBlock Origin has prevented the following page from loading“. Most affected like unlock Origin and they would like to keep using it, but they would like the add-in or uBlock to block ads and other elements only instead of blocking whole pages.

uBlock Origin has prevented the following page from loading

What is causing the ‘uBlock Origin has prevented the following page from loading’ issue?

We investigated this particular issue by looking at various user reports and the workarounds that they used to get around this inconvenience.

Most of the time, this particular popup is displayed when the user tries to visit a website or download something that has malware/adware bundled installers – This is why the issue is quite common directories like download.com.

The reason why this error appears is that uBlock Origin extension is configured by default to block whole pages if the URL matches with a listing present inside the Malware Domain list. This ad blocking method is typically referred to as strict blocking. If uBlock manages to find a match, the whole domain will be blocked by default.

Even if the default behavior of uBLock Origin (when newly installed) is to block ads, trackers, and malware, there are some steps that you can take to whitelist the site in question. But keep in mind that when the warning occurs, it doesn’t necessarily mean that the site is harmful – it just means that the extension managed to find a matching filter in the selected filter list.

If this scenario is applicable to you and you’re looking for a method that will allow you to prevent the block page from ever appearing again, this article will provide you with some workarounds. There are ways to disable the apparition of the ‘uBlock Origin has prevented the following page from loading’ page temporary or permanently.

Down below, you’ll encounter a collection of methods that other users in a similar situation have used to modify the default behavior of uBlock Origin. All the workarounds featured below will ultimately help you achieve the same thing, but each approach is different. Because of this, feel free to follow the one that is more convenable to your situation.

Method 1: Allowing temporary access

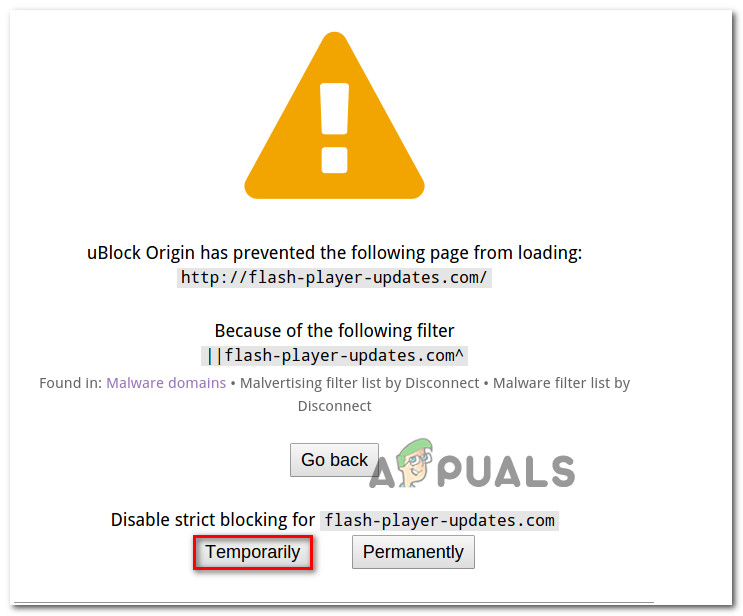
If you don’t plan on spending too much time on the blocked URL (maybe you’re just trying to download something), the most convenable choice is to just click the Temporarily button under Disable strict blocking.

Allowing temporary access in uBlock

This option will allow you to temporarily allow the URL to be accessed. By default, the access period will be for 60 seconds, but you can boost that to 120 seconds bo following the steps below:

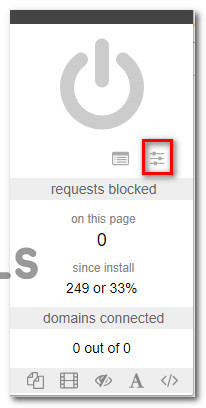
  1. Click on the Extension/addon icon of Unlock (top-right corner). Then. click on the Settings icon from the newly appeared pop-up.
    Accessing the Settings menu of uBlock
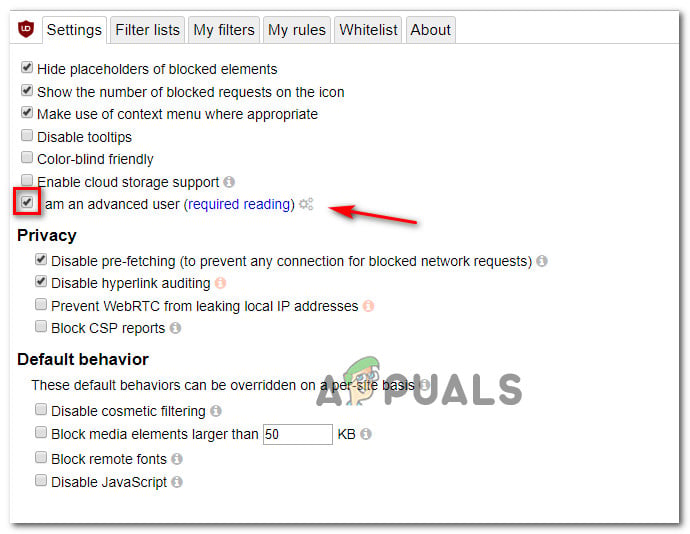
  2. Inside the Settings of uBlock, go to the Settings tab and check the box associated with I am an advanced user.  Then, click the little gear icon that appeared near the option that you’ve just checked.
    Accessing the advanced settings
  3. Paste the following line of code at the end of the list, then click Apply Changes to save the new default behavior:
    strictBlockingBypassDuration

If this method did not help you to resolve the issue or you’re looking for a permanent fix, move down to the next method below.

Method 2: Allowing permanent access

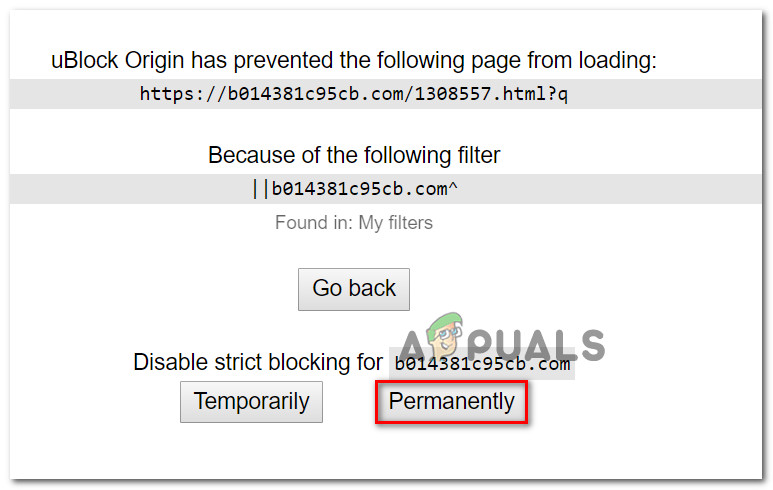
If you visit the blocked website and you want uBlock to play well with it, you can also allow the site permanently by clicking on Permanently.

Allowing the site to be accessed permanently

Doing this will prevent the web page from being blocked by uBlock in the future. If you end up changing your mind and decide that the pop-up should prevent any users from visiting the website, you can simply remove them whitelist rule by following these steps.

  1. Click on the Extension/addon icon of Unlock (top-right corner). Then. click on the Settings icon from the newly appeared pop-up.
    Accessing uBlock’s Settings
  2. Inside the Settings menu of uBlock, go to the Whitelist tab and delete the site that you previously added. Once the web page is removed, click on Apply Changes.
    Removing a website from the Whitelist

If you are looking for a way that will prevent the popup from ever appearing again (even with websites that you haven’t visited before), move down to the next method below.

Method 3: Disabling strict blocking

If you’re looking for a way that will prevent the annoying pop up from ever appearing again, one way to do it is to enforce a ‘no-strict-blocking’ rule using the My rules pane. But keep in mind that while this might resolve the issue and allow you to navigate without interruptions, you’re also exposing the computer to a lot of ad-bundled installers and potentially even malware.

But if you want to go ahead with the procedure, here’s what you need to do:

  1. Access uBlocks Settings menu by clicking on the extension icon (top-right corner) and clicking on the Settings icon.
    Accessing the Settings menu of uBlock
  2. Inside the Settings menu of uBlock, go to the My rules tab and add the following line of code to the Temporary rules tab:
    no-strict-blocking: * true
    
  3. Once you type the rule inside the Temporary rules table, click Save and then click on Commit to set the rule as permanent.
    Establishing a permanent rule

That’s it. The no-strict-blocking rule is now active, so you won’t see the annoying pop-up prompt again. But if you ever change your mind, you can remove the rule by deleting it from the Temporary rules, clicking on Save and then clicking on Commit again.

Reverting the permanent rule in uBlock

If you’re looking for a different approach, follow the next method below.

Method 4: Using a Pop-up blocker with uBlock (Chrome & Mozilla only)

This might seem like an over the top method of preventing the pop-up from appearing, but a lot of uBlock users are using this workaround to avoid seeing the “uBlock Origin has prevented the following page from loading” prompt.

This method involves installing another extension called Proper Blocker. This is confirmed to work well with uBlock and will prevent annoying pop up from ever showing up on your screen.

Here’s are two guides on installing and configuring Poper blocker depending on the browser that you’re using.

Google Chrome

  1. Visit this link (here) and click on Add to Chrome to install the Poper Blocker extension on your browser.
    Installing Poper Blocker on Chrome
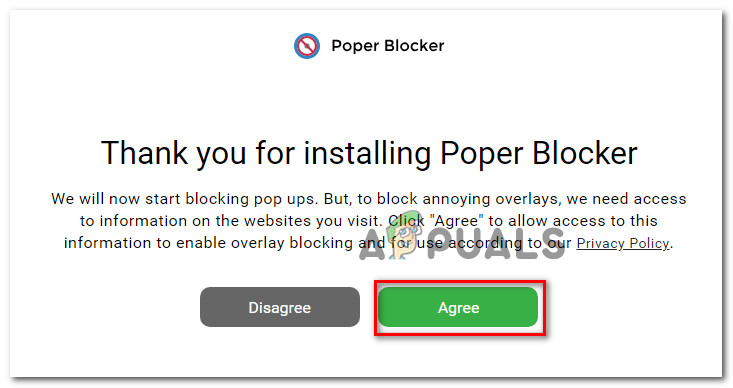
  2. Once the extension is installed, click on Agree to allow Poper Blocker to access information about the websites that you visit.
    Allowing Poper Blocker access to the websites that you visit
  3. That’s it. Poper Blocker will now start blocking any type of popup or overlay (including the on in uBlock).

Mozilla Firefox

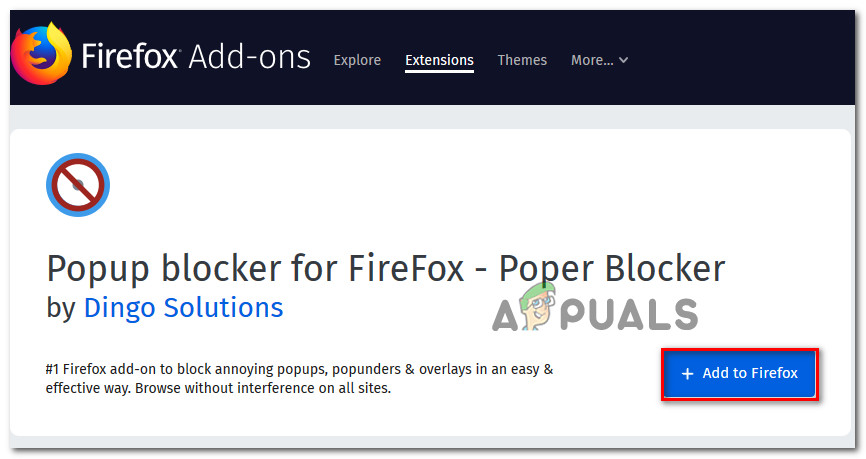
  1. Visit this link (here) and click on Add to Firefox to install Poper Blocker on your Mozilla Firefox browser.
    Installing Poper Blocker on Mozilla Firefox
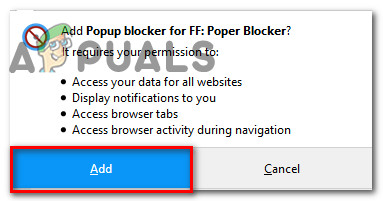
  2. Click on the Add button to allow the installation of Poper Blocker.
    Adding Poper Blocker to Mozilla Firefox
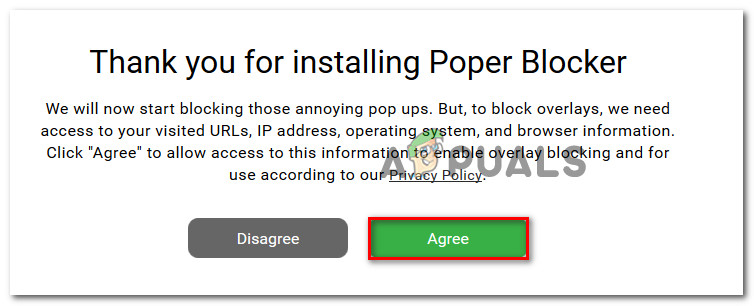
  3. Once the extension is installed, click on the Agree button to allow the add-on to access your URLs, IP address and browser information.
    Allowing Poper Blocker to use the required information
  4. That’s it. Poper Blocker will now start blocking any type of popup or overlay (including the on in uBlock).

If you’re looking for a different approach for preventing the “uBlock Origin has prevented the following page from loading” pop up from appearing on your screen again, move down to the next method below.

Method 5: Removing your custom filters

If you’re using custom filters (your own or some filters imported from somewhere else), the pop-up might appear due to a false positive. In the event that you maintain a list of custom filters or you imported them from the web, you might want to disable them and see if the issue is still persisting.

Here’s a quick guide on how to do this:

  1. Click the uBlock extension icon (top-right corner) and then click on the Settings icon.
    Accessing the Settings menu of uBlock
  2. Inside the Settings menu of uBlock, go to the My filters tab and delete every filter that you have in place. Then, click on Apply changes to save the new behavior.
    Deleting every custom filter

    Note: If you plan on using the filters again, it’s advisable to click the Export button to create a backup before deleting them all.

That’s it. Visit the page again and see if you’re still getting the annoying pop-up.

If this method wasn’t applicable or you’re looking for a different approach, move down to the next method below.

Method 6: Disable Malware domain checking (not recommended)

uBlock mostly blocks whole pages only if the URL matches something in the Malware Domain list. Because of this, you can prevent the popup from ever occurring if you disable uBlock’s ability to reference Malware Domains.

As you can imagine, this is not something we recommend since you might leave your system exposed to security lists. However, this method is efficient in those cases where you use a different 3-rd party application to protect yourself against malware.

But if you’re determined to use this workaround, here’s a quick guide on disabling malware domain checking:

  1. Click on the uBlock icon (top-right corner) and then click on the Settings icon.
    Accessing the Settings menu of uBlock
  2. Inside the Settings menu of uBlock, go to the Filter lists menu and expand the Malware domains menu.
  3. Uncheck every checkbox under Malware domains to disable any type of malware domain checking.  Then, click on Apply changes (top-right corner) to save the new preferences.
    Disabling Malware Domain Checking

The post Fix: uBlock Origin has prevented the Following Page from Loading appeared first on Appuals.com.

Fix: Steelseries Stratus XL Not Working

$
0
0

SteelSeries is a Danish manufacturer of gaming peripherals and accessories, including headsets, keyboards, mice, and gaming surfaces. The Stratus XL is a joystick controller manufactured by SteelSeries for Windows and Android devices.

Stratus XL

However, a lot of reports have been seen where the controller works fine on android but either doesn’t connect at all on Windows 10 or immense lag is seen while playing games. This problem is caused by a Windows 10 update and was not addressed by the manufacturer. In this article, we will discuss the causes of the issue and come up with viable solutions.

What Causes the “Stratus XL Not Working Error”?

The cause of the error seems to be a bug relating to

  • Windows Update: The cause of the error seemed to be a windows 10 update that seemingly caused these connection issues with the controller. The software developers at SteelSeries overlooked the modifications to be made in the controller software in order to make it compatible for the next build of Windows. However, a firmware update was released later to eradicate the problem.

Solution 1: Updating Firmware

Firstly, we will be updating the device firmware to the latest because the new firmware is promised to eradicate this issue. Make sure that you have SteelSeries software installed on your computer.

  1. Connect your controller to the PC with a micro USB cord (not included so you have to buy it separately) before connecting through Bluetooth
    Note: Make sure it is not a “power only” cable.
  2. It will now show up on the SteelSeries Engine
  3. Now open the SteelSeries Engine and click on this icon (it should be having a red notification on it like indicated in the picture)
    Clicking on the icon
  4. Now simply click on update and it will update the SteelSeries Engine to the latest version
    Clicking on Update
  5. Also, you will see a red banner below your controller that reads “Critical Update“. Left-Click on the banner
    Red Banner below the controller
  6.  Allow the firmware update to run completely and leave the controller plugged in. Once complete, you should get a pop-up dialog that looks like this.
    Update complete notification banner
  7. Now connect via Bluetooth and wait for it to say “the device is ready”.
  8. Now restart the controller and it should work fine.

This process should solve all the problems regarding the connection of the controller, its configuration and lag.

Note: The Micro-USB connector is in the place where the batteries go and you will need to remove the batteries in order to connect it via a Micro-USB cable. Also, the cable does not come with the box so u will have to buy it separately from the controller.

The post Fix: Steelseries Stratus XL Not Working appeared first on Appuals.com.

Fix: Logitech G430 Microphone Not Working on Windows 10

$
0
0

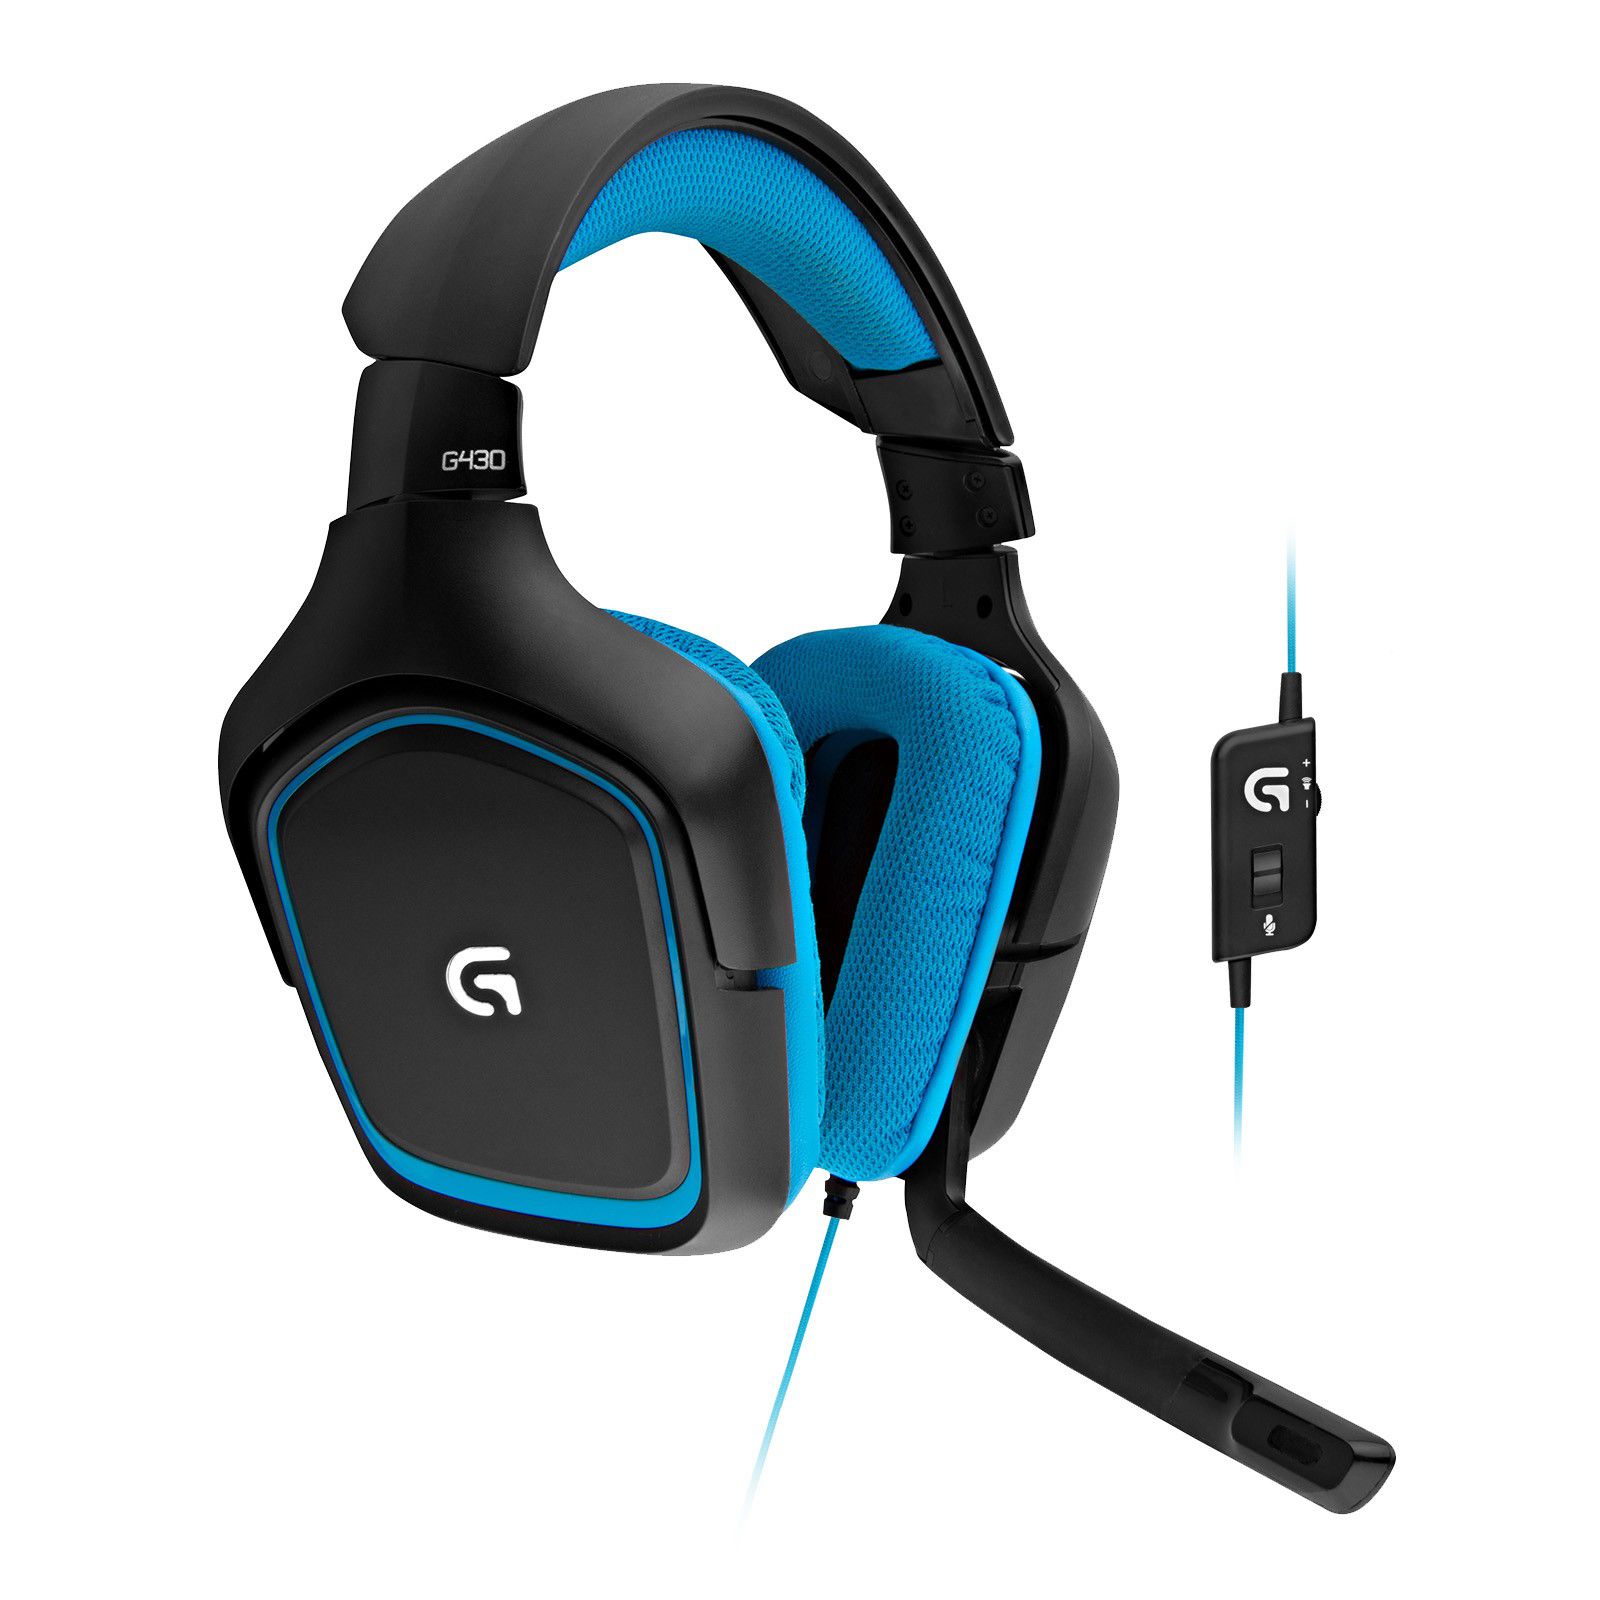
Logitech’s inventory encompasses a wide variety of personal peripherals (both cordless and corded), with special emphasis on products for PC navigation, gaming, Internet communications, digital music, and home-entertainment control. One such product is the Logitech G430 Headset, the product was loved by a lot of users due to the affordable price tag and adequate performance.

Logitech G430

However, quite recently we have had many reports of an issue with the microphone in Windows 10. The microphone would simply stop working although it was plugged in correctly and there was no issue with the hardware. In this article, we will inform you of the causes of this error and try to solve them in a step by step process.

What causes Microphone not to Work in G403?

The cause of the error is not specific and can be triggered due to a number of general reasons. However, some of the major causes are:

  • Windows Updates: Windows 10 after updates automatically changes your privacy settings after an update which prohibits certain app from having access to your microphone
  • Corrupt Drivers: Sometimes, a bug or an update causes the drivers of the microphone to get corrupted which can be the cause of the problem
  • Corrupted Software: In some cases, the official Logitech software that comes with the headphones might be causing the issue. It might be corrupt due to a conflict or a bug and might be causing errors with device configuration

Now that you have a basic understanding of the nature of the problem and its causes we will move on towards the solutions.

Solution 1: Reinstalling the Device Drivers

Before we start configuring the settings, you can try reinstalling G403’s drivers. This step will make sure you don’t have any issues with the drivers or the plugging in of your device since there are numerous cases where because of improper drivers, Windows is unable to detect or recognize the device.

  1. Click on the Start Menu
    Clicking on the start menu
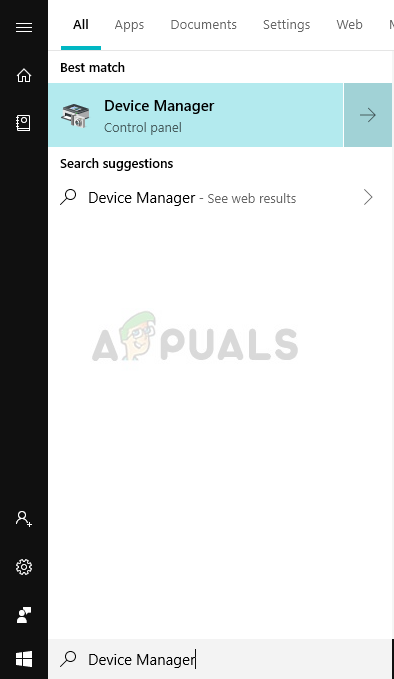
  2. Search For Device Manager
    Searching for Device Manager
  3. Now that you are in the device manager Click on Audio Inputs & Outputs.
    Navigating to Audio inputs and outputs in Device Manager
  4. Then Right Click ON the Microphone and Select Uninstall Device
    Uninstalling the Blue Snowball Drivers
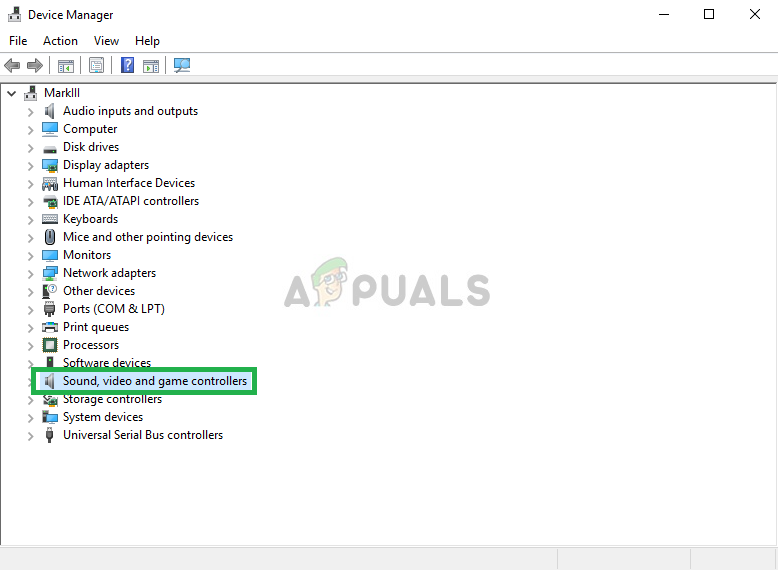
  5. Similarly, Navigate to Sound, Video and Games Controller.
    Navigating to Sound, video and game Controllers
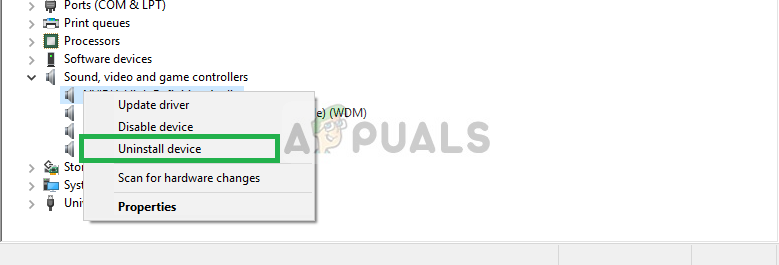
  6. Now Uninstall the Microphone Drivers from here as well.
    Navigating to Sound, video and game Controllers
  7. Now simply unplug and replug the microphone into your computer and the windows will reinstall these drivers If you had an issue with the drivers it should now be fixed.

Solution 2: Changing Windows Privacy Settings

After an update on Windows 10, the privacy settings were automatically changed and some apps were not allowed to use the microphone, while in some cases the microphone was disabled entirely. We will be changing those settings in the following process.

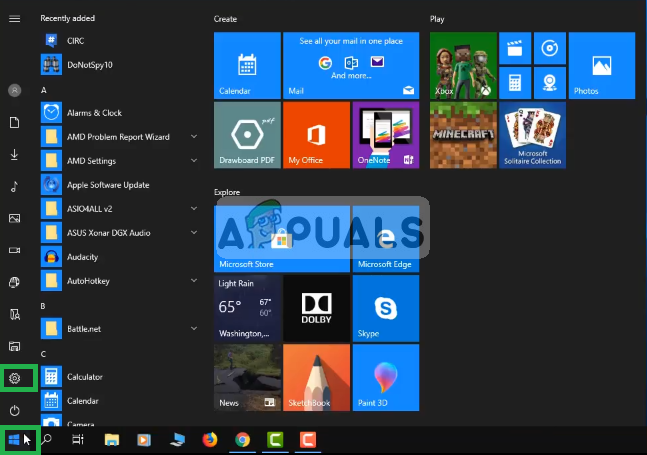
  1. Click ON the Start Menu and Click on the Settings icon
    Clicking on Settings
  2. From there Click on Privacy Settings.
    Opening Privacy Settings
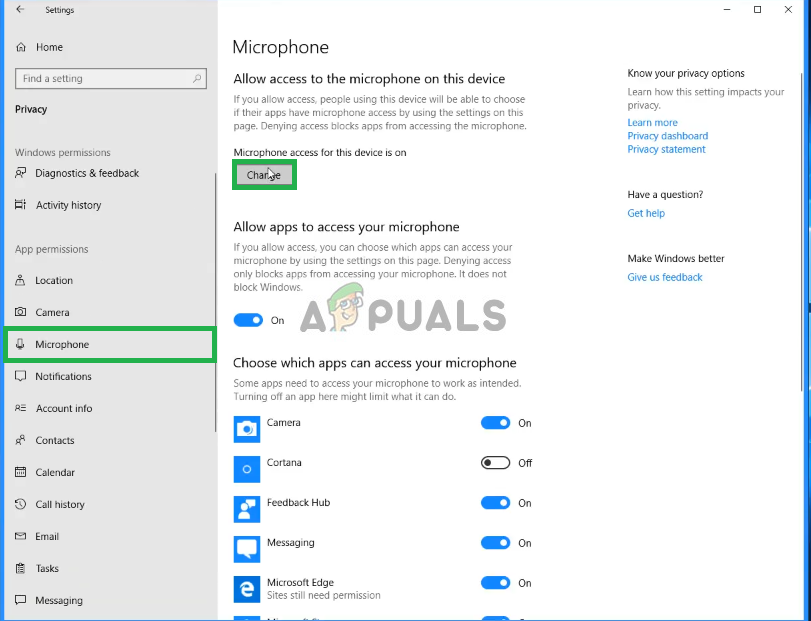
  3. From There Click on Microphone and then click on Change.
    Changing Microphone Privacy Settings
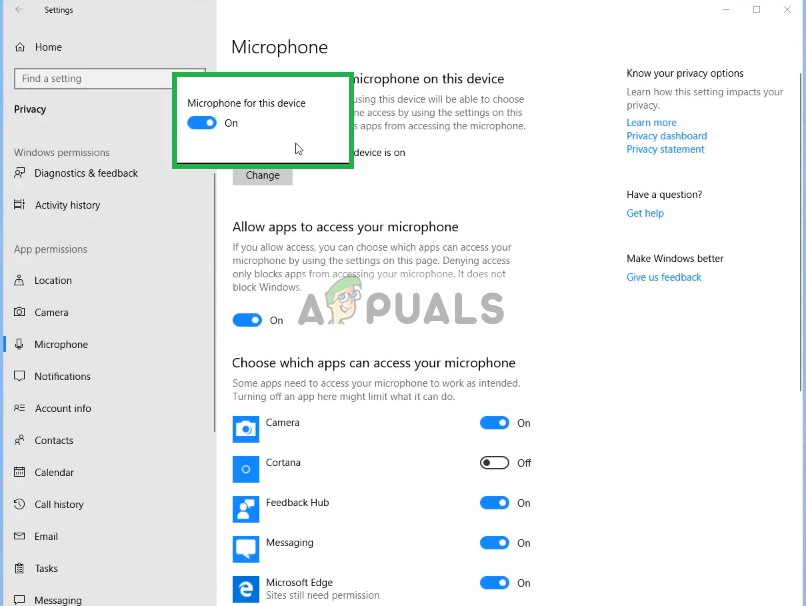
  4. Then Make Sure it is Enabled
    Making Sure Microphone is Enabled
  5. Also, Make Sure the Apps that you use have the Permissions enabled too from below
    Checking Permissions to use the microphone for apps

If the issue was due to the privacy settings it should be solved by now.

Solution 3: Enabling Microphone Drivers

The drivers for the microphone are sometimes disabled in the sound settings so in this step we will make sure that the microphones drivers are enabled.

  1. Right-Click on the Sound icon and then on Sounds
    Opening Sound settings
  2. From there Click on the Recordings tab.
    Clicking on the recordings tab
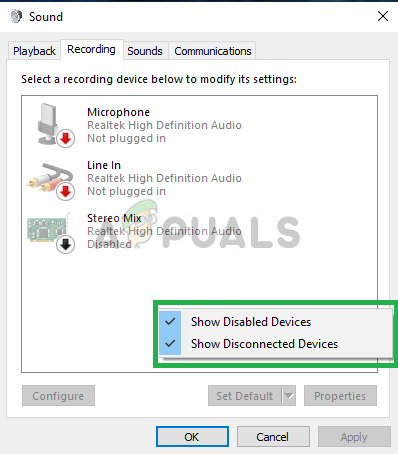
  3. Now Right-Click on an empty space and make sure that both the options are checked
    Making show both the options are checked
  4. Now Right-Click on the microphone drivers and click on Enable.
    Clicking on Enable
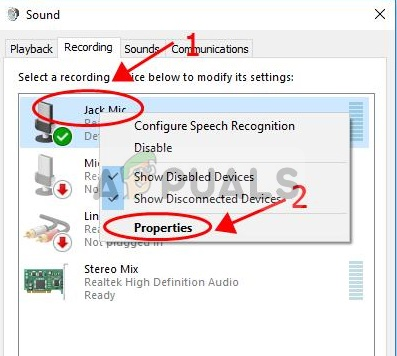
  5. Now again Right-Click on the microphone drivers and click on Properties
    Right-Clicking on the microphone and left-clicking on properties
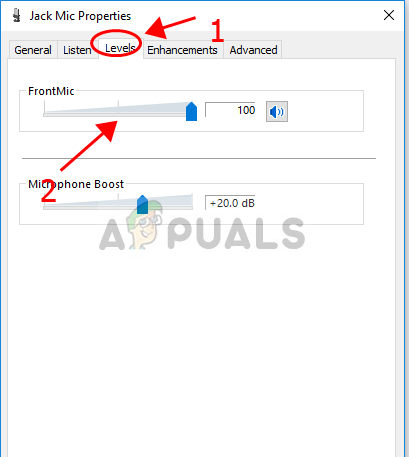
  6. Now from here Click on Levels tab and make sure that the slider is at the maximum
    Clicking on the Levels tab and dragging the slider to the maximum


This should solve any issues with the drivers or the configuration of the microphone settings however if this does not solve the issue uninstall the Logitech software and reinstall it after downloading it from their official website.

The post Fix: Logitech G430 Microphone Not Working on Windows 10 appeared first on Appuals.com.

Fix: Cannot Complete the Update Error SU-42481-9 on PS4

$
0
0

Users experience the error code SU-42481-9 on their PS4s when they are downloading or installing updates on their console. This error message started to emerge in the mid-2018 and has been present since.

PS4 Error SU-42481-9

Play Station officials have acknowledged the error message on their official Twitter handle and even responded with some tips which do not seem to work properly. Here we have gone through all the workarounds you can perform on your system to fix the issue at hand.

What causes PS4 Error SU-42481-9?

Users experience the error code SU-42481-9 when their play station goes into an error state when trying to either connect to the PSN network or when updating the system. Here are few of the culprits which might prompt this issue:

  • Corrupt temporary files: There are cases where the PS4 has corrupt temporary files which prevent it from updating properly.
  • Bad updating files: It is possible that the files meant to be installed through the update are corrupt and cannot be installed properly.

Before we move on with the solutions, make sure that you have your PSN credentials at hand. You might need to re-enter them when prompted. Also, remove all disks from the console before proceeding.

Solution 1: Power Cycling your PS4

Play stations are known to go into error states since quite a long time. However, this can be fixed easily by power cycling the console. Power cycling is the act of completely shutting down your device and making sure all the power is drained. This forces the console to recreate all the configurations before starting up.

  1. Power down your PS4 device from the front of the console and turn it off normally.
  2. Once the console is properly shut down, unplug the power cable from the outlet.
  3. Now press and hold the power button on the PS4 for 30 seconds to make sure all the power is drained.
Power Cycling PS4
  1. Now wait for 4-5 minutes and let it sit idle. Later plug everything back and try running the PS4. Check if the error message went away and you can connect to the PSN network successfully.

Solution 2: Updating through Safe Mode

If power cycling doesn’t work and you still receive the error code, we can try updating the console properly through safe mode. PS4 has a safe mode through which you can perform basic operations to fix unexpected issues and error codes. When we update the PS4 through the safe mode, it might take a while so make sure that you are patient and don’t cancel the process at any stage.

  1. Press the Power Button present on the front panel of the PS4 to turn it off. The indicator will blink a few times.
  2. After turning off your PS4, press and hold the Power Button and keep holding it until you hear two beeps. The first beep will usually be heard when you press it initially and the second beep when you keep pressing it (for around 7 seconds).
  3. Now connect the PS4 controller with a USB cable and press the Play Station button present on the controller. The Play Station will now be in the safe mode.
Update System Software in Safe Mode
  1. Select the option Update System Software and continue. Once the process is finished, restart your Play Station and check if the issue is resolved.

The post Fix: Cannot Complete the Update Error SU-42481-9 on PS4 appeared first on Appuals.com.

Fix: DirectX Setup Error ‘An internal error has occurred’ in Origin

$
0
0

Users experience the error message “DirectX Setup Error: An internal error has occurred” when they try to install or launch games in Origin. Origin makes use of the DirectX API like all other game engines out there.

DirectX Setup Error in Origin

DirectX is used in graphics and the rendering done inside the game. This error occurs when Origin is unable to launch the DirectX setup when installing or launching your game for the first time. This is a very common issue and is present in the game engine for quite some time.

What causes DirectX Setup Error in Origin?

This error message particularly signifies that DirectX could not be initialized properly. There are only a few causes for why this might happen on your computer.

  • DirectX Files are Corrupt: The main reason why Origin is not able to launch DirectX is because the files are either corrupt or outdated. Refreshing these files usually fixes the issue at hand.
  • DirectX not Installed: In some cases, Origin is unable to independently install DirectX on your computer. This might be because of permission issues or because the elevation is not granted.
  • Antivirus Software Conflicting: If all the components are working as expected, there are chances that your Antivirus software is not working as it should and is blocking Origin’s actions.

Before moving on to the solutions, make sure that you are logged in as an administrator on your computer. Furthermore, you should have an open internet connection without any proxy servers or VPNs.

Solution 1: Deleting old DirectX Files

As mentioned before, the number one reason why you experience this error is because the DirectX files already present in your directory are corrupt or unusable. This occurs a lot in Origin and can also be caused if you have changed the directory of Origin folder. The original file paths might have been hampered and caused them useless. We will delete the old file (or place them in a folder) and launch Origin. When Origin will notice that the files it needs aren’t there, it will download/install them again accordingly.

  1. Press Windows + E to launch the File Explorer and navigate to the following directory:
C:\Program Files (x86)\Origin Games\*name of game*\Installer\directx\redist

If you do not have hidden files enabled on your computer, follow the following steps in order:

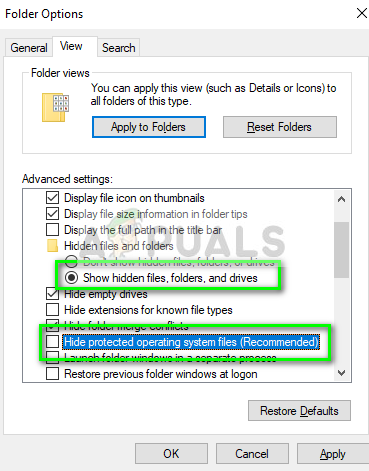
Click View and select Options > Change folder and search options. You perform similar steps if you are using an older version of the operating system.

Changing Folder options – Windows Explorer

Select the tab View and check the option Show hidden files, folders, and drives. Also, uncheck the option Hide protected operating system files (Recommended).

Unchecking Hide protected operating system files
  1. Now you need to create a new folder and name it anything you want. Now move all the files except the ones mentioned below:
DSETUP.dll

dsetup32.dll

DXSETUP.exe
Moving extra files to a folder
  1. Now you will see the three files and the folder we just created in the directory.
Selected files in ‘redist’ direectory

Solution 2: Installing DirectX Manually

There are some cases where Origin fails to install DirectX on its own. This can be traced back to Windows Updates where the security settings are made tighter and access of applications gets limited.

DirectX is basically a collection of APIs (application programming interface) which helps the application and your hardware in rendering and graphics processing. In this solution, we will navigate to Microsoft’s website and install DirectX after downloading the executable. Do note that you will require an administrative account to perform these steps.

  1. Navigate to the official Microsoft website and download the installer from there.
Downloading DirectX Run time installer
  1. After downloading the file to an accessible location, run the executable with administrator privileges and install DirectX. If it is already installed, consider doing a proper reinstall in case any modules are missing.
  2. Restart your computer and check if the error message is resolved.

Solution 3: Disabling Antivirus Software

If you have recently activated/installing Antivirus software on your computer, there are chances that it is conflicting with Origin when it tries to install DirectX files. This is a known issue which comes out every now and then with the Origin client.

We advise that you first disable your Antivirus Software temporarily. If this doesn’t work, consider uninstalling it and then checking Origin. You should always use the latter if you have the Antivirus Product Key at hand. You can check our article on How to Turn Your Antivirus Off.

Solution 4: Reinstalling Origin

Origin is an online gaming, digital distribution and digital rights management platform developed by Electronic Arts that allows users to purchase games on the internet for PC and mobile platforms, and download them with the Origin client. You are basically using Origin to launch your games. In this solution, we will try to reset Origin client and see if this fixes the issue.

Note: You will have to re-download all of your games from scratch.

  1. Press Windows + R, type “appwiz..cpl” and open the application manager. Navigate to the entry of Origin, right-click it and uninstall the application completely.
  2. Once the application is uninstalled, navigate to the official website and download the client again.
Downloading Origin
  1. Now launch the Origin Client and download the game again from the store. Now check if the issue is resolved.

Note: You can also try repairing the entire game from within the client. This helps pinpoint files which are incomplete or corrupt.

The post Fix: DirectX Setup Error ‘An internal error has occurred’ in Origin appeared first on Appuals.com.

Fix: Name Resolution for the Name Wpad Timed Out

$
0
0

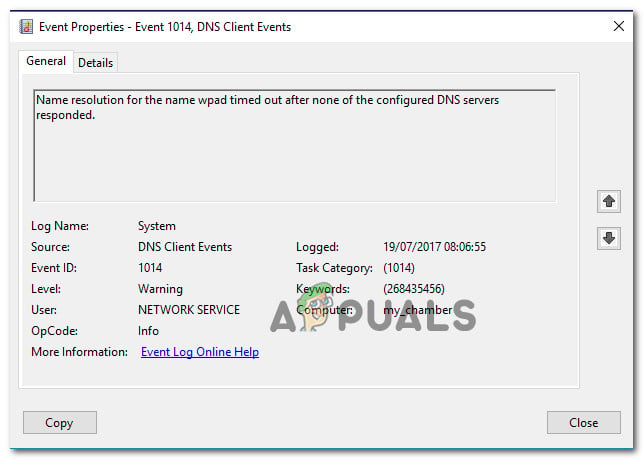
Several users have been reaching us with questions after discovering the ‘Name resolution for the name wpad timed out‘ error inside the Event Viewer. Most affected users will investigate the Event Viewer after dealing with constant Wi-Fi internet connection loss with a Yellow triangle on the top of the Wi-Fi icon.

Name resolution for the name wpad timed out after none of the configured DNS servers responded.

What is causing the ‘Name resolution for the name wpad timed out‘ error?

We looked into this particular issue by looking at various user reports and the repair strategies that most affected users have successfully used to get the issue resolved. Based on our investigations, there are several common scenarios that will trigger this particular error message:

  • TCP/IP Offload is enabled for a network adapter – RSS, Autotuning and Taskoffload are all technologies that are confirmed to trigger this particular error. Disabling them might enable you to resolve the issue.
  • ISP does not support TCP/IP v6 – This issue might occur if TCP/IP v6 is enabled on the computer or sever but the ISP does not yet support TCP/IP v6. In this case, the solution is to simply disable TCP/IP v6.
  • Corrupted o badly installed network adapter – Another possible reason for this error is a corrupted or incomplete installation of the Network adapter drive. In this case, uninstalling the driver will force your OS into reinstalling it again.
  • Damaged TCP/IP connection – If a certain scenario is applicable, this error might occur because the TCP/IP instructions are incorrect or corrupted. In this case, resetting the TCP/IP Connection will resolve the error message.
  • Glitched DNS cache – Another reason why this issue might occur is a glitched DNS cache that is triggering false positives. Several affected users have reported that this particular error was no longer occurring after they flushed the DNS cache from an elevated Command window.
  • Default DNS server is unstable – There are a lot of reports with users that managed to confirm that the issue was being caused by an unstable DNS server. If this particular scenario is applicable, the solution is to replace the default DNS server with Google’s DNS.

If you’re struggling to resolve this particular error message, this article will provide with several troubleshooting steps that will help you get around this particular error. Down below, you’ll encounter a collection of methods that other users in a similar situation have used to get the issue resolved.

If you want to stay as efficient as possible, follow the methods in the order that they are presented as they are ordered by efficiency and severity. You should eventually encounter a fix that will resolve the issue in your particular scenario.

Method 1: Using the Network adapter troubleshooter

Before we dive into other, more technical repair strategies, let’s see if your Windows version is equipped to deal with this issue automatically. Several users have managed to resolve the ‘Name resolution for the name wpad timed out‘ error by using the built-in Network Adapter troubleshooter.

This built-in utility will scan for common network adapter problems and automatically apply the right repair strategies for the problems that it manages to identify. Here’s a quick guide on using the network adapter troubleshooter:

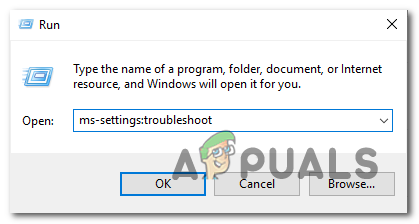
  1. Press Windows key + R to open up a Run dialog box. Then, type “ms-settings:troubleshoot” and press Enter to open the Troubleshooting tab of the Settings app.
    Opening the Troubleshooting tab of the Settings app via a Run box
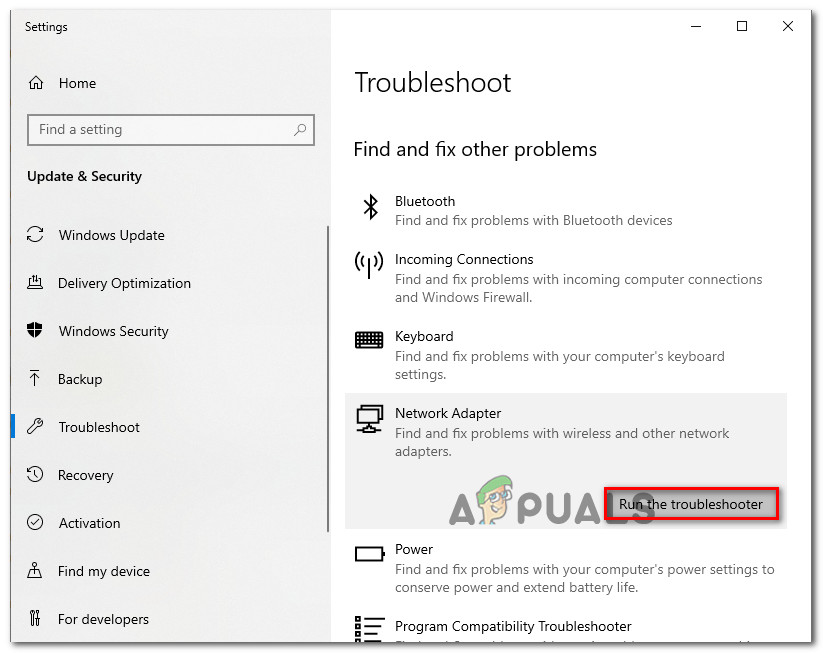
  2. Inside the Troubleshooting tab, scroll down to Find and fix other problems, click on Network Adapter and select Run the troubleshooter.
    Running the Network Adapter troubleshooter
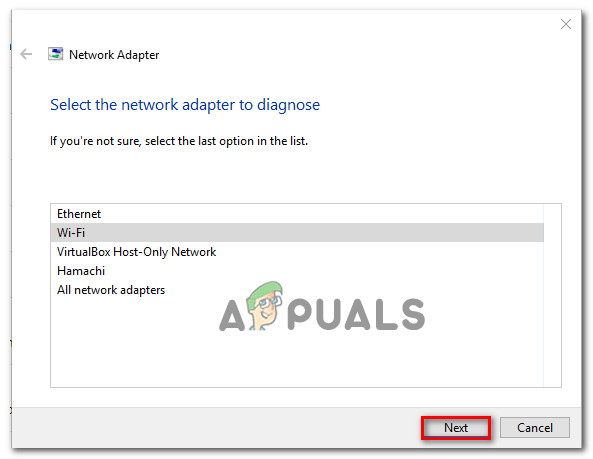
  3. After the initial scan is complete, select the network adapter that is acting up from the list and click Next.
    Troubleshooting the adapter that is causing the error
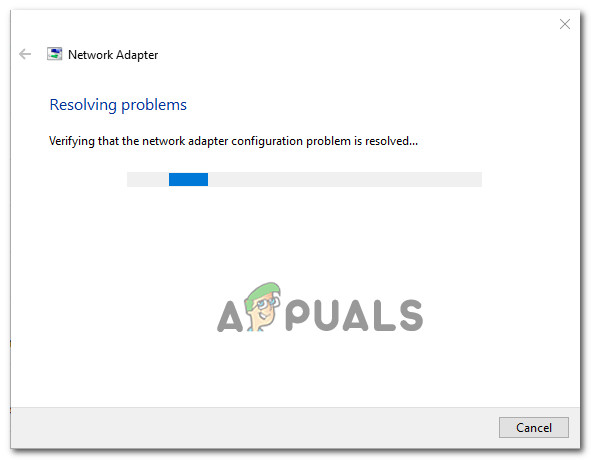
  4. Wait until the scan is complete. During this process, the troubleshooter will apply various repair strategies and then restart the network adapter to see if the issue has been resolved.
    Built-in troubleshooter is resolving the issue
  5. Once the process is complete, you will get a rundown with the problems identified and fixed. Close the troubleshooter and see if the issue has been resolved.

If the ‘Name resolution for the name wpad timed out‘ error is still occurring or the fix only lasts momentarily, move down to the next method below for a different approach.

Method 2:  Reinstalling the Network adapter (Windows 10 only)

Another approach that might resolve the issue with minimal hassle is to simply uninstall the network adapter via Device Manager. This will force your OS to automatically re-detect the network adapter and reinstall it from scratch.

Note: This procedure should only be attempted on Windows 10 since it’s capable of detecting and installing any missing driver automatically.

Here’s a quick guide on reinstalling the network adapter in order to resolve the ‘Name resolution for the name wpad timed out‘ error:

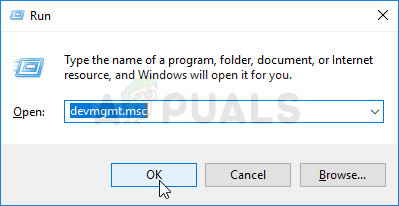
  1. Press Windows key + R to open up a Run dialog box. Then, type “devmgmt.msc” and press Enter to open up Device Manager.
    Running Device Manager from a Run box
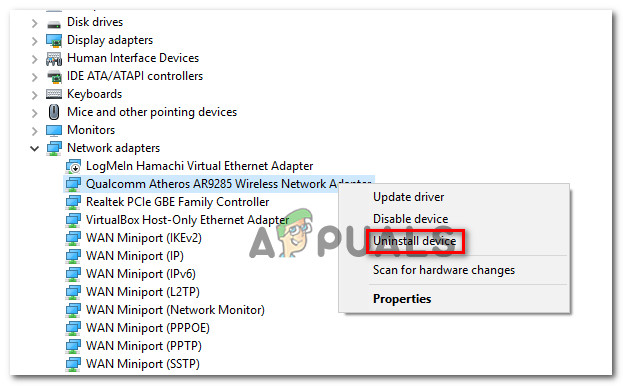
  2. Inside Device Manager,  expand the drop-down menu of Network adapters and right-click on the network adapter that is causing the issue. Then, click on Uninstall device.
    Uninstalling the network adapter
  3. Once the device has been uninstalled, exit Device Manager and restart your computer. At the next startup, Windows 10 will automatically detect that an important driver is missing and install the necessary firmware for the network adapter.
  4. When the next startup is complete, test your internet connection and see if you’re still encountering the same issue.

If the ‘Name resolution for the name wpad timed out‘ error is persisting, move down to the next method below.

Method 3: Resetting the TCP/IP Connection

This particular error can also occur if the TCP/IP instructions become damaged or corrupted. The set of built-in TCP/IP instructions is one of the most important parts of your Internet connection. If you find yourself in a scenario where you can’t connect to the internet at all, TCP/IP might be causing it.

Fortunately, you can reset the TCP/IP instructions fairly easily using the NetShell utility. Here’s a quick guide on how to reset your TCP/IP connection:

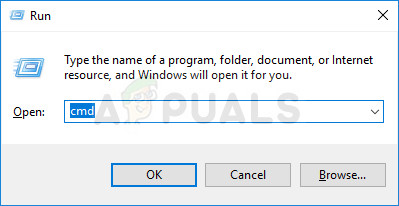
  1. Press Windows key + R to open up a Run dialog box. Then, type “cmd” and press Ctrl + Shift + Enter to open up an elevated Command prompt. When prompted by the UAC (User Account Control), click Yes to grant administrative privileges.
    Running CMD as an admin
  2. Inside the Elevated Command Prompt, type in the following command and press Enter to reset TCP/IP manually:
    netsh int ip reset
  3. Once TCP/IP is reset, close the elevated Command Prompt and restart your computer.

At the next startup, see if the  ‘Name resolution for the name wpad timed out‘ error is still occurring. If it is, move down to the next method below.

Method 4: Flushing the DNS cache

Another potential repair strategy that could very well resolve the issue for you is to flush your computer’s DNS cache. Several affected users have reported that this procedure resolved any connection interruptions caused by the ‘Name resolution for the name wpad timed out‘ error.

Here’s a quick guide on flushing your computer’s DNS cache;

  1. Press Windows key + R to open up a Run dialog box. Then, type “cmd” and press Ctrl+ Shift + Enter to open up an elevated Command prompt. When prompted by the UAC (User Account Control), click Yes to allow administrative privileges.
    Running CMD as an admin
  2. Inside the elevated Command Prompt, type the following commands and press Enter after each command:
    ipconfig /flushdns
    ipconfig /registerdns
    ipconfig /release
    ipconfig /renew
  3. Once the DNS cache has been flushed, restart your computer and see if the error is still occurring once the next startup is complete.

If you’re still encountering the ‘Name resolution for the name wpad timed out‘ error, move down to the next method below.

Method 5: Changing the Default DNS server

You might be encountering the ‘Name resolution for the name wpad timed out‘ error due to some inconsistencies with the default DNS server. We managed to identify some reports where the issue was fixed by changing the default DNS with the one provided by Google.

Here’s a quick guide on changing the default DNS address to Google’s DNS:

  1. Press Windows key + R to open up a Run dialog box. Then, type “control” or “control.exe” and press Enter to open up Control Panel.
    Running Control Panel from a Run box
  2. Inside the classic Control Panel window, click on Network and Internet, then click on Network and Sharing Center.
    Accessing the Network and Sharing Cente
  3. From the Network and Sharing Center screen, click on Change adapter settings.
    Accessing the adapter menu
  4. Right-click on the network that you are currently connected to and choose Properties.
    Opening the Properties screen of the active connection
  5. Inside the Properties screen, go to the Networking tab and double click on Internet Protocol Version 4 (TCP / IPv4).
    Accessing the Internet Protocol Version 4 settings
  6. In the Properties screen of Internet Protocol Version 4, enable the Use the following DNS server addresses toggle. Then, set 8.8.8.8 for Preferred DNS Server and 8.8.4.4 for Alternate DNS server.
    Setting the Google DNS
  7. Hit OK to save the changes, then restart your computer to allow the changes to take effect.

Once the next startup is complete, see if the issue has been resolved. If the same  ‘Name resolution for the name wpad timed out‘ error is still occurring, move down to the next method below.

Method 6: Disabling TCP/IP v6

Another possibility why this particular error might occur is a scenario in which TCP/IP v6 is enabled on the computer but your ISP (Internet Service Provider) does not support TCP/IP v6. In this case, the solution is to simply disable TCP/IP v6.

Here’s a quick guide on how to do this:

  1. Press Windows key + R to open up a Run dialog box. Then, type “ncpa.cpl” and press Enter to open up the Network Connections window.
  2. Inside the Network Connections window, right-click on the network that you’re currently connected to and choose Properties.
    Opening the Properties screen of the active connection
  3. Inside the Properties screen of your network, go to the Networking tab and scroll down through the list of used items. Then, uncheck the box associated with Internet Protocol Version 6 (TCP/IPv6) and hit Ok to save the changes.
    Disabling Internet Protocol Version 6 (TCP/IPv6)
  4. Once IPv6 has been disabled, restart your computer and see if the error has been resolved at the next computer startup.

If you’re still encountering the same ‘Name resolution for the name wpad timed out‘ error inside your Event Viewer, move down to the next method below.

Method 7: Disabling RSS, Autotuning, and Taskoffload

There are three unnecessary technologies that might end up triggering the ‘Name resolution for the name wpad timed out‘ error. Several affected users have reported that their connection became stable once and for all after they disabled RSS, Autotuning, and Taskoffload.

This procedure can be a little tedious, but we’re going to show you a quick way on how to do this from an elevated Command Prompt and Registry Editor:

  1. Press Windows key + R to open up a Run dialog box. Then, type “cmd” and press Ctrl + Shift+ Enter to open up an elevated Command Prompt window. When prompted by the User Account Control, click Yes to grant administrative privileges.
    Running Command Prompt as an Administrator
  2. Inside the elevated Command Prompt, type the following commands in order and press Enter after each one to disable RSS, Autotuning and TaskOffload:
    netsh interface tcp set global rss=disabled
    netsh interface tcp set global autotuninglevel=disabled
    netsh int ip set global taskoffload=disabled
  3. Once the three technologies are disabled, close the elevated Command prompt. Then, open a Run box (Windows key + R)m type ‘regedit‘ and press Enter to open up the Registry Editor. When prompted by the UAC (User Account Control), click Yes to give administrative privileges
    Typing Regedit in Run to Open Registry Editor
  4. Inside the Registry Editor, use the navigation bar at the top to arrive at the following location:
    Computer\HKEY_LOCAL_MACHINE\SYSTEM\CurrentControlSet\Services\Tcpip\Parameters

    Note: You can navigate there manually or you can simply paste the address inside the navigation bar.

  5. You also need to disable the Scalable Networking Pack (SNP). To do this, open each of the following registry key and set their Value data for each to 0:
    EnableTCPChimney
    EnableTCPA
    EnableRSS

    Note: If one of these or more of these keys don’t exist, you’ll need to create them manually by going to Edit > New > Dword (32 – bit) value and name each key accordingly.

  6. Once the modifications have been made, close Registry Editor and restart your computer. At the next startup, check if the issue has been resolved.

The post Fix: Name Resolution for the Name Wpad Timed Out appeared first on Appuals.com.

Fix: A Secure Connection to the Server Cannot be Established on Outlook

$
0
0

The error message ‘Log onto incoming mail server (IMAP): A secure connection to the server cannot be established’ appears when you try to test your IMAP configured account. This error can be caused by several things including your third-party antivirus restrictions, the modification of ciphers or protocols in the Windows Registry etc. When you try to configure your account as IMAP instead of using an Exchange Account, you will be sometimes presented with such errors which will prevent you from receiving emails etc.

A Secure Connection to the Server Cannot be Established

The outgoing settings seem to work, however, the incoming configuration gives the said error message. Most of the users like using POP3 or IMAP because it offers them a lot more control and they can manipulate the email messages with ease as if they were stored on their system. Nonetheless, you can isolate your issue by going through the solutions given down below.

What causes the ‘A Secure Connection to the Server Cannot be Established’ Error Message on Microsoft Outlook?

Well, as the error message suggests, the error appears due to some issue with the IMAP settings or any third-party software on your system that is stopping the requests being sent.

  • Third-party Antivirus: Most of the antiviruses out there that offer internet security which usually blocks such requests. In such cases, you will have to whitelist the server that you are using.
  • Modification of Ciphers or Protocols in the Windows Registry: The issue can also occur due to the modifications made to the ciphers and protocols keys in the Windows Registry. This can be easily dealt with using a third-party utility.
  • Incorrect IMAP Configuration: In some cases, the error is due to the incorrect configuration of IMAP. This usually includes using the wrong ports or encryption types etc.

You can isolate the issue by implementing the solutions given down below. Please make sure to apply them in the same order as provided so that you get a resolution as quickly as possible.

Solution 1: Exclude the Server in the Third-Party Antivirus

As we have mentioned above, almost all of the third-party antiviruses out there offer Internet Security these days which is appreciated by a lot of users. However, it does have its side effects i.e it often blocks incoming requests due to which various errors can occur including the IMAP one. Hence, in such a case, you will have to add the server to the exclusion list and you should be good to go. If you don’t use such third-party antivirus, please skip to the next solution.

Solution 2: Modifying Windows Registry

In some cases, the issue can be due to the modifications made to the ciphers and protocols entries in the Windows Registry. These entries are important for the function of the Secure Channel, also known as Schannel, security package. This package supports various encryption types such as SSL 2.0 and 3.0, TLS 1.0 etc. Thus, modifications to such entries can often lead to various errors when it comes to the use of these encryption types. You can fix this by using third-party software. Here’s how to do it:

  1. Download the IIS Crypto tool from here.
  2. Once downloaded, install it and then launch it.
  3. Make sure you are in the Schannel tab, click Best Practices and hit Apply.
    Applying Schannel Settings
  4. Restart your computer afterward.
  5. Should fix your issue.

Solution 3: Double-check IMAP Settings

The issue can also occur due to the invalid settings of IMAP. In some cases, the port that you have provided is incorrect or the encryption type that you have selected is not supported. In such a case, you will have to make sure the settings that you have entered are correct. Make sure the port matches the correct port for IMAP which usually is 993 with the encryption SSL/TSL type.

Checking IMAP Configuration

The post Fix: A Secure Connection to the Server Cannot be Established on Outlook appeared first on Appuals.com.
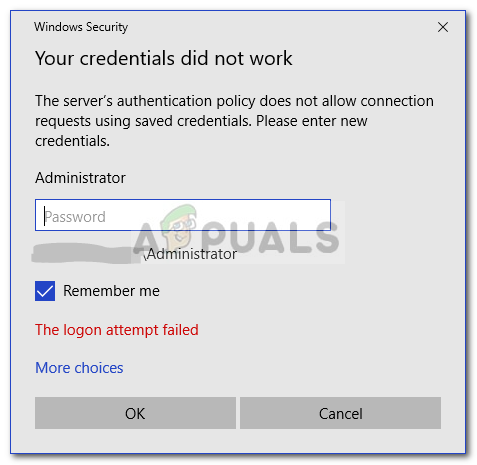
Fix: System Doesn’t Have Any USB Boot Option

$
0
0

Some PC users are encountering the “System doesn’t have any USB boot option” error when trying to reinstall Windows or when trying to access the  EFI USB Device inside the Advanced Options menu. The issue is not restricted to a certain build or model as it’s reported to occur with most manufacturers including Lenovo, Dell, ASUS etc.

The system doesn’t have any USB boot option.

What is causing the “system doesn’t have any USB boot option” issue?

We investigated this particular issue by looking at various affected users reports and the repair strategies that they collectively used to get the issue resolved. Our investigations revealed several culprits that are confirmed to cause this particular error message:

  • Secure boot is enabled – As countless user reports have shown, this particular error might appear if Secure boot is enabled when the user tries to reinstall / clean install Windows from a bootable USB drive. In this case, the solution is to simply disable secure boot.
  • Legacy / CSM support is disabled from BIOS or UEFI – On computers with newer motherboards, this particular error can be encountered because Legacy support or the compatibility support module is disabled. If this scenario applies, the solution is to enable the equivalent service from the BIOS/ UEFI settings menu.
  • The computer is affected by the Lenovo Service Engine – Lenovo computers are likely to encounter this particular error due to a proprietary service called Lenovo Service Engine (LSE).  Since it’s in no way essential, you can resolve the issue by accessing the BIOS or UEFI settings and disabling the LSE service.
  • The bootable USB drive wasn’t made correctly – There’s also a chance that the issue is occurring because the bootable USB drive that you’re trying to use when installing, repairing or upgrading your Windows is not created correctly.

If you’re currently struggling with this particular error message, this article will provide you with several verified steps that will troubleshoot the issue. Down below, you’ll discover a collection of methods that other users in a similar situation have used to get to the bottom of the issue.

If you want to remain efficient through this whole process, follow the potential fixes below in order until you find a fix that will resolve the problem in your particular scenario. If some of the methods below will not be applicable to your scenario, skip them and continue down the list.

Method 1: Disabling Secure boot from the Boot Options Screen

One popular fix that a lot of affected users have deployed successfully to resolve the “System doesn’t have any USB boot option” error is to disable Secure boot from the BIOS/UEFI settings.

Secure boot is an industry standard developed by the biggest players in the PC industry in order to ensure that the computer exclusively uses software trusted by Original Equipment Manufacturers (OEM).  However, this security feature might create problems if you’ve created the installation media yourself through unofficial channels like Rufus.

As you can expect, the process of disabling Secure Boot will be different from manufacturer to manufacturer. But there are some similarities in the process that can be followed by everyone:

  1. Power up your machine and start pressing your the Setup (boot) key during the bootup sequence. Most of the time, the setup key will be displayed on your screen. But you can also find your particular boot sequence by pressing the Esc key, the F keys (F1, F2, F4, F8, F12) or the Del key (Dell computers) repeatedly or by searching online for your dedicated setup key.
    press a key to enter setup or bios
    Press [key] to enter setup
    Note: If you have UEFI, hold the Shift key while clicking the Restart button. Then, go to Troubleshoot > Advanced Options: UEFI Firmware Settings to reach the UEFI settings.
    Accessing the UEFI firmware settings
  2. Once you gained entry to your bios menu, look for a setting named Secure Boot and set it to disabled. Typically, you will find it inside the Security tab, but depending on your BIOS /UEFI version, you might also find it inside the Boot or Authentication tab.
  3. Once Secure Boot is disabled, save the changes to the BIOS / UEFI and restart your computer.
  4. See if you’re no longer encountering the “System doesn’t have any USB boot option” error while Secure Boot is disabled.

If you’re still encountering the same error message, move down to the next method below.

Method 2: Enabling Legacy/CSM Boot support 

Some users have reported that the issue has been resolved after they accessed their UEFI settings and enabled BIOS compatibility mode / CSM Boot support. In most cases, this will improve the compatibility with older operating systems that weren’t designed for UEFI and allow you to bypass the “System doesn’t have any USB boot option” error.

Here’s a quick guide on enabling the Legacy/CSM support on UEFI/BIOS firmware:

  1. Click the Power icon and press Restart while holding the Shift key. This will ensure that your operating system will restart directly into the Advanced Recovery menu.
    Accessing Advanced Startup using Settings

    Note: On Windows 10, you can open a Run box ( Windows key + R), type “ms-settings:recovery” and press Enter to open the Recovery tab of the Update & security settings menu.  Then, click on Restart now under Advanced startup to restart your computer directly into the recovery menu.

  2. Once your computer restarts into the Advanced Options menu, go to Troubleshoot > Advanced Options and click on UEFI/BIOS Firmware Settings.
    Accessing the UEFI firmware settings
  3. Then, click the Restart button to change the UEFI firmware settings. Your computer will then restart directly into the UEFI/BIOS Setup.
    Restarting the computer directly into the UEFI Setup
  4. Once you arrive inside your UEFI Firmware settings, check your settings for an entry that will allow you to change the Boot Mode from UEFI to BIOS (you can typically find it under the Boot category). Keep in mind that some BIOS/UEFI versions will include the possibility of allowing both UEFI and Legacy -if possible, select that.
    Changing the Boot control to Legacy

    Note: On a BIOS-powered system, make sure that you enable Legacy Support or USB Legacy Support. It can usually be found under the Advanced tab.

    USB Legacy Support
  5. Save the changes and exit your UEFI/BIOS settings. Then, perform the same operation that was previously causing the “System doesn’t have any USB boot option” error and see if the issue is still occurring.

Method 3: Reset BIOS/UEFI settings to default

Some users that we’re struggling to resolve this particular error message have reported that what finally resolved the issue was resetting all BIOS/ UEFI settings to default.  As you might imagine, this step will be different depending on your computer manufacturer and the boot technology that is used.

We can’t provide you with definitive steps on how to do this, but we created two separate guides (for each boot technology) that will help you reach the right menus:

Resetting the BIOS settings to default

  1. Power up your machine and start pressing your the Setup (boot) key during the bootup sequence. If you can’t find the Setup key on your screen, see if you can guess it by pressing the Esc key, the F keys (F1, F2, F4, F8, F12) or the Del key (Dell computers) repeatedly (during the initial screen) or by searching online for your dedicated setup key.
    press a key to enter setup or bios
    Press [key] to enter setup
  2. Once you’ve gained entry to your BIOS settings, access a setting named Setup Defaults (also found as Reset to Default, Factory Default or Setup Default). Then, choose Load Setup Defaults and follow the on-screen prompts to confirm and save the current configuration.
    Load default system configuration

    Note: On most popular BIOS versions, you can load the default BIOS configuration by pressing F9 and then Enter.

  3. Save the changes and exit.
  4. Repeat the steps that we’re previously triggering the “System doesn’t have any USB boot option” error and see if the issue is still occurring.

Resetting the UEFI settings to default

  1. Press Windows key +  R to open up a Run dialog box. Then, type “ms-settings:recovery” and press Enter to open up the Recovery menu of the Settings app.
    Accessing the Recovery Screen
  2. In the Recovery window, click the Restart now button under Advanced startup.
    Accessing Advanced Startup using Settings
  3. Once your computer restarts into the Advanced Options menu, go to Troubleshoot > Advanced Options and click on UEFI/BIOS Firmware Settings.
    Accessing the UEFI firmware settings
  4. Then, click the Restart button to change the UEFI firmware settings. Your computer will then restart directly into the UEFI/BIOS Setup.
    Restarting the computer directly into the UEFI Setup
  5. Once you reach your UEFI settings, access the Settings menu and search for an option named Restore Defaults (or similar). Then, complete the operation and save the changes before you exit the UEFI settings.
    Restore UEFI settings to the defaults
  6. At the next system startup, recreate the operation that was previously triggering the error and see if the same issue is still occurring.

If you’re still encountering this particular error message, move down to the next method below.

Method 4: Disabling the Lenovo Service Engine (Lenovo computers only)

On Lenovo computers the “System doesn’t have any USB boot option” error can also be caused be caused by a  proprietary utility called Lenovo Service Engine (LSE). This utility is only present on certain Lenovo desktop systems and is used to send non-personally identifiable data to a Lenovo server when the system is first connected to the Internet.

Although it seems like a harmless system, a lot of users are reporting that the service will end up causing this particular error if left enabled. Fortunately, disabling the service is quite easy on all Lenovo models that include it.

Here’s what you need to do:

  1. Press F1 while the system is booting up (at the initial booting sequence) to access the BIOS settings of your computer.
  2. Once you’ve reached the BIOS settings of your Lenovo computer, use the arrow keys to select the Security tab. Then, move down to Lenovo Service Engine and set the service to Disabled.
    Disabling the Lenovo Service Engine (LSE)
  3. Save the current BIOS configuration, then exit your BIOS settings.
  4. At the next computer startup, recreate the same operation that was previously triggering the “System doesn’t have any USB boot option” error and see if the issue has been resolved.

Method 5: Create a Correct USB bootable drive

Another possible reason why you might end up seeing the “System doesn’t have any USB boot option” error is that the installation media that you’re using is not bootable or was not created to be compatible with your BIOS/UEFI settings.

If you’ve come this far without results follow one of the articles features below to recreate the USB bootable drive with the recommended instructions:

The post Fix: System Doesn’t Have Any USB Boot Option appeared first on Appuals.com.


Fix: Street Fighter V Steam Not Launching

$
0
0

Many gamers that are desperately trying to play Street Fighter V report that the game refuses to launch on PC no matter what they try to do. There isn’t an error message that comes up – It’s just that nothing happens when they double-click on the game executable or they try to launch the game from Steam. Although the issue is not exclusive to a certain Windows version, it’s mostly reported to occur on Windows 10.

Street Fighter V (SFV) is not launching on PC (Steam)

What is causing the ‘Street Fighter V Steam Not Launching’ issue?

We investigated this particular issue by looking at various user reports and the repair strategies that some affected users have deployed in order to resolve the issue. From what we gathered, there are several common scenarios that will end up facilitating the apparition of this issue:

  • Windows Defender is blocking the game – A particular Windows Defender update is known to trigger a false positive when it comes to Street Fighter V. The issue is 2 years old and it’s still not addressed, so the only way around it is to establish a security exclusion in your Windows Security settings.
  • AVAST antivirus is blocking the game – Similar to Windows Defender, Avast is also known to trigger false positives with this particular game. In this case, you can get around the issue by establishing an exception rule or by uninstalling the 3rd party security software completely.
  • Intel Driver Support or Intel System Usage is conflicting with the game’s executable – There are two Intel processes that are known to conflict with Street Fighter V. Several affected users have reported that the issue was no longer occurring if they stopped the two processes prior to trying to launch the game.

If you’re currently struggling to get your Street Fighter V game to launch, you’ve come to the right place. Down below, you’ll find a collection of methods that other players in a similar situation have successfully used in order to resolve this particular issue.

Method 1: Excluding Street Fighter files from Windows Defender

If you’re encountering this particular issue and you’re not using a 3rd party security software, it’s very likely that Windows Defender is detecting the main game’s executable (StreetFighterV.exe) as a false positive and prevents you from opening the game. Several affected users have reported that the issue was no longer occurring after they reconfigured Windows Defender (Windows Security) to exclude the game folder from the scan.

Here’s what you need to do to prevent Windows Defender from blocking your game:

  1. Press Windows key + R to open up a Run dialog box. Then, type “ms-settings:windowsdefender” and press Enter to open up the Windows Security tab of the Settings app.
    Opening up the Windows Defender tab of the Settings app
  2. Inside the Windows Security tab, click on Open Windows Security to open the built-in security solution.
    Opening the Windows security menu
  3. Inside the Windows Security menu, click on Virus & threat protection,  then click on Manage settings (under Virtus & Threat protection settings).
    Accessing the Virus & Threat protection settings
  4. Scroll down to the Exclusions menu and click on Add or remove exclusions.
    Accessing the Exclusions menu of Windows Security
  5. Next, click on Add an exclusion and select Folder from the newly appeared drop-down menu.
    Adding a new folder exclusion
  6. Use the newly appear menu to navigate to the location of your Street Fighter V folder, select it and click on Exclude this folder.
    Excluding the Street Fighter V folder
  7. Restart your computer and launch Street Fighter at the next system startup.

If you’re still encountering the same issue or this method was not applicable, move down to the next method below.

Method 2: Uninstalling AVAST or establishing a security rule

Another common culprit identified by a lot of affected users is the Avast antivirus. In this particular case, the issue can be resolved in two different ways: Either you uninstall the 3rd party security suite or you add the entire Street Fighter V installation folder to the exception list.

If you decide to add the folder to the exception list, here’s what you need to do:

  1. Open Avast and go to Settings > General.
  2. Scroll down to the Exclusions tab, select File paths, then the Browse button.
  3. Navigate to the location of Street Fighter V and select it to add it to the Exclusions list.
    Adding the Street Fighter V folder to the exclusion list

If you decide to go the drastic route and remove your Avast security suite from your computer in order to resolve the issue, we advise you to go for a way that ensures that you leave no remnant files behind. You can follow this article (here) to make sure that you’re completely removing Avast antivirus.

If you’re still encountering the issue or this method was not applicable, move down to the next method below.

Method 3: Stopping the Intel Driver Support and Intel System Usage processes

Some affected users have discovered that in their case, the issue was caused by two Intel processes that ended up preventing the game from running: Intel Driver Support and Intel System Usage.  Although it’s unclear why these two Intel processes are somehow interfering with the game, it’s clear that stopping them before running the game will resolve the issue in some cases.

Here’s what you need to do:

  1. Press Ctrl + Shift + Enter to open Task Manager. Once you get there, scroll through the list of Background processes and see if either the Intel Driver Support process or Intel System Usage process (or both) is active.
  2. If one (or both) of these processes are active, right click on the process and select End Task.
    Ending the Intel(R) System Usage Report and Intel Driver Support processes
  3. Once the processes have been stopped, launch the game and see if the error has been resolved.

The post Fix: Street Fighter V Steam Not Launching appeared first on Appuals.com.
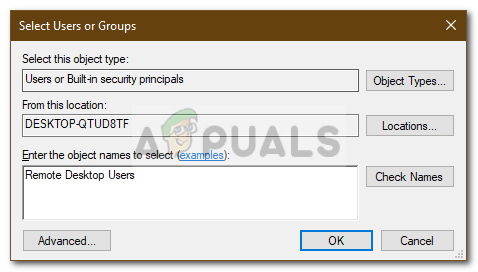
Fix: Error code 51 (Game Failed to Start) on Steam

$
0
0

Users experience the Error code 51 along with the message ‘Game failed to start’ when they are trying to launch a game installed through the game engine, Steam. This error message is applicable and can be seen happening with all sorts of games such as Dota or Skyrim.

Error code 51 (Game Failed to Start) on Steam

Based on our investigation, users usually experience this issue when they have either updated Steam to the latest build or are running a game for the first time on their computer. This is rather a recurring issue and mostly signifies that there is some external issue for why the game is not launching.

What causes the Error Code 51 (Game failed to Start) on Steam?

We looked at this problem by looking at several repair strategies, user reports and the common steps which were used to solve the issue. Based on our research, there are several common scenarios which might trigger this problem:

  • Third-party applications: Third-party applications are known to conflict with the Steam especially Antivirus and other protective software.
  • Corrupt game installation: Games installations can become corrupt or outdated. In this case, since the game doesn’t meet all the parameters by Steam, it won’t be able to launch.
  • Microsoft Visual C++ Redistributable: This module is used by Steam in order to run the game smoothly and is part of the engine of the game. If this is not installed, the game will not launch.
  • Corrupt Steam: If all the above reasons don’t seem to cause the issue, the only logical explanation left is that your Steam is either corrupt or outdated. A complete reset might solve the issue.

Before we move to the solutions, make sure that you are logged in as an administrator on your computer. Furthermore, you should have an open internet connection without any firewalls or proxy servers.

Solution 1: Verifying Integrity of Game files

The first troubleshooting step into fixing the issue is verifying the integrity of your game files. There are instances where the game you are trying to launch either has incomplete installation files or some of the files are corrupt. In this case, the game will definitely fail to launch and cause the Error code 51.

When we verify the integrity of game files, Steam downloads a manifest from the game servers and compares all the files details. If any file is found missing or different, it is replaced immediately. You need to verify the integrity of the game which is causing the issue. Here are the steps which you need to perform.

  1. Open your Steam application and click on Games from the top bar. Now select A. Noire from the left column, right-click it and select Properties.
  2. Once in Properties, click on Local Files category and select Verify Integrity of Game Files.
Verifying Integrity of Game Files
  1. Now, wait until the process is complete. Restart your computer after the verification is complete and launch L.A. Noire again. Check if the game starts as expected.

Solution 2: Checking third-party Applications (including Antivirus)

The next step is checking if there are any problematic applications installed on your computer which might be conflicting with Steam when it tries to launch the game. Special emphasis has to be drawn towards Antivirus software.

Antivirus software might limit some of Steam’s functionalities (false positive) which will result in Steam not being able to complete all the operations it needs before the game is launched. In this solution, you need to troubleshoot yourself and figure out of there are any applications which might be the culprit.

  1. Press Windows + R, type “appwiz.cpl” in the dialogue box and press Enter.
  2. Once the application manager is opened, scour through all the applications and look for the ones which you might think conflict with Steam.
  3. If you have identified an application, right-click on it and select Uninstall.
Uninstalling Problematic Software
  1. Restart your computer and check if the error message is resolved.

Note: You can also navigate to Steam’s official support page and check the type of applications which are known to cause issues with the game engine. You can also check our article on How to Turn Your Antivirus Off. You should also consider disabling third-party FPS or game boosters. These are known to conflict with the game engine.

Solution 3: Installing DirectX and Microsoft Visual C++ Redistributable Manually

Steam usually installs Microsoft Visual C++ Redistributable and DirectX automatically when it installs the game which needs this module. However, there are several cases where this automatic process might be halted and the module may not get installed. In this solution, we will navigate to the game files which is failing to launch and launch the module properly again. Make sure that you are logged in as an administrator in this solution.

  1. Press Windows + E to launch the Windows Explorer and navigate to the following address:
C:\Steam\steamapps\common\dota 2 beta\_CommonRedist\vcredist

Here, the name of the game is Dota 2. You can choose the required folder in your case accordingly.

  1. Now right-click on both the executables and select Run as administrator.
Installing Visual Studio Redistributable
  1. The installation wizard will proceed with the installation process. After the process is complete, navigate to the following file path:
C:\Steam\steamapps\common\dota 2 beta\_CommonRedist\DirectX
  1. Now right-click on the files exe and select Run as administrator. 
Installing DirectX Components
  1. Restart your computer after both the installations are complete and launch the game. Check if you can start it properly.

Solution 4: Updating Graphics Drivers

Graphics Drivers are the main actors or driving force behind the running of your game. In fact, they are responsible for displaying the GUI in your computer as well. If the graphics drivers are not updated to the latest build available, they might not get initialized properly or not fulfill Steam’s require might will cause the error message.

In this solution, you have to update both graphics drivers i.e. in-built drivers (Intel HD or UHD) and dedicated drivers.

  1. Press Windows + R, type “devmgmt.msc” in the dialogue box and press Enter.
  2. Once in the device manager, expand the category of Display adapters, right-click on the graphics hardware and select Update driver.
Updating Graphics Drivers
  1. Now you have two options. Either you can make use of Windows update so it might install the latest drivers automatically or you can manually navigate to the manufacturer’s website and choose the second option after downloading the file.
Installing Drivers – Device Manager
  1. Restart your game properly after updating the drivers and check if the error message is resolved.

Note: You can also navigate to your manufacturer’s website and download the latest drivers from there. Then you just have to download the executable and run it on your computer.

Solution 5: Refreshing Steam Completely

If all the above methods fail to work, we will attempt at reinstalling Steam completely. There are rare instances where Steam installation files are corrupt beyond repair and need to be reinstalled. This usually happens when you manually transfer the Steam folder to another directory or make some changes to your account.

When we refresh Steam files, we are not deleting your downloaded games. Your Steam user data will also be preserved. Only the bad files or outdated ones will get replaced by the application itself. Have your credentials at hand because you might be asked to input them.

You can read our article on how to refresh your Steam files. You can create a temporary backup in case things go sideways.

The post Fix: Error code 51 (Game Failed to Start) on Steam appeared first on Appuals.com.

Fix: Minecraft OpenGL Error 1281

$
0
0

Minecraft OpenGL is a setting inside the game which attempts to make the game faster and smoother on your computer by reducing the load of rendering on the system by ‘instructing’ the GPU not to render anything which isn’t in the direct view of the player. There is obviously a tradeoff where your GPU does less work but the CPU gets more loaded.

Minecraft OpenGL Error 1281

By default, the option is set as On so users can have enhanced performance so it is very common to see cases where users experience the error message “OpenGL Error 1281”. This error message mostly has to do with third-party variables and modules running concurrently.

What causes ‘OpenGL Error 1281’ in Minecraft?

If you are experiencing this error message while playing a fully modded Minecraft, chances are that some of the mod modules are conflicting with your game. After our initial survey, we came to the conclusion that some of the reasons why you might experience this error are:

  • Shaders: Shaders are graphics settings which are usually imported by the user in their modded Minecraft. If any of them is in fault or is corrupt, the game will display the error.
  • OptiFine: OptiFine is one of those third-party applications which try to enhance the gameplay of Minecraft by giving users more control of the game. If this isn’t updated or is in an error state, you will experience the OpenGL error.
  • Version control: Minecraft is known to show issues if your forge and shader versions do not sync with each other.
  • Java Files: Minecraft makes use of Java in its game application. Usually, all the Java requirements are installed automatically by the game but if they get left out, this error will pop up.

Before we move on with the solutions, make sure that you are logged in as an administrator on your computer and have an active open internet connection.

Solution 1: Removing all Shaders

Shaders for Minecraft are an add-on for the game which allows players to set different terrains and settings. They are more like mini-mods which change the texture of the game for example, from winter to summer. Since shaders use all the resources of the application, they are known to conflict with other mod modules.

Shaders in Minecraft

You should try to disable the existing shaders one by one and see which one solves the error message you are experiencing. Start with the latest one which you added to the game and work your way down. You can cut paste the shaders to another location in-case you want to use them later on.

Solution 2: Updating OptiFine

OptiFine is a Minecraft optimization tool which allows the game to look better in the appearance and run faster in performance. It also has full support for HD textures and other configuration options which are needed for modding. It allows users to get an FPS boost, allows support for shaders etc.

Downloading Latest OptiFine

In a nutshell, this can be said the main driving force behind your mods and them interacting with each other. According to our research, we saw numerous cases where having an older application of OptiFine usually causes the error message.

Check the version of OptiFine being used in your Minecraft. If it is older, consider navigating to the official download page of OptiFine and install the latest version as soon as possible. Restart your computer before launching the game again.

Solution 3: Checking Version Compatibility of Mods

People who usually experience the OpenGL Error 1281 have usually modded their Minecraft extensively and are using more than one Mod modules. If any of your modules are out of sync, meaning that one version of one mod is not compatible with another version of the other mod, you will experience this issue.

Hence you should double-check all the mods installed on your computer and check their versions. If any of them have a mismatch, consider disabling the mod and try launching the game. You can easily check the version compatibility of the mod from their official developer website.

Solution 4: Installing Java Packages Manually

Java file packages are a group of directories of Java files which are used by several applications in their operations including Minecraft. In fact, all the mods used in Minecraft are of Java and if the Java file packages themselves are not installed on your computer, they will fail to initialize and give you the error message. Here in this solution, we will install the Java files on your computer manually and check if the issue is resolved.

  1. Right-click on This-PC present on your Desktop and select Properties.
Properties – This PC
  1. Now in front of System type check the type of operating system installed on your computer. If it is 32-bit, download the Java files from (here) and if it is 64-bit, download them from (here).
Checking System Type
  1. Now extract the file which you just download to an accessible location. Open the folder and copy the file version folder that you see.
Copying Java File
  1. Now press Windows + E to launch Windows Explorer and navigate to the following path:
C:\Program Files\Java   (for 32 bit)

C:\Program Files (x86)\Java   (for 64 bit)

Now paste the file which you copied to the location. Make sure that you copy the name of the folder which we just pasted.

  1. Now launch the Minecraft mod manager and click on Edit profile present at the bottom of the screen.
Changing Path
  1. Now underneath Java settings (Advanced), check the executable option and replace the correct path. In the picture above, the path of the file we just pasted is set correctly.
  2. Restart your computer and launch Minecraft again. Check if the issue is resolved.

Solution 5: Reinstalling Minecraft

If all the above methods don’t work, you can proceed and reinstall the entire game. Do note that this might erase your User data unless it is saved against your profile or you have backed it up. You can also copy the user data folder from the game’s directory another location.

  1. Press Windows + R, type “appwiz.cpl” in the dialogue box and press Enter.
  2. Once in the application manager, locate Minecraft, right-click on it and select Uninstall.
    You can also uninstall the game by executing the uninstaller from the folder directory. Make sure that you also delete all the mod files and temporary setting files.
  3. Now navigate to Minecraft’s official website, insert the credentials and download the game again.
Downloading Minecraft

Note: Make sure that you have your credentials available as they will be needed for the download the game from the site.

The post Fix: Minecraft OpenGL Error 1281 appeared first on Appuals.com.
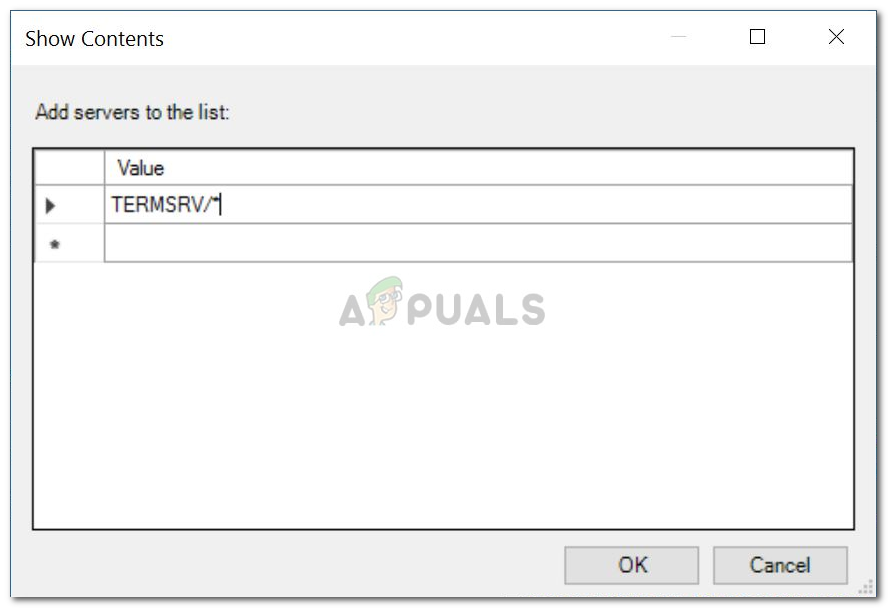
Fix: USB Error This Device is Currently in Use

$
0
0

This specific error appears when users try to safely eject their external removable storage drives. The error message appears along the following lines:

This device is currently in use. Close any programs or windows that might be using the device, and then try again.

This Device is currently in Use

The error message appears to be quite self-explanatory but users have reported that even closing everything properly doesn’t prevent the error from appearing; long after the device has ceased to be used. Still, there are useful methods which can be used to resolve this problem and we have prepared them for you below.

What Causes the “This Device is currently in Use” Error?

The list of causes for this error is short but it properly explains just how the error can come to be and how it can be resolved based on that knowledge:

  • A simple bug can cause the error message to appear when using the option from the taskbar but now when using it in This PC
  • A process may really be using a file from your removable drive and you may need to find out what it is and end it.
  • Your USB drive might be formatted as NTFS which can be problematic on some versions of Windows

Solution 1: Use This PC to Eject the Drive

Even though these two methods should be exactly the same, ejecting the drive by opening This PC and locating the drive inside has actually worked for plenty of users. When using the option to safely eject the drive which can be located from the taskbar, the error appears but you can circumvent this by following the instructions below.

  1. Open your Libraries entry on your PC or open any folder on your computer and click on This PC option from the left side menu. If you are using an older version of Windows (Windows 7 and older), simply open My Computer from your Desktop.
  2. Right-click on the removable drive you want to format and choose the Eject option from the context menu which will appear.
Ejecting the removable drive
  1. A small warning window will open up to make sure you still want to proceed with the process. Click on Continue and be patient for the “safe to remove” message to appear over the taskbar as it would if the error hadn’t appeared in the first place.

Solution 2: Use Event Viewer to Find out which Process is Problematic

As the error message suggests, there might be a program or a process which may be using data from the drive without your knowledge or without a visible window being preset on your screen. This process is impossible to track via Task Manager but you can use Event Viewer to check for the error message and locate the ID of the process which is triggering the error message.

  1. Open Control Panel by locating it in the Start menu. You can also search for it using the Start menu’s search button.
  2. After the Control Panel window opens, change the “View by” option at the top right part of the window to “Large Icons” and scroll down until you locate the Administrative Tools entry. Click on it and locate the Event Viewer shortcut at the top. Click on it to open it as well.
Opening Event Viewer using Control Panel
  1. From the left-side menu, right-click the Applications and Services Logs section and choose View >> Show Analytic and Debug Logs.
  2. After that, navigate to Windows Logs >> System. You should see a long list of different events. Look for the one from “Kernel-PnP” and the text should look something like this:

The application System with process id xxx stopped the removal or ejection for the device…

The problematic error in Event Viewer
  1. There should be an actual number instead if the ‘xxx’ placeholder. Take note of that number by remembering it or writing it down somewhere.
  2. Use the Ctrl + Shift + Esc key combination by pressing the keys in the same time to open the Task Manager utility.
  3. Alternatively, you can use the Ctrl + Alt + Del key combination and select Task Manager from the popup blue screen which will appear with several options. You can also search for it in the Start menu.
Opening Task Manager using the Ctrl+Alt+Del key combination
  1. Click on More details at the bottom left part of the window in order to expand Task Manager. Right-click somewhere around the names of the columns and check the box next to the PID entry in the context menu.
  2. Look for the process whose PID corresponds with the number you took note of above. Select it by left-clicking and choose the End task option from the lower right part of the window.
Ending the problematic task in Task Manager
  1. Click Yes to the message which is going to be displayed which should warn about how ending various processes may affect your computer so make sure you just confirm it.
  2. Check to see if you are now able to safely remove your drive!

Solution 3: Format the Drive as exFAT (USB Drives)

Sometimes this problem can appear with USB removable drives which have been formatted as NTFS. This can cause the drive to be locked by the Windows Transactional NTFS feature which wrongly treats NTFS drives as non-removable ones no matter if they really are removable or not.

A solution is to either format the drive as FAT32 or exFAT. FAT32 doesn’t support storing files larger than 4GB so exFAT should be the way to go!

  1. Open your Libraries entry on your PC or open any folder on your computer and click on This PC option from the left side menu. If you are using an older version of Windows (Windows 7 and older), simply open My Computer from your Desktop.
  2. Right-click on the USB Removable Drive you want to format and choose the Format… option from the context menu which will appear.
Formatting the drive
  1. A small window will open up named Format so make sure you click on the menu under File system and choose the exFAT file system if it’s not already selected. Click on Format and be patient for the process to finish. Try to safely remove your USB once again!

Solution 4: Use Process Explorer

Using Process Explorer is a sort of an easier way of performing the Solution 2 without the need of Event Viewer. This tool is available for free and it’s available as an official Microsoft program. The tool is used to show which handles, DLLs, and files the processes on your computer have opened.

  1. Download Process Explorer from this official Microsoft link. Click the Download button after scrolling, simply unpack the archive and double-click the executable.
Downloading Process Explorer
  1. Click Find, Find Handle or DLL (Dynamic Link Library) in the tool menu. Type the drive letter of the USB device in the Handle or DLL substring textbox, and press the Search Button.
  2. Find the process and its PID (Process Identifier) in the following box. In the system process tree view, find the process according to the Find Handle or DLL dialog box.
Find Handle or DLL
  1. Press Ctrl + H to show Handles in Lower Pane View. Find the File according to the drive letter, and right-click it, choose Close Handle. Check to see if you are now able to remove your drive correctly!

The post Fix: USB Error This Device is Currently in Use appeared first on Appuals.com.
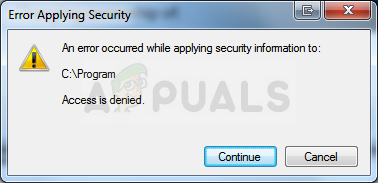
Fix: Elite Dangerous Failed to Synchronize Time with Server

$
0
0

The error message ‘Failed to synchronize time with server’ appears when the Elite Dangerous game fails to open up. This error may be caused due to the wrong time and date settings on your system, your proxy settings etc. Elite Dangerous is basically a space flight simulation game that is developed by Frontier Developments where the players get to experience piloting in the Milky Way galaxy. The error message pops up when players try to launch the game from the launcher.

Failed to Synchronize Time with Server

Sometimes, this can be due to a server-side issue and your system is not the one to blame, however, most of the times, that is not the case. This issue troubles someone quite often, nonetheless, you do not have to worry as we have mentioned the possible solutions down below.

What causes the ‘Failed to Synchronize Time with Server’ Error Message on Windows 10?

The reasons why your game gives you the said error message whenever you try to launch it are given down below:

  • Incorrect Time and Date Settings: If the time and date settings on your system are incorrect, it might be the reason due to which you are facing the error message.
  • Game Files: In some cases, the error message can be due to the corruption of certain game files in which case you will have to verify the integrity of your game files.
  • Proxy Settings: If you are using a proxy while trying to connect to the internet, that might be generating the error message. In such a scenario, you will have to reset your router configuration and you will be good to go.

Now that you are aware of the possible causes of the error message, you can overcome your issue by following the solutions provided down below.

Solution 1: Verifying Integrity of Game Files

One of the possible reasons for the error message, as we have mentioned, is the corruption of the game files. Thanks to Steam, you can easily verify the integrity of your game files and replace the ones that are corrupted. To do this, follow the steps down below:

  1. Make sure your game is closed and open up the Steam window.
  2. Go to Library, right-click Elite Dangerous and select Properties.
  3. Go to the Local Files tab and click ‘Verify Integrity of Game Files’.
    Verifying Integrity of the Game Files
  4. Wait for it to finish the process and then see if it fixes the issue.

Solution 2: Reset Router

Your proxy settings can affect certain connections due to which errors are caused. Such is the case here, if you are using a proxy or anything else, it could potentially be causing the error message. In such a case, to get rid of the error message, you will have to reset your router as to reset all the network settings and restore it to default. This will remove all the proxy settings and your game should work fine the next time you try to launch it. If it still doesn’t resolve your issue, then jump onto the next solution.

Solution 3: Syncing Time and Date

Another possible cause of the issue is incorrect time and date settings on your system. In such a case, you will have to make sure that the time and date settings on your system are correct and then try to launch the game. Here’s how to rectify time and date settings:

  1. Press Windows Key + I to open Settings.
  2. Go to Time & Language.
  3. On the left-hand side, select the correct Time zone from the drop-down list.
    Setting Time and Date
  4. If it is greyed out, turn off the ‘Set time zone automatically’ option.
  5. Close the Settings window and try to launch the game.

Solution 4: Disabling Third-Party Antivirus

If none of the above-mentioned solutions work out for you, then the issue has to be due to the third-party antivirus installed on your system. Most of the antivirus software out there control the incoming and outgoing connection requests due to which, in some cases, errors are caused. Thus, to eliminate the error message, you will have to disable the third-party antivirus and then try to launch the game.

Disabling Third-Party Antivirus

The post Fix: Elite Dangerous Failed to Synchronize Time with Server appeared first on Appuals.com.
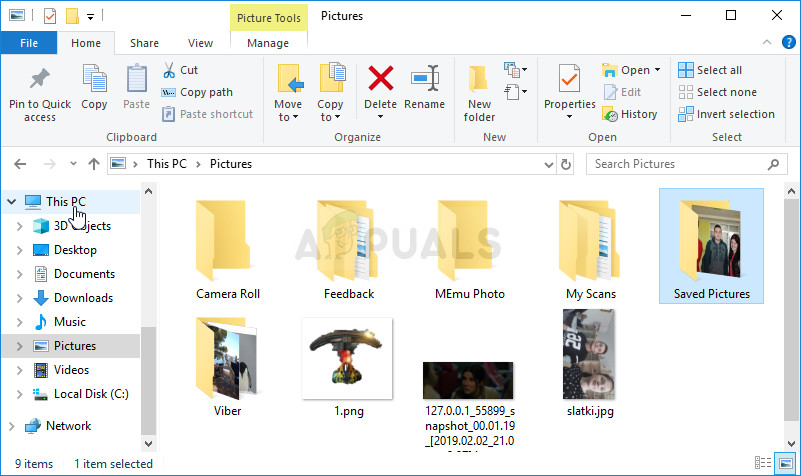
Viewing all 4495 articles
Browse latest View live