Netflix is a US-based online streaming service it was founded in 1997 and it is a subscription-based streaming service. Netflix has become quite popular especially in this decade and is now used by over 140 million users monthly. Due to its great library of movies and tv shows it continues to grow and extend its services to an even larger audience.
But recently an “Error Code NW-3-6” has been seen across all the devices and continues to agonize users. In this article, we will discuss some of the causes of the error and try to provide you with solutions which will be targeted in removing all the problems which are causing issues with the streaming service
What Causes The “Error Code NW-3-6” Error?
The cause of this problem is not specific and a number of factors could be causing the issue some of which are:
Configuration Issues: There might be a configuration issue either with your ISP or with the device which might be preventing it from contacting the streaming service
Internet Connectivity Issue: Your device might be unable to connect to the internet due to which it might be having an issue connecting to the streaming service
Now that the most basic causes have been discussed we will move on towards the solutions.
Solution 1: Disconnecting VPN, Proxy
If you are connected to the internet through a Virtual Private Network or a Proxy Server we would recommend you to disconnect and connect directly to the internet. Sometimes the device has problems connecting to the internet if you are connected through another server. The device might be unable to contact the streaming services so whatever your device is the most basic troubleshooting step would be to disconnect all VPN and Proxy servers.
Solution 2: Restarting Your Console
Sometimes your Streaming Device could be causing the error. There might be some bug or some loading problem with it that might be preventing it from connecting to the internet so we recommend you to try these steps:
Unplug the power to your Streaming Device.Turning Device off
Wait for 5 Minutes
Plug in your device and see if Netflix Works
Solution 3: Verify Your Internet Connectivity
If there are problems with your ISP, then Netflix won’t work because it needs to connect to the internet in order to stream. Also, if your router or DNS settings are getting in its way it won’t be able to stream. Here we will try connecting your device directly to your router using an ethernet cable. This will help fix an internet connection issue (if any).
Turn Off your Streaming DeviceTurning Device off
Connect your Streaming Device directly into your modem using an Ethernet CableConnect Device directly into the modem
Turn on your streaming device and try again.
NOTE: If You are having problems connecting to the internet, contact your ISP for the resolution of the problem
Solution 4: Restart Your Internet
Sometimes the internet modem might be causing issues connecting to the Netflix streaming service. In this solution, we will restart your internet completely by power cycling your router. This will completely reinitialize all the configurations and help resolve error states.
Unplug power from your Internet Router
Wait for 5 minutes
Plug power back into your Internet Router
Start your streaming device after 5 minutes to see if it works
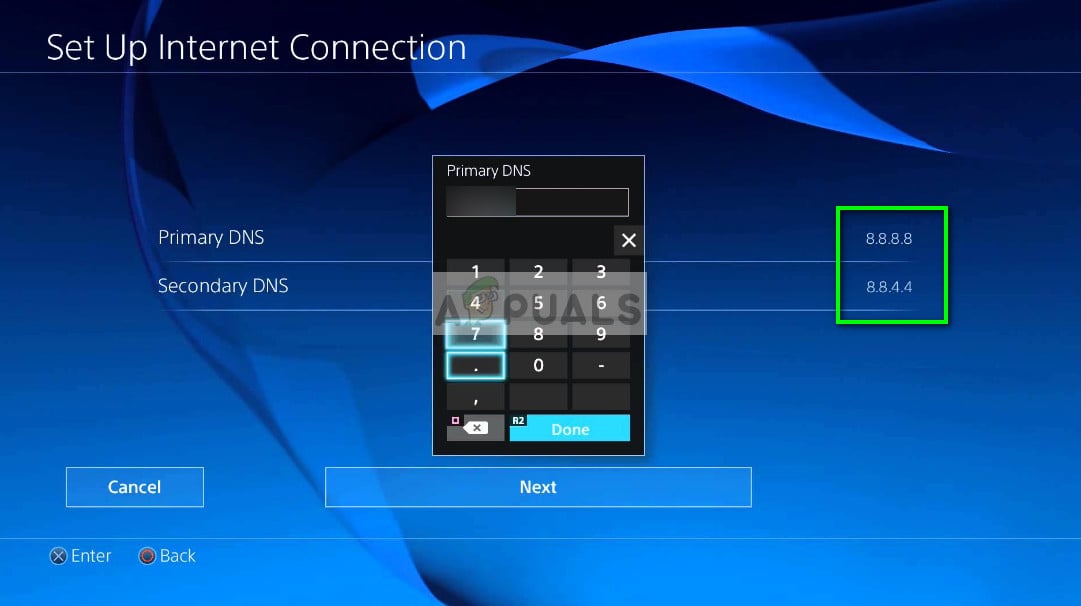
Solution 5: Verifying DNS Settings.
DNS servers match domain names to their associated IP addresses. When you type a domain name into your browser, your computer contacts your current DNS server and asks what IP address is associated with the domain name. Sometimes, that information can be changed or corrupted which means that your domain name would be correct but your IP address associated with that would be wrong so in this step we will be reinitializing the DNS settings for the consoles
For Playstation
Navigate to Settings
Select Network Settings
Select Internet Connection Settings.
Select Custom
Choose either Wired Connection or Wireless, depending on your connection method.
If Wireless, use the following steps before proceeding.
Under the WLAN section, select Enter Manually.
Press the right directional button three times to get to IP Address Setting (your previously saved SSID, Security Setting, and Password will populate automatically).
If Wired Connection, select Auto-Detect for Operation mode.
Select Automatic for IP Address Setting.
Select Automatic for IP Address Setting.
Select Automatic for DNS Setting.
Select Automatic for MTU.
Select Do Not Use for Proxy Server.
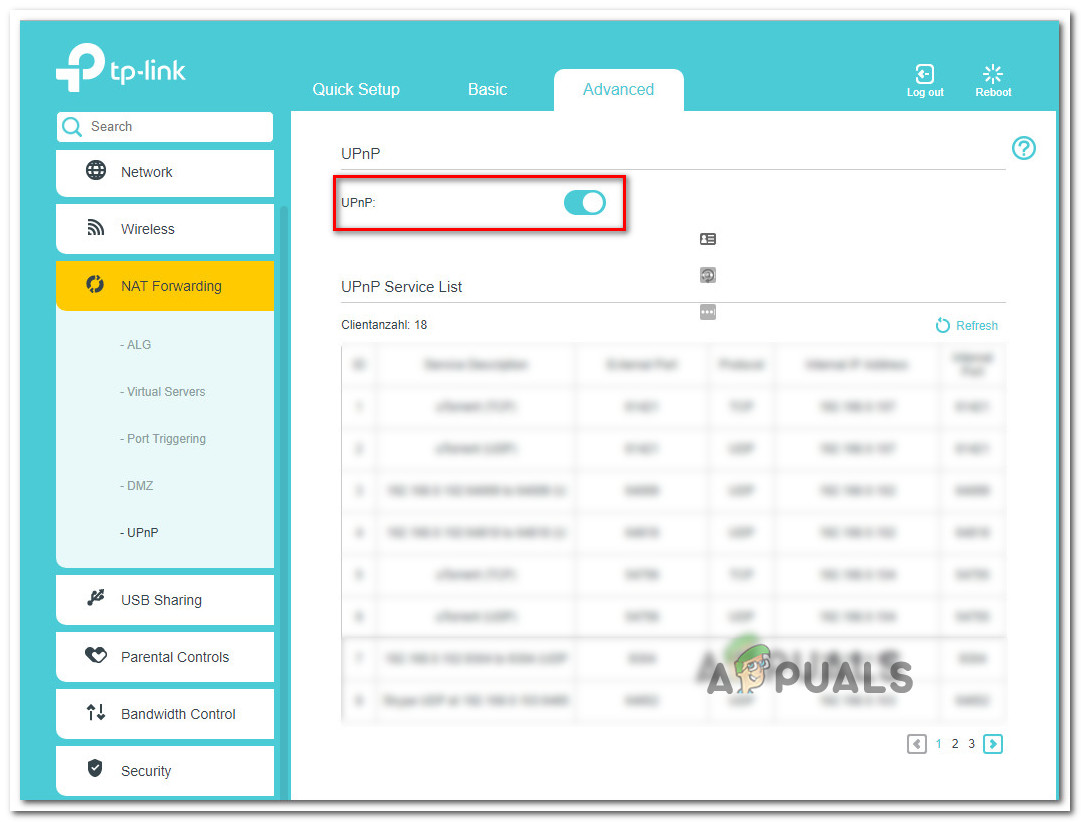
Select Enable for UPnP.
Press the X button to save your settings.
Select Test Connection.
For Xbox
Press the Guide button on your controller
Go to Settings and select System Settings.
Select Network Settings.
Choose your network and select Configure Network.
Select DNS Settings and choose Automatic.
Turn your Xbox off and back on.
Try Netflix again.
NOTE: These Settings are available only for these consoles and if you are using the service on another device you can check your DNS settings according to its own method.
The error message ‘Something went wrong’ along with the error code 0x80090016 appears when Windows is unable to set up a PIN for your device. This is usually due to the corruption of the Ngc folder which is located in the system volume. Many of us have been using a password to log into our system for ages, however, since you are able to sign in using your Microsoft account in Windows 10, using a PIN over a password can be a lot more secure and better.
Something Went Wrong Error 0x80090016
Using a PIN is safer because the PIN is only allocated for a specific device and others cannot access your Microsoft account in case they get their hands on your PIN. However, while setting up a PIN, you might get to face certain issues such as the error code 0x80090016 . You can easily circumvent the issue by implementing a few simple solutions.
What causes the ‘Something Went Wrong’ Error 0x80090016 on Windows 10?
Well, this particular error code doesn’t seem to be caused by many factors rather it is limited to the following elements —
Corruption of Ngc folder: In most of the cases, the error message occurs when the contents of the Ngc folder on your system are corrupted. This folder is responsible for holding the files that are accountable for your system’s protection.
Third-party Applications: Another potential factor that can result in the emergence of the error message is third-party applications. Usually, the request is interfered by the background processes due to which Windows fails to set up a PIN for you.
Before you proceed into the solutions, please make sure that you are using an administrator account. The first solution is going to require administrative privileges as you will be accessing a directory that even the administrator accounts have no rights over.
Solution 1: Deleting the Contents of Ngc Folder
Since the corruption of the Ngc folder is the most probable cause of the issue, you will have to deal with it by deleting the contents of the folder. This is most likely to fix your issue and you will be able to set up a PIN successfully. Here’s how to do it:
Open up the Windows Explorer and navigate to the following directory:
If you are not able to see the AppData folder, you will have to enable the hidden folders by clicking on File and then selecting ‘Change folder and search options’. Switch to the View tab and make sure ‘Show hidden files, folders, and drives’ option is checked. Hit Apply and then click OK.
You will not be able to access the Ngc folder without taking over the ownership.
To take over ownership, right-click on the folder and click Properties.
Switch to the Security tab and click Advanced.
Click Change in front of Owner.
Changing Permissions Of the Folder
Type in the username of the account that you are currently using.
Afterward, click Check Names and then hit OK.
Adding Administrator Account
Make sure that the ‘Replace owner on subcontainers and objects’ box is checked.
Click Apply and then hit OK.
Giving Administrator Account Permissions Over the Folder
Open up the Ngc folder and delete the all the contents of the folder.
Try adding a PIN again.
Solution 2: Using Local Group Policy
In some cases, the error message appears because the Windows policies are configured to disable PIN sign-in. In such a case, you will have to enable the policy and then try adding a PIN. Here’s how to do it:
Press Windows Key + R to open Run.
Type in ‘gpedit.msc’ and press Enter.
Navigate to the following directory:
Computer Configuration > Administrative Templates > System > Logon
Locate the ‘Turn on PIN sign-in’ policy and double-click it to edit it.
Set it to Enabled and then click Apply and OK.
Enabling PIN Sign-in
This error appears in a file’s or folder’s properties deep inside security settings which deal with file permissions and ownership. Under the permissions section, you may encounter the following error message:
You do not have permission to view this object’s security properties, even as an administrative user. To try taking ownership of the object, which includes permission to view its properties, click Change above.
You do not have permission to view this object’s security properties, even as an administrative user
If you want to be able to change the permissions related to the file or folder which is giving you problems, we suggest you follow the rest of the article closely and try out all methods. Good luck!
What Causes the You do not have Permission to View this Object’s Security Properties Error?
The list of possible causes for this problem is pretty short and straightforward. The path to the solution highly depends on what might have caused the problem for you so we recommend you check this list first:
Some other program or service is using your file or folder simultaneously, preventing you from editing its permission settings. If this is the case, a simple restart should be more than enough to solve the problem.
The file is created or is owned by a user account which is no longer active on your computer. This can be resolved easily in Safe Mode.
You are not the owner. Taking ownership of the problematic file or folder might get rid of all permission problems.
Solution 1: Simply Restart Your Computer
The most common cause for this problem is simply the fact that the file or folder you want the change the permissions for is open in some other program or used by some other service and it’s impossible to interrupt that. If that is the case, a simple restart may be enough for you to resolve your problems.
Simply click the Start menu button of your computer followed by the Power Button. Choose Restartfrom the list of options and see if your problem has been resolved.
Solution 2: Start Your PC in Safe Mode and Delete Old Users
Another possible scenario for this problem occurs if the file was created or is owned by a user account which has since been deleted. This will sometimes still list the file as being owned by the deleted user account which will also prevent it from having its permission settings altered. You can delete the user account from being the owner in Safe Mode.
This method is useful for a version of Windows older than Windows 10. Use the Windows + R key combination on your keyboard in order to start the Run dialog box and type in “msconfig” before clicking OK.
In the System Configuration window, navigate to the Boot tab to the right and check the box next to the Safe Boot entry. Click OK and restart your computer in order to boot into Safe Mode.
Enabling Safe Boot from ‘msconfig’
If you are using Windows 10 on your PC, there is another way to access Safe Mode on your computer. Use the Windows Key + I key combination in order to open Settings or click the Start menu and click the gear key at the bottom left part.
Click on Update & security >> Recovery and click the Restart Now option under the Advanced startup section. Your PC will proceed to restart and you will be prompted with the Startup Settings screen.
Click 4 or F4 in order to boot into Safe Mode
Click the number 4 key or F4 in order to start your PC in Safe Mode on Windows 10.
Now that you have successfully booted into Safe Mode, right-click on the file or folder giving you the problems and choose Properties from the context menu.
Navigate to the Security tab and click the Advanced button at the bottom. Click the Add button in the new window which pops up and click the Select a principal button at the top.
Click Select a Principle to locate the proper user account
Enter the name of the user account you wish to add permissions for and click Check Names.
In the old window, choose Allow under Type and make sure it “Applies to: This folder, subfolders and files”. Choose the permissions you wish to add and click OK.
Choose the permissions you want and accept the changes
Choose the old account which has been deleted from the Permission entries list, click on it once, and click the Remove button and confirm any dialogs.
Open ‘msconfig’ and remove the check box next to Safe Mode and restart your computer.
Solution 3: Add Permissions for all Authenticated Users
This interesting method includes adding a user called Authenticated Users to add permissions and it will basically enable you to add permissions overriding this problem. This is easy to perform and it has helped some people to get rid of the issue so we highly recommend you try this out.
Open your Libraries entry on your PC or open any folder on your computer and click on This PC option from the left side menu.
Navigate to the folder or file that you which to change the permission settings for.
This PC entry in the menu
Right-click the folder, click Properties, and then click the Security tab. Click the Advanced button. The “Advanced Security Settings” window will appear. Here you need to add another Permission entry on the list. Click the Add button.
Click the blue Select a principal button from the top of the page and click Advanced from the new Select User or Group window.
Click Advanced for advanced search options
Click Find Now right after that and locate the Authenticated Users entry in the Search results at the bottom. Double-click to select this entry.
Select Authenticated Users from the list as the required account
In the old window, choose Allow under Type and make sure it “Appliesto: This folder, subfolders and files”. Choose the permissions you wish to add and click OK.
Click OK once more and your problem should be resolved.
Solution 4: Take Ownership
Another great method of solving this problem is taking full ownership of it so that you can freely change and edit permissions settings. Taking ownership in the same window as the one you opened in Properties will sometimes throw some error so it’s better if you use Command Prompt for the same job. Follow the instructions we have prepared below!
Search for “Command Prompt” by typing it either right in the Start menu or by pressing the search button right next to it. Right-click the first entry which will pop up as a search result and select the “Run as administrator” context menu entry.
Additionally, you can also use the Windows Logo Key + R key combination in order to bring up the Run dialog box. Type in “cmd” in the dialog box which appears and use the Ctrl + Shift + Enter key combination for admin Command Prompt.
Running CMD as an admin
Type in the following commands in the window and make sure you press Enter after typing each one. Wait for the “Operation completed successfully” message or something similar to know that the method worked.
“F:\ProblemFolder” is a placeholder for the actual location of the file. If the commands above report not errors, then you have managed to change the permissions and the ownership of the file or folder!
This error message is the one which appears after running a network troubleshooter on any version of Windows from Windows 7 and it indicates that there is a problem regarding your DNS server which is causing further Internet connection problems.
Your computer appears to be correctly configured, but the device or resource (DNS server) is not responding
The problem is quite popular and people are always looking for new methods to try out. We have gathered the working methods we could find and put them all together in a single article in order to help out future people who struggle with the same problem. Good luck in resolving the issue!
What Causes this Error?
The list of possible causes is not long and it’s something you might expect from a DNS problem. The key to resolving this problem lies in its cause and we highly recommend you check out this list:
Faulty or outdated network drivers are a number one cause and they should be updated as soon as possible. This will prevent future errors from appearing as well.
You might be using the wrong DNS and IP addresses. You should consider either switching to default settings or changing the DNS server to Google’s.
Solution 1: Update or Roll Back Your Network Drivers
To be honest, updating and rolling back the driver are two opposite actions but it all depends on which driver brought the error to your computer. If you are running old, no-longer-supported drivers on your computer, then an update is almost certain to solve the problem.
However, if the problem started to occur after you have updated your driver one way or another; a rollback might be good enough until a new, more secure driver is released. You should also update or rollback the network device you are using to connect to the Internet (Wireless, Ethernet, etc) but performing the same process all of them should do no harm.
First of all, you will need to uninstall the driver you currently have installed on your machine.
Type “Device Manager” into the search field next to the Start menu button to open the device manager window. You can also use the Windows Key + R key combination in order to open the Run dialog box. Type devmgmt.msc in the box and click OK or Enter key.
Running Device Manager
Expand the “Network Adapters” section. This will display all network adapters that the machine has installed at the moment.
Update the Driver:
Right-click on the network adapter you want to uninstall and select “Uninstall device“. This will remove the adapter from the list and uninstall the networking device.
Click “OK” when prompted to uninstall the device.
Uninstalling your networking device driver
Remove the adapter you are using from your computer and navigate to your manufacturer’s page in order to see the list of available drivers for your operating system. Choose the latest one, download it, and run it from the Downloads folder.
Follow the instructions on-screen in order to install the driver. If the adapter is external such as a Wi-Fi dongle, make sure it stays disconnected until the wizard prompts you to reconnect it to your computer. Restart the computer and check to see if the problem has disappeared.
Rolling Back the Driver:
Right click on the network adapter you want to uninstall and select Properties. After the Properties window opens, navigate to the Driver tab and locate the Roll Back Driver option.
Try to roll back driver if it was updated recently
If the option is grayed out, it means that the device wasn’t updated recently as it has no backup files remembering the old driver. This also means that the recent driver update is probably not the cause of your problem.
If the option is available to click on, do so and follow the instructions on-screen to proceed with the process. Restart the computer and check to see if the problem still occurs in Command Prompt.
Solution 2: Change the DNS and IP Addresses you are using
If you have tweaked some of these settings in the past, you may want to consider returning everything to how it was before in order to resolve this problem. On the other hand, if you haven’t configured these settings before, you might want to try and use other DNS addresses such as Google’s DNS address available for free.
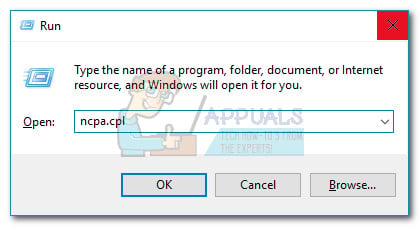
Use the Windows + R key combo which should immediately open the Run dialog box where you should type ‘ncpa.cpl’ in the bar and click OK in order to open the Internet Connection settings item in Control Panel.
The same process can also be done by manually Control Panel. Switch the View by setting at the top right section of the window to Category and click on Network and Internet at the top. Click the Network and Sharing center button in order to open it. Try to locate the Change adapter settings button at the left menu and click on it.
Change adapter settings in Network Sharing Center
Now that the Internet Connection window is open using any method above, double-click on your active Network Adapter and click on the Properties button below if you have admin permissions.
Locate the Internet Protocol Version 4 (TCP/IPv4) item on the list. Click on it in order to select it and click the Properties button below.
IPv4 Properties
Stay in the General tab and switch both radio buttons in the Properties window to “Obtain an IP address automatically” and “Obtain DNS server address automatically” if they were set to something else.
Switching IP and DNS settings to default
If they weren’t, still choose “Obtain an IP address automatically” only this time keep the “Use the following DNS server addresses” button checked and use 8.8.8.8 and 8.8.4.4 for the Preferred and Alternate DNS server respectively.
Keep the “Validate settings upon exit” option checked and click OK in order to apply the changes immediately. Check to see if the same error appears after running the network troubleshooter!
Solution 3: Clear Your DNS Cache and Reset Your IP Settings
This method is quite popular for its simplicity and plenty of people use it in order to fix most things related to connectivity issues. The funny thing is that it works and users have commented saying that this is the only step it took to resolve the problem. Try it out now!
Search for “Command Prompt” by typing it either right in the Start menu or by pressing the search button right next to it. Right-click the first entry which will pop up as a search result and select the “Run as administrator” context menu entry.
Additionally, you can also use the Windows Logo Key + R key combination in order to bring up the Run dialog box. Type in “cmd” in the dialog box which appears and use the Ctrl + Shift + Enter key combination for admin Command Prompt.
Running Command Prompt as an Administrator
Type in the following commands in the window and make sure you press Enter after typing each one. Wait for the “Operation completed successfully” message or something similar to know that the method worked.
This error, among many others, appears after users have installed a Windows update. The error is common for Windows 10, 8, and 7 and it usually manifests itself in the same manner. First of all, users are not able to see their desktop except the Recycle Bin and the Taskbar. The error appears on startup along the lines:
C:\WINDOWS\system32\config\systemprofile\Desktop is not accessible
Access is denied.
Desktop is not accessible
The screen is usually completely black with only the Recycle Bin and the Taskbar being visible. The error can be fixed in numerous ways so make sure you follow the instructions in this article to resolve this problem!
What Causes the Desktop is not Accessible Error?
Faulty user account – the best way to circumvent the problem is to quickly create a new account and redownload the latest updates via Media Creation Tool to resolve the problem for good.
Desktop folder – If the Desktop folder was moved, emptied or corrupted, you can fix the problem by replacing it with a different one.
Third-party antiviruses – Tools like Avast and Norton are known to cause this error to occur so make sure you get rid of them.
Solution 1: Use a Different User Account and Install the Latest Updates
This method was used by plenty of users who have encountered the problem and posted about it online and it worked! Apparently, the Desktop will be okay if you try signing in with a different profile. After that, all it takes is installing the latest batch of updated using Media Creation Tool and you are ready! Try it out below.
After your computer boots and gives you the error and a blank screen with only the taskbar, start with the steps below.
Use the Windows Key + R key combination in order to bring up the Run dialog box. Type in “cmd” in the dialog box which appears and use the Ctrl + Shift + Enter key combination for admin Command Prompt.
Running CMD as an administrator
Type in the command below in order to navigate to the User Accounts screen. Make sure you click Enter afterwards:
control userpasswords2
Click the Add button and follow the instructions which will appear on-screen. Make sure you create a non-Microsoft account by choosing the Sign in without a Microsoft account (not recommended) option from the bottom of the window.
Choose the option at the bottom for a non-Microsoft account
Click Next and confirm your choice by clicking Local account in the next window. After that, fill out other information such as name and password and navigate through.
After you have created the new account, head back to the Command Prompt window and use the following command to log out of your current account:
shutdown –L
Log into the account you have just created and everything should be okay now. If ‘explorer.exe’ is crashing, restart it using Task Manager.
How to successfully restart ‘explorer.exe’
Download the Media Creation Tool executable from Microsoft’s website and wait for the download to complete. Double-click on the downloaded file in your Downloads folder called MediaCreationTool.exe in order to open the setup. Tap Accept at the first screen.
Select the “Upgrade this PC now” option by enabling its radio button and click on the Next button to continue. The tool will download certain files, check for updates, and scan your PC to see if it is ready so please stay patient.
Choose Upgrade This PC Now for an in-place upgrade
Accept the license terms from the next window if you want to continue with the installation and wait again to communicate with Microsoft for updates (again).
After that, you should already see the Ready to install screen with Install Windows and Keep personal files and apps options being listed. The install should now proceed so your computer should be updated after the tool finishes with its process and the error should no longer appear.
Solution 2: Copy the Desktop Folder
This error has attracted plenty of attention when it came out and this method came out of nowhere and pretty much took people by surprise as it worked for almost everyone for which the first method failed. Make sure you try this method before giving up!
Open your Libraries entry on your PC or open any folder on your computer and click on This PC option from the left side menu.
Check down for Local Disk (C:) underDevices and drives and double-click to open it.
Opening Local Disk inside Thic PC
Double-click the Users folder and the Default folder inside. If you are unable to see the Default folder, you may need to turn on the option which enables you to view hidden files and folders. Click on the “View” tab on File Explorer’s menu and click on the “Hidden items” checkbox in the Show/hide section.
Reveal and open the Default folder
Right-click the Desktop folder inside the Default folder and choose Copy from the context menu. After that, head back and navigate to C >> Windows >> System32 >> config >> systemprofile.
Windows folder might also be hidden. In the systemprofile folder, right-click and paste the Desktop folder you copied. Restart your computer and check to see if the problem still appears.
Solution 3: Uninstall Problematic Antivirus Tools
Free third-party antivirus tools such as Avast or Norton are a known cause for this issue and you should definitely consider uninstalling them for good. For example, if your Norton license has expired, it may cause a certain file to misbehave and this problem occurs. The real solution is to uninstall them!
Click on the Start menu and open Control Panel by searching for it. Alternatively, you can click on the gear icon in order to open settings if you are using Windows 10.
In Control Panel, select to View as: Category at the top right corner and click on Uninstall a Program under the Programs section.
Uninstalling a program in Control Panel
If you are using the Settings app, clicking on Apps should immediately open a list of all installed programs on your PC.
Locate the antivirus you are using on the list and click on it once. Click on the Uninstall button above the list and confirm any dialog boxes which may appear. Follow the instructions on-screen in order to uninstall it and restart your computer afterwards.
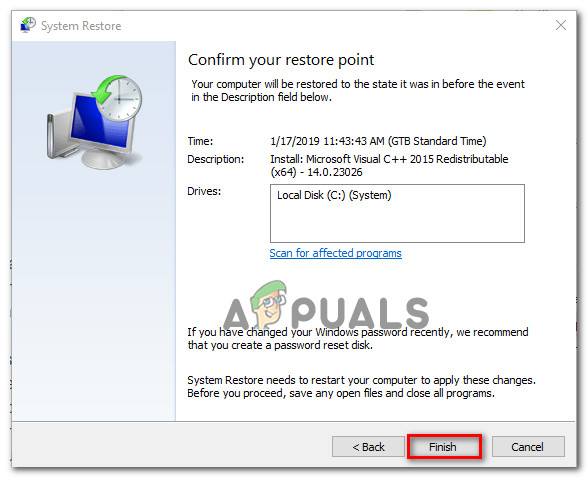
Solution 4: System Restore
System Restore is always the last resort but it’s a successful method and you shouldn’t lose anything if you have created restore points recently. The only thing you need to make sure is that the restore point you choose is before the error started to occur.
Search for the System Restore tool using the Search button next to the Start menu and click on Create a restore point. In the System Properties window, click on System Restore.
Opening System Restore
Inside the System Restore settings window, select the option named Choose a different restore point and click the Next button.
Select a particular restore point your computer saved before. You can also select any restore point available on the list and hit the Next button to select it and restore the PC to that point in time. Make sure you choose the one before the error started to occur on your PC.
Choose a restore point from before the error has started to occur
After the process is over, you will be reverted to the state your computer was in at that period in time. Check to see if the ‘Desktop is not accessible’ message still appears!
Netflix is a US-based online streaming service it was founded in 1997 and it is a subscription-based streaming service. Netflix has become quite popular especially in this decade and is now used by over 140 million users monthly. Due to its great library of movies and tv shows it continues to grow and extend its services to an even larger audience.
Netflix Error Code UI-800-3
But recently there have been many reports of an “Error UI-800-3” occurring, this error has been seen on almost all the devices that are supported by Netflix and continues to agonize users. In this article, we will discuss some of the causes of the error and try to provide you with solutions which will be targeted in removing all the problems which are causing issues with the streaming service
What Causes the Error UI-800-3?
The cause of this problem is not specific and a number of factors could be causing the issue, some of the causes are
Cached Data: Often Netflix stores images, scripts and other media files on your device. It is possible that the cached data on your device might be causing the issue by interfering with the service.
Signing in: Sometimes, this error can also be associated with a “Signing in” problem that Netflix is facing.
Now that you have a basic understanding of the causes of the problem. We move forward to trying the solutions below.
Solution 1: Restarting Your Streaming Service.
In some cases, the solution to the problem is as simple as restarting your streaming device. This involves completely shutting down your device for a couple of minutes and restarting it for this we will try the following procedure
Shut Down your streaming service
Unplug both the Streaming Service and the TV from the power
Give it a couple of minutes
Plug in both, your streaming service and your television
Turn your television ON
This is the most basic troubleshooting procedure that you can try if this does not work then move on to the next solution
Solution 2: Signing Out or Resetting the Settings
This procedure depends on your streaming device if your streaming device does not allow you to sign out it should have an option to reset all the settings make sure you try that before moving on to the next step. However, if your streaming service does allow you to sign out follow the below-mentioned procedure
Go to the settings option and select Sign Out Of all devicesClicking on the Sign Out of all devices button
Sign in again to the device and see if it works
NOTE: This will sign Netflix out of all the devices you use Netflix on.
Solution 3: Clearing The Netflix App Cache
Some devices automatically clear the device cache when you power-cycle them. If you are using one of those devices then your cache will automatically be cleared after you try the first solution mentioned above. However, if your device does allow you to delete your cache then try to follow this procedure
NOTE: This Procedure is Different for specific devices
For Amazon Fire TV or Fire TV Stick try
Press the home button on your Fire TV remote.
Select Settings
Select Manage installed applications.
Select the Netflix app.
Select Clear data.
Select Clear data a second time.
Select Clear cache.
Unplug your Fire TV device for a couple of minutes.
Plug your Fire Tv device back in
This clears the cache for your Fire TV or Fire TV Stick.
For a ROKU device
Press the home button on your remote five times.
Press the up arrow button one time.
Press the fast rewind button two times.
Press the fast forward button twice
The Roku will restart.
Solution 4: Reinstalling Your Netflix App
If the problem still persists then it should be with the Netflix app itself. Some devices don’t allow the app to be uninstalled, if you are using one of those devices then you cannot reinstall. However, if the device does allow you, then reinstalling the app could solve your problem
Press the Menu Button on your Device
Go to Installed and select Netflix.
Click on Uninstall button to uninstall the application.
Uninstalling the Netflix app
Performing these steps should solve the Netflix Error UI-800-3 if it still doesn’t solve your problem then contact your service provider for customer support.
Call of Duty: Black Ops 3 is a first-person shooter and was released in November 2015. The game is the 12th addition to the Call of Duty Franchise and is the third addition to the Black Ops series. The game is played by a ton of players online and is available across all the platforms.
ABC Error Call Of Duty Black Ops 3
However, there have been numerous reports by users of an “A.B.C error” this error was seen all across the three platforms i.e, PC, Xbox, and PlayStation. In this article, we will discuss the causes of this issue and try to solve them step by step
What Causes the “A.B.C” Error on Black Ops 3?
There is not one specific cause of this error as it could be due to a number of reasons some of which might be:
Updates: This error can occur if an update installed while you were playing online or while you were connected online.
Service Interruptions: This error also occurs when there is a service interruption either on your end or on the Developers end
Slow Internet Connection: The error could also occur due to a slow internet connection or due to an unstable network.
Solution 1: Updating The Game.
If a new update deployed while you were playing the game then you might be facing this error. So to solve this, follow these steps:
Restart Your Game
After The Intro Don’t press X or A or Enter
Wait For the numbers in the top right-hand corner to Change Numbers Before the Update
When They Change Press X or A or Enter
Numbers After The Update
NOTE: It might take some time depending on the speed of your internet and the size of the update
Solution 2: Restarting Your Console
If the above-mentioned step did not work for you, there might be a bug with the console or the game and restarting your console might help for that
Plug off The power to your console. Now take out the power cable and press and hold the power button for a short while.
Plug in the power after 5 minutes and turn on the console.
Now Try To Run the Game
Solution 3: Restarting your Internet Connection
Sometimes the problem could be with your IP configuration or your internet connection for that matter you should restart your internet modem
Plug off Your internet modem. Make sure that all the internet cables are working properly.
Wait for 5 minutes before Plugging in the power to your modem again.
Wait for the modem to start and try to run your game.
If these steps don’t solve your problem then it is possible that the game servers might be down.
Call Of Duty: Black Ops 4 is the latest addition to the Black Ops franchise by Treyarch and published by Activision. It is a Multiplayer First-Person shooter and was released worldwide for Windows, PlayStation, and Xbox on October 12, 2018. The Franchise has been a success for the company and is played by millions of players.
Out Of Memory Error Black Ops 4
But recently we had many reports of an “Out Of Memory” error on Black ops 4. This error causes the game to crash and an error pops up which reads “Call Of Duty: Black Ops 4 is out of memory”. In this article, we will go over the causes of this error and try to fix it in different steps.
What Causes the “Out Of Memory Error” in Black Ops 4?
The Error can arise due to a number of reasons and causes but to make a list two of the most probable causes are
Low Disk Space: You are running out of disk space on the partition in which you installed the game
Page Filing Issue: The Virtual Memory Page Filing System does not have enough memory allocated to it.
Solution 1: Freeing Up Disk Space
If the disk space on the partition on which black ops 4 is installed is less than 1 GB then you have to free up space and make sure that the partition has an at least 1 GB of Memory Free or else you will continue to face these issues. Games like Black Ops require some additional memory to virtually store the game files on the drive which is why they require additional virtual memory on the disk in addition to RAM, therefore, in order to work efficiently, Black Ops will require additional space on the partition.
Low Disk Space
Solution 2: Page Filling Settings:
Page Filling is like a virtual memory on your hard drive each application requires a certain amount of virtual memory in order to function properly. If the virtual memory on the partition is low then you will see the out of memory error in order to eradicate this follow the steps below
Right-Click on the Windows Logo in the bottom Left-hand corner.
Right Clicking on Windows Logo in the bottom left-hand corner
A little pop up appears, now left-click on “System“.
Clicking on System
From there Click on System InfoClicking on System Info
A pop up will appear, From there click on System ProtectionClicking on System Protection
Another Pop up appears, Click on Advanced.Clicking on Advanced
From there, Click on Settings under the Performance Heading
Clicking on Settings
Now a pop up opens up, From there Click on Advanced and then on ChangeClicking on advanced and then on change
Now make sure you uncheck the “Automatically manage paging file size for all drives” box.
Unchecking the automatically manage paging file size box
After that Check “Custom Size”Checking The Custom Size Option
In Initial Size type “1024 ” and in Maximum Size type “16000” and click on Set.
Now click on OK and Restart your Computer.
Note: You should have at least 16 gigabytes of space free in the drive in which your windows is installed for this process if not then try to free up space or decrease the Maximum Size value to the space that is available but it should not be less than 8000
Solution 3: Updating Your Game
In a recent Release by Activision, they recognized the memory leak problems that the game was facing and said that they had been taken care of in the latest update. Therefore, to remove any additional memory related issues you need to update your game to the latest version for this
For this purpose open your Blizzard Battle.net Launcher
Click on Games and Select Call Of Duty Black Ops 4
Battle.net Launcher Game
Click on OptionsClicking on Options in Cod BO 4
Select Check For UpdatesChecking For Updates
This will automatically Check For Updates and prompt you to update your game
Dropbox is one of the most used cloud-storage architectures in the market. It allows people to upload files on the go and access them through any platform. However, we have several cases where Dropbox fails to sync properly on Windows 10.
Dropbox Logo
There can be several different reasons why Dropbox fails to sync properly ranging from issues in the network to problems with the application itself. We will go through the workarounds one by one and see if this can be resolved without much hassle.
What Causes Dropbox to not Sync on Windows 10?
There are a number of causes which can be the root of the issue. This particular issue does not have a specific cause but to make a list the most probable causes are
Sync Error with a Red Dot: This issue is caused by several misconfigurations in settings along with several bugs which conflict with it.
File in Use: Dropbox works best if only one instance of the app is running on the same computer.
Other Syncing Apps: Also, it is to be noted that no other syncing apps are interfacing with the Dropbox for it to work properly.
Identical Names: If two files have identical names then the dropbox will not sync it because it causes errors in recognition of the files.
Firewall Issues: If the Dropbox app or its update is not allowed through the firewall then also it can cause issues because it might have problems connecting with the internet
Proxy settings: If you are using a proxy or VPN while syncing it might also cause the problem because Dropbox will recognize that as a security violation.
Solution 1: Configuration of Settings and Upgrading Your account
Before we start configuring files and settings, you can perform the basic troubleshooting techniques. These tips will help if you are having issues connected to the internet or you don’t have storage left.
You should make sure your date and time settings are correct.
Make sure no proxy, VPN is running in the background
Make sure Dropbox is allowed through your firewall
You can fix your storage quota issue by removing some of your synced files or by upgrading to Dropbox plus or professional.
Making sure Dropbox is allowed through the firewallChecking Your storage plan in Dropbox account settings
If you already have a Plus or Professional account, check your account page to make sure your plan hasn’t been downgraded. If you’re on a Dropbox Business team, ask your admin to check the team’s account status in the Admin Console.
If you have been downgraded to Dropbox basic then upgrade your plan.
Solution 2: Renaming the Files
While trying to sync files you may see a “White space Conflict“. This is caused due to nearly identical names of two files except for space at the end of one of them.
Renaming A file
To fix this, rename one of the files to solve this issue.
Solution 3: Exiting Other Applications
While trying to sync some files you may see an error due to the files being used by another application. Whenever a file is opened for editing by another application or editor, it will not sync properly. Only when it is closed, Dropbox will proceed to upload the newest version of the file.
Press Windows + R, Type “taskmgr” and press ENTEROpening Task Manager
Check for any instances of the file running which you are trying to sync. Left-click on it and select End Task. Ending Other Applications using the file
Now Dropbox will automatically sync the file to cloud.
Solution 4: Granting access in Firewall
If Dropbox is not updated to the latest version, it will fail to sync your files properly. You might also encounter the error “Dropbox will stop syncing because it can’t update”. One of the reasons why Dropbox fails to update is because your Windows firewall is conflicting with it. We will disable it try updating the application.
Press Windows + S, type “firewall” in the dialogue box and press Enter.
Open the application and select “Firewall and Network Protection”.
Click “Allow an app through firewall“. Also, click Change Settings Button so we can edit the list.
Clicking on Allow an App through Firewall
Now make sure that Dropbox and its Updater.exe is allowed through the firewall
Allowing Dropbox and Dropbox updater.exe to access the firewall
This will make sure that Dropbox and its Updater is allowed through the firewall and should terminate any problems limiting it from connecting to the internet.
Solution 5: Adjusting Dropbox Settings
Dropbox also has certain configurations that are set through the command prompt it is possible that those configuration settings were meddled with somehow and that might be causing the issue with syncing your files. Before we adjust those settings make sure to try signing out and then signing in if that doesn’t work follow these steps:
Quit Dropbox by clicking on the Dropbox icon in the system tray, clicking the gear icon in the notifications panel, and selecting Exit Dropbox from the menu.
Exiting Dropbox
Press the Windows Key + R (at the same time), then type cmd and press Enter to open the command prompt. Opening Command Prompt Through RUN
Copy and paste the following lines into the command prompt, one at a time, and press Enter after each one. Please make sure you copy and paste these commands (don’t type them by hand), as getting them wrong could cause some harm. Also, you can only paste them by right-clicking and selecting Paste.
If the location of the Dropbox folder is not “C:\Users\YourUser\Dropbox path”, please modify the first command to point to it. For example, if your Dropbox is in D:\Dropbox, the command would look as follows:
icacls "D:\Dropbox" /grant "%USERNAME%":(F) /T
The other commands should remain unchanged. Please note that, depending on the size of your Dropbox, this operation might take some time to complete, so wait for the C:\ prompt to appear again.
Restart Dropbox by going to the Start menu and selecting Program Files, then Dropbox.
Note: If you don’t see a Dropbox option under Program Files, you will need to restart Dropbox by entering “%APPDATA%\Dropbox” into the Windows Explorer window and double-clicking Dropbox.exe
Solution 6: Updating Your App
The user can access the files on the website but they cannot open the files on the computer utilizing Smartsync. This error persists across all the computers utilizing Smartsync. This error was first discovered on an older version of Dropbox it has since been patched. If due to some reason your Dropbox app was not automatically updated. Try the steps below
Click on the Start Menu.
Clicking on Start Menu
Click on Settings. Clicking on the Settings icon
Click On Apps. Clicking on Apps
Select Apps & Features from the left panel.
Clicking on Apps & Features to uninstall Dropbox
Once there look for Dropbox and click on uninstall
Then simply download and install the app again to should solve the issue.
The error message ‘Account restrictions are preventing this user from signing in’ is revealed when a user is not able to establish a Remote Desktop connection to a target system using Windows Server 2012 or above. This error can be caused by your Windows Group Policy which stops it from passing credentials to the remote system. On the contrary, many people assume that the issue is often due to expired passwords or blank passwords which can sometimes be the case, however, in case it isn’t, then many are left without any clue.
Account Restrictions are Preventing this User from Signing in
Remote Desktop Connections are widely used by security administrators or other parties and its use has been gradually increasing. Thus, errors are to be expected as every application out there contains errors that just need to be unveiled. Nonetheless, you can easily isolate your issue by implementing the solutions given down below.
What causes the ‘Account Restrictions are Preventing this User from Signing in’ Error Message?
This error message can be caused in different scenarios, however, the following things seem to be the cause most often —
Windows Group Policy: Windows policies are responsible for some of the actions that your system performs. The error message is, sometimes, due to a particular Windows Group Policy which stops the Remote Desktop Client to expose sign-in credentials to the remote host. Disabling the policy seems to fix the issue.
No Password: In some cases, the error message can also occur if the user account that you are using to establish a remote connection doesn’t have a password. In such a case, you will have to either set a password or just disable this policy as well.
Now that you are aware of the potential causes of the error message, you can isolate your issue by using the solutions provided down below.
Solution 1: Disabling Windows Group Policy
As we have mentioned above, there is a security policy that prevents RD client from exposing the supplied credentials. This policy, however, seems to cause the said error message in some scenarios. Thus, to get rid of the error message and be able to establish a connection, you will have to disable it. Here’s how to do it:
Press Windows Key + R to open the Run dialog box.
Type in ‘gpedit.msc’ in the search box and then hit Enter.
Once the Windows Local Group Policy Editor opens up, navigate to the following directory:
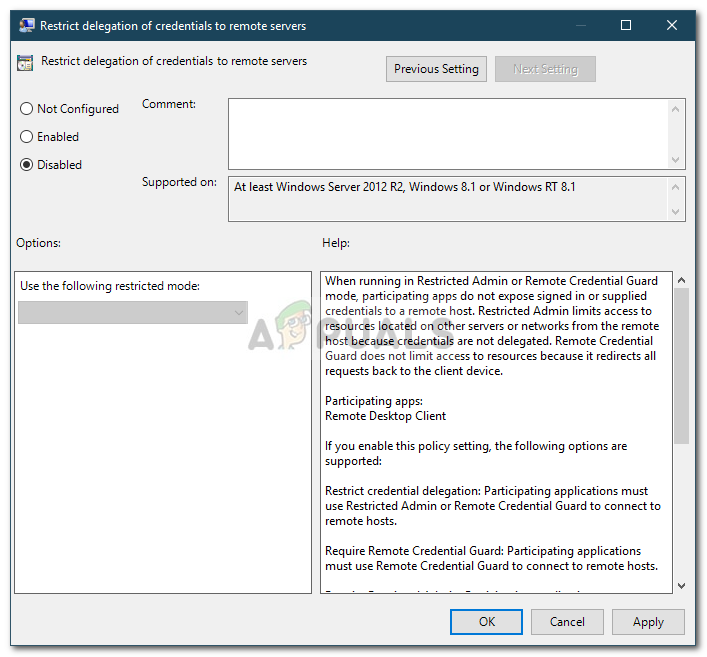
Computer Configuration > Administrative Templates > System > Credentials Delegation
There, on the right-hand side, locate the ‘Restrict delegation of credentials to the remote servers’ policy.
Double-click it to edit it. Set it to Disabled, click Apply and then hit OK.
Disabling the Security Policy
See if it fixes the issue.
Solution 2: Setting up a Password
The error message can also appear if the user account that you are using has no password set. Therefore, in order to fix the issue, you will have to set up a password and then see if it fixes the issue. In case it does, you will have to enter a password every time you want to sign-in. However, if you wish, you can avoid this by simply disabling a Windows Group Policy. Here’s how to do it:
Open up the Local Group Policy Editor as shown above.
Once you have opened it up, go to the following location:
Computer Configuration > Windows Settings > Security Settings > Local Policies > Security Options
On the right-hand side, you need to locate the ‘Accounts: Limit local account use of blank passwords to console logon only’ policy.
Double-click to edit it and then just set it to Disabled.
Disabling the Policy
Some users are encountering the “An error occurred. Please try again later. Playback ID” when trying to play certain videos on Youtube. Most of the time, the issue is encountered with all videos, while other affected users report that they only see this error with several videos. This particular error is not specific to a certain Windows version or to a certain browser – We managed to identify reports of it occurring on Windows versions from 7 to 10 on browsers like 3rd party browsers like Chrome, Firefox and Opera.
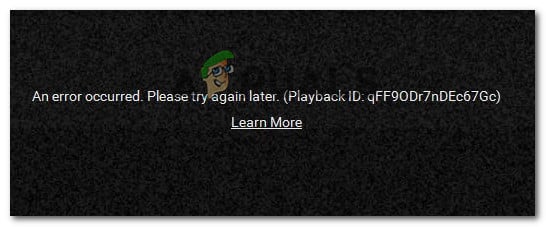
An error occurred. Please try again later. (Playback ID: )
Note: The Playback ID is specific to each video.
What is causing the ‘Youtube an Error Occurred Playback ID’ error?
We researched this particular error message by looking at various user reports and the repair strategies that they used to get the issue resolved. Based on our investigations, there are several common scenarios that will trigger this particular error message:
Corrupted browser files – This issue might be triggered by some missing/corrupted browser files. This can happen due to some badly cached data or after you become the victim of a browser hijacker (there are also cases where this issue occurs after the threat has been removed). In this case, reinstalling the browser should take care of the issue.
The network connection has been modified – This particular YouTube error is known to occur with Dynamic IP configurations. In this case, a temporary but very quick fix is to restart the router or modem and allow the network configuration to refresh by itself.
Badly cached DNS data – The error might also occur if your DNS Resolver Cache holds data that interferes with your outgoing connections. Clearing the DNS cache will resolve the issue if this particular scenario can be applied.
The Automatic DNS is causing the issue – In a lot of cases, the culprit that was triggering the issue was an automatic DNS assigned by the ISP. A better alternative that might also resolve the issue is to use Google’s Public DNS for your connection.
If you’re struggling to resolve this particular error message, this article will provide you with several verified troubleshooting steps. Down below, you’ll discover a selection of verified fixes that other users in a similar position have used to resolve the ‘Youtube an Error Occurred Playback ID’ error.
For the best results, follow the methods below in the order that they are presented. You should eventually encounter a fix that will resolve the issue in your particular scenario.
Method 1: Reinstalling your browser
If the “An error occurred. Please try again later. Playback ID” error only occurs with a particular 3rd party browser, you might want to start by reinstalling the software. Sure, you can also avoid the issue entirely by using a different browser, but let’s see if we can fix this without having to switch to other software.
We could try to clear the cache or force the browser to create a new user profile, but these steps are specific to each browser version. A better approach would be to reinstall your browser completely. This will force your OS to delete any corrupted cached data some corrupted user preferences that are saved locally – this is true regardless of your browser version. Several affected users have confirmed that this method enabled them to resolve this particular error message.
Here’s how to reinstall your browser in order to resolve the “An error occurred. Please try again later. Playback ID” error:
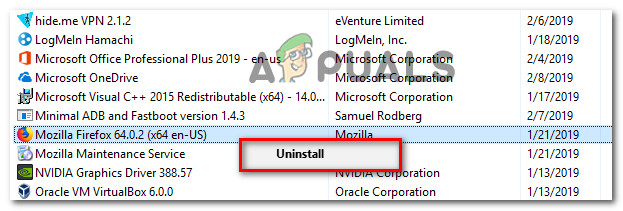
Press Windows key +R to open up a Run dialog box. Then, type “appwiz.cpl” and press Enter to open up the Programs and Features window.
Type appwiz.cpl and Press Enter to Open Installed Programs List
Inside Programs and features, scroll down through the list to locate the browser that is causing the “An error occurred. Please try again later. Playback ID” error.
Once you see it, right-click on it and choose Uninstall. Uninstalling your browser
Then, follow the on-screen prompts to remove the browser from your computer. If you’re asked whether you want to remove cached data or the user preferences, click the appropriate button to confirm.
Once your browser has been uninstalled, restart your computer.
At the next startup, use a built-in browser (Internet Explorer or Edge) to navigate to the download page of the 3rd party browser that you previously uninstalled and download the installation executable. Here are some download links for the most popular browsers: Chrome Mozilla Opera
Open the installation executable and follow the on-screen prompts to reinstall the browser.
Open the recently installed browser, navigate to a Youtube video that was previously failing and see if the issue has now been removed.
If you’re still encountering the same error message, move down to the next method below.
Method 2: Restarting your router/modem
Several affected users have reported that in their case, the fix was as simple as forcing a restart on their router/modem. What this essentially does is force the device to recreate the connection, which mind end up resolving the issue automatically.
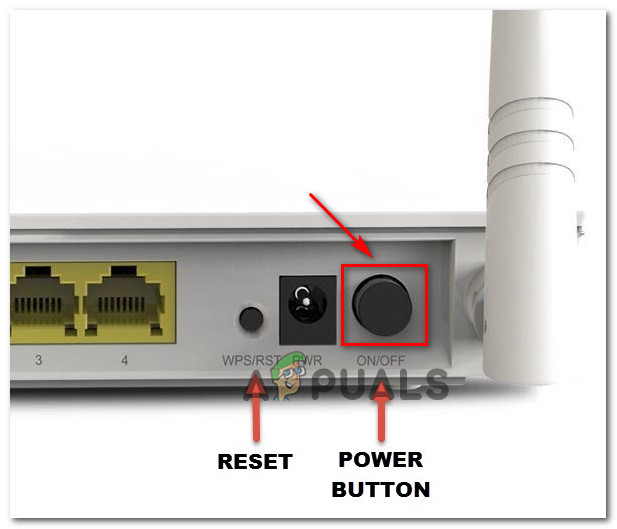
Most routers will have a power button, so it’s best to press it to turn it off, wait a couple of seconds, then press it again to turn it back on. You can also disconnect the power cable for a couple of seconds to achieve the same effect. However, avoid pressing the reset button (on the back of your router), because this has the potential of resetting your network preferences (network password, forwarded ports, user preferences, etc).
Restarting your router/modem
Once you manage to restart your modem, wait until the connection is recreated, then open a YouTube page that was previously failing and see if the issue has been resolved.
If you’re still encountering the same error message, move down to the next method below.
Method 3: Flushing the DNS Cache
Flushing your DNS (domain name servers) cache is known to fix a lot of browser related issues, and this error is no exception. Several affected users reported that the issue was no longer occurring for YouTube videos after they flushed the DNS Resolver Cache. This particular fix is mostly reported to be effective in those situations where the same error message is encountered on multiple browsers.
Unfortunately, most affected users that managed to resolve the error using the procedure below reported that it was only temporary (the error returned after several errors). However, it still makes up for a quick fix if you’re in no mood to do extensive troubleshooting.
Here’s how to flush your DNS cache in order to resolve the “An error occurred. Please try again later. Playback ID” error:
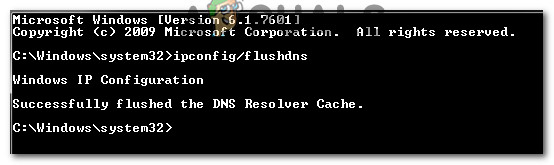
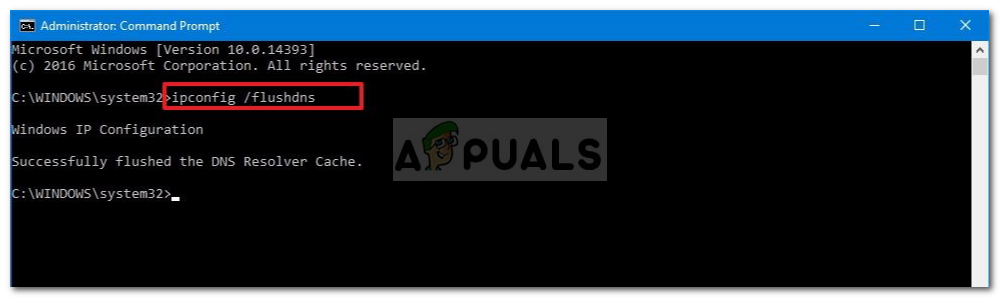
Press Windows key + R to open up a Run dialog box. Then, type “cmd” and press Ctrl + Shift + Enter to open up an elevated Command Prompt. If prompted by the UAC (User Account Control), click Yes to grant administrative privileges.
Opening Command Prompt via Run dialog box
Inside the elevated Command Prompt, type the following command and press Enter to flush your DNS cache:
ipconfig/flushdns
Note: What this essentially does is remove all information stored in the DNS cache, forcing your computer to find new DNS information.
After you receive the confirmation message, open a Youtube video that was previously displaying the “An error occurred. Please try again later. Playback ID” error and see if the problem has been resolved.
Example of a successfully flushed DNS Resolver Cache
If the same problem is still occurring, move down to the next method below.
Method 4: Changing your DNS Google’s Public DNS
Most ISP’s will set your DNS (domain name servers) automatic via Dynamic Host Configuration Protocol (DHCP). Several affected users discovered that changing the DNS switchboard from the default one (provided by the ISP) to Google’s Public DNS managed to resolve the issue permanently.
But to do this, you’ll need to explicitly change the DNS settings in your operating system to use the Google Public IP addresses. The procedure of doing this will vary a little depending on your Windows version, but we’re going to feature a method that is universal (will work for every Windows version).
Here’s how to change your current DNS to Google’s public domain name server in order to resolve the “An error occurred. Please try again later. Playback ID” error:
Press Windows key + R to open up a Run dialog box. Then, type “ncpa.cpl” and press Enter to open up the Network Connections window.
Next, select the connection that you want to configure the Google Public DNS for. If you want to do it for your wireless network, right-click on Wi-Fi (Wireless Network Connection) and choose Properties. If you want to do it for an Ethernet (cabled) connection right-click on Ethernet (Local Area Connection) instead.
Inside the Wi-fi/Ethernet Properties screen, go to the Networking tab and go to the settings box under This connection uses the following items. Next, select Internet Protocol Version 4 (TCP/IPv4) and click the Properties button.
Inside the Internet Protocol Version 4 (TCP/IPv4) Properties screen, go to the General tab. Next, select the toggle associated with Use the following DNS server address and replace the Preferred DNS server and the Alternate DNS server with the following values: 8.8.8.8 8.8.4.4
Save the changes, then repeat steps 3 and 4 with Internet Protocol Version 6 (TCP/IPv6), but this time, use these values for the Preferred DNS server and the Alternate DNS server: 2001:4860:4860::8888 2001:4860:4860::8844
Restart your network connection. After your connection is restarted, open your browser. load a Youtube video that was previously failing and see if the issue has been resolved.
Configuring your network connection with Google’s DNS
Method 5: Doing a system restore
This issue might also occur due to a bad codec that recently got installed on your system. But the thing with codecs is it’s not always easy to pinpoint the software that installed them in the first place. This is why in situations like this it’s better to just use the System Restore wizard to revert your machine to a point where everything was functioning just fine.
Several users that we’re struggling to resolve the “An error occurred. Please try again later. Playback ID” error have managed to resolve it by using a System Restore point older than the apparition of this issue.
Here’s a quick guide on how to do this:
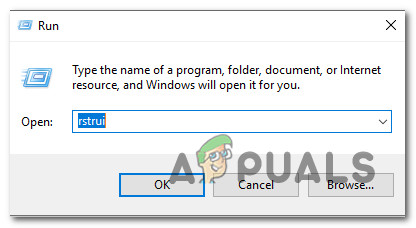
Press Windows key + R to open up a Run dialog box. Then, type “rstrui” and press Enter to open the System Restore wizard.
Opening the System Restore wizard via Run box
Inside the System Restore wizard, press Next at the first screen.
Getting past the initial screen of System Restore
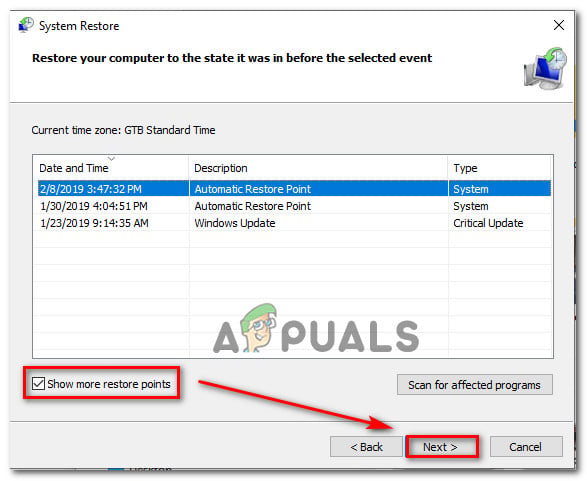
In the next screen, start by checking the box associated with Show more restore points. Next, select a system restore point that is dated before you first started to deal with this particular error. Then, click Next to advance.
Restoring your system to a previous point in time
Note: Keep in mind that all changes (installed apps, user preferences, etc.) that you made since that restore point was saved will be lost once this procedure is complete. This process will restore your computer to the exact state in which it was when the restore point was taken.
Click Finish, then Yes at the confirmation prompt to start the restoring process. Your computer will then restart and the older state will be enforced at the next startup.
Starting the System Restore process
The Sims 4 is the fourth major title in the life simulation series The Sims developed by The Sims Studios and published by Electronic Arts. It was released in September 2014. The Game received mixed reactions but is still played by a lot of people.
Error Code 102
Numerous users reported that they encountered an error “Code 102” when they added a new object. The error causes a particular sim or in some cases even a whole family to be corrupted and that sim or family fails to load and this error code shows up. In this article, we will be discussing the causes of the error and try to solve it
What Causes The Sims 4 “Error Code 102”?
We investigated this particular issue by looking at various user reports and the repair strategies that some affected users deployed to get the issue resolved. According to our findings, the error code was being triggered due to
New Object: The new Lin-Z Speaker has a certain bug that was causing the issue and every household that it was added to was facing the problem. The object was added in a new update by the developers.
If you are currently struggling to solve this particular issue this article will provide you with a few troubleshooting steps which will solve the problem in most cases.
Solution 1: Removing The Object
The Error only pops up when you try to play the sim that was corrupted due to the Lin-Z speaker bug so you can play the other sims. You can try to remove the object from your household for that purpose we will follow the following steps
Add a new Sim to that Household
Play as that Sim
Delete the Lin-Z speaker system
Now save your Game and Exit.
Now Navigate to
C:\Users\"username"\AppData\Local\The Sims 3
Make sure you delete the ‘localthumbcache.package”
Now Restart the game and you should be able to play all of the sims
Solution 2: Update Your Game:
This issue is almost a month old and if you still can’t solve the problem you can try to apply the latest patch by the developers for that purpose
Open Origin
Select The Sims 4
Click on the Settings Icon
Selecting Settings Icon
From there Click on Update Game
This will automatically update your game to the latest version making sure you have the latest patch automatically applied.
The Elder Scrolls V: Skyrim is an action role-playing video game developed by Bethesda Game Studios and published by Bethesda Softworks. It was released for all the platforms in November 2011 and is a sequel to The Elder Scrolls IV: Oblivion. It has been reported that the game has sold 30 million copies since its release up until November 2016. SKYUI is a PC friendly UI mod For Skyrim and it offers a much better user experience with the game due to its countless mods.
SkyUI Error Code 5
But many users have been reporting about a “SkyUI Error code 5” Error that surface while playing the game. The error occurs while trying to open skill, map and favorites menu. Though the issue sounds critical, it really is not. The issue can be easily resolved by implementing some easy fixes that are mentioned in the article down below. However, before we get into that, let us have a look at what potentially causes the issue.
What Causes the “SkyUI Error Code 5” Error?
We investigated this particular issue by looking at various user reports and the strategies that they used to either repair or circumvent the issue. Based on our reports, a particular conflict triggers this specific error code which is:
The 60 FPS Interface Mod: The 60 fps interface mod forces the interface to run at 60 fps. By default, the interface runs at 30 fps. However, this mod often causes conflict with the Skill, map, and the favorites menu.
Now that you have a basic understanding of the cause of the problem we will now move forward towards finding a viable solution based upon verified feedback.
Uninstalling The Mod
Since we know that the 60 FPS Interface Mod is causing the problem we will be uninstalling that mod
Navigate to
NexusModManager/Skyrim/Mods
Select the 60 Fps Interface Mod it should be a .zip file
Delete the mod
Now Delete the SkyUI and Reinstall it
Also, make sure your Skyrim Script Extender is updated to the latest version (2.0.5)
This should solve the “SkyUI Error Code 5” error completely. If this still does not solve your issue then reinstalling the game is the only option.
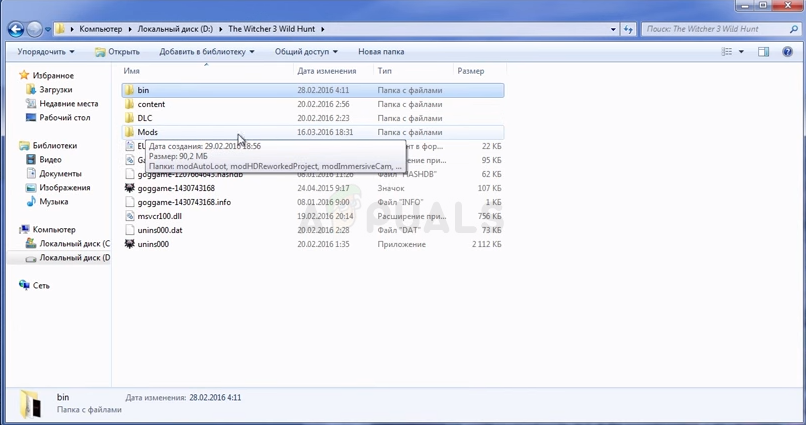
The Witcher 3: Wild Hunt is a 2015 Open-world, Action role-playing game developed by CD Projekt. The game is a sequel to the Witcher 2 and is the third addition to the series. Upon its release, the game was heavily appreciated for its amazing graphics and open world. Also, the well-written story and side quests make it an even more amazing game to play.
Script Compilation Error Witcher 3
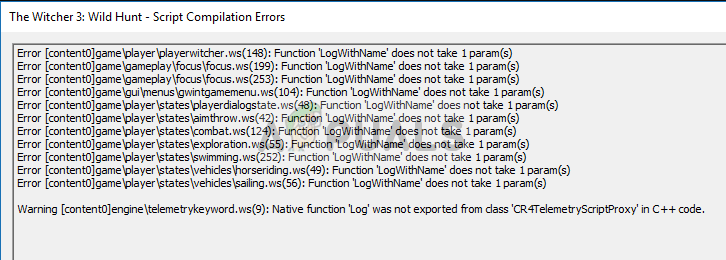
A lot of Mods also became available for the game, but recently a lot of reports have been coming in of a “script compilation error” that occurs when you apply certain mods to the game. In this article, we will discuss the causes of the error and try to solve them step by step.
What Causes The Script Compilation Error?
The error occurs only if you try to use mods in the game, there could be two different causes to the error
Mod Versions: The version of the mods you are trying to install might be “1.30” and the version of the GOTY is “1.31”. Even if no script compilation errors occur you might still see a problem with the gameplay because the “1.30” version of mods just override some of the features of the “GOTY 1.31 ” version of the game.
Mod Conflicts: If you have more than one mods installed they might be conflicting with each other especially if they have different versions, i.e if one mod version is 1.30 and the other’s is 1.31 then they might be causing conflict with each other.
The solutions to these problems will be discussed below and we will make sure you can use all of your mods with your game without any trouble.
Solution 1: Updating Mods and Game.
As we discussed before if your Witcher 3 game is updated to the latest GOTY edition and the mods you are using are of the “1.30 version” then you might see a script compilation error or have issues with certain features of the game. Also, if your game is not on the “1.30” or “1.31” version even then these issues can arise while modding. To fix this
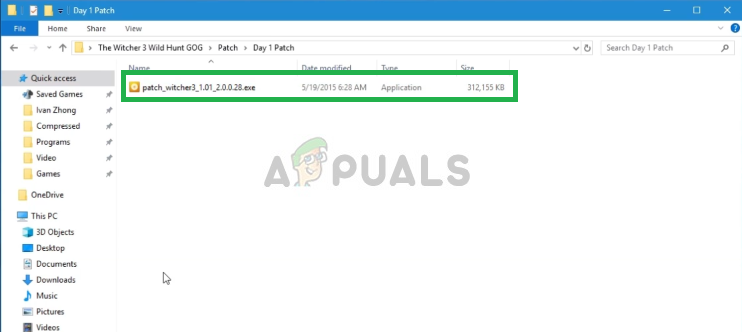
Once you have downloaded all the patches put them all in one folder.
First Install the Day 1 Patch, to do so just double click on the patch.exe
Double-clicking the Day 1 Patch
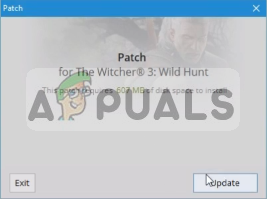
This will open up a pop-up Click on UpdateClicking on Update
This will automatically install the Day 1 Patch For your Game.
Repeat this process for all the other Patches (install all of them in order)
After you are done, your game will have been updated to the 1.31 version and now you may have gotten rid of the script compilation errors due to the game version.
Now make sure that the mods that you are downloading are of the 1.31 version for them to work correctly.
Note: Skip The Step 14 if you don’t want to download each mod again and try the second solution.
This process should solve all the version related conflicts within the mods and with the game if the error still persists then you should move on to our next solution.
Solution 2: Applying the Unification Patch.
If you do not want to update your mods and the mods and the games have different versions than you should apply the Unification Patch that was released later to solve these conflicts. Below we will apply the patch step by step.
Once downloaded, Copy both the “Content” and the “Mods” in your game folder.
Copying the content and the mods folder
Make sure to select Copy and Replace.
Note: Make Sure you update the game to its latest version before applying this solution, the process has been explained in the previous solution.
Solution 3: Merging Mod Scripts
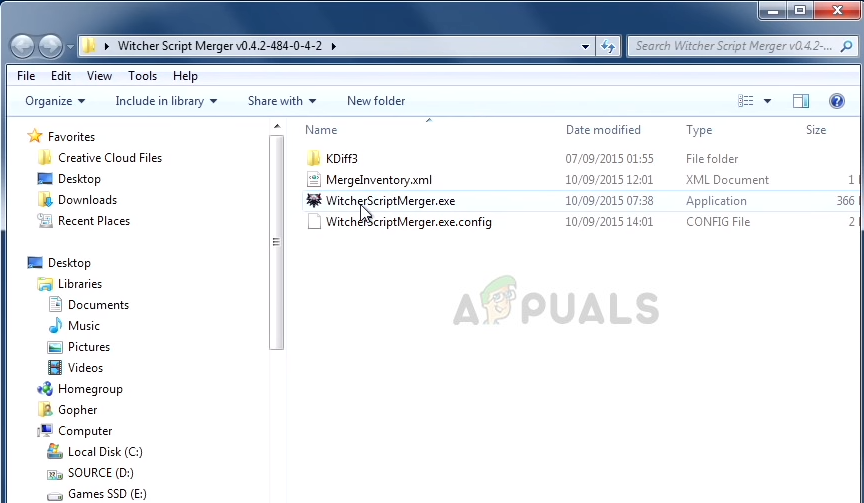
Not all of the Witcher 3 mods are compatible with each other and sometimes give rise to conflicts which result in the scripts compilation error. We will be solving this problem using software which allows for the scripts to be merged together and solve the conflicts we will be going over the step by step process below.
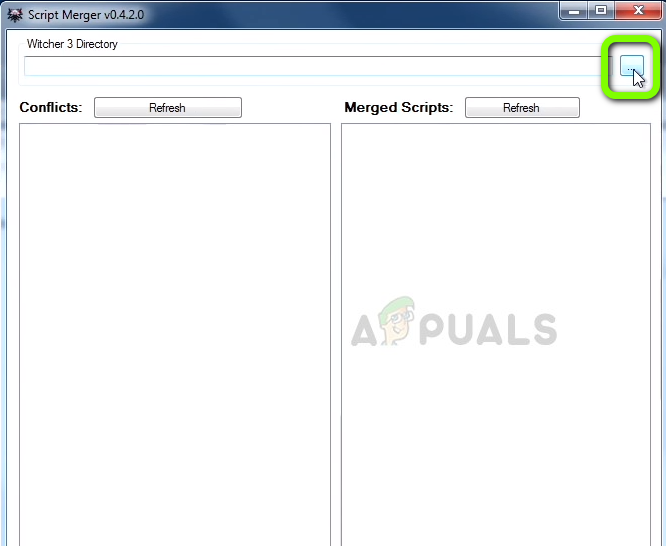
Select your Witcher 3 directory by clicking on “…”
Selecting Witcher 3 directory
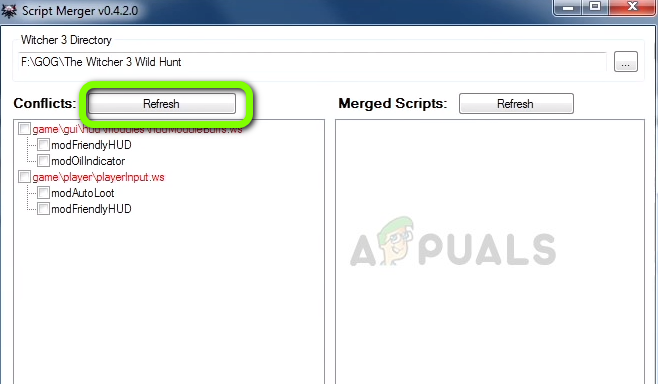
Now click on refresh in Conflicts and it will tell you the conflicts in the mods.
Clicking on Refresh
Now select the Mods and Click on Merge Selected ScriptClicking on Merge Selected Script
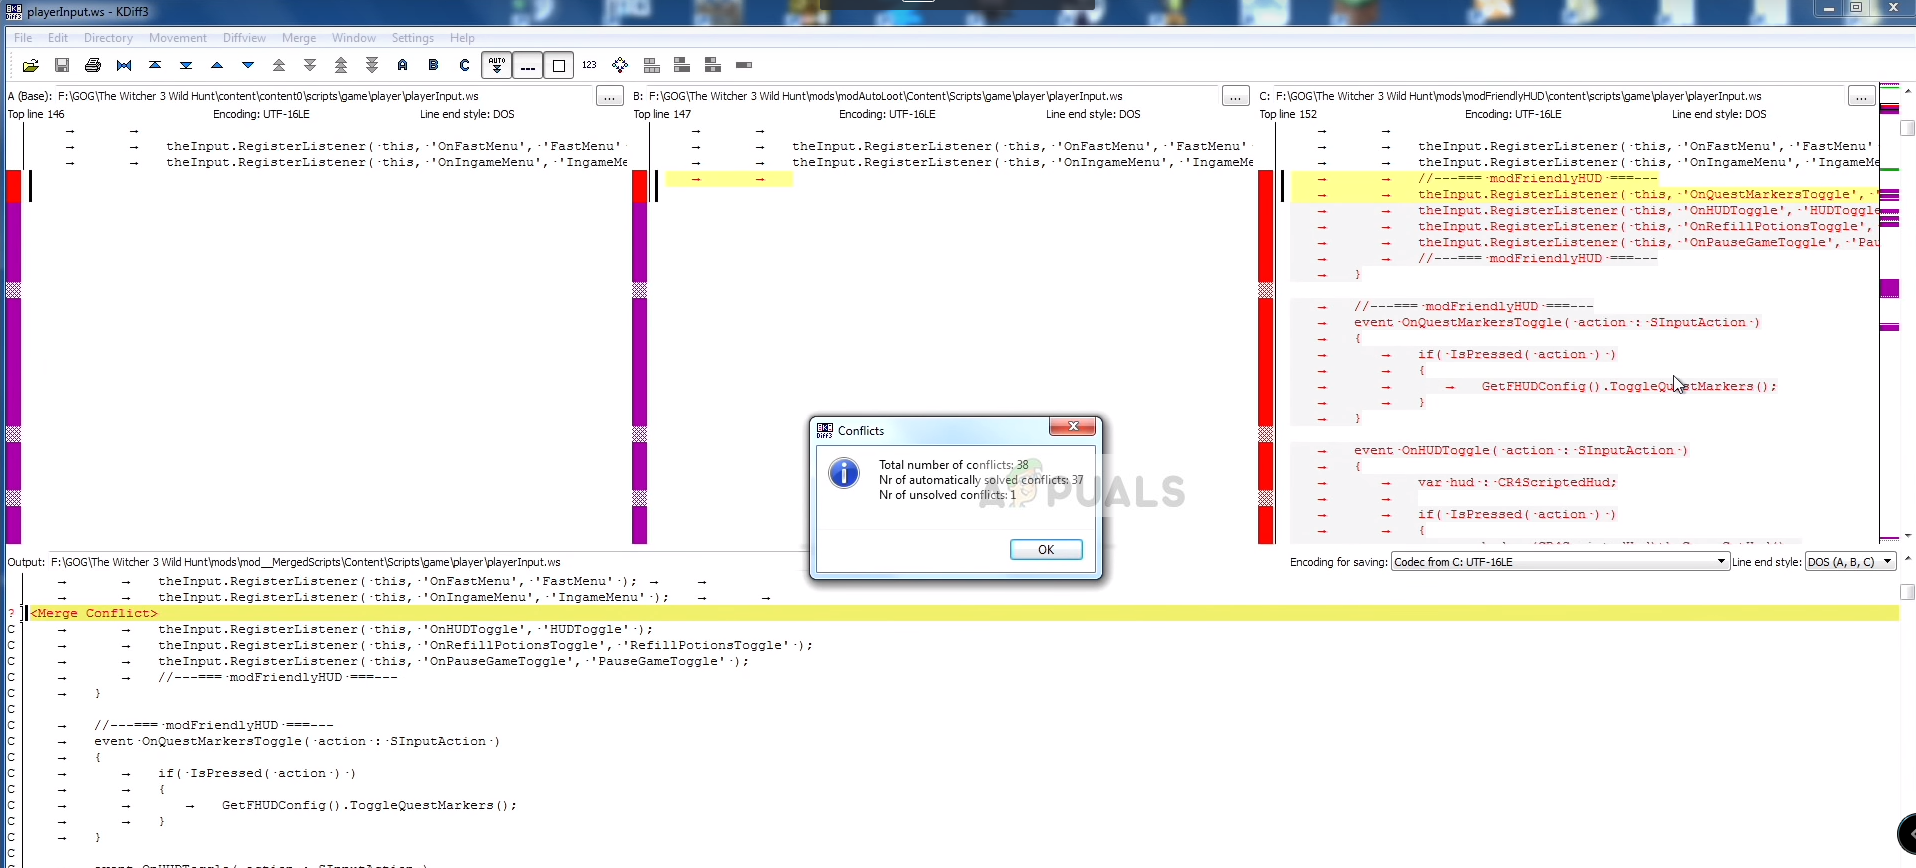
Now It will tell you the number of Conflicts in the scripts and the ones that it has resolved automatically also the ones that need to be resolved manually. Click on OKClicking on OK
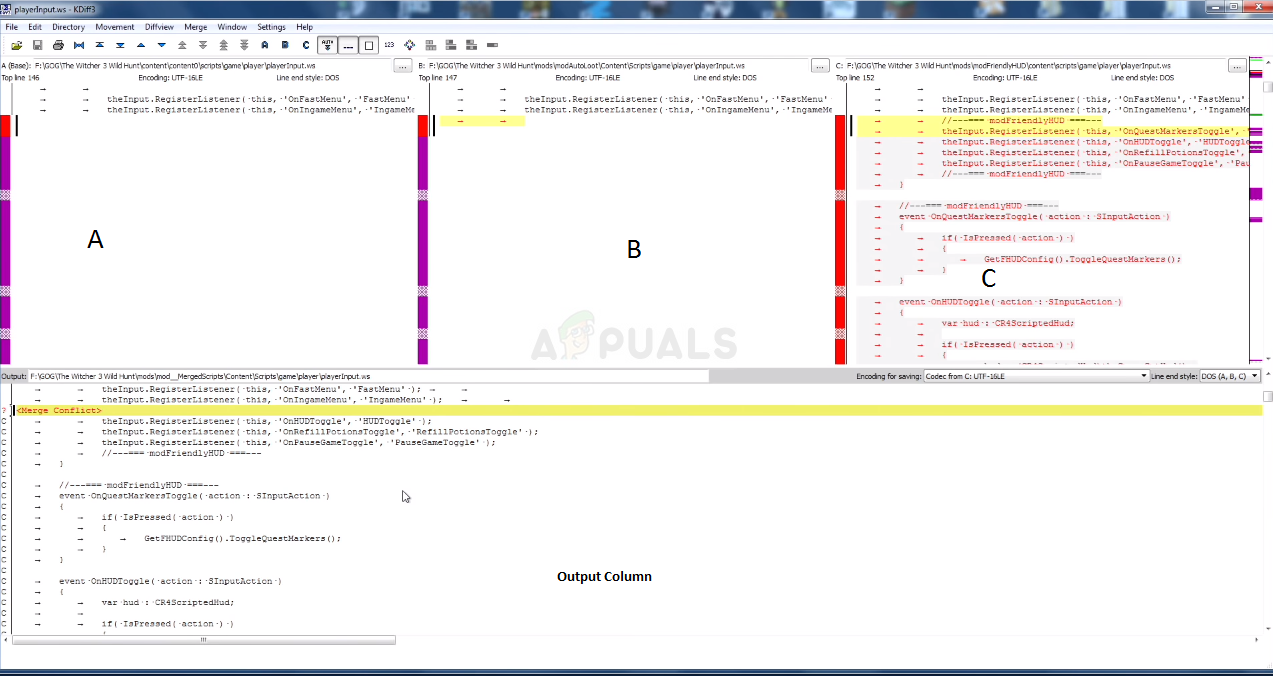
Now as you can see on the top words A, B and C are visible, they are the names of the three columns. Also, below you can see the output column
The Columns inside the script manager
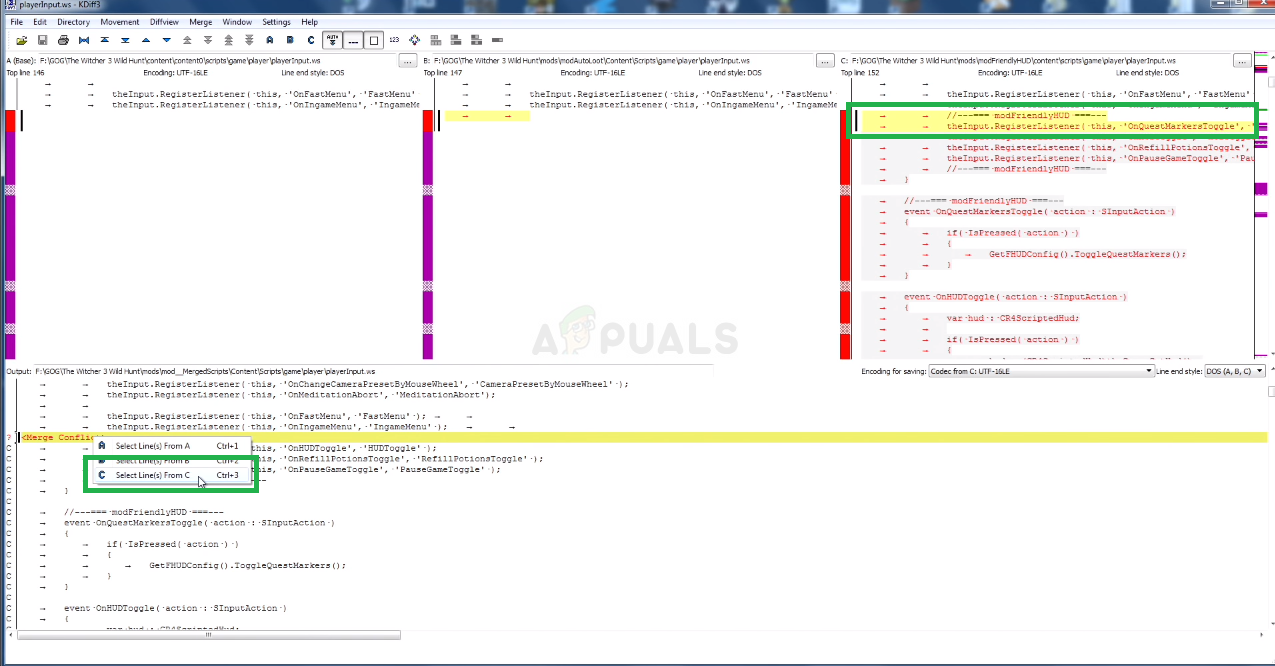
The yellow Lines indicate the conflicts that require to be resolved manually so in order to resolve those on the Output Column we scroll down and search for the line that says Merge Column and is highlighted in yellow and Right-Click on it, Now we have to see in the A, B and C columns and see in which column actual code is highlighted in yellow. In this case that is in the C column
Using Lines from Column C
So, we click on Select Lines From C
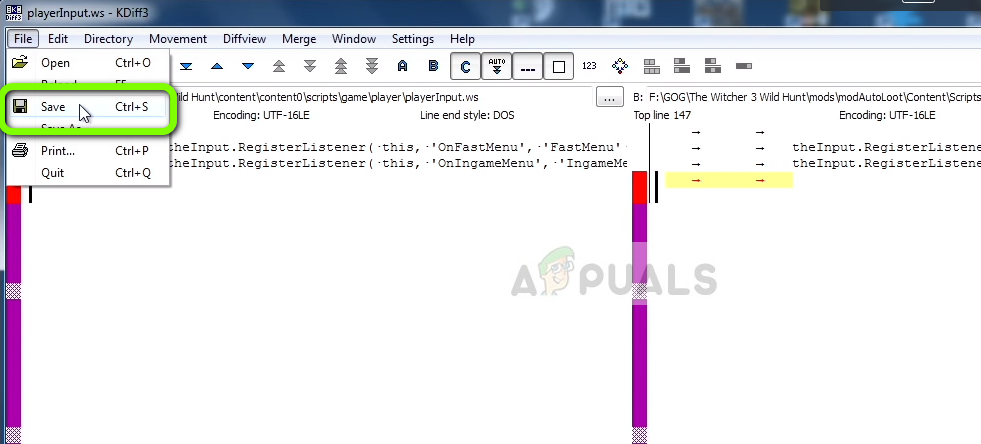
Now as you can see the lines from the column C have automatically been used and the conflict is solved now click on File and SaveSaving our changes
Now close this window and you will see a message that says Merge Finished just Click on OKClicking on OK
Now the conflict between those mods has been solved.
Note: If you have more than one manual conflict repeat the above process until all the conflicts are resolved
This process solves all the conflicts that arise between the scripts of the two mods by merging together their scripts and making sure that the merged script allows you to use both the mods together without any conflict. Make sure you try all the solutions in order because if not it might give rise to even more problems with the script of the game.
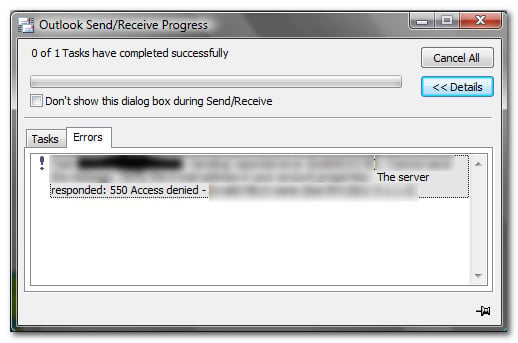
Several users have been reaching us with questions after some (or all) emails that they try to send from their email clients (Outlook, Thunderbird, etc.) are being rejected with the SMTP error 550 (also known as SMTP error 5.5.0).
What is causing the SMTP Error 550?
We investigated this particular issue by looking at various user reports and the repair strategies that they tried to resolve the issue.
As it turns out, the 500 Error status code typically means that the email could not be delivered because the recipient mailbox is not available. Almost always, the problem is with the recipient mail server than with the sending client.
By digging into the issue thoroughly, we managed to identify a list of potential suspects that might end up causing the SMTP error 500:
Recipient’s email address has a typo – This is the most frequent trigger for this particular error message. It’s very possible that the reason why you get the SMTP error 500 code returned is that the emailed that you typed inside the recipient field is incorrect.
The address no longer exists on the recipient server – It’s also possible that you managed to type the correct recipient address, but the recipient no longer exists on the receiving server. The address might have been suspended or deleted due to policy violations.
Anti-spam filtering is blocking the email – Another possible reason why you’re seeing the error message is that of an overly-protective anti-spam filtering service.
Outbound mail filtering service has blocked the email – It’s also possible that your sending server has some outbound mail filtering rules that ended up blocking the sending of the message.
SMTP authentication failure – Another possible scenario is that the message was by sending SMTP due to an SMTP authentication failure.
Receiving mail server is down – Although this is a very rare occurence, there’s a chance that the receiving mail server is down and cannot process your sending request.
Recipient mailbox is closed, inactive, disabled or suspended – The issue might also occur because the mailbox that you’re trying to reach is disabled / closed / suspended due to various reasons.
MX records are not configured correctly on the recipient mail server – In some rare occurrences, the issue might also be caused by an incorrectly configured MX records.
If you’re encountering this particular error when trying to send mail, this article will provide you with some troubleshooting steps. Down below, you’ll find a collection of methods that other users in a similar situation have used to get the issue resolved.
But keep in mind that this is usually an issue with the recipient and not the sender, so your repair strategies are limited if you have no means of troubleshooting on the receiving end.
Method 1: Double-check for typos inside the email address
As mentioned above, the number one reason why this error occurs is that the recipient email address is incorrect. With this in mind, check the recipient (To) field again and make sure that the address you typed/pasted is correct. Make sure that there are no spaces and keep in mind that the username part of the email address is case sensitive.
Ensuring that the email address is typed correctly
It’s also possible that the people who provided you the email have given you the wrong email intentionally or by mistake.
Method 2: Ask the recipient to turn down their firewall
Another possible scenario is one in which the recipient’s firewall is preventing your email from getting through to their inbox. This is somewhat tricky because you won’t see a different status code if this scenario is applicable.
Obviously, if you’re encountering this error when contacting an unknown person or when sending out mass emails this won’t be applicable, but if you personally know the person, you can ask him/her to temporarily disable the Firewall protection.
Disabling the Anti-Spam function
Some 3rd party firewall will have a separate Anti-Spam function that will automatically deal with email messages that are considered spammy. If this scenario is applicable to the recipient, convince her (or do it yourself) to disable the Anti-Spam filter.
Once the recipient has dealt with the firewall/ anti-spam filter, send the email again and see if you still get returned the SMTP error 500.
If you’re still getting the same error code, move down to the next method below.
Method 3: Verifying if the server IP or Domain is blacklisted
It’s possible that the server IP or the domain that you use to send the emails is blacklisted by an anti-spam filter. Some email systems are known to reject emails from blacklisted domains and IP automatically with the 550 status code.
If your email servers have been blacklisted, some of the emails you send out may not be delivered – that’s why you might end up getting frequent 550 SMTP error codes. This is a common practice used to reduce the amount of spam.
Fortunately, there is an easy way to verify whether this scenario is applicable to your current situation. You can use a tool that will test the IP address of your mail server over 100 DNS based email blacklists ( Real-time blacklist, DNSBL, RBL).
Here’s a quick guide on how to identify the IP address of your mail server and verify whether it has been blacklisted:
Visit this link (here), type in your email domain and click on MX Lookup to initiate a scan. This will help us discover the IP address of our email server.
Discovering the IP address of your email server
Once you manage to discover the IP Address of your email domain, copy it to your clipboard.
Visit this tool (here) and paste the IP address that you previously fetched and click on Blacklist Check. Once the scan is complete, you will be presented with a list of known email Blacklists. Scroll down through the list to confirm that your address is not blacklisted.
Blacklisted IP address
If you find that the IP address of your domain name is blacklisted on one of the lists, it’s almost a given fact that you’re unable to send the email because of some anti-spam filter.
If this investigation reveals that your Email domain or IP is blacklisted, try to use a different email address to send the email.
Several Star Was Battlefront 2 players have been encountering the Error Code 721 / 1017 when trying to connect online. This particular error is not restricted to a particular system since it’s confirmed to occur on PC, PS4 and Xbox One. This is a major inconvenience for most players since the majority of the Star Was Battlefront 2 user base only cares about the multiplayer component.
Star Was Battlefront 2 Error Code 721
Note: There’s another variation of this particular error- Error Code 1017
What is causing the Error Code 721 /1017?
We investigated this particular error by looking at EA’s official response, user reports and at the repair strategies that most affected users successfully deployed to resolve the issue. Based on what we gathered, there are multiple scenarios that will end up triggering one of these two error codes:
DDOS (Distributed Denial of Service) attack – EA has a long and painful history with coordinated DDoS attacks that ended up affecting their servers. If the issue started appearing out of nowhere, you should check if other users are encountering the same issue. If the error code is widespread, there is no other fix but to wait for the issue to be resolved by EA’s software engineers.
Cached data is causing the issue on consoles – Some people have managed to get this particular issue sorted by power cycling their console. This seems to suggest that there’s an issue with how some data is being cached that ends up breaking the online functionality of Star Wars Battlefront 2.
Corrupted installation – This issue might also occur due to corrupted installation on PC. Uninstalling the game using the Programs and Feature window and then reinstalling it from Steam or Origin seems to have fixed the problem for some affected users.
IP Configuration Problems – A lot of users with Dynamic IPs report that the issue occurs regularly for them (mostly reported to occur on PC). They are able to alleviate the issue temporary by releasing and Renewing the IP configuration using an elevated Command Prompt.
UPnP is enabled – Opposed to most of the other games with multiplayer components, Star Wars Battlefront 2 seems to be acting up when Universal Plug and Play is enabled. Several affected users have reported that the issue is no longer occurring when UPnP is disabled.
Unstable default DNS – This particular issue can also occur in those instances where the default DNS is unstable or incompatible with EA’s servers. People in this situation have managed to get the issue resolved by switching the default DNS with Google’s DNS.
If you’re currently facing the same error code in Star Wars Battlefront 2 and you’re looking for a way to get around it, this article will provide you with several troubleshooting steps. Down below, you’ll encounter a collection of methods that other users in a similar situation have used to resolve the issue.
Some of the methods below will not be applicable to the platform that you’re encountering the issue on. Because of this, follow the methods below in order and stick to those applicable to your system.
Method 1: Investigating for a widespread issue
Before you dive into the other potential repair strategies, it’s important to make sure that you’re not dealing with widespread issues. As mentioned above, Error Code 721 became notorious for Battlefront 2 players in the aftermath of a widespread DDoS attack on EA’s servers that severely crippled the online functionality for weeks.
No such reports have been reported in the last few months, but just to be sure, visit the following links just to make sure that your issue is local:
If EA is currently experiencing problems with their servers, you should be able to find a lot of reports of similar users struggling with the same error and/or an official announcement on EA’s Star Wars official Twitter account.
In the event that you find no such evidence, chances are the issue happens due to local factors. In this case, you should be able to resolve the error code using one of the methods below.
Method 2: Hard resetting console (PS4 & Xbox One)
If you’re encountering this issue on a console and you haven’t found any evidence that the issue is widespread, you are likely dealing with a local issue. In this case, power cycling your console should be enough to get the issue resolved. Several users who were in a similar situation have reported that the issue was resolved for them after they performed a hard reset.
Here’s how to perform this procedure depending on which console you’re encountering the issue on:
Hard resetting on Xbox One
Press and hold the Xbox One power button (the front of the controls) for 10 (or more seconds).
When you see that the lights have gone out completely, unplug the console’s power cable from your power supply and wait for 10 seconds or more.
After that period of time has passed, plug the power cable back into your console and press the Xbox button again.
Once your Xbox One boots back up, open Start Wars battlefront and see if the issue has been resolved.
Perform a hard reset on Xbox One
Hard resetting on PlayStation 4
On your Dualshock4 controller, press and hold the PS button to bring up the Power options.
From the list of available Power Options, select Turn off PS4 option and press the X button. Do not put it into rest mode.
Once the lights go off, unplug the console’s power cable and wait for 10 seconds or more.
Plug the power cable back into your console and press the power button to start it up.
Run Star Wars Battlefront 2 and see if the error has been resolved.
Turning OFF PS4
If this method didn’t help you to resolve the Error Code 721, move down to the next method below.
Method 3: Reinstalling Star Wars Battlefront 2 (PC only)
Several affected users have reported that the error Error Code 721 / 1017 was resolved in their case after they reinstalled the game. The procedure is mostly confirmed to be effective in those cases where the uninstalled is carried on from the Programs & Features screen (rather than directly from Steam or Origins).
Here’s a quick guide on how to do this:
Press Windows key + R to open up a Run dialog box. Then, type “appwiz.cpl” and press Enter to open up the Programs and Features window.
Type appwiz.cpl and Press Enter to Open Installed Programs List
Inside the Programs and Features screen, right-click on Star Wars Battlefront 2 and choose Uninstall. Then, follow the on-screen prompts to complete the uninstallation.
Re-download the game from Origins or Steam and see if the error has been resolved.
If reinstalling the game didn’t resolve the error code or this method wasn’t applicable to your particular scenario, move down to the next method below.
Method 4: Releasing and Renewing the IP Configuration (PC only)
Another method that has been effective for several users that have been encountering the issue on PC is to release and renew the IP configuration. What this procedure essentially does is it forces the client to give up its lease by sending the server a DHCP release notification and mark’s the old IP address as available (this is done with ipconfig /release). Then, the ipconfig /renew is used to request a new IP address.
Here’s a quick guide on how to do this:
Press Windows key + R to open up a Run dialog box. Then, type “cmd” and press Ctrl + Shift + Enter to open up an elevated Command Prompt.
Running CMD as an admin
Note: When you’re prompted by the UAC (User Account Control), click Yes to grant the application administrative privileges.
Inside the elevated Command Prompt, run the following command and press Enter to force the client to release your current IP address:
ipconfig/release
In the same elevated Command Prompt, run the following command and press Enter to request a new IP address for your machine:
ipconfig/renew
Close the elevated Command prompt and run Star Wars Battlefront 2 again to see if the issue has been resolved.
If you’re still encountering the same Error Code 721 / 1017 when trying to connect online in Star Wars Battlefront 2, move down to the next method below.
Method 5: Disabling UPnP
While most of the other games that feature a multiplayer component will become much stable one UPnP (Universal Plug and Play) is enabled, Star Wars Battlefront 2 is a different deal. There are dozens of reports of people that have managed to resolve the Error Code 721 / 1017 after disabling UPnP from their router.
This is very peculiar considering that UPnP is a technology specifically developed to allow for instant port forwarding (which most online games make use of). The fact that this fix continues to be successful for a lot of affected users suggests that there are some issues with the way the game is configured to use UPnP.
In any case, here’s a quick guide on how to disable UPnP on your router. Follow the instructions below to see if disabling UPnP manages to resolve the issue:
Make sure that your computer or console is connected to your router/modem. Next, open your default browser and type one of the following addresses and press Enter:
192.168.0.1
192.168.1.1
Note: These two are generic router addresses that should land you inside your router settings. If these don’t work, search online for specific steps on how to access your router/model settings based on your model.
Once you get to the login page, you’ll need to insert your credentials. Most manufacturers will have the default username as “admin” and the default password as “admin” or “1234”.Accessing your Router/Modem settings
Note: If the default credentials provided here don’t match your router/modem, search online for the default credentials based on what model you have.
Once you gain access to your router settings, open the Advanced (Expert) settings and look for a Nat Forwarding sub-tab. When you see it, access it and ensure that UPnP is enabled.
Enabling UPnP from your Router settings
Note: Keep in mind that these instructions were performed on a TP-Link router. If you have a different manufacturer, your screens will look different than here.
Once UPnP has been enabled, restart your router and force the changes to take effect.
Open Star Wars Battlefront 2 and see if the error code has been resolved.
If you’re still encountering the same Error Code 721 / 1017, move down to the next method below.
Method 6: Changing the default DNS to Google’s DNS
Another popular fix that has helped a lot of users to resolve the Error Code 721 / 1017 in Star Wars Battlefront 2 is to change the default DNS addresses to the ones used by Google. But keep in mind that this process will be different depending on the platform that you’re encountering the issue on.
To address this issue, we have created three separate guides, so make sure to follow the one applicable to your platform.
Changing Default DNS on PS4
From your Dashboard, go to Settings > Network > Set Up Internet Connection.
Choose Wi-Fi or LAN, depending on what type of network you’re using.
Choose Custom, then set the IP Adress to Automatic.
Set the DHCP Host Name to Do Not Specify.
Next, set the DNS Settings to Manual, set the Primary DNS to 8.8.8.8 and the Secondary DNS to 8.8.4.4.
Note: You can also use the DNS address from IPV6: Primary DNS – 208.67.222.222 Secondary DNS – 208.67.220.220
Open Star Wars Battlefront 2 and see if the error has been resolved
Google DNS settings – PS4
Changing Default DNS on Xbox One
From the Xbox One menu, go to Settings > Network > Advanced Settings.
Chose DNS settings and select Manual.
Next, enter the 8.8.8.8 for the Primary DNS and 8.8.4.4 for the Secondary DNS. Note: You can also use the DNS address from IPV6: Primary DNS – 208.67.222.222 Secondary DNS – 208.67.220.220
Start Star Wars Battlefront 2 and see if the issue has been resolved.
Changing Default DNS on PC
Press Windows key + R to open up a Run dialog box. Next, type “ncpa.cpl” and press Enter to open up the Network Connections window.
Run dialog box: ncpa.cpl
Select the connection that you want to configure the Google Public DNS. If you want to do it for your wireless network, right-click on Wi-Fi (Wireless Network Connection) and choose Properties. If you want to do it for an Ethernet (cabled) connection right-click on Ethernet (Local Area Connection) instead.
Opening the Properties screen of your network
Inside the Wi-fi/Ethernet Properties screen, go to the Networking tab and go to the settings box under This connection uses the following items. Next, select Internet Protocol Version 4 (TCP/IPv4) and click the Properties button.
Accessing the Internet Protocol settings
Inside the Internet Protocol Version 4 (TCP/IPv4) Properties screen, go to the General tab. Then, select the toggle associated with Use the following DNS server address and replace the Preferred DNS server and the Alternate DNS server with the following values: 8.8.8.8 8.8.4.4
Repeat steps 3 and 4 with Internet Protocol Version 6 (TCP/IPv6), but this time, use these values for the Preferred DNS server and the Alternate DNS server: 2001:4860:4860::8888 2001:4860:4860::8844
Restart your network connection. After your connection is restarted, open Star Wars Battlefront 2 and see if the issue has been resolved.
The error message ‘Remote Desktop can’t find the computer’ pops up when your Remote Desktop connection fails. This can be due to a number of reasons including your DNS cache or the system hosts file etc. Often it is assumed that the error message is emerging because the system is not able to resolve the specified hostname due to some issue with the DNS, however, it is not necessarily the case every time. There are other factors as well due to which you are not able to resolve the hostname.
Remote Desktop Can’t Find the Computer
In some cases, the issue is simply because you have mistakenly entered the hostname incorrectly. You can also, sometimes, get over the issue by simply using the IP address instead of the hostname. However, in case it doesn’t work out, then you are in for a ride. In such a case, you can try to use the solutions given down below to isolate the issue.
What causes the ‘Remote Desktop Can’t Find the Computer’ Error Message on Windows 10?
Well, the error message appears because your system is not able to resolve the specified hostname which can be due to one of the following factors —
DNS Cache: In most of the cases, your DNS cache is responsible for the system not being able to reach the hostname. In such a case, you will just have to flush it.
No Entry in the Hosts File: The error message can also appear if your system’s hosts file has no entry of your RDP server. In such a situation, you will have to manually add it.
Remote Desktop Connections Credentials Cache: The issue also seems to be caused by the credentials cache of the Remote Desktop Connections. To isolate it, you will have to clear the credentials cache.
Now, getting towards the possible resolutions for the issue, you can circumvent it by implementing the following solutions.
Solution 1: Flush DNS
If you are caught in the midst of the said error message then the first thing you need to do is to flush your DNS cache. In most of the cases, this will fix your issue. Here’s how to do it:
Press Windows Key + X and select Command Prompt (Admin) from the list to open an elevated command prompt.
Once the command prompt loads up, type in the following command and then hit Enter:
ipconfig /flushdns
Flushing DNS
Close the command prompt.
Check if it isolates the issue.
Solution 2: Clear RDP Connections History
In some cases, the issue can also be caused by the credentials cache of the Remote Desktop Connections. In such a case, you will have to clear the RDP connections history. This can be done using the Windows Registry. Here’s how to do it:
Press Windows Key + R to open the Run dialog box.
Type in ‘regedit’ and then hit Enter.
Now, navigate to the following directory:
HKEY_CURRENT_USER\Software\Microsoft\Terminal Server Client\Default
On the right-hand side, delete all the MRU entries and then restart your system.
Deleting MRU Entries
See if it fixes the issue.
Solution 3: Adding the Hostname to the Hosts File
If the above solutions do not work out for you, then the hosts file on your system is missing your RDP server entry. In such a case, you will have to manually put it in and then see if it fixes the issue. To do this, follow the given instructions:
Press Windows Key + X and then select Command Prompt (Admin) from the list to open an elevated command prompt.
In the command prompt, type in the following and then hit Enter:
Notepad C:\Windows\System32\drivers\etc\hosts
This will open up the hosts file in a notepad.
Hosts File
You will have to add a string in the following format:
127.0.0.1 [hostname of the server]
Press Ctrl + S to save the notepad file.
Close the notepad file and then close the command prompt.
This error is generally associated with an external device you have installed recently and the error message is accompanied with performance issues regarding the device. The error itself can be found in Device Manager when opening the properties for the problematic device.
Windows cannot Load the Device Driver for this Hardware because a Previous Instance of the Device Driver is still in Memory (Code 38)
Usually, the problematic devices have been connected via USB and the problem can be resolved by managing those ports. We have prepared several useful methods which have worked for other users and we hope it will enable you to resolve the problem!
What Causes the ‘Windows cannot Load the Device Driver for this Hardware because a Previous Instance of the Device Driver is still in Memory (Code 38)’ Error?
The list of possible causes is not very long but it pretty much deduces which solution you are ought to use in order to resolve the problem. Let’s have a look!
USB controller drivers may have been installed incorrectly and you should consider reinstalling them.
Hard disk turning off when your computer is idle has reportedly caused this problem for plenty of people.
The problem was often caused by installed third-party programs and services which have interfered with device drivers. A clean boot can help you figure out which program is causing the trouble.
Solution 1: Hold Shift While Shutting Down
This amazingly simple method definitely deserves its spot at the top of our list because of its sheer simplicity and because of the fact that it managed to help countless users who struggled with the “Windows cannot load the device driver for this hardware because a previous instance of the device driver is still in memory (Code 38)” error.
This method is the most useful for laptops. Simply hold the Shift button while clicking the Power Off option in the Start menu or the physical button. This will completely turn off your laptop and drain it of everything, making the next power up a sort of a new beginning. Check to see if this resolves your problem!
Solution 2: Reinstall USB Devices in Device Manager
This solution is generally easy even though it may take a few minutes more than other solutions depending on how many USB devices there is under Device Manager. This method has helped out the most users by far and we highly recommend you try out this method before the rest!
First of all, you will need to uninstall the driver you currently have installed on your machine.
Type “Device Manager” into the search field next to the Start menu button to open the device manager window. You can also use the Windows Key + R key combination in order to open the Run dialog box. Type devmgmt.msc in the box and click OK or Enter key.
Running Device Manager
Expand the “Universal Serial Bus controllers” section. This will display all installed USB devices your machine currently has.
Right-click on each entry on the list and choose the Uninstall device option from the context menu. Make sure you repeat the same process for all entries on the list.
Uninstalling a USB device in Device Manager
Confirm any dialog prompts, close Device Manager and restart your computer. Windows will automatically reinstall the devices you have just uninstalled and the error should be gone by now!
Solution 3: Make sure Hard Disk is never Turned off
This is yet another amazing solution which can be performed easily and which has helped plenty of people who have struggled with the same problem. This method will make sure your hard disk is never turned off when your computer is idle. This may seem like a drastic change but it’s minor when compared to the fact that your device will finally start working properly!
Right-click on the battery icon located in the system tray and click on Power Options. If you are not using Windows 10, click on the Start menu and search for Control Panel. Change the View by option to Large icons and click on the Power Options
Opening Power Options in Control Panel
Choose the power plan you are currently using (usually Balanced or Power saver) and click on the Change plan settings In the new window which opens, click on Change advanced power settings.
In this window, click the small plus button next to the Hard disk entry on the list in order to expand it. Do the same for the Turn off hard disk after Change the Setting option to Never by clicking on it.
Settings the hard disk to never turn off
Do the same for all active battery plans since your computer will sometimes switch between them automatically. Check to see if the code 38 still appears on your computer.
Solution 4: Run the Hardware & Devices Troubleshooter
This troubleshooter is the standard part of Windows troubleshooting suite inside Control Panel. Since Device Manager doesn’t offer the troubleshooter inside the device’s properties, this one is probably the most useful you can try out in order to get the job done. This has helped plenty of people and we hope it will help you as well.
Start up Control Panel by searching for the utility in the Start button or by clicking the Search button (Cortana) button at the left part of your taskbar (bottom left part of your screen.
You can also use the Windows Key + R key combo where you should type “control.exe” and click Run which will also open Control Panel directly.
Running Control Panel
After Control Panel opens, change the view to Category and click on View devices and printers under Hardware and Sound in order open this section.
Under the central section, locate the problematic device, left-click on it once, and click the Troubleshoot button at the top menu. If you don’t find your problematic device, click on your computer’s icon.
Troubleshooting a problematic device
Wait for the troubleshooter to finish trying to detect and solve the problem and follow the instructions on-screen to allow it to fix the problem. Check to see if the “Windows cannot load the device driver for this hardware because a previous instance of the device driver is still in memory (Code 38)” error still appears.
Solution 5: Clean Boot
Clean booting in order to successfully detect a service or a process which starts up with your computer is definitely the number one solution. Some other services or programs are simply problematic and this can help you pinpoint them out.
Use the Windows + R key combination on your keyboard. In the ‘Run’ dialog box type ‘msconfig’ and click ‘OK’.
Running MSCONFIG
Under the General tab in the same window, click to select the Selective startup option, and then click to clear the Load startup items check box to make sure it’s not checked.
Under the Services tab, click to select the Hide all Microsoft services check box, and then click ‘Disable all’.
Disabling all non-Microsoft services from starting up
On the Startup tab, click ‘Open Task Manager’. In the Task Manager window under the Startup tab, right click on each startup item which are enabled and select ‘Disable’.
Disabling Startup Items in Task Manager
After this, you will need to enable the Startup items one by one and restarting your computer. After that, you need to check whether the error appears again.
Once you locate the problematic startup item or service, you can undertake action in order to solve the problem. If it is a program, you can reinstall it or repair If it is a service, you can disable it, etc.
This error appears when users are trying to either upgrade from an earlier version of Windows to Windows 10 or Windows 8.1 or if they are trying to update their operating system using recovery media stored on a USB flash drive.
You can’t Install Windows on a USB flash Drive Using Setup
In other cases, the error appears even if users try to update their computer regularly using Windows Update without a USB device with Windows recovery media installed on it. Either way, we have prepared several methods which should take care of the problem quite easily if you follow the instructions carefully!
What Causes the “You can’t Install Windows on a USB flash Drive Using Setup” Error?
Windows Update errors are generally difficult to find a cause for and this problem is no exception, especially when you consider the fact that it can appear out of nowhere, even without the existence of a USB flash drive to cause the error. Still, here is a list of the most common causes:
A faulty registry key may fool your operating system into thinking it’s a portable version which can further lead to other errors such as the one described in this article.
Partition management is yet another cause for people who are trying to install a fresh copy of Windows. The partition where you want to install the OS must be marked as active.
Solution 1: Change a Registry Entry
The first solution on our list is quite easy to perform and it provides a quick fix as all you need to do is to change the value of a registry entry related to your operating system. Still, as editing the registry can be dangerous and lead to system instability, you should definitely make sure to use precaution.
Since you are going to edit a registry key, we recommend you check out this article we have published for you to safely backup your registry to prevent other problems. This way you can easily revert the changes you have made if something goes wrong.
Open the Registry Editor window by typing “regedit” in either the search bar, the Start menu, or the Run dialog box which can be accessed with the Windows Key + R key combination. Navigate to the following key in your registry by navigating at the left pane:
Click on this key and try to locate a REG_DWORD entry called PortableOperatingSystem at the right side of the window. If such option exists, right-click on it, and choose the Modify option from the context menu.
Right-click this key and choose Modify
In the Edit window, under the Value data section change the value to 1 or 0 depending on the current state, and apply the changes you have made. Confirm any security dialogs which may appear during this process.
You can now manually restart your computer by clicking Start menu >> Power button >> Restart and check to see if the problem is gone.
Solution 2: Mark the Partition as Active
This method is highly useful to users who are trying to install a fresh copy of Windows on their computer. The partition where you wish to install the operating system must be set as active which can be done by following the set of steps below:
Open the Disk Management utility by searching for it in the Start menu or the search bar and clicking the first option.
The alternative is to either use the Windows Key + X key combination or right-click on the Start menu and choose the Disk Management option in order to open its console.
Open Disk Management by Right-clicking Start Menu
Locate the partition you want to make active (the one where your operating system is installed or the one where it will be installed). Right-click on it and choose the Mark Partition as Active option from the context menu.
Right-click the required partition and choose this option
Confirm any dialog prompts and confirm your changes. Restart your computer and check to see if the “You can’t install Windows on a USB flash drive from Setup” error message still appears.
Solution 3: Reset Windows Update Components
The first method in this article is the most successful one and the second one is great for cases where the first method fails. However, this doesn’t take away the fact that this method is a generally useful way of dealing with most update-related issues on Windows PCs. It’s a somewhat lengthy method, to be honest but it will make it worth your while!
Let’s start with the method by shutting down the following services which are the core services related to Windows Update: Background Intelligent Transfer, Windows Update, and Cryptographic Services. Shutting them down before we start is very important if you want the remainder of the steps to perform without errors.
Search for “Command Prompt” either right in the Start menu or by tapping the search button right next to it. Right-click on the first result which appears at the top and select the “Run as administrator” option.
Running CMD as an admin
Users who are using an older version of Windows can use the Windows Logo Key + R key combination in order to bring up the Run dialog box. Type in “cmd” in the box and use the Ctrl + Shift + Enter key combination in order to run Command Prompt as an administrator.
Copy and paste the command shown below and make sure you click the Enter key on your keyboard.
net stop bits
net stop wuauserv
net stop appidsvc
net stop cryptsvc
Stopping the required services
After this step, you will have to delete some files if you want to continue with resetting the update components. This should also be done via Command Prompt with administrative privileges. Run this command:
Del “%ALLUSERSPROFILE%\Application Data\Microsoft\Network\Downloader\qmgr*.dat”
Change the name of the SoftwareDistribution and catroot2 In order to do this, at a command prompt with admin privileges, copy and paste the following two commands and click Enter after copying each one.
Let’s navigate back to the System32 folder in order to proceed with the final part of this method. This is how to do so in Command Prompt.
cd /d %windir%\system32
Since we have completely reset the BITS service, we will need to reregister all of the files necessary for this service to run and operate properly. However, each of the files requires a new command in order to make it reregister itself so the process may end up being quite long. Copy the commands one by one and make sure you don’t leave out any of them. You can find the complete list if you follow this link in a Google Drive file.
The next thing we are going to do is reset Winsock by copying and pasting the following command back into the administrative Command Prompt:
netsh winsock reset
netsh winhttp reset proxy
Resetting Winsock and Proxy
If all of the steps above have gone through painlessly, you can now start the services you closed in the first step by using the commands below.
net start bits
net start wuauserv
net start appidsvc
net start cryptsvc
Restart your computer after following through with the steps provided and try running Windows Update again. Hopefully, you will now be able to avoid the annoying error message.
The error appears after plugging in an external hard drive, USB flash drive or an SD card. Before the error appears, Windows might prompt you to format the disk before using it only to inform you that “The volume does not contain a recognized file system”.
The Volume does not Contain a Recognized File System
The error is sometimes caused by faulty encryption files or by a RAW extension. In either way, we have prepared several working methods for you to try out in order to get rid of this error. Good luck and follow the solutions below!
What Causes the Volume does not Contain a Recognized File System Error?
Faulty or broken Boot Manager utility which needs to be fixed using certain commands in Command Prompt.
Malware infection usually manifests itself by inflicting damage to external drives connected to your computer so make sure you scan your computer!
Encryption programs for drives sometimes damage the drive’s files during the decryption process and it leaves the drive damaged, displaying this error.
Solution 1: Fix the Boot Manager
Going through the essential commands related to the boot manager is always a nice and easy way to get started with your troubleshooting. There are several methods you should run in a particular order in order to reset and reboot the Boot Manager service which is directly responsible for managing the external drives connected to your computer.
If your computer’s system is down, you will have to use the installation media used to install windows for this process. Insert the installation drive you own or which you have just created and boot your computer. The following steps are different from one operating system to another so follow them accordingly:
WINDOWS XP, VISTA, 7: Windows Setup should open prompting you to enter the preferred language and time and date settings. Enter them correctly and choose the Repair your computer option at the bottom of the window. Keep the initial radio button selected when prompted with Use recovery tools or Restore your computer and click on the Next Choose Startup Repair (the first option) when prompted with the Choose a recovery tool selection.
WINDOWS 8, 8.1, 10: You will see a Choose your keyboard layout window so choose the one you want to use. The Choose an option screen will appear so navigate to Troubleshoot >> Advanced Options >> Command Prompt
Open Command Prompt using Advanced Options
If you are not having problems with the system, you can use the Windows UI to access this screen. If you are using Windows 10 on your PC, there is another way to access the Advanced Startup on your computer. Use the Windows Key + I key combination in order to open Settings or click the Start menu and click the gear key at the bottom left part.
Click on Update & security >> Recovery and click the Restart Now option under the Advanced startup section. Your PC will proceed to restart and you will be prompted with the Advanced options screen.
Accessing Advanced Startup using Settings
Click to open the Command Prompt from the Advanced options screen.
Command Prompt should now open with administrator privileges. Type in the command displayed below and make sure you hit Enter afterwards.
Note: Replace the ‘C:’ placeholder with the letter of the drive you are troubleshooting
Close Command Prompt afterwards and choose the Restart option. Check to see if the problem is gone.
Solution 2: Scan Your Computer for Malware
Even though this sounds over the top, malware infections are one of the leading causes of this problem and it’s vital you check your computer for malware. Malicious programs would want to prevent you from running things from external drives and they may even infect them. Follow the steps below for advice:
Here, we will show you how to scan your PC with Malwarebytes as it often shows the best results considering the fact that it really has a vast database. Good luck!
Malwarebytes Anti-Malware is an amazing anti-malware tool with a free version you can download from their official website. Hopefully, you won’t need the full suite after you solve this issue (unless you want to buy it and have it ready for other problems) so make sure you download the trial version by clicking here.
Downloading Malwarebytes from their official website
Locate the executable file you just downloaded from their website in the Downloads folder on your PC and double-click on it in order to open it on your computer.
Select where you want to install Malwarebytes and follow the installation instructions which will appear on the screen in order to complete the installation process.
Installing Malwarebytes
Open Malwarebytes by locating it in the Start menu or on your Desktop and select the Scan option available at the home screen of the application.
The tool will probably launch its updating process in order to update its virus database and then it will proceed with the scan. Please be patient until the process finishes which might definitely take a while. If malware is detected on your computer, confirm to have it deleted or quarantined.
Choose what to do with remaining threats
Restart your computer after the scanning process is over and check to see if you still experience issues with the unrecognized file system!
Note: You should also use other security scanners if you can tell the type of malware you have on your computer (ransomware, junkware, etc.). Apart from that, a single scanner will never be able to recognize and delete all types of malware so we suggest you try other ones as well!
Solution 3: Start a SFC Scan
An SFC scan if quite useful as it’s a utility which will scan your computer for missing system files (especially system files) and it will try to redownload and replace them from Microsoft’s servers. This method is great for users who have encrypted a drive on their computer and went into trouble decrypting it.
The tool can be launched via Command Prompt and users have reported that running an SFC scan which might take longer in this scenario has triggered a CHKDSK scan at the next startup which went on to resolve the problem. Make sure you give this method a shot if the ones above have failed to help!
Search for “Command Prompt” by typing it either right in the Start menu or by pressing the search button right next to it. Right-click the first entry which will pop up as a search result and select the “Run as administrator” context menu entry.
Additionally, you can also use the Windows Logo Key + R key combination in order to bring up the Run dialog box. Type in “cmd” in the dialog box which appears and use the Ctrl + Shift + Enter key combination for admin Command Prompt.
Running CMD as an admin
Type in the following commands in the window and make sure you press Enter after typing each one. Wait for the “Operation completed successfully” message or something similar to know that the method worked.
sfc /scannow
Try to restart your computer and check to see if the CHKDSK utility starts up prompting to check your hard drive for errors. Wait for it to finish with its process and check to see if the problem is gone.