Quantcast
Channel: Kevin Arrows | Network Engineer | Appuals.com
Viewing all 4495 articles
Browse latest View live

Fix: Partner Did not Connect to Router in TeamViewer

$
0
0

Some Windows users are encountering the “Partner did not connect to router” error when trying to connect to another computer via Teamviewer. Prior to the attempt, both computers appear to be ready for the connection (according to the information presented inside the Teamviewer app).
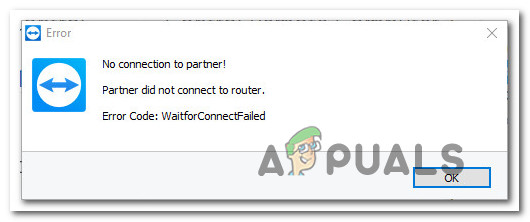
No connection to partner!
Partner did not connect to router.

What is causing the “Partner did not connect to router” error?

We investigated this particular issue by looking at various user reports and the repair strategies that most affected users have deployed to resolve this particular problem. Based on what we gathered, there are several fairly common scenarios that will trigger this particular error message:

  • One (or both) computer is not configured to allow Full Access – The most frequent reason why this error occurs is if TeamViewer is configured to disallow Full Acess Control. This can happen on one or both involved computers. in this case, the solution is to access the Advanced settings of TeamViewer and reconfigure the software to allow Full Access.
  • Network connection is triggering the error – Another fairly common reason that will trigger this error is an inconsistency with the internet connection. This typically happens with computers using an ISP that grants dynamic IPs. In this case, the easiest fix is to restart all involved network connections.
  • Microsoft Store Teamviewer app is buggy – There are numerous reports of users encountering this exact issues with the Microsoft Store version of the TeamViewer app. The vast majority of affected users have managed to resolve the problem by simply installing the desktop (classic) version of TeamViewer.
  • The latest TeamViewer version is not supported by one (or both) computer – There are cases where the latest version of TeamViewer will trigger this particular issue on low-spec computers. Downgrading the TeamViewer version on all involved parties should resolve the issue in this case.

If you’re currently struggling to resolve the “Partner did not connect to router” error, this article will provide you with several troubleshooting steps. Down below, you’ll find a collection of methods that other users in a similar situation have used to get the issue resolved.

Since the methods are ordered by efficiency and simplicity, we advise you to follow them in the order that they are presented in. One of them is bound to resolve the issue in your particular scenario.

Method 1: Allowing Full Access

In order to ensure that the TeamViewer client is not prohibited from facilitated a connection between the two computers, you’ll need to make sure that both computers are configured to allow full Access Control. This setting should be enabled by default, but certain 3rd party security applications might override this preference automatically.

Here’s a quick guide on making sure that Access Control is set to Full Access on both of the involved computers:

Note: The procedure below needs to be followed on every computer involved in the operation.

  1. Open TeamViewer and click on the Extras tab. Then, from the newly appeared drop-down menu, click on Options to bring up the settings menu.
  2. Inside the TeamViewer options menu, select the Advanced tab from the left-hand side menu.
  3. With the Advanced tab selected, move to the right-hand side menu and click on Show advanced options to make the hidden settings visible.
  4. Once the Advanced options menu is visible, scroll down to Advanced settings for connections to this computer and modify the drop-down menu associated with Access Control to Full Access.
  5. Save the settings by clicking the Ok button.
  6. Restart Teamviewer on both computers and see if the issue has been resolved.
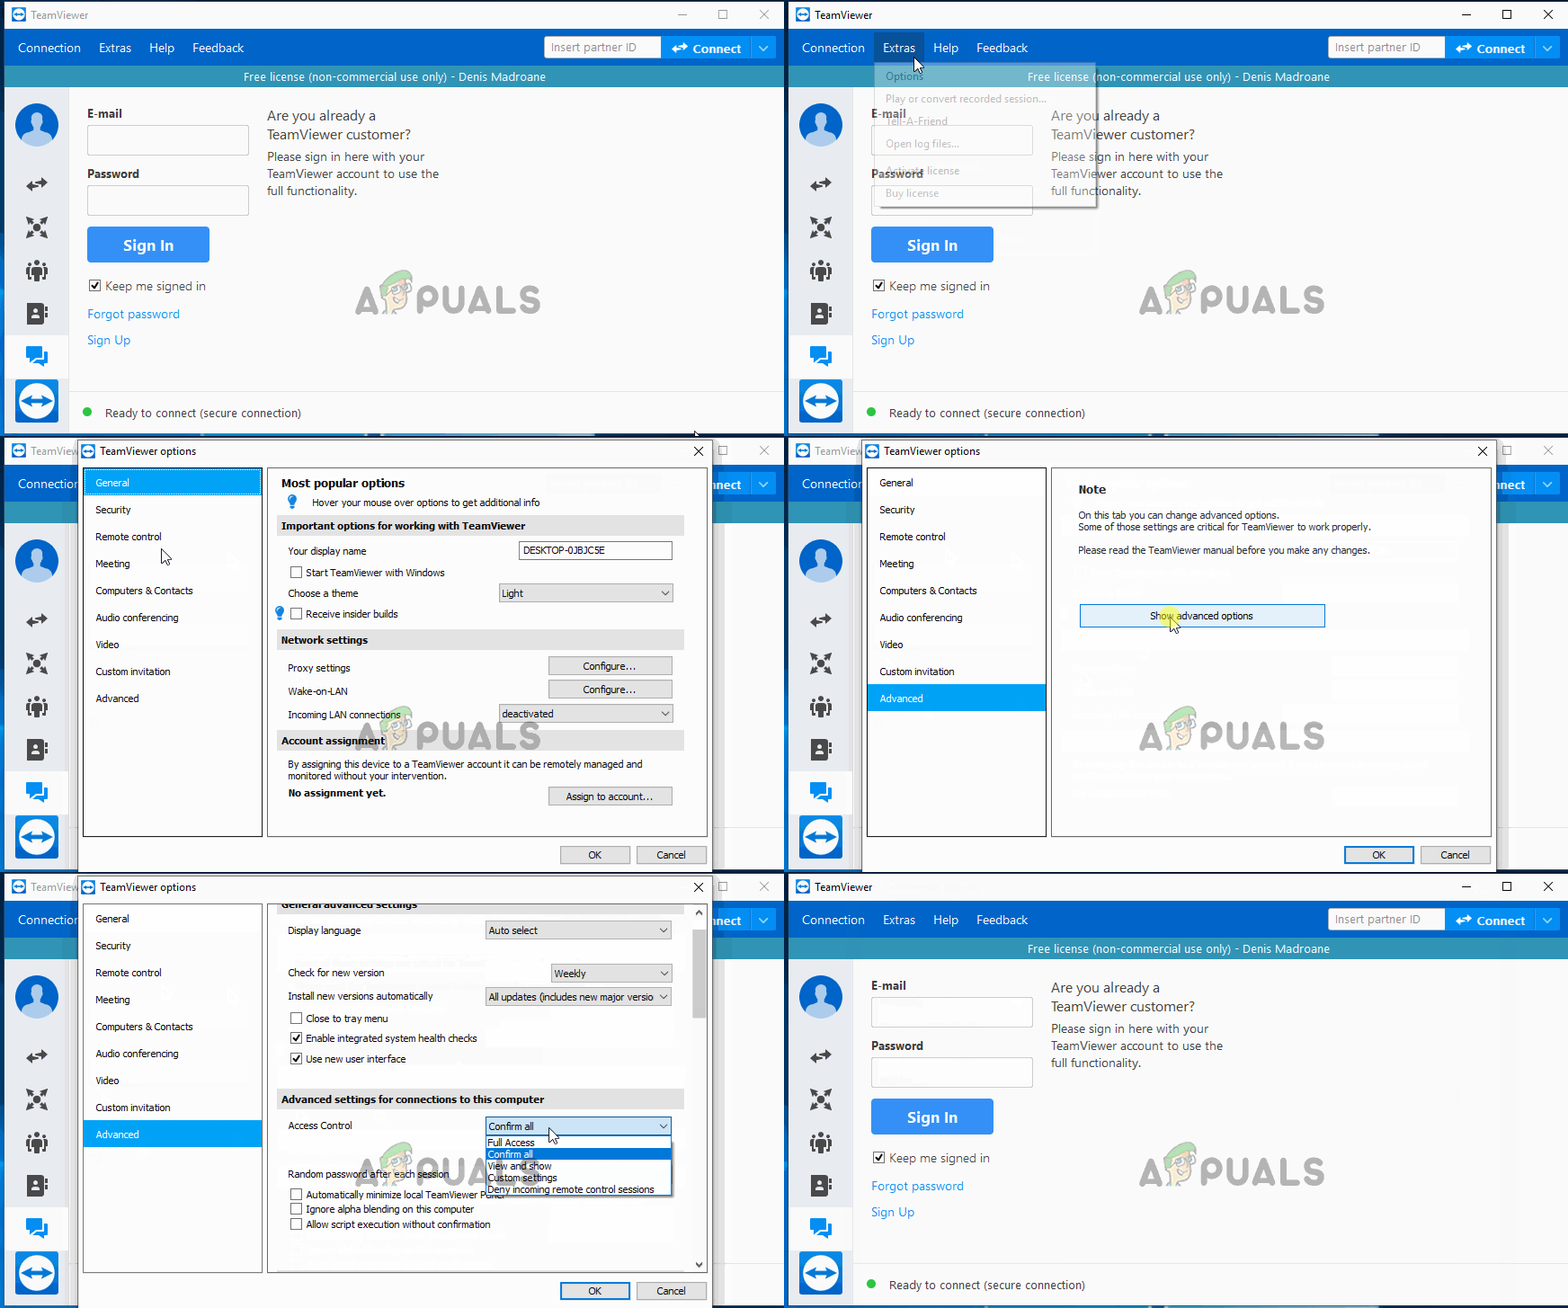
Enabling Full Access in TeamViewer

If you’re still encountering the “Partner did not connect to router” error after following the steps above on both computers, move down to the next method below.

Method 2: Restarting the network connection both PC

As some users have reported, restarting the network connection on both involved computers might be enough to resolve the “Partner did not connect to router” error. There are confirmed situations where the partner was initially not ready for the connection and a router/modem restart solved the issue.

So, before trying anything else, let’s see if a simple network refresh will do the trick. With this in mind, disconnect your computer from the network and ask your partner to do the same. The best approach to switch your router/modem off and on again, then wait for the connection to be re-established.

After the internet connection on both computers has been re-established, try to re-create the TeamViewer connection and see if the same issue is still occurring.

If you’re still seeing the “Partner did not connect to router” error, move down to the next method below.

Method 3: Using the Teamviewer desktop app on both computers

As it turns out, this problem seems to be a lot more frequent when the involved parties are both using the Windows App store app. Several affected users have reported that the issue was no longer occurring if they use the full desktop app downloaded from TeamViewer’s website.

The Windows Store app was buggy from the start and the issues seem to persist 2+ years after the original launch.

Note:  Remember that in order to implement this method, you’ll need to install the desktop app of Teamviewer on both involved parties. In other words, you’ll need to follow the instructions below twice – one for each involved computer.

Here’s how to install the TeamViewer desktop app :

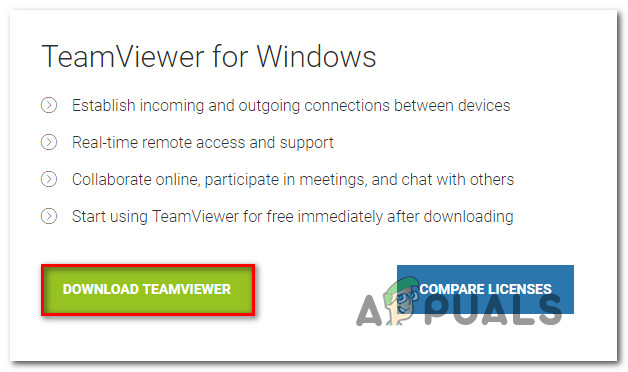
  1. Visit this link (here) and click the Download TeamViewer button to initiate the download of the installation executable.
    Downloading the desktop version of TeamViewer
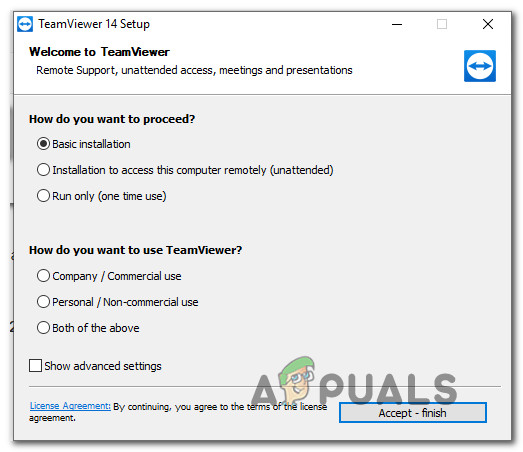
  2. Once the download is complete, open the installation executable (TeamViewer_Setup.exe) and follow the on-screen prompts to complete the installation.
    Installing the desktop version of TeamViewer on both computers
  3. When prompted by the UAC (User Account Control), click Yes to grant administrative privileges.
  4. Once the desktop version of TeamViewer is installed on both computers, reboot both and see if the error is still occurring when you try to connect after the next startup is complete.

If you’re still encountering the same “Partner did not connect to router” error, move down to the next method below.

Method 4: Downgrading to a previous version

If you’ve come this far without a result, one last thing that you might try is to downgrade the TeamViewer version to a previous, more stable version. But keep in mind that you’ll need to install the same version on both computers.

Several users struggling to resolve the same issue have managed to circumvent the issue by downgrading to version 11. Here’s  a quick guide on how to do this:

Note: You’ll need to follow the steps below on both computers.

  1. Press Windows key + R to open up a Run dialog box. Then, type “appwiz.cpl” and press Enter to open the Programs and Features menu.
    Type appwiz.cpl and Press Enter to Open Installed Programs List
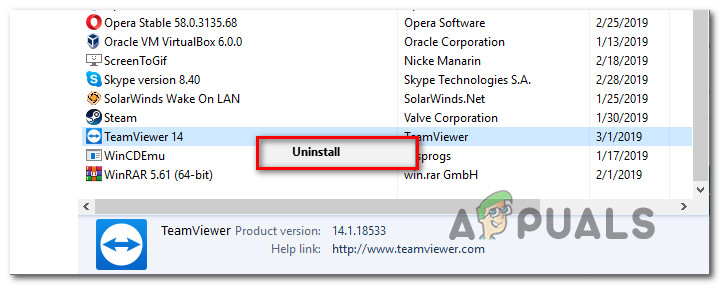
  2. Inside Programs and Features, scroll down through the list of installed applications to locate the TeamViewer installation. Once you see it, right-click and click on Uninstall.
    Uninstalling the newer version of TeamViewer

    Note: Make sure TeamViewer is completely closed before attempting to uninstall.

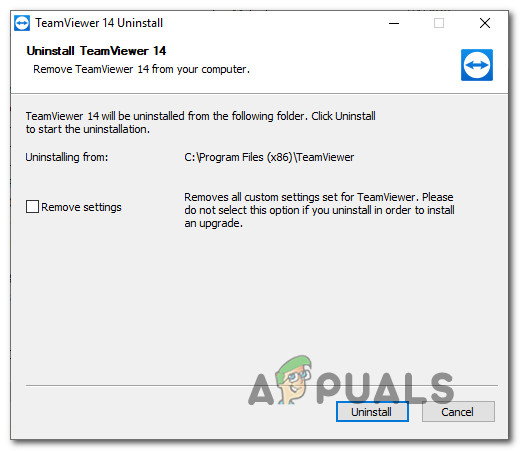
  3. Follow the instructions on the Uninstall screen to get rid of the software, then restart your computer.
    Uninstalling TeamViewer 14
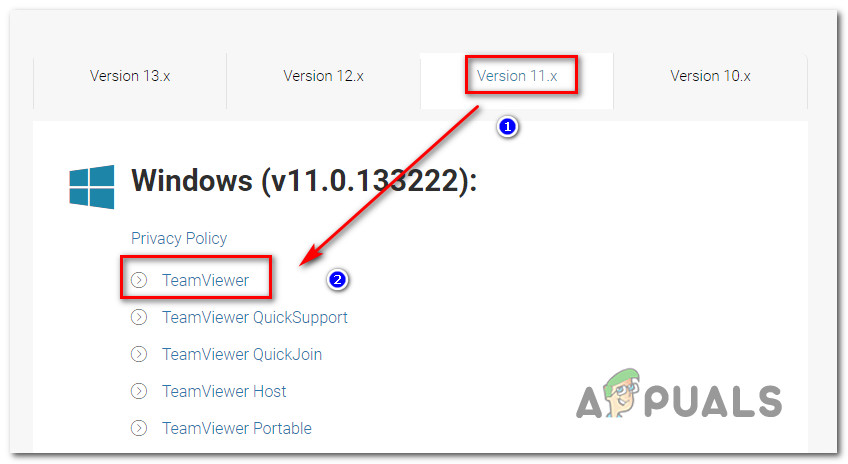
  4. At the next system startup, visit this link (here), click on the Version 11.X tab, then click on TeamViewer to download the installation executable.
    Downloading a previous TeamViewer version
  5. Follow the install instructions to install the older version on both computers.
  6. Once the installation is complete, restart both computers again and re-create the connection. The “Partner did not connect to router” error should no longer occur.

The post Fix: Partner Did not Connect to Router in TeamViewer appeared first on Appuals.com.

The 5 Best Antivirus Softwares for Windows XP

$
0
0

Five years since Microsoft officially retired Windows XP, the OS is still very much in use. Which is not really surprising considering how popular it was. But still, we cannot ignore the risks that come with using this Operating System. Without any patches being installed, It can be really easy for attackers to hack into your system. And we have already seen how hackers can utilize system vulnerabilities to cause huge damages. This is why my first advice to anyone using Windows XP is always to upgrade their OS.

However, I understand that for some this may not be a viable option. This could be due to lack of upgrade costs, hardware limitations or Work environment limitation. There are still several institutions like schools and hospitals that still rely on Windows XP. In such cases then you will have to resort to different methods to ensure that you are protected. And my best recommendation is the installation of an Antivirus software.

It is the first program I install on any new machine and considering that I am always using the latest version of Windows then it should say a lot to you whose Operating system has not seen an update since 2014. Unfortunately, some of the Antivirus Software that may be considered as the best overall may not be necessarily the best for Windows XP because there is always the chance that they too have stopped supporting the OS. Which makes the process of choosing the ideal Antivirus for your XP system a task in itself.

Fortunately, we have rounded up a list of 5 of the best Antivirus software that still receive updates from their developers. We will highlight the major features of each so that you can make an informed decision on which is the most ideal.

But even before that, there are some other measures you can take to improve the overall security of your XP machine. First, ensure that you have upgraded to the latest service pack 3. Also, ensure that you have installed all the patches released by Microsoft before they seized support for the OS. Additionally, using a supported browser can help you maintain some level of security when surfing the net. You can check out our post for the best browsers for Windows XP.

But now to the matters at hand, which are the best Antivirus programs for Windows XP.

Comodo may be a relatively new name to most users but it is an excellent choice for protecting your Windows XP computer. And one of the biggest advantage it offers is the ability to detect and prevent Zero-day exploits. These attacks are very easy to miss and usually by the time you know they have already caused huge damages to your computer or organization.

Comodo Antivirus

Comodo protects your system against all types of Malware including viruses, Trojans, and Worms. The reason it’s so effective in preventing new attacks can be attributed to its unique default-deny platform. It works by testing any unknown file trying to access your system in a sophisticated virtual system complete with Virtual com interfaces, Disk, Registry, and Memory. Depending on how the malware affects the virtual system then the antivirus can determine whether or not it is a threat.

During the initial stages of use, Comodo may flag safe applications as threats but the good thing is that it allows you to create a list of trusted websites and applications which it can skip during the scanning process.

AVG is a household name when it comes to antiviruses. It should, therefore, come as good news that their Antivirus software offers full protection against malware in Windows XP. The bad news is that you will not have access to new features that come with the latest versions of their software. The good news is that the virus definitions will always be up to date so no chances of infection from new viruses. AVG ensures real-time protection of your computer by performing continuous background scans.

AVG Antivirus Free

You will also like the intuitive user-friendly AVG interface. It comes with a toolbar from where you can easily access all the important functionalities such as the system status, Resident protection, updates, system analysis among others. The resident protection feature works in cooperation with AVG Email scanner to protect you from possible attacks through your email. They scan every file attachment including those that have already been opened and executed and will immediately block them if found to be malicious.

AVG also allows you to easily disable Internet Explorer and other Windows components like Media player that may act as gateways to attacks on your system. This antivirus is compatible with all versions of Windows which means you can still continue using it if you choose to upgrade your OS. And the best part is that it’s completely free.

Much like AVG, Avast is also a trusted name that will protect your XP system against all the latest threats. However, you will not have access to any new features that are developed. You cannot also contact support for assistance with any issue with the program. Avast antivirus has four scanning modes. Quick scan, Full System Scan, Removable media scan and targeted scanning that allows you to select a specific folder.

Avast Free Antivirus

Another good thing about Avast is that it does not conflict with any other Anti-malware that you might have installed. You can, therefore, combine their functionalities to achieve a fool-proof system.

Avast antivirus is a lightweight program that does not draw too much power from your CPU. As a result, you won’t notice any change in the performance of your system. The program also includes extra features like disk clean up and browser cleanup that can be leveraged to increase the performance of your old computer. Avast is also available for Android and iOS operating systems in case you need to extend protection to your mobile devices. It is completely free.

Panda Security Antivirus takes a different approach in protecting your PC by running its scans on the cloud. And there are two big advantages to this. One is that it uses fewer system resources and therefore your computer is always running at optimum performance. Secondly and definitely most important is that it has access to an unlimited database of malware types on the cloud which makes it more effective in protecting your XP system.

Panda Security Cloud Antivirus

Panda antivirus can identify and protect your system against all types of malware including spyware and rootkits. For unknown viruses, Panda Antivirus works by analyzing their behavior patterns to determine whether or not they pose a risk to the system. It also a great tool for protection against online fraud and hackers.

Panda Antivirus performs automatic updates on the cloud which eliminates the need to install the updates manually. It also includes a VPN that allows you to browse the internet privately. The user interface is also an impressive feature that I should mention. It’s quite modern compared to the other antivirus programs and not overly complicated. Panda Cloud Antivirus is available as both a free and licensed version.

BitDefender is the other antivirus you can trust to secure your XP system. And What I really like about it is just how easy it is to use. If it is your first time using an antivirus or you just prefer a program that’s simple to use then it does not get better than this.

BitDefender

BitDefender does not involve any configurations and the UI has only 3 components. An automatic scan button, a display of the scanned log analysis, and the option to enable/disable the antivirus shields. It is a basic software that will not take up much of your system resources but is quite effective in identifying and blocking viruses, worms, spyware and other types of malware.

BitDefender performs real-time analysis of your system and you are hence assured of protection around the clock. Nevertheless, it includes a game mode that helps you maintain optimum performance when playing games by disabling the real-time analysis.

The post The 5 Best Antivirus Softwares for Windows XP appeared first on Appuals.com.

The 5 Best Compression Softwares in 2019

$
0
0

What comes to mind when you hear the word compression? More storage space, Faster download time,  right? Some might argue that unlike before, we now have considerably large hard disks that undermine the relevance of compression software. However, they forget one thing. The larger the hard disk the more it will cost you. And what about when you want to send files over connections with limited bandwidth or via email. Gmail, for instance, can only send files not exceeding 25 MB. When you put these factors into consideration then you begin to understand how a compression software can help you.

Also if we are to think more critically file compression can be a great way to increase productivity. By reducing the time taken to send and download files over the internet then you save valuable time that could be utilized elsewhere. I know. It’s deep but it’s true.

Then there are the additional features that come bundled within the compression software. Like file encryption. So in this post, we aim to help you choose the most ideal compression software by highlighting the 5 best tools by our standards.

Would this even be a list of compression software without WinZip? This was one of the first compression tools and many years later it’s just as effective. The biggest challenge of using WinZip, perhaps, is that you have to pay for a license when most of the other major compression tools are free. However, I would say that it is understandable considering the extra functionalities it offers.

WinZip

For instance, WinZip includes its own compression format type called .zipx. This file format has a better compression rate than all the other compressed formats and so by extension WinZip has better compression rates than all the other software. Am not one to be convinced by mere words so I decided to prove how true this claim is by testing WinZip’s compression rate against that of 7-Zip and WinRar.

I used a 1.5GB video file and a 10GB ISO image as my test files. True to their word, the Zipx format had the best compression. Although in the case of ISO image, it was evenly matched with 7-Zip both recording 43% compression rates. You can, therefore, already guess which is my second best pick for compression software. Other file types supported by WinZip include 7z, TAR, GZIP, VHD, and XZ.

WinZip has also tried to keep up with current trends as is evidenced by the integration with the cloud. It provides an easy way to upload and download files on the cloud and offers support for various cloud services like DropBox, Google Drive, CloudMe and SkyDrive.

This software is also integrated with Microsoft Office to facilitate easy zipping of your documents. It also includes add-ons that extend all its functionalities to Windows Explorer, Microsoft Outlook, Photos, and SharePoint. WinZip uses unlossy file compression and will also protect your data through banking-level encryption.

7-Zip is a free open-source compression tool that is also quite popular. And one major reason for its popularity is its great compression rates that are on the same playing field as some of the paid versions. 7-Zip allows the compression of files into numerous formats including its own 7z that enables you to create self-extracting files. The developers also claim that this software can compress files of up to 16 billion GB. And seeing that I don’t have such a file to confirm this, I guess we will have to believe it.

7-Zip

File compression with 7-Zip is rather easy. It features a straightforward customizable interface that allows you to remove options that you don’t need. You can drag your file into the compression window or add it directly from the UI by following a simple file tree that works the same as Windows Explorer.

7-Zip will also be a great tool for encrypting your files. You can also use it to split the very large files into smaller volumes to facilitate easier sharing. Unlike WinZip, you cannot use 7-Zip to repair damaged archives. However, this being a free software you were always bound to make some compromise.

WinRar is another staple name in the file compression niche thanks to its ability to create RAR files. Most of the other compression tools can only extract the RAR files. You might also have come across WinRAR from the numerous jokes and memes that circulate around the web regarding its free trial. Although WinRAR is presented as a premium software with 30-days free trial, you will still be able to use its full features years after the free trial ended. The downside being that you have to deal with a continuous pop-up window reminding you to purchase the software.

WinRAR

Another highlight feature of WinRAR is the ability to create a ‘solid archive box’ that enables you to compress multiple files at the same time. On top of the RAR format, you will still be able to compress files into various other formats like ACE, ARJ, BZ2, and GZ.

The WinRAR interface is not what you would call appealing but WinRAR has tried to improve it over time. Beginners may still have trouble navigating through the numerous available options but they are all well labeled for better understanding. It also includes a wizard to guide you through the zipping and unzipping process.

WinRAR uses 256-bit encryption to protect your data and can also be used to repair broken archives. The software is available for both Windows and Mac and comes with multiple language versions.

PeaZip is another open-source compression tool that is available freely for both Windows and Linux users. It can be used to compress files into over 150 compressed formats including its own PEA format.

PeaZip

If you already have WinRAR installed on your computer, PeaZip can integrate with it allowing you to create and extract RAR files. This tool comes with a visibly colorful and intuitive UI that’s a complete deviation from what you will see on 7-Zip. Also, unlike its open-source counterpart, you can fix broken archives using PeaZip.

This tool is also available as a portable version. Which means even if it’s not your main compressing tool you could still carry it around in your drive for zipping and unzipping on the go. Another distinguishing feature of this tool is the ability to convert archived files into different formats. PeaZip can also be used to encrypt your files and uses two-factor authentication. Other great functionalities include a password manager, secure file deletion and file hashing.

Wondershare is not your typical file compression tool but if its videos you are interested in shrinking then it’s an excellent choice. Being compatible with over 1000 video formats it’s hard to imagine any type of video that you cannot compress using Wondershare.

Wondershare

This tool works by manipulating file parameters such as video resolution, encoders, bitrate, format, and others to achieve the compressed state. It also includes some editing capabilities that allow you to crop, trim, rotate, and perform other editing features before you can compress the video.

Wondershare also includes a video download feature that lets you download videos from all the popular video platforms by pasting the video URL. You can also compress multiple videos at the same time thanks to the batch processing feature. Other additional features include GIF maker, screen recorder, casting video to the TV and the ability to fix Media Metadata. Wondershare is available for both Windows and Mac users.

The post The 5 Best Compression Softwares in 2019 appeared first on Appuals.com.

The 5 Best Voice Changing Softwares to Use in 2019

$
0
0

Do you remember when the Talking Tom app first came out? I do because I could not stop laughing at how stupidly funny it was. Well, that was voice changing technology in its most basic form. Now imagine being able to do this in real time and with multiple voice variations. Because that is what voice changing software will help you do. They come with multiple preset voice types like Alien voices, robotic voices, and cartoon voices. They also allow you to manually change your voice by altering the pitch, frequency, tone, and other voice aspects.

The mischevious ones are already thinking about how they can use these software to prank their friends and relatives. I don’t blame you. The voice changing software can also be great in changing your voice during gaming. This could be just for fun but it can also better personalize the character you are playing. If you are playing a commander in Black Ops Unit Commander then you will need a commanding voice that calls for some respect.

So in this post, I will be taking you through some of the finest Voice Changer Software you can use. Depending on your intended use, you can opt for a real-time voice changer or the alternative type that requires that you record your voice before you can alter it. Now let’s dive in.

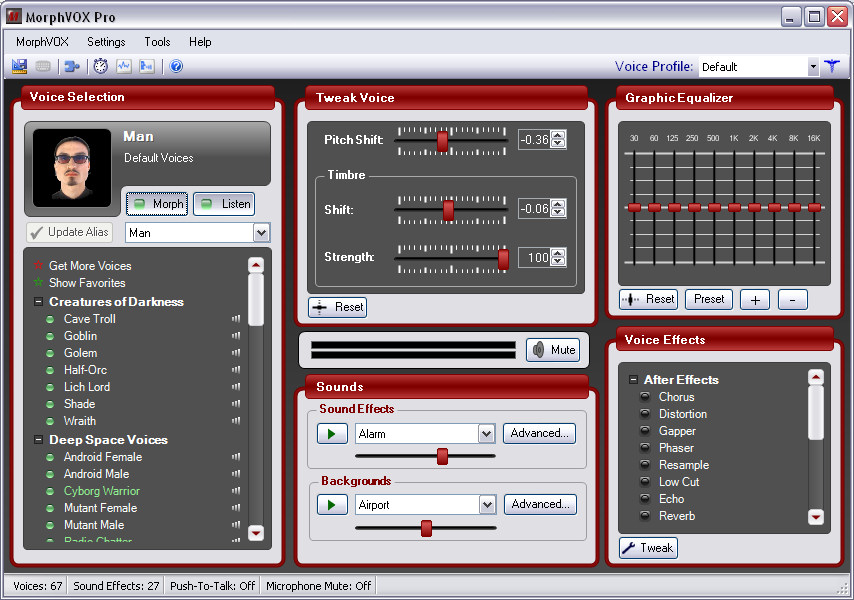
Morph Vox is a largely popular software that comes with a bunch of cool features. It is available as a free tool, MorphVox Junior, and as a paid version, MorphVox Pro. However, the free version may not be ideal given the set of limitations imposed. For instance, it only comes with 3 voice options. A single male, female, and kid. Therefore, for the best experience, I would recommend that you use the premium version.

MorphVOX Pro

It changes voice in real time and is hence well suited for online communication and gaming. MorphVox comes with two operating modes. The skinned mode allows you to quickly select your voice of choice from the already existing options maybe add a few effects and you are good to go. Then there is the Studio Mode that allows you to dig a little deeper. Here you can adjust the voice timbre and pitch.

MorphVox easily integrates with the various games and online chat platforms and includes a background noise filter that will be especially useful if you are using your computer’s built-in microphone. Another interesting feature is the ability to add background noises that can help create a real-life scenario easily from your computer. MorphVox also allows you to alter recorded audios that are in .WAV format. This software is only available for Windows.

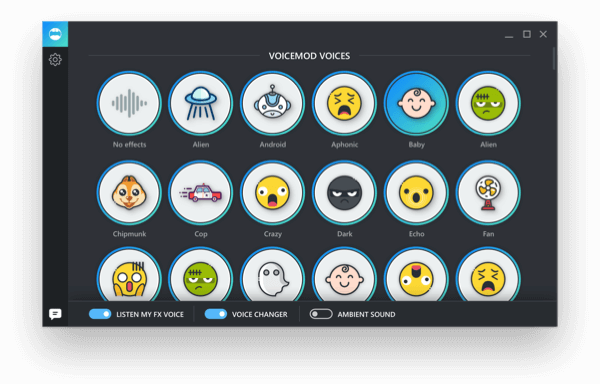
Voice Mod is a voice changer software designed for Windows users. It modifies your voice online and offers support for numerous online games with the most notable being Fortnite, Minecraft, and PUBG. It’s also a great option for streaming and chatting online. Some of the chatting and streaming software that are compatible with Voice Mod include Discord, Twitch, VRChat, Skype, and Stream Deck.

Voicemod

Voice Mod changes your voice in the real-time and has a pretty awesome collection of voice options and effects. From Chipmunk, baby, Android, Alien to police there is no shortage of voice types. There is even a crazy voice. Voice Mod is available for free.

Voxal Voice Changer is also a free software and is available for both Windows and Mac users. It enables you to alter your voice in basically every application that uses a microphone including all your favorite games. And there is no shortage of voice types and effects. There is even the choice to adopt a male or female voice. Yes, there is a very high chance that the female online game partner with an angelic voice might actually be a dude.

Voxal Voice Changer

Voxal Voice changer also alters your voice in real time but it also includes the option to change recorded audio. This software comes with an easy to understand UI that makes the process of editing your voice a breeze. It’s also quite lightweight in that it does not affect the performance of your system and other application. A point to note is that if you intend to use this voice changer in a business model then you will have to purchase it. It is only free for home use.

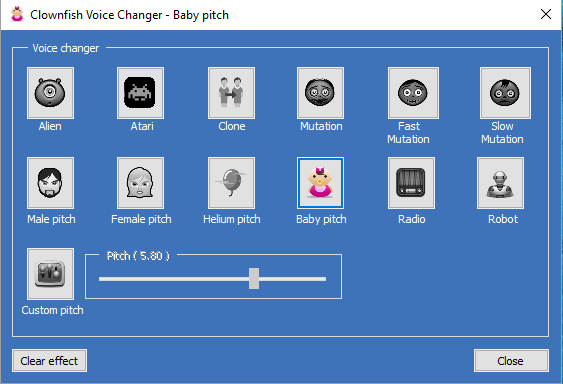
Clownfish is a multi-platform application that can be also used to change your voice in any application in your computer that uses a microphone. The most notable supported applications are Skype, Viber, Discord, and TeamSpeak. It also modifies your voice in steam and will, therefore, work with all your favorite games.

Clownfish Voice Changer

Clownfish does not support the addition of voice effects by default but it provides guides on where to find and install them. The installation process is straightforward and the software does not put too much load on the CPU performance. There are multiple voice options to choose from and just to mention the most interesting, we have Male pitch, Female Pitch, Baby Pitch, Alien, Robot and Darth Vader. That last one will come as good news to the Star Wars fans. Clownfish Voice Changer is only available for Windows.

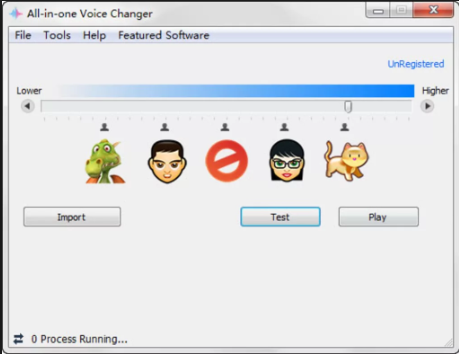
All-in-One Voice changer is what you would call an upgrade Skype Voice Changer. It works on the same principle but allows you to link it to other IM tools such as Yahoo Messenger and QQ International. So basically All-in-One tool is a voice changer developed specifically for online chatting.

All-in-One Voice Changer

It is a great software for making prank calls to your friends and relatives. It even lets you change the voice type in mid-conversation to make things funnier. Changing your voice has never been easier than with All-in-One Voice Changer. It features a slide bar that you either move to the left or right to change the pitch of your voice. You can preview each change until you achieve your preferred choice. You can also import a recorded .wav audio and change it within the software.

Unfortunately, this software is not free. They do provide a free trial but only in a Cat voice which is a bit underwhelming. On the upside, once you upgrade you will get access to video modification feature that is not available in any of the other software. You can use it to add funny dubs when video chatting.

The post The 5 Best Voice Changing Softwares to Use in 2019 appeared first on Appuals.com.

Fix: WebGL is Not Supported

$
0
0

Some users are reportedly unable to use WebGL-based sites like WebGL Earth, Shadertoy, etc. The message that comes up is ‘WebGL is not supported‘. Although the message is much more common with Google Chrome, it’s also confirmed to appear with other browsers (Opera & Firefox). The issue is not exclusive to a certain Windows version, but it’s mostly reported to occur with systems using an older GPU model.

WebGL is not supported

What is WebGL?

WebGL is a JavaScript API used for rendering interactive 2D and 3D graphics without the use of plug-ins within any compatible web browser. Although WebGL is fully integrated with most web standards, it’s still depended on GPU support and might not be available on older devices.

The main usage of WebGL is the implementation of GPU-accelerated usage of physics, effects and image processing as part of the web page canvas. The original author of WebGL is the Mozilla Foundation.

What is causing the ‘WebGL not supported’ issue?

We investigated this particular issue by looking at various user reports and the repair strategies that they themselves deployed to get this particular issue resolved. Based on what we gathered, there are several common scenarios that will trigger this particular issue:

  • Browser version dosen’t support WebGL – Older browser versions are not designed to support WebGL technology. If you’re encountering the issue with a severy outdated browser version, the fix is to update to a version that supports WebGL.
  • Hardware acceleration is not enabled in your browser – Although hardware acceleration is not a requirement for WebGL, we’ve found a lot of reports where the WebGL technology was not functioning correctly. Chrome is known to falsely report that WebGL is not supported if hardware acceleration is disabled. In this case, the solution is to access your browser settings and enable hardware acceleration from your browser.
  • Outdated Graphics drivers – Another possible trigger that will cause the ‘WebGL is not supported’ error is a severely outdated graphics driver. In this case, the fix to update the graphics driver to the latest version automatically (using Device Manager) or manually (using the proprietary updating software from your GPU manufacturer).
  • Windows XP doesn’t support WebGL – If you’re still using Windows XP, you’ll likely need to upgrade in order to use the WebGL technology. A workaround that will allow you to use XP is to use an older Chromium build (not recommended)

If you’re looking for a way to resolve the ‘WebGL is not supported‘ error on your browser, this article will provide you with several troubleshooting steps. Down below, you’ll find a collection of methods that other users in a similar situation have used to get the issue resolved.

Method 1: Check if your browser version supports WebGL 

Keep in mind that not all browser versions will support WebGL. If your browser version is severely outdated, you might be seeing this error message because your browser is not equipped to handle WebGL.

Almost all the recent browser versions are equipped to handle Web GL, but there are some exceptions. For example, WebGL is not supported on Opera Mini regardless of what version you’re using.

A quick way to check if your browser version supports WebGL is to check this table (here). You can easily see which browser versions are equipped to handle WebGL.

Checking if WebGL is supported on your browser version

Since all of the popular browsers are currently supporting WebGL with the latest desktop versions, you will probably be able to resolve the issue by updating to the latest build available.

Update Google Chrome
Updating Google Chrome

If you’ve ensured that your current browser version is equipped to support WebGL and you’re still encountering the ‘WebGL is not supported‘ error, move down to the next method below.

Method 2: Enabling hardware acceleration on your browser

One possible reason why you might be encountering the ‘WebGL is not supported‘ error is that hardware acceleration is disabled in your web browser. The WebGL technology is dependent on hardware acceleration, so you’ll need to take the appropriate steps to ensure that hardware acceleration is enabled on your browser.

Since the steps of enabling hardware acceleration are different from browser to browser, we’ve created separate guides for all the most popular web browsers. Please follow the one applicable to the browser that you’re using:

Enabling hardware acceleration on Chrome

  1. Click on the action menu (three dot icon) in the top-right corner and then click on Settings.
  2. Inside the Settings menu, scroll down to the bottom of the list and click on Advanced to make the advanced settings options visible.
  3. Scroll down to the System tab and check the toggle associated with Use hardware acceleration when available.
  4. Click the Relaunch button to make the enforce the change.
Enabling hardware acceleration on Google Chrome

Enabling hardware acceleration on Mozilla Firefox

  1. Open Firefox and go to to the action button (top-right corner) and click on Options.
  2. Then, in the Options menu, scroll down to Performance and disable the checkbox associated with Use recommended performance settings.
  3. With the recommended performance settings disabled, enable the checkbox associated with Use hardware acceleration when available.
  4. Restart your browser to force the changes to take effect.

Enabling hardware acceleration on Opera

  1. Click the Opera icon (top-left corner) and choose Settings from the menu.
  2. Inside the Settings menu, scroll down to the bottom of the screen and click the Advanced button to make the hidden settings options visible.
  3. Scroll down to the System tab and enable the toggle associated with Use hardware acceleration when available.
Enabling hardware acceleration on Opera

If you’re still encountering the error even after enabling hardware acceleration, move down to the next method below.

Method 3: Upgrading graphics drivers

Since WebGL is depended on GPU support, older graphics drivers might end up causing the ‘WebGL is not supported‘ error. If your system is equipped to support WebGL, you might be able to resolve the issue by just by making sure that you’re using the latest graphics drivers available.

If you have Windows 10, you can do this easily by using Device Manager to update your graphics drivers. Here’s how:

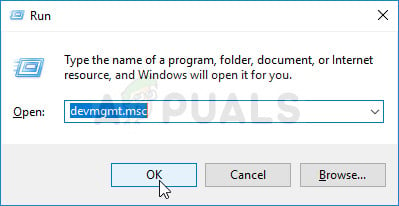
  1. Press Windows key + R to open up a Run dialog box. Then, type “devmgmt.msc” and press Enter to open Device Manager.
    Run Device Manager using Run Dialog Box
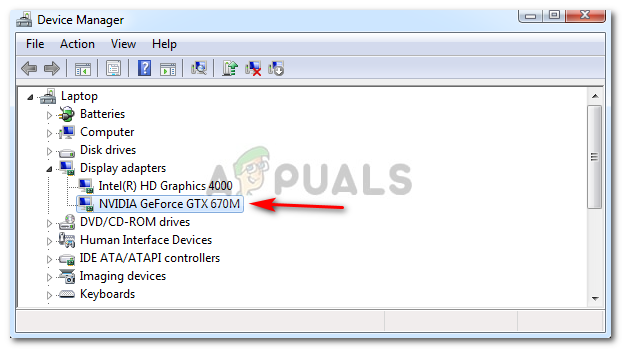
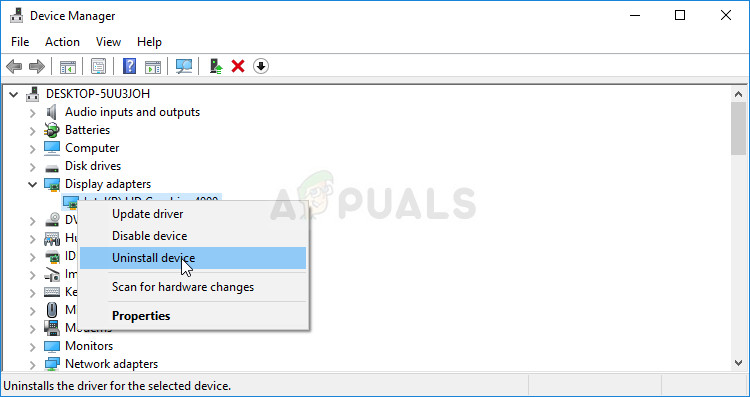
  2. Inside Device Manager, expand the drop-down menu associated with Display adapters. Then, right-click on your graphics card and choose Update driver.
    Update Graphics Driver by right-clicking it.

    Note: If you’re using a system that has both a dedicated & integrated GPU, it’s best to update both. Also, make sure that you’re using a stable Internet connection.

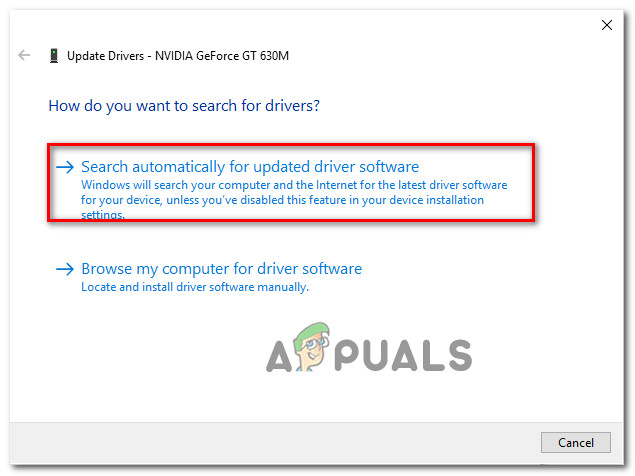
  3. From the next screen, click on Search automatically for updated driver software, then follow the on-screen prompts to search for the newest driver.
    Searching for the newest driver automatically
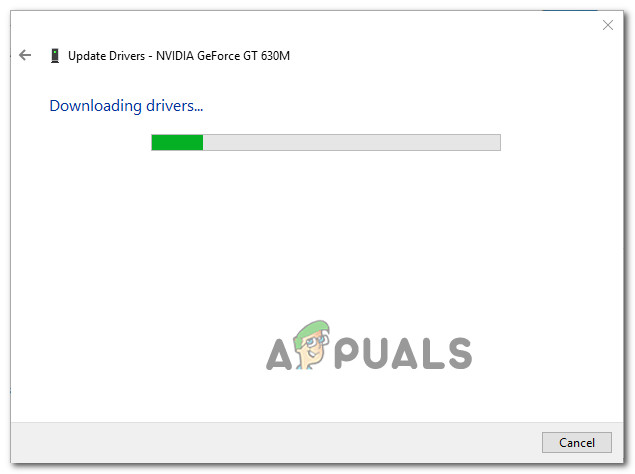
  4. Wait until the driver is fully downloaded, then follow through with the installation to set up the newer driver.
    Downloading the latest graphics driver
  5. Once the newer driver has been installed, restart your computer to complete the installation.
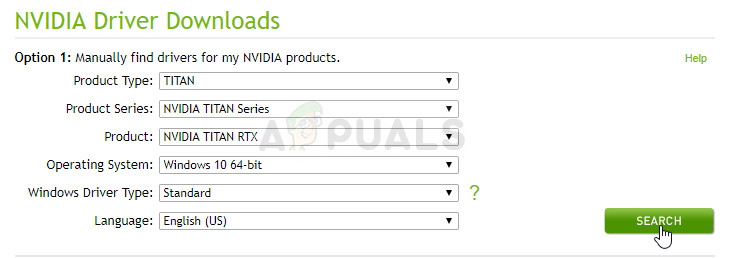
    Updating the dedicated Nvidia driver to the latest version


  6. Open your browser again and see if you are now able to view WebGL content.

If you have an older Windows version or Device Manager fails to identify a newer driver version, you’ll need to track down the latest version for your particular GPU model and install it manually.

Fortunately, every major GPU manufacturer has proprietary software that will automatically identify the appropriate driver and install it for you. Just use the software appropriate to your GPU manufacturer:

If you’re still encountering the same issue even after updating your GPU drivers, move down to the next method below.

Method 4: Installing a newer Windows version (if applicable)

Since GPU rendering has been removed in Windows XP by most browsers (due to security reasons), so you’ll likely need to install a newer Windows version if you wish to use WebGL.

Or, if you insist on using WebGL with Windows XP, you can do it by using an older Chromium version.  If this scenario is applicable to you, settle for a Chromium version older than build 291976.

The post Fix: WebGL is Not Supported appeared first on Appuals.com.

Fix: Slack Notifications not Working

$
0
0

Several users are reporting that they don’t receive any notifications from Slack. Even though it’s widely regarded as the best team collaboration service, Slack has a long and painful with the delivery of notifications. Whether it’s the desktop version or the UWP (Universal Windows Platform) Slack version on Windows or the iOS app, this notification problem has been around for years now.

What is causing the Slack notifications to stop functioning?

We investigated this particular issue on Windows by looking at various user reports and the repair strategies that some affected users have deployed in order to resolve the problem. Based on what we gathered, there are several fairly common scenarios that will trigger this particular issue:

  • Notifications Manager has determined that Slack notifications are not important – The notification manager on Windows 10 got smart, meaning that it will decide on the notifications that go through based on the user interest. If you got a lot of Slack notifications and ignored all of them, you will start seeing less and less of them until you start showing interest.
  • Desktop notifications are disabled for Slack – You might not be seeing Slack notifications because the Slack notification functionality is disabled from Slack’s settings menu. In this case, enabling notifications for All new messages and ensuring that they get delivered through Windows Action Center should resolve the issue in this particular scenario.
  • Do Not Disturb mode is preventing the notifications from going through – The Do Not Disturb mode is designed to spare you from receiving notifications during resting hours, but if you’re working with a team that has a different timezone, this mode might kick in during your working hours. To resolve this issue, you’ll need to either disable this mode completely or modify its settings to reflect your own working hours.
  • Corrupted Slack application cache – As some users have reported, as cached data piles up, you might start noticing delays in the deliverance of notification. Since these delays are known to get bigger and bigger, it’s best to form a habit of cleaning your Slack application cache from time to time. This procedure is different depending on the type of Slack application that you’re using.
  • New notification behavior is not functioning correctly – The new Windows 10 notification behavior is known to cause some problems (particularly with the desktop version of Slack). Fortunately, there is a Run command that will allow you to revert back to the previous notification behavior extremely easily.
  • Quiet Hours (Focus Assist) is blocking Slack notifications – If Quiet Hours (Focus Assist) is enabled on Windows 8.1 or Windows 10, it could be the reason why you’re notifications fail to be delivered. In this case, either disable the feature altogether or configure it to the proper hours.

If you’re currently looking for troubleshooting steps that will fix your Slack notifications, this article will help. Down below, you’ll find a collection of methods that other users in a similar situation have used to correct this broken behavior.

The methods are ordered by efficiency and severity, so please follow them in the order that they are presented. One of them is bound to resolve the issue in your particular scenario.

Method 1: Read all your pending messages

If you’re no longer receiving Slack notifications (but you used to see them), chances are your operating system has determined that those messages are not that important to you so it stopped sending them. This is a new feature introduced with Windows 10.

If this particular scenario is what’s causing the lack of Slack notifications, the fix is to simply read all pending Slack messages. This will send the right signals to Windows 10, making it aware that you’d like to receive more in the future.

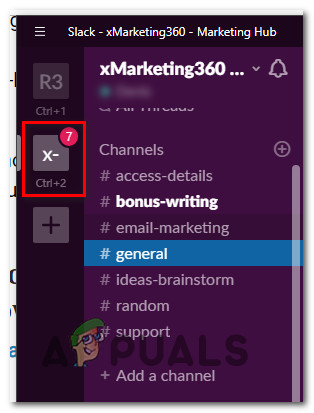
Reading all new messages in Slack

With this in mind, simply open your Slack application (desktop or UWP) and click on each new messages to read it. Once every message has been read, close Slack and restart your computer. If Windows was previously considering Slack notifications as not important, this behavior should have changed now.

Once the next startup is complete, monitor Slack’s behavior and see if you start receiving notifications. If you still can’t see Slack notifications, move down to the next method below.

Method 2: Make sure that desktop notifications are enabled

If you never received Slack notifications, chances are this functionality is disabled from Slack’s Settings menu. Keep in mind that workspace administrators have the ability to change the default notification behavior.

Even more,  notification settings are not application wide – If you’re part of multiple workspaces, you’ll need to establish default behaviors for all of them.

Here’s a quick guide on making sure that desktop notifications are enabled on Slack:

Note: The steps below will work on both the desktop and the UWP version of slack.

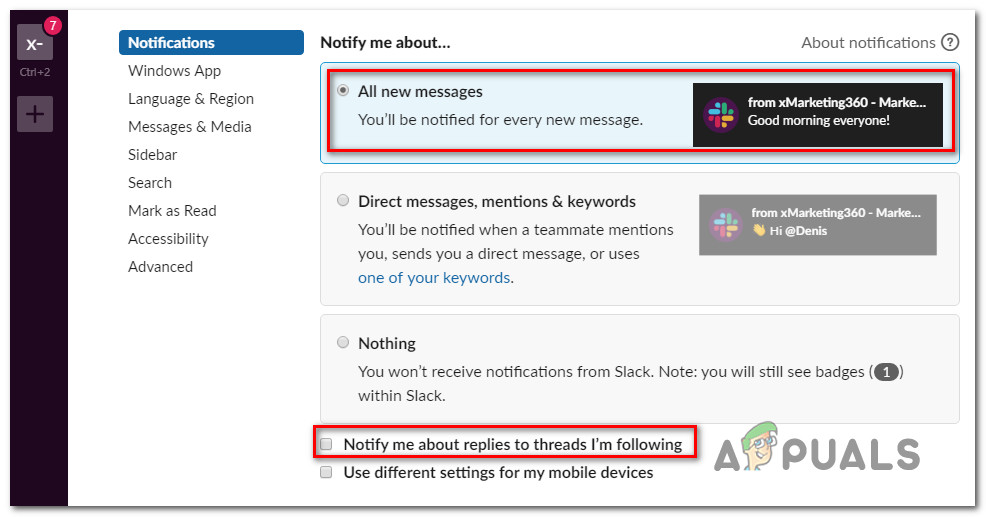
  1. Open Slack (desktop or UWP)  and press Ctrl + Comma key (‘,’) to open up the Preferences menu.
  2. Then, go to the Notifications tab and make sure that the All new messages toggle is selected.
    Ensuring that notifications are enabled on Slack

    Note: If you’d like to get notifications about every thread reply, check the box associated with Notify me about replies to threads I’m following.

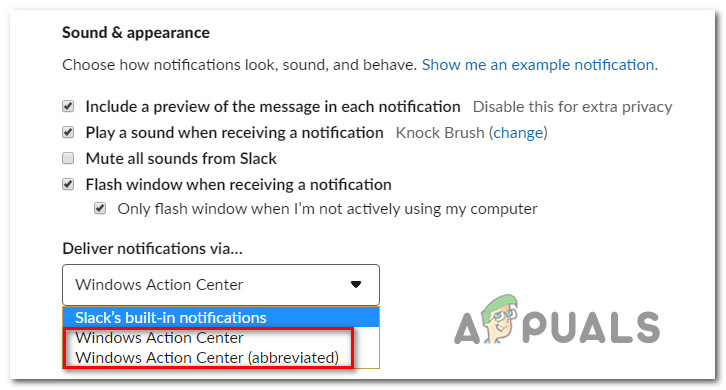
  3. Next, scroll down to the Sound & appearance tab and make sure that the drop-down menu associated with Deliver notifications via… is set to Windows Action Center or Windows Action Center (abbreviated).
    Changing the notification deliverance method on Slack
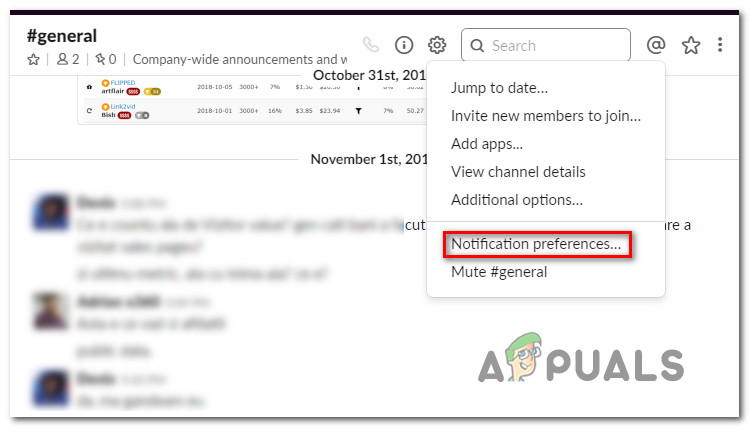
  4. Keep in mind that on top of these master notification options that we’ve just modified, there are also individual channel settings that will override the general settings. To adjust the notification behavior on individual channels, open each workspace that you’re part of and click on the Cog icon and click on Notification preference.
    Accessing the Notification Preferences menu
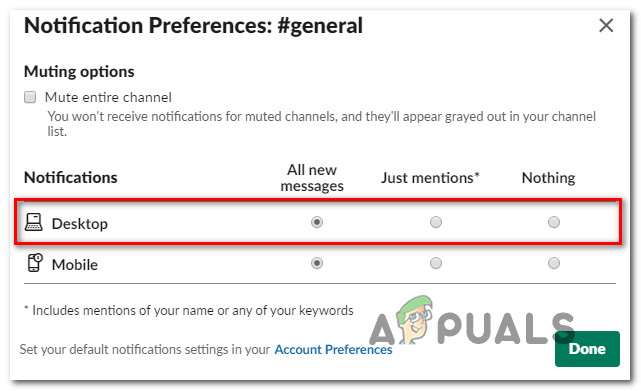
  5. Then, from the Notifications Preferences menu, set the Desktop toggle to All new message and click Done.
    Modifying the Individual Notifications on Slack.
  6. Restart your Slack application and see if you start receiving notifications.

If you still can’t see notifications even after ensuring that notifications are enabled for your application, move down to the next method below.

Method 3: Disabling or adjusting the Do Not Disturb Mode

Another potential setting that could end up disabling your Slack notifications is the “Do not disturb” mode.  While this mode is turned on, Slack will not send you any notifications. This setting is typically adjusted by the workspace creator according to the team member’s time zone but can be overridden quite easily.

If you’re in a completely different time-zone than the one established by the workspace creator, that could be the reason why you don’t see any notifications.  If this scenario is applicable to your situation, here’s a quick guide on modifying the “Do Not Disturb Mode” settings accordingly:

  1. Open Slack (desktop or UWP) and press Ctrl + Comma key (“,”) to open up the Preferences menu. Then, click on Notifications and scroll down to the Do Not Disturb section.
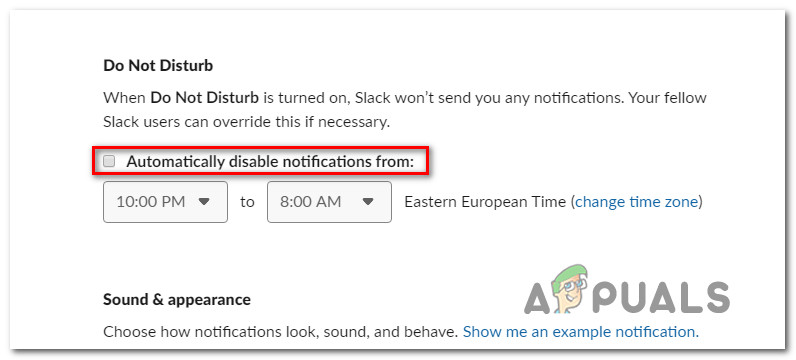
  2. Now, depending on what you’re after, you can either disable or modify the Do Not Disturb feature to reflect your needs. To disable it, simply disable the checkbox associated with Automatically disable notifications from.
    Disabling the Do Not Disturb mode

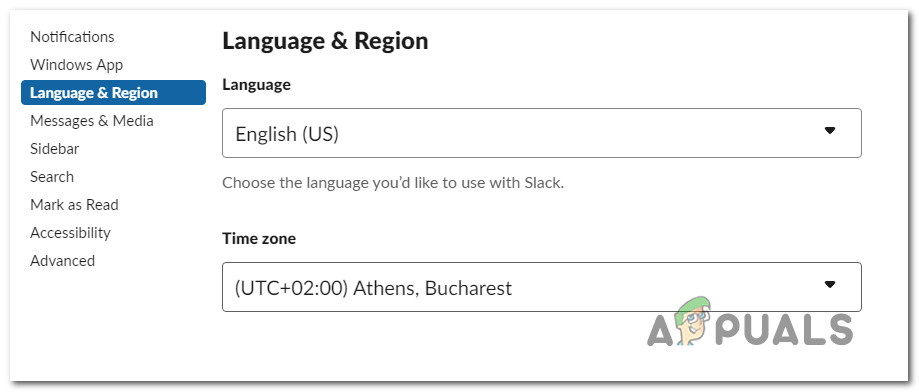
    Note: If you’d like to preserve your quiet hours, you can leave the box associated with Automatically disable notifications from checked and adjust the hours manually. But make sure that you set the correct time zone according to your location.

    Changing the time zone on Slack
  3. Restart your Slack client and see if you start receiving notifications.

If you’re still not receiving notifications on Slack, move down to the next method below.

Method 4: Clearing the Slack application cache

As it turns out, failure to show notifications can also be traced back to a Slack application cache error. Several users struggling to resolve the same behavior have managed to get the issue resolved by clearing the Slack application cache.

Slack stores cached data to speed up the loading times and improve on the user experience. But as a lot of user reports have shown, as cached data piles up, you might start seeing negative effects (including the disappearance of the notifications or large delays).

Fortunately, it’s quite easy to clear the cache is quite easy, but the procedure is different depending on what version of Slack you’re using. Please follow the appropriate guide depending on which Slack version you’re using:

Clearing Slack’s cache for UWP version

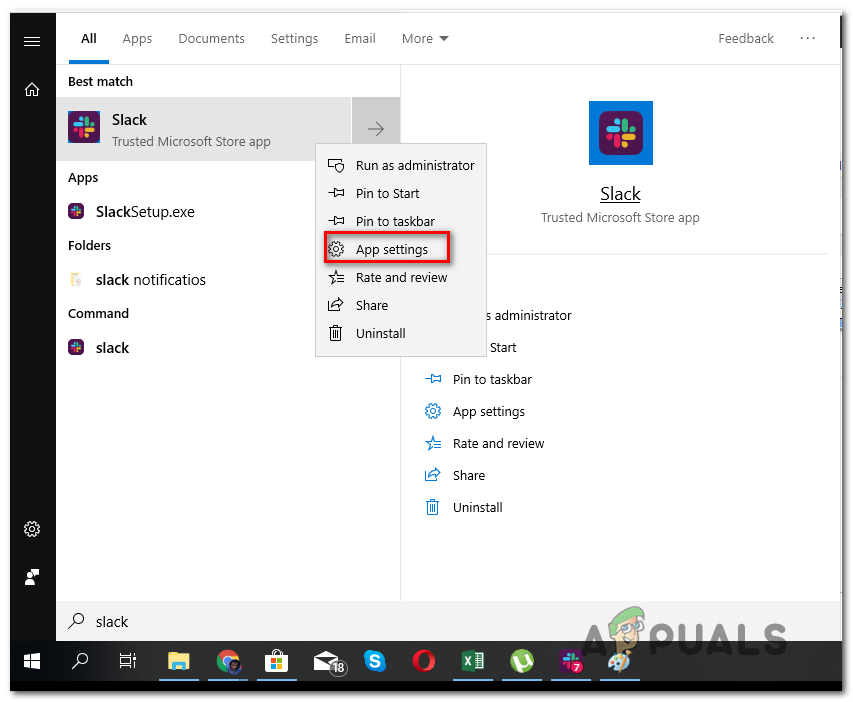
  1. Press the Windows key and start searching for Slack. Then, right-click on Slack and choose
    Note: If you have both versions of Slack, ensure that you’re targeting the UWP version. The UWP version has a small text with “Trusted Microsoft Store App” under it.
    Accessing the Settings menu of Slack’s UWP app
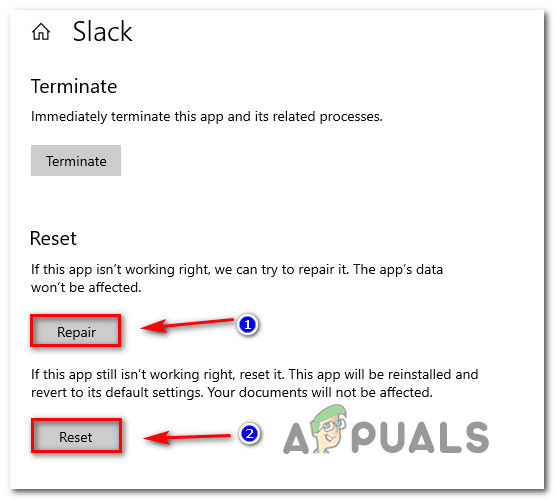
  2. Inside the Slack options menu, scroll down and click on Repair. Once the procedure is complete, restart your computer and see if you start seeing Stack notifications. If you aren’t, return to the Reset menu again and click on Reset.
    Repairing or resetting slack
  3. After the cache is cleared, sign into your workspace again and see if you start receiving notifications. If you aren’t, move down to the next method below.

Clearing Slack’s cache for Desktop version

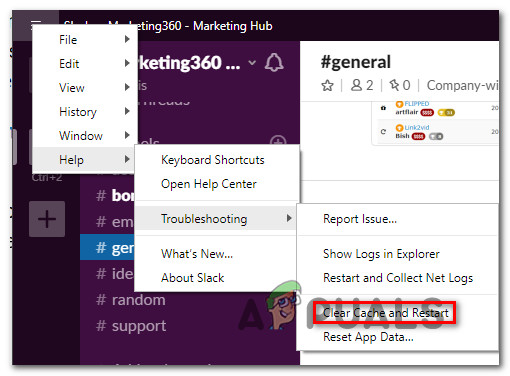
  1. If you’re using the desktop version of Slack, click on the Hamburger menu (top-left corner of the screen).
  2. Go to File > Help > Troubleshooting, then click on Clear Cache and Restart.
  3. Your Slack application will restart in a couple of seconds with the cache cleared. See if you start receiving notifications.

If you’re still not receiving any notifications even after clearing the application’s cache, move down to the next method below.

Method 5: Reverting back to the previous notification behavior

Several affected users have reported that the issue was fixed after they disabled Slack’s integrations with Windows Action Center and reverted back to the previous notification behavior. This can be done quite easily with a simple Run command.

Here’s what you need to do:

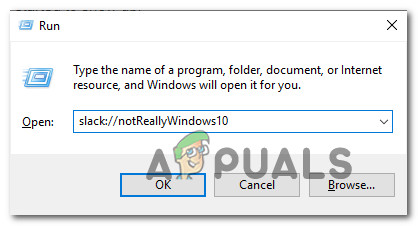
  1. Press Windows key + R to bring up the Run dialog box.
  2. Inside the Run dialog box, type or paste the following command and press Enter:
    slack://notReallyWindows10
    Reverting to the default Slack notification behavior
  3. Restart your computer and see if you start receiving notifications at the next startup.

If you’re still unable to see Slack notifications, move down to the next method below.

Method 6: Disabling Quiet Hours (Focus Assist) on Windows

Another popular reason why you might be seeing this particular issue due to a Windows productivity feature called  Quiet Hours (rebranded as Focus Assist). If you didn’t know, this feature will disable all notifications during a set time that you get to configure yourself.

The Quiet Hours feature works as a master filter, meaning that it will override any application settings (including Slack). So even if you have Slack configured to display a notification for every event in your workstation, Quiet Hours will disable them all.

Note: Quiet Hours is only available on Windows 8.1 and Windows 10.

If you’re suspecting that Quiet Hours might be causing this particular problem, here’s what you need to do:

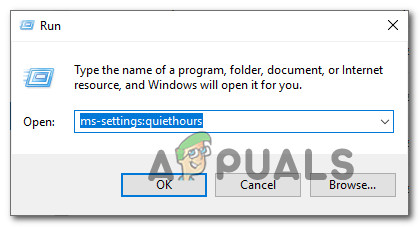
  1. Press Windows key + R to open up a Run dialog box. Then, type “ms-settings:quiethours”  and press Enter to open the Quite Hours (Focus Assist) tab of the Settings app.
    Accessing the Quiet Hours (Focus Assist) menu
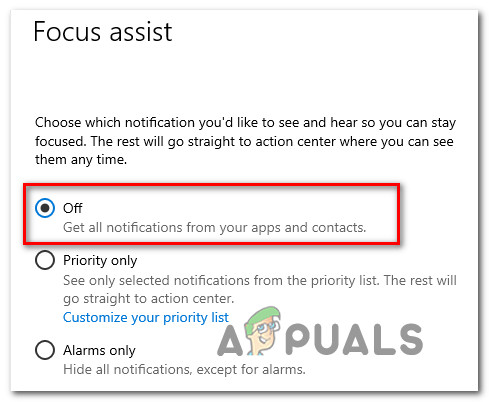
  2. Inside the Focus Assist (Quiet Hours) menu, set the toggle to OFF.
    Setting Quiet Hours (Focus Assist) to Off
  3. Restart your computer to save the changes and see if your Slack notifications are becoming visible.

The post Fix: Slack Notifications not Working appeared first on Appuals.com.

Fix: Not Enough USB Controller Resources

$
0
0

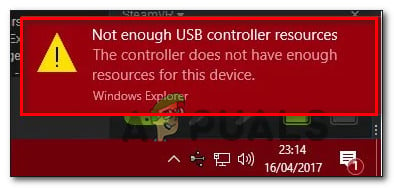
Some Windows users are seeing the “Not Enough USB Controller Resources” error when plugging in a device/peripheral inside the USB port. Most of the time, this is reported to occur with USB 3.0 ports. The issue is not specific to a particular Windows version as it’s reported on Windows 7, Windows 8.1 and Windows 10.

Not Enough USB controller resources

What is causing the “Not Enough USB Controller Resources” error?

We investigated this particular issue by looking at various user reports and the resolve strategies that most affected users have made use of to resolve the issue.

Based on our investigations, the issue is rarely related to power or bandwidth. Most likely, you’re encountering this error message due to an EndPoint limitation.

What is a USB endpoint?

An endpoint is the most basic form of USB communication. An endpoint will carry data in only one direction (either from the host computer to the device or vice versa). That’s why there are two types of endpoints (OUTs and INs).

When you connect a USB device, your computer will create a number of EndPoints (channels running to or from the device). Flash drives will use 3-4 endpoints, where headsets and other sensors might use up to 10 IN and OUT endpoints.

With this in mind, there are three major situations that can cause the “Not Enough USB Controller Resources” error:

  • USB Controller limit is exceeded – If you use a lot of USB devices which are using a lot of EndPoints, you might see this error message because you’ve exceeded the available number of EndPoints. Keep in mind that USB 3.0 controllers have a limit of 96 Endpoints per controller on Intel XHCI controllers while AM4 controllers support 254 EndPoints.
  • The USB port EndPoints usage exceeded the limit – Most USB controllers are capped at 16 IN & 16 OUT EndPoints for every available port. But since most devices will use primarily IN EndPoints, you’ll run out of them pretty quick.  Because of this, you can only use USB ports to a limited extent.
  • Power being drawn from the USB devices exceeds the maximum capacity – If you’re encountering this particular issue on a notebook or laptop, it’s very likely that the amount of power being drawn from the USB devices exceeds the maximum capacity. Using a docking station or a USB with its own power source will resolve the issue in this case.

If you’re encountering the “Not Enough USB Controller Resources” error and you’re looking for some methods that will allow you to resolve or circumvent the issue, this article will provide you with some troubleshooting guides.

Down below, you’ll find a collection of methods that other users in a similar situation have successfully used to get the issue resolved. To stay efficient, we advise you to follow the methods in the order that they are presented in.

Method 1: Moving some devices to a regular USB 2.0 port

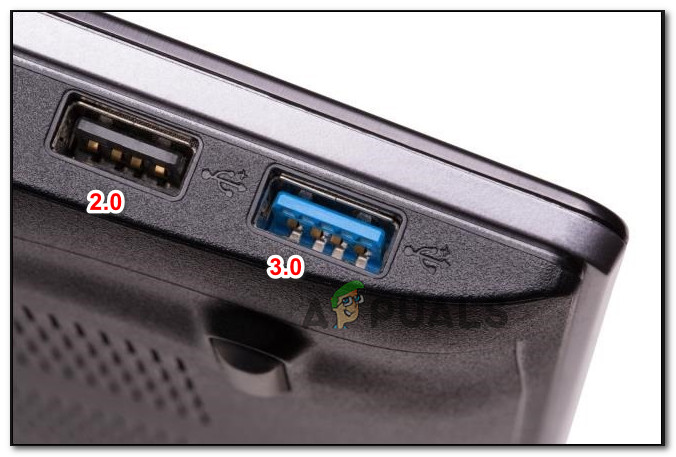
If you’re encountering this issue on a USB 3.0 controller, you will be able to circumvent the error by moving some devices to the classic 2.0 port. If you’re trying to connect hardware that uses a lot of endpoints (VR headset, 7.1 headsets), you might be tempted to use a USB 3.0 hub to enjoy all the benefits that come with the newer transfer protocol.

But USB hubs can only be used for a limited degree since you will exceed the 16 IN Endpoint limit fairly quick (just by connecting a VR Headset + 7.1 Headset). Fortunately, you can go around this problem easy just by connecting one of your devices to a regular USB 2.0 port.

Plugging the keyboard into a 2.0 USB port

Try to leave the devices that need superior transfer speeds the most to the USB 3.0 port and move an older device to the USB 2.0 port.

As soon as you go under the 16 EndPoint limit, the “Not Enough USB Controller Resources” error should no longer occur.

Method 2: Using a docking station or USB Hub with its own power source

If you’re encountering this issue on a laptop/notebook, chances are the problem comes from the total amount of power being drawn from the USB ports.

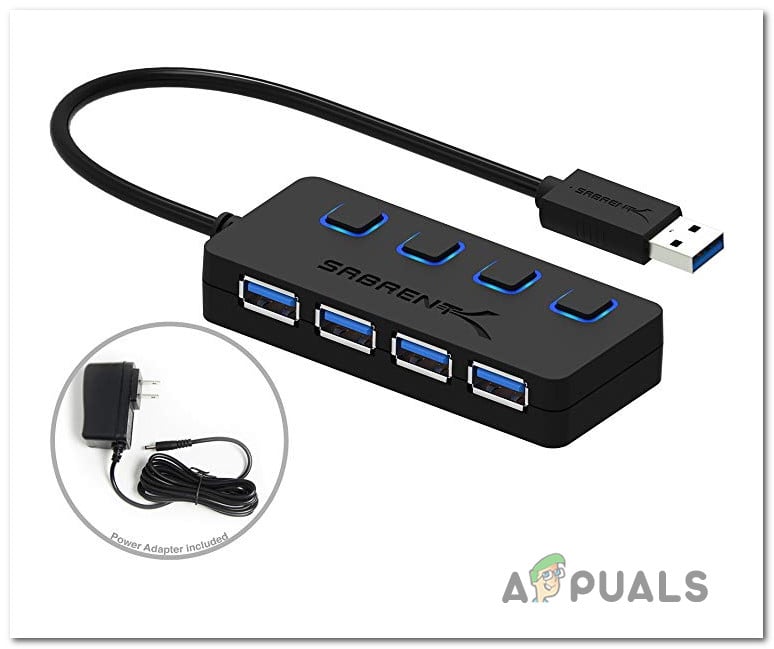
If you can’t limit the number of the devices that are drawing power from your USB ports, you can resolve the “Not Enough USB Controller Resources” error by purchasing a docking station or a USB hub with its own power source (Powered USB Hub).

Buying a POWERED USB Hub

Docking stations are generally more expensive (over $50), so if you’re looking for a cheap workaround, you can easily find a Powered USB Hub a the $15 price mark.

Method 3: Reinstalling the Universal Serial Bus Controllers

As some users have reported, this particular issue can also occur if the USB controller driver was badly installed or got corrupted somehow. You might be able to resolve the “Not Enough USB Controller Resources” error by using Device Manager to reinstall the USB controller driver.

Here’s a quick guide on how to do this:

  1. Press Windows key + R to open up a Run dialog box. Then, type “devmgmt.msc” and press Enter to open up Device Manager.
    Run Device Manager using Run Dialog Box
  2. Inside Device Manager, expand the Universal Serial Bus controllers, right-click on your USB host controller and click Uninstall Device. If you have two different USB Host Controllers, uninstall both.
    Uninstalling the USB Host Controller from via Device Manager
  3. Restart your computer. At the next startup, Windows will automatically reinstall the missing USB Host controller driver.

If the  “Not Enough USB Controller Resources” error is still occurring, move down to the next method below.

Method 4: Disabling the XHCI Mode Option from BIOS setting

An extreme solution that will most likely resolve the “Not Enough USB Controller Resources” error with USB is to disable the xHCI Mode option from the BIOS Settings. But doing this automatically means that all your USB 3.0 ports are downgraded to USB 2.0.

If this is a sacrifice you are willing to make in order to resolve the error message, here’s how to disable the Intel xHCI Mode option:

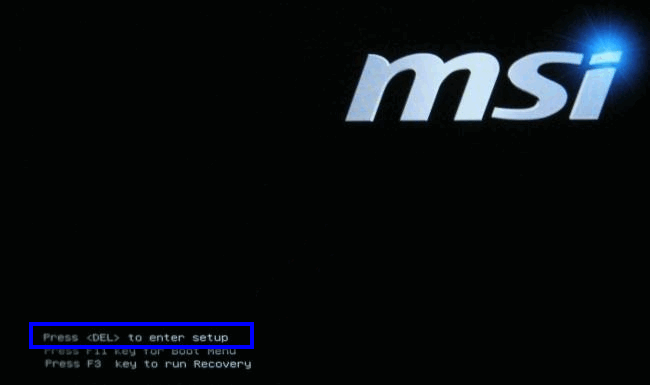
  1. Restart your computer and repeatedly press the Setup key during the initial screen until to access the BIOS settings of your computer.
    press a key to enter setup or bios
    Press [key] to enter setup
    Note: The Setup key is typically shown on the initial startup key, but if you can’t see it, search online for specific steps on how to enter your BIOS settings (based on your laptop/motherboard model)
  2. Once you’re inside your BIOS settings, go to the Advanced tab and look for an option named USB EHCI debug under Device Options. Enabling this option will disable the xHCI controller which ends up resolving the error message.
    Disabling XHCI Mode option

    Note: These settings will be different depending on your manufacturer. You might find this setting under a different name including XHCI Pre-Boot mode, EHCI Hand-OFF or xHCI Mode.

  3. Once xHCI controller has been disabled, save your modifications and allow your computer to boot up normally.
  4. At the next startup, you should no longer see the “Not Enough USB Controller Resources” error.

The post Fix: Not Enough USB Controller Resources appeared first on Appuals.com.

Fix: Grand Theft Auto V Crashes on Startup

$
0
0

Grand Theft Auto V is an action-adventure video game developed by Rockstar North and published by Rockstar Games. It was released in September 2013 for PlayStation 3 and Xbox 360, in November 2014 for PlayStation 4 and Xbox One, and in April 2015 for Microsoft Windows.

Grand Theft Auto V Cover

However, quite recently a lot of reports have been coming in of the game crashing at startup. This error persists whether you try to launch the game directly or even through the launcher. In this article, we will tell you some of the reasons due to which this error can be triggered and provide you with viable solutions to solve the problem.

What Causes the GTA V to Crash At Startup?

Unfortunately, the cause of the error cannot be specified but according to our reports some of the most common causes were:

  • Missing Files: It is possible that the game might be missing certain files or some files might have been corrupted. The game does not launch properly if certain files of the game are missing.
  • Graphics Drivers: Sometimes, if the graphics card drivers are not up to date it can cause issues with certain elements of the game thus resulting in frequent crashes and even causing issues with the startup.
  • Memory Leaks: There is a virtual memory on every hard disk partition. This virtual memory acts as a temporary RAM and processes the information before sending it to the RAM. If this memory is low it can cause frequent crashes or even cause issues with the startup.

Now that you have a basic understanding of the causes we will move on towards the solutions.

Solution 1: Verifying Game Files.

It is possible that the game might be missing certain files or some files might have been corrupted. The game does not launch properly if certain files of the game are missing. Therefore, in this step, we are going to be verifying the game files and make certain that the game files are complete.

This process differs for the Steam Versions and the non-Steam versions of the game

For Non-Steam Versions:

  1. Press  “Windows+R” buttons on your keyboard.
    Opening Run
  2. Type “cmd” in the Run and press enter
  3. Now Type “cd c:\Program Files\Rockstar Games\Grand Theft Auto V” and press Enter
    Note: If you have installed the game to a different directory type the address of the game installation folder.
    Typing in the command
  4. Now type ” GTAVLauncher.exe-verify” and press Enter
  5. The game launcher will now open and begin to verify the game files.
  6. After the files are verified try to run the game

For Steam Versions: 

  1. Launch Steam and sign in to your account
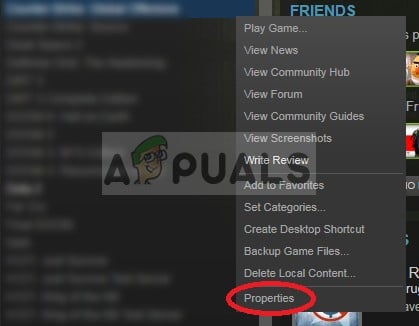
  2. Go into the library section and RightClick on the game
    Right-Clicking on the game
  3. Select Properties
  4. After that Click on the Local Files option and click on the “Verify the integrity of Game Cache” option
    Clicking on the Local Files option
  5. This will take some time to verify after it is done try to run the game

Solution 2: Updating Graphics Drivers.

Sometimes, if the graphics card drivers are not up to date it can cause issues with certain elements of the game thus resulting in frequent crashes and even causing issues with the startup. Therefore, we will be updating the graphics drivers to the latest ones in order to eradicate this issue.

For Nvidia Users: 

  1. Click on the Search bar on the left-hand side of the taskbar
    Search bar
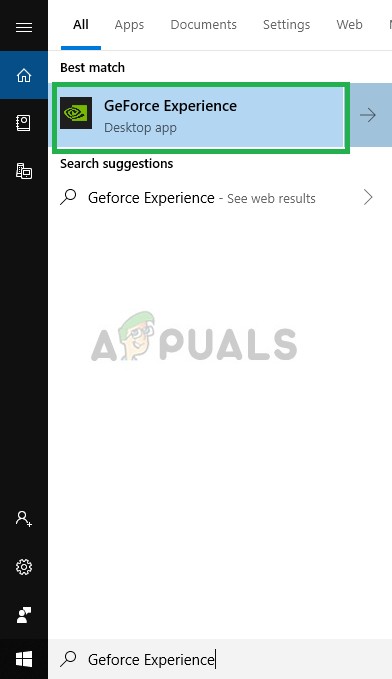
  2. Type in Geforce Experience and press enter
  3. Click on the first icon to open the application
    Opening Geforce Experience
  4. After signing in, Click on the “Drivers” option on the top left
    Clicking on Drivers
  5. In that Tab, Click on the “Check for Updates” option on the top right
    Clicking on Check for Updates
  6. After that, the application will check if new updates are available
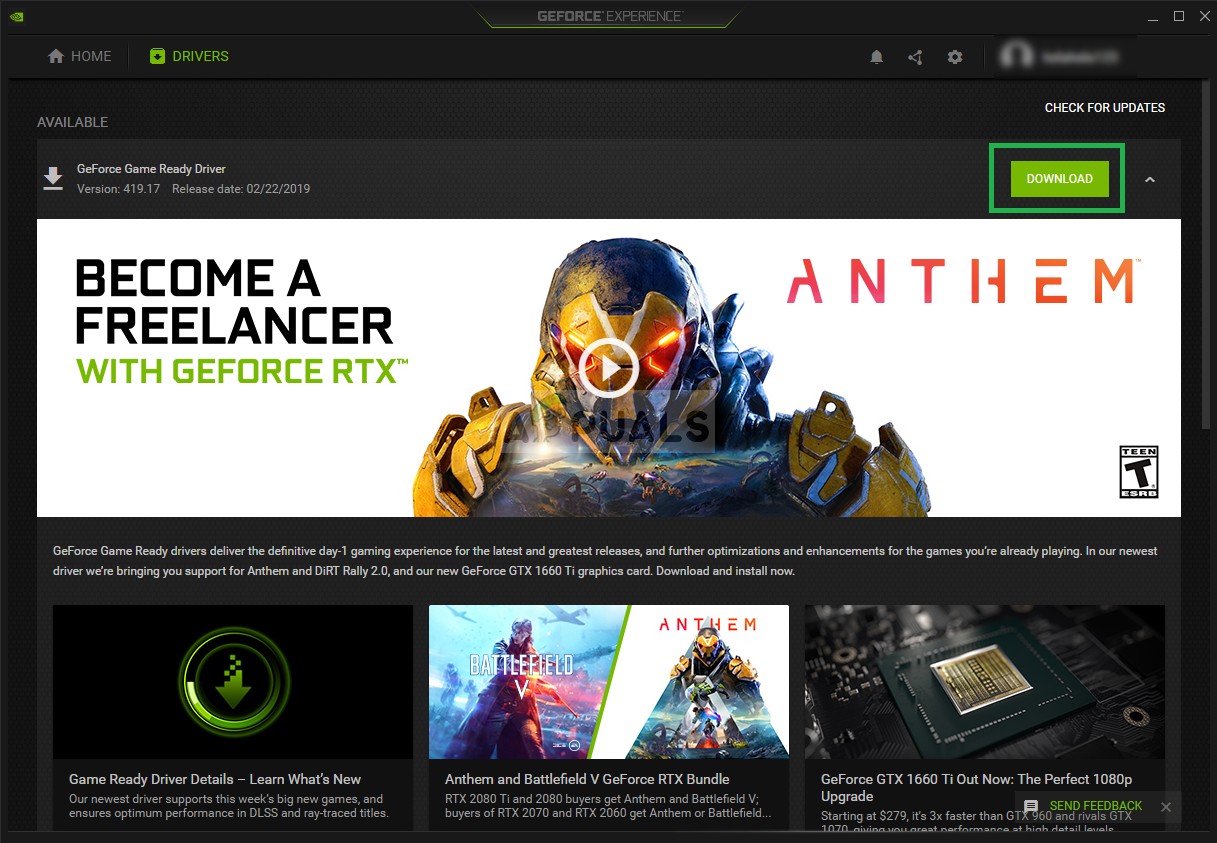
  7. If the updates are available a “Download” button will appear
    Click on the Download button
  8. Once you click on that the driver will begin to download
  9. After the Driver is downloaded the application will give you the option for “Express” or “Custom” installation.
  10. Click on the “Express” installation option and the Driver will automatically be installed
    Selecting Express Installation
  11. Now try to Run the game

For AMD Users: 

  1. RightClick on the Desktop and select AMD Radeon Settings
    Opening Radeon Settings
  2. In the Settings, click on Updates in the lower right corner
    New Updates Option
  3. Click on “Check For Updates
    Checking for Updates
  4. If a new update is available a new option will appear
  5. Click on the option and select Update
    Clicking on New and Update
  6. The AMD installer will start, click on Upgrade
    Clicking on Upgrade in the AMD installer
  7. The installer will now get the package ready, check all the boxes and click on Install
    Updating Driver
  8. This will now download the new driver and install it automatically
  9. Restart your computer and try to run the game.

Solution 3: Increasing Virtual memory

There is a virtual memory on every hard disk partition. This virtual memory acts as a temporary RAM and processes the information before sending it to the RAM. If this memory is low it can cause frequent crashes or even cause issues with the startup. Therefore, in this step, we will be increasing the virtual memory for which

  1. Press the “Windows+R” buttons to open up the Run Prompt
  2. Type “systempropertiesadvanced” in the Run Prompt.
    Typing the command in RUN
  3. Under the Performance heading, click on “Settings
    Opening “Settings”
  4. Now in the Performance Options, click on the “Change” option under the “Advanced” Tab
    Clicking on Change
  5. Uncheck the “Automatically Manage Page Filing for All Drives” option
    Unchecking
  6. Check the “Set Manually” box and type in “4096” in the “Initial Size” option and “8192” in the “Final size” option.
    Changing the paging size
  7. Click on “OK” and Apply your Settings
  8. Restart your computer for the settings to take effect and try to run the game

The post Fix: Grand Theft Auto V Crashes on Startup appeared first on Appuals.com.


Fix: Operating System Loader has no Signature

$
0
0

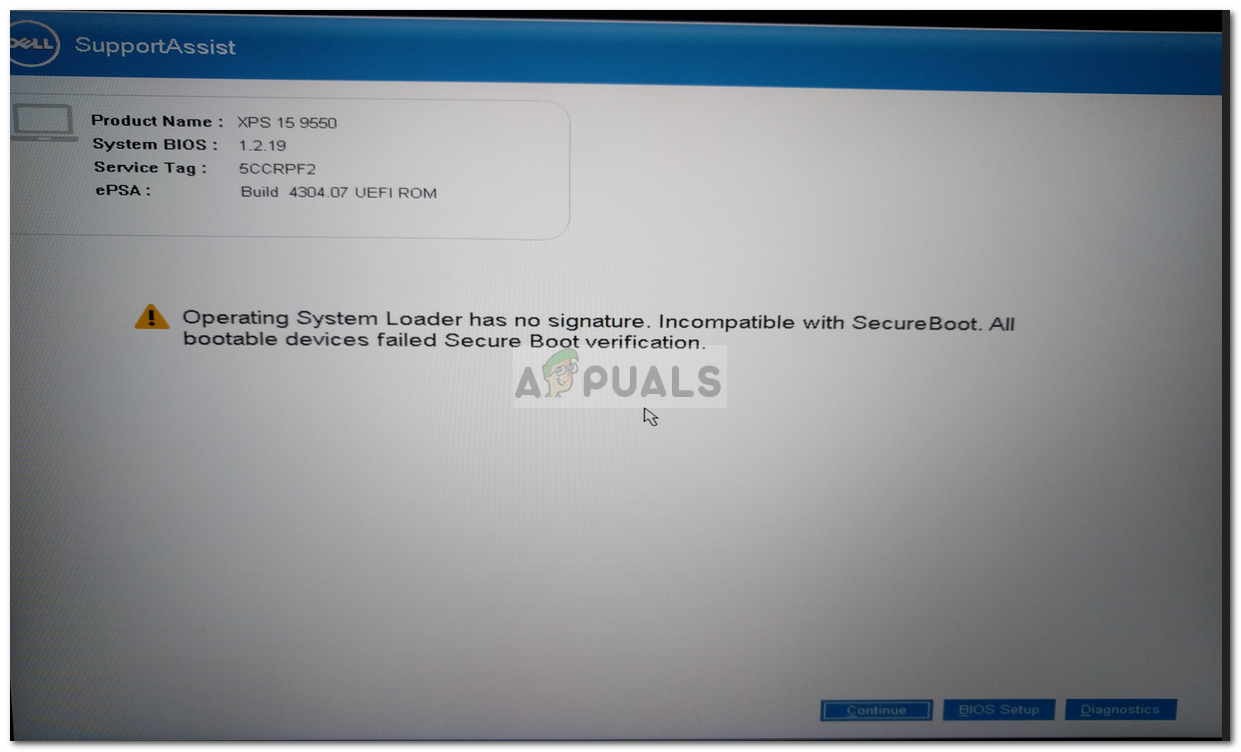
If you are not able to start your computer because of the error ‘Operating system loader has no signature’, then it is probably due to a bad boot image file that is not being recognized by your system. Such can be very worrisome as you it appears on boot up and consequently, prevents you from accessing your files.

Operating System Loader has no Signature

Well, you don’t have worry as this guide will walk through different solutions that you can implement. But before we get into that, you might want to know more about the cause of the error message.

What causes the ‘Operating System Loader has no Signature’ Error Message?

There are different reasons as to why you might get this error. Here are some of them —

  • A Bad/unauthentic Boot Image File: The error is caused due to a bad/unauthentic boot image file which the computer does not recognize. In modern computers, UEFI mode is used for the booting purpose instead of the BIOS (legacy) one. This booting mode has a feature called Secure Boot which when turned on, detects the boot image if it is authentic or not.
  • Windows installed in BIOS Mode: If you are trying to boot an operating system which you installed in BIOS mode (legacy mode) will not boot if Secure Boot is turned on. So, be careful with that.

Now, in order to fix this error, there are different things you can try.

Note:

If you are getting this error because you have installed Windows 10 or any Linux operating system in BIOS mode then, the easy fix for it is to just disable the UEFI mode in your BIOS settings. This will get rid of the error.

But if that’s not the case, then you need to try some of the solutions below. One of them might work for you as the cause of every error is different but these are the general working solutions for this particular error.

Solution 1: Doing a Hard Reset

You can perform a Hard Reset of your computer and see if it gets rid of this error. If you are using a Desktop, so to perform a Hard Reset, you have to turn off your computer. Remove all the peripherals. Then, remove the power cable and press and hold down the power button for 15-20 seconds. This will hard reset your computer to the factory default settings.

If it’s a laptop, then you have to power off your laptop, remove the AC cable and the battery. Then, you need to press and hold down the power button for 15-20 seconds. This will perform a hard reset of your laptop. I hope after doing this your error will be fixed, but if it is not then you can try the other solutions listed below.

Solution 2: Reset the BIOS

The second solution you can try is to reset the BIOS. Well, every manufacturer has a different BIOS settings interface but I will guide you how can do it in a Dell computer. Here’s how to do it:

  1. Power off your computer. Then power it on and immediately press F2 many times.
  2. Doing that will get you in the BIOS settings.
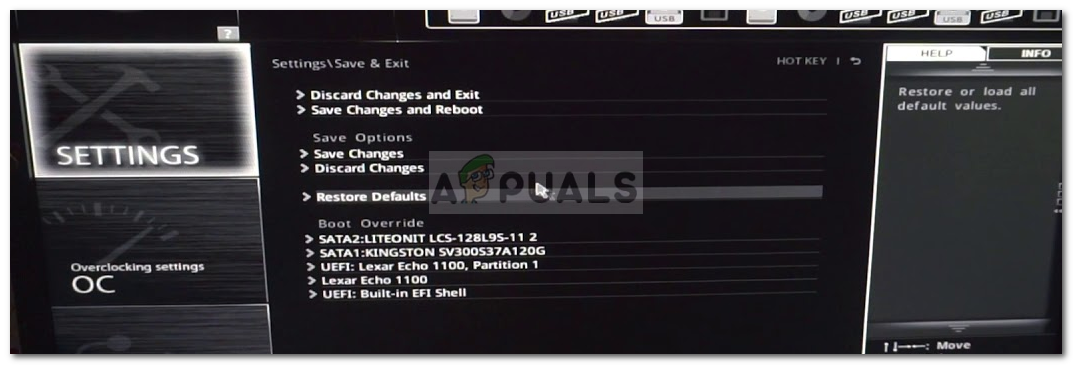
  3. Now scroll to the bottom and you will see option Restore Settings or BIOS Defaults. Click on that.
    Restore Default BIOS Settings

That’s it your BIOS has been reset. If this doesn’t isolate the issue, don’t worry as we are not done yet, you can try on the solutions down below.

Solution 3: Change the Boot Sequence

If the above two solutions don’t work for you then you can try changing your boot sequence. To do this, follow the given instructions:

  1. First of all, you have to go to your BIOS settings.
  2. From there select Legacy mode instead of the UEFI mode.
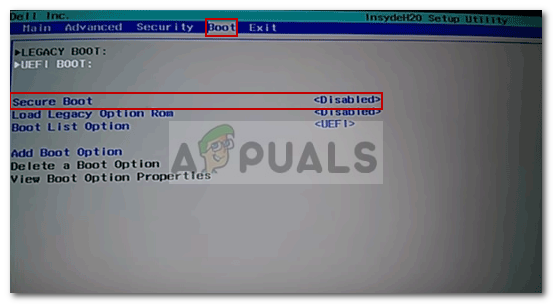
  3. If that doesn’t isolate the issue, you can turn off the Secure Boot option.
    Disable Secure Boot

Solution 4: Reset Windows 10

Finally, if the above solutions do not work, then you can try resetting your Windows 10. Be aware that by doing so, your computer will go back to a state it was in some time before which might cause unavailability of some of the software that you have right now. So in order to do that, you have to access the Windows Recovery Environment. Here’s how do it:

  1. To access WinRE, you will have to shut down your machine forcefully two times. To do this you have to press and hold down the power button until your computer shuts down. Do this twice and you should be able to access Windows Recovery Environment. After you power on it the third time, you will be able to access the Windows Recovery Environment.
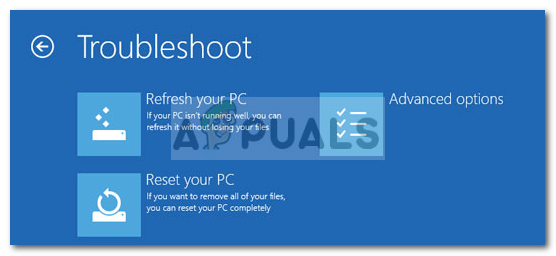
  2. Afterward, you have to choose the option Troubleshoot and from there, you have to select “Reset this PC”.
    Resetting the PC
  3. On the next screen you have to select “Keep my files/Remove Everything”.

After this, your computer will be reset. It will take some time to finish the process so be patient. Your error should be vanished after resetting your Windows 10.

The post Fix: Operating System Loader has no Signature appeared first on Appuals.com.

Fix: Rockstar Cloud Servers are Unavailable

$
0
0

This controversial error message appears when users are trying to join a multiplayer game in GTA V and the error prevents them from accessing any online features. The problem itself can sometimes be attributed to the fact that Rockstar’s servers are really down or going through maintenance which can only be waited out.

Rockstar servers unavailable!

However, if the problem persists, it might not be the servers’ fault and you might want to consider finding another solution which involves troubleshooting various settings on your computer. Follow the article we have prepared in order to find out more!

What Causes Rockstar Servers to be Unavailable?

The list is long but we will cover the causes which you can analyze and get rid of effectively:

  • The servers are really under maintenance or they might be down in your area. There is nothing you can do to affect this.
  • WinSock may be in need for a reset.
  • Your DNS server may not be handling the game’s requests properly so consider changing it.
  • The ports that the game requires to be open may be closed and you should try to open them manually.
  • Your antivirus tool may be interfering so considering switching to a better alternative.

Solution 1: Resetting WinSock

netsh winsock reset” is a helpful command that you can use in Command Prompt to reset winsock catalog back to the default setting or a clean state. You can try this method if you are experiencing the “Rockstar servers unavailable” error when trying to launch GTA V.

  1. Search for “Command Prompt” by typing it either right in the Start menu or by pressing the search button right next to it. Right-click the first entry which will pop up as a search result and select the “Run as administrator” context menu entry.
  2. Additionally, you can also use the Windows Logo Key + R key combination in order to bring up the Run dialog box. Type in “cmd” in the dialog box which appears and use the Ctrl + Shift + Enter key combination in order to run Command Prompt using administrator privileges.


Running CMD using the Run Dialog Box
  1. Type in the following command in the window and make sure you press Enter after typing it. Wait for the “Winsock reset completed successfully” message or something similar to know that the method has worked and you haven’t made any mistakes while tying.
netsh winsock reset
Resetting WinSock
  1. Check to see if you still struggle with problems regarding Rockstar servers being unavailable.

Solution 2: Change Your DNS Server

The problem is often caused by a faulty Internet connection which is simply not accepted by the Rockstar servers or its service. The problem can be resolved easily by changing your default DNS settings to use the ones we provide. This can be done easily in Control Panel so make sure you follow the steps below carefully.

  1. Use the Windows + R key combo which should immediately open the Run dialog box where you should type ‘cpl’ in the bar and click OK in order to open the Internet Connection settings item in Control Panel.
  2. The same process can also be done by manually opening Control Panel. Switch the View by setting at the top right section of the window to Category and click on Network and Internet at the top. Click the Network and Sharing center button in order to open it. Try to locate the Change adapter settings button at the left menu and click on it.
Change Adapter Settings in Network and Sharing Center
  1. Now that the Internet Connection window is open using any method above, double-click on your active Network Adapter and click on the Properties button below if you have admin permissions.
  2. Locate the Internet Protocol Version 4 (TCP/IPv4) item on the list. Click on it in order to select it and click the Properties button below.
Opening the IPv4 Properties
  1. Stay in the General tab and switch the radio button in the Properties window to “Use the following DNS server addresses” if it was set to something else.
  2. Set Preferred DNS server to be 23.228.235.159 and the Alternate DNS server to be 1.0.0.0.
Changing the DNS server
  1. Keep the “Validate settings upon exit” option checked and click OK in order to apply the changes immediately. Check to see if the “Rockstar servers unavailable” message still appears!

Note: If the addresses above don’t work out, don’t give up on the solution and try using 8.8.8.8 and 8.8.4.4 for Preferred DNS server and Alternate DNS server respectively.

Solution 3: Forward Certain Ports in Windows Firewall

The game has its ports which need to be open by Windows Firewall at all times. Make sure you do so by following the steps below!

  1. Navigate to Control Panel by searching for it in the Start menu and click on System and Security >> Windows Firewall. You can also switch the view to Large or Small icons and click on Windows Firewall instantly.
Opening Windows Defender Firewall
  1. Select the Advanced settings options and highlight Inbound Rules in the left section of the screen.
  2. Right click on Inbound Rules and click on New Rule. Under the Rule type section, select Port. Select TCP or UDP from the first set of radio buttons (depending on which ports you are working on) and switch the second radio button to “Specific local ports. You will need to add the following ports in order to fix the problem with Rockstar servers:
TCP Ports: 80, 443
UDP Ports: 6672, 61455, 61456, 61457, 61458
Entering the required ports to be opened
  1. Make sure you separate them by a coma right to the last one and click on Next after you have finished.
  2. Select the Allow the connection radio button in the next window and click Next.
Allow the connection for the ports
  1. Select the network type when you want to apply this rule. If you switch from one network connection to another quite often, it’s recommended that you keep all of the options checked before clicking Next.
  2. Name the rule something which makes sense to you and click Finish.
  3. Make sure you repeat the same steps for Outbound Rules (choose Outbound rules in Step 2).

Solution 4: Change the Antivirus you are Using

Free antivirus tools can be quite helpful and they can do their job protecting your computer but sometimes they just don’t get along well with other things on your computer. Players have suggested that uninstalling their antivirus tools helped resolve the error but the problem is that it’s very unsafe to leave your computer unprotected. That is why it’s better to simply find a better alternative if you are using a free version of antivirus.

  1. Click on the Start menu and open Control Panel by searching for it. Alternatively, you can click on the gear icon in order to open settings if you are using Windows 10.
  2. In Control Panel, select to View as: Category at the top right corner and click on Uninstall a Program under the Programs section.
Uninstall a Program in Control Panel
  1. If you are using the Settings app, clicking on Apps should immediately open a list of all installed programs on your PC.
  2. Locate your antivirus tool in Control Panel or Settings and click on Uninstall.
  3. Its uninstall wizard should open so follow the instructions to uninstall it.
Uninstalling your antivirus
  1. Click Finish when the uninstaller completes the process and restart your computer to see whether errors will still appear. Make sure you choose a better antivirus option.

The post Fix: Rockstar Cloud Servers are Unavailable appeared first on Appuals.com.

How to Block a Website in Chrome

$
0
0

Google Chrome (commonly known simply as Chrome) is a cross-platform web browser developed by Google. It was first released in 2008 for Microsoft Windows and was later ported to Linux, macOS, iOS, and Android. The browser is also the main component of Chrome OS, where it serves as the platform for web apps.

Chrome Logo


Sometimes, you might need to block certain websites, for example, to configure the computer for office use or restrict some websites for your home use. Therefore, in this article, we will teach you how to block websites on Google Chrome using an extension.

How To Block Websites On Google Chrome?

Chrome allows you to add numerous extensions to the browser. This feature can also be used to block websites therefore in this step we are going to add an extension which we will later configure to block websites for that

  1. Navigate to this page
  2. Click on the “Add to Chrome” button
    Clicking on Add to Chrome
  3. Click on “Add Extension” again and it will begin to download the extension
    Clicking on “Add Extension”
  4. Chrome will automatically download the extension and begin to install it on the browser
  5. Once it is installed it will automatically open the webpage of the extension
  6. However, if the webpage doesn’t open up automatically, click on the Extension’s icon in the top right corner
    Clicking on the extension’s icon
  7. Click on the Gear icon from the dropdown
    Clicking on the Gear Icon from the dropdown
  8. It will now open up the Settings webpage of the site, type the address of the site you want to block in the address bar and click on the “+” button to block it
    Type in the address of the site and click on the + button to block
  9. Also, you can block the website by visiting it.
  10. Once on the website that you want to block, click on the Extension’s icon on the top right
    Clicking on the extension’s icon
  11. Select “Block Website” to block the website.
    Click on the “Block Site” button to block it when on the site

Note: If you click on the Extension’s icon you will also see a button that enables or disables the extension. Make sure it is enabled in order to block the websites. You can also try to set up redirection by clicking on the Redirection button in the extension settings page and typing the address of the site you want to redirect to. Due to this, the users will now be redirected to that site whenever they try to use a website that is blocked.

The post How to Block a Website in Chrome appeared first on Appuals.com.

Fix: Chrome Keeps Opening New Tabs

$
0
0

Google Chrome (commonly known simply as Chrome) is a cross-platform web browser developed by Google. It was first released in 2008 for Microsoft Windows and was later ported to Linux, macOS, iOS, and Android. The browser is also the main component of Chrome OS, where it serves as the platform for web apps.

Google Chrome logo

However, recently we have received many reports of the browser automatically opening new tabs. This issue causes a lot of unwanted tabs to open which in addition to slowing down your computer can also hinder your browsing experience. In this article, we will tell about some common causes of the problem and provide you with viable solutions in order to get rid of the issue.

What Causes Chrome to Keep Opening New Tabs?

There are many things that can trigger this issue and we have researched the most common ones which are

  • Malware: There is a possibility that some sort of malware might have been added on your pc which is causing this random opening of tabs.
  • Corrupt Installation: It is also possible that the installation of the Chrome browser is corrupted and is causing this issue.
  • Search Settings: In the search settings there is an option to open a new tab for each search this can also cause the random opening of tabs.
  • Background Apps: Some extensions of Chrome have permission to run in the background while this can be a useful feature as you would continue to get your notifications even when chrome is turned off but sometimes this feature can malfunction and cause the problem.

Now that you have a basic understanding of the causes of the problem we will move on towards the solutions.

Solution 1: Removing Unwanted Extensions and Apps.

Sometimes certain apps are installed automatically if you download something from an untrusted source which can in turn cause this random opening of tabs and also is a threat to your privacy. Also, there might be certain extensions on your Chrome browser that might be problematic. In this step, we are going to be removing both unwanted extensions and applications.

  1. Click on the search bar in the bottom lefthand side of the taskbar
    The search bar on the bottom left-hand side
  2. Type in “Add or Remove Programs” press enter and click on the icon
    Typing Add or Remove Programs in the search bar
  3. Search for any Application that looks suspicious and was not added by you
  4. Click on it and select Uninstall
    Uninstalling
  5. Now Open up your Chrome Browser and in the address bar type “chrome://extensions/”
    Search bar Chrome
  6. This will open up the extensions that have been applied on your chrome browser.
  7. If you find an extension that you did not add yourself, Click on “Remove
    Removing Unnecessary extensions
  8. Also, make sure to remove any VPN or Proxy extensions as they are mostly the cause of the issue.

This step will make sure that no suspicious app or extension is causing the issue if this does not solve your problem move on towards the next solution.

Solution 2: Adjusting Search Settings

The Search Settings are sometimes configured to open up new tabs every time you search for something. This can be quite annoying in most cases and in this step we will be disabling this setting.

  1. Open the Chrome browser, type anything in the search bar and press enter
  2. Click on the “Settings” option right above your results.
    Clicking on Settings below the search bar
  3. After that Click on “Search Settings
    Search Settings
  4. In the settings option, Scroll down and make sure the “Open New Window for each result” Box is unchecked.
    Unchecking Box

This will disable the browser from opening a new tab every time you search for something. If the issue still persists move on to the next solution.

Solution 3: Disabling Background Apps

Certain extensions, when allowed to be run in the background, can provide you with important notifications even when the Chrome app is closed but they might also sometimes cause the problem therefore in this step we are going to disable those extensions and apps from running in the background.

  1. Open Chrome, Click on the Menu icon on the top right corner and select the Settings option.
    Menu button Chrome
  2. In the settings option, scroll down and click on “Advanced” then scroll down further to the System Section.
    System Options
  3. Disable the “Continue Running Background Apps when Google Chrome is Closed” option.
    Disable This option

This will prevent the Chrome extensions and associated apps from running in the background.

Solution 4: Removing Malware.

Certain Malware often gets installed automatically when you download something from an untrusted source therefore, in this step we are going to scan the computer for any Chrome related malware and remove it from the computer. For that

  1. Click on the Menu icon on the top right corner of the Browser and select “Settings
    Menu button Chrome
  2. In the settings, scroll all the way down and click on “Advanced
    Advanced settings expander
  3. Scroll to the “Reset and Cleanup” section and click on the “Clean up computer” option
    Clicking on the cleanup option
  4. Now click on “Find Harmful Software
    Clicking on the Find Harmful Software option
  5. Chrome will automatically scan your computer for any malware related to it and automatically Remove it from your computer.

Solution 5: Reinstalling Chrome

If none of the solutions worked for you it is possible that the installation of the chrome browser might have been corrupted. Therefore in this step, we are going to completely remove chrome from the system and reinstall it. For which

  1. Click on the search bar on the bottom left-hand side of the taskbar
    The search bar on the bottom left-hand side
  2. Type in “Add or remove program” and click on the icon
    Typing Add or Remove Programs in the search bar
  3. Search For Google Chrome in the list of the applications.
  4. Click on it and select uninstall
    Uninstalling
  5. Now download Chrome again and install it.

This should solve the problem if it was related to the corrupt installation of the browser. If this still does not solve the problem then you should contact customer support.

The post Fix: Chrome Keeps Opening New Tabs appeared first on Appuals.com.

Fix: Windows Could Not Prepare the Computer to Boot Into the Next Phase of Installation

$
0
0

Some users are encountering the “Windows could not prepare the computer to boot into the next phase of installation” error when trying to install Windows or trying to upgrade an existing version. The issue is not exclusive to a particular Windows version and it’s reported to occur with Windows 7, Windows 8.1 and Windows 10 installations.

“Windows could not prepare the computer to boot into the next phase of installation”

What is causing the “Windows could not prepare the computer to boot into the next phase of installation” error?

We investigated this particular issue by looking at various user reports and the repair strategies that they used to get the issue resolved. Based on what we gathered, there are several common scenarios that will end up triggering this particular error message:

  • Too many non-essential devices are plugged in – Certain BIOS versions are known to act up when too many unnecessary hardware is plugged in during the installation/upgrade process. A lot of affected users have managed to get the issue resolved by removing or disabling every unnecessary hardware.
  • Installation media improperly prepared – A few affected users have confirmed that this particular error was occurring due to a badly created installation media. Upon recreating it properly, most users have reported that the issue was resolved.
  •  BIOS does not support the Windows version – This particular issue is mostly encountered with Mini-PC and similar computers.  Most of the smaller motherboards models that are recently released feature a BIOS version that doesn’t support Windows 7 or under.
  • System file corruption is causing the error – It’s also possible that system file corruption is what’s causing this particular error. Users in a similar situation have reported that the issue was resolved after they deleted all partitions and did a clean install.

If you’re currently looking for fixes that will allow you to get past the “Windows could not prepare the computer to boot into the next phase of installation” error, this article will provide you with several potential repair strategies.

Down below, you’ll discover several different fixes that other users in a similar situation have used to get the issue resolved.  Since the methods below are ordered by efficiency and severity, we advise you to follow them in the order that they are presented in.

Method 1: Disabling all unnecessary hardware

The most effective fix when encountering the “Windows could not prepare the computer to boot into the next phase of installation” error is to remove/disable any unnecessary hardware. This is especially effective in those situations where the user tries to upgrade an existing Windows installation.

Some users are speculating that the issue is triggered by a bugged BIOS version on older computers. This is only reported to occur when there are a lot of peripherals and external devices connected to the computer.

With this in mind, remove any non-critical hardware such as Universal Serial Bus (USB) devices, network adapters, sound cards, serial cards etc. If you have multiple HDD or SDDs, disconnect those that are not needed during the installation. Also, remove any optical drives that are currently active in your computer.

Once your computer is running with the bare minimum hardware, restart your computer and start the installation again. Chances are you will be able to complete the process without seeing the error again.

Method 2: Prepare the installation media properly

Another possible culprit that might end up triggering this particular issue is a badly written installation media. Since it’s confirmed that the “Windows could not prepare the computer to boot into the next phase of installation” error might occur if the media wasn’t prepared properly, you might be able to resolve the issue by starting the process again from a different installation media.

Here are two different methods that you can follow in order to create Windows installation media. Follow whichever ones seem more convenable to your current situation:

Creating the Installation Media with Rufus

Repeat the process with the newly created media and see if you’re still encountering the “Windows could not prepare the computer to boot into the next phase of installation” error.

If the error is still persisting even with the new installation media, move down to the next method below.

Method 3: Verify whether BIOS  supports the Windows version 

If you’re trying to install an older Windows version on a newer laptop or desktop, there is a chance that your BIOS model does not support the Windows version that you’re trying to install. There are a lot of reported cases with this occurring on Mini-PC models. Almost all newer models will not support Windows versions older than 8.1.

If you think this scenario might be applicable to your current situation, call your warranty service or search online to see if the BIOS model present on your PC supports the Windows version that you’re trying to install.

Alternatively, try to install a newer Windows version and see if the  “Windows could not prepare the computer to boot into the next phase of installation” error persists.

Method 4: Deleting all partitions

Some affected users have reported that they were finally able to go through with the installation and complete the process without the “Windows could not prepare the computer to boot into the next phase of installation” error only after they deleted all partitions and started the OS installation process from scratch.

Of course, this can be a major inconvenient if you were simply trying to upgrade an existing Windows installation, but if you’ve come this far without a result you don’t really have any other choice.

But just in case things go wrong, we advise you to create a Windows System Image backup before you proceed with the deletion of all available partitions. You can follow this article (here) for steps on how to create a System Image backup.

Once the backup is in place, restart your computer and force your computer to boot from the installation media. When you reach the screen where you get to select where to install the OS, delete every available partition and create new ones from the Unallocated space.

Deleting all partitions

Next, proceed with the Windows installation normally and you should no longer be encountering the “Windows could not prepare the computer to boot into the next phase of installation” error.

The post Fix: Windows Could Not Prepare the Computer to Boot Into the Next Phase of Installation appeared first on Appuals.com.

Fix: Chrome Extensions Stopped Working

$
0
0

Several Chrome users are reporting that they suddenly lost all functionality from any installed extension. Most affected users are reporting that the issue started occurring abruptly with no error message whatsoever. Right-clicking any installed extensions don’t do anything. Several users have reported that the context menu option for each extension is no longer showing up.

Chrome Extensions Stopped Working

What is causing the Chrome Extensions to stop working?

We investigated this particular issue by looking at various user reports and the repair strategies that they successfully used to get rid of the problem. Based on our investigations, there are several different scenarios that will trigger this particular error message:

  • Glitched Google Chrome process – More often than not, this particular issue occurs because the main Google Chrome process is hanging or becomes glitched.  In this case, you can resolve the issue by ending the Chrome process Via Task manager and opening Chrome again.
  • Installed Extensions Conflict – There is a lot of extension in Google Chrome that simply can’t play nice with each other. In some cases, you can resolve the issue by disabling and then enabling all extensions, but there are confirmed cases where affected users had to remove one or more extensions in order to restore the normal functionality for the rest.
  • Outdated Chrome or Windows build version – As it turns out, Windows 10 includes a security feature that will prevent you from using extensions, add-ins or add-ons that improve on the functionality on the browser while. This is done in order to avoid putting your system at further risk. Some affected users have reported that they were able to use their extensions again after they installed every pending update in Windows Update and updated chrome to the latest version.
  • Corrupted browser user profile – Another root cause that might be triggering this particular behavior in Google Chrome is a corrupted user profile. For several different reasons, your user profile might be unable to call upon Extension Manager, which will end up breaking all your available Chrome extensions. In this case, forcing your browser to create a new user profile will most likely resolve the issue.
  • Experimental settings are conflicting with the Extension Manager – Another reason that might trigger this particular behavior is some experimental settings (flags) that are conflicting with Extension Manager. The easiest fix, in this case, is to revert all experimental settings to their defaults.
  • Browser hijacker infection – There are several different variations of the Yeabd66.cc virus capable of breaking your extensions in the process of infecting your browser. Although you will be able to remove it with a Malwarebytes scan, you’ll likely need to reinstall your browser at the end of it.

If you’re currently looking for ways to get your Chrome extensions to work again, this article will give you some troubleshooting ideas. Down below, you’ll find a collection of potential fixes that users in similar situations have deployed successfully to resolve the issue.

If you want to be as thorough as possible, follow the methods below in the order that they are presented. One of the following repair strategies is bound to resolve the issue in your particular scenario.

Method 1: Ending the Chrome process via Task manager

A lot of users facing the same issue have managed to resolve it by closing Google Chrome and then ending the task (process) associated with the browser via Task Manager. This is the most popular solution out of the bunch, but a couple of users have reported that this fix was only temporary for them.

Some users are speculating that these steps end up resolving the issue in those cases where the main Google Chrome process glitches and ends up affecting the installed extensions.

Here’s a quick guide on ending the Chrome process via Task Manager.

  1. Close Google Chrome complete (make sure that you also close it’s a tray-bar icon).
  2. Press Ctrl + Shift + Esc to open up Task Manager.
  3. Select the Processes tab, right-click on Google Chrome and choose End Task.
    Ending the Google Chrome task
  4. Restart your Chrome browser and see if the issue has been resolved.

If you’re still unable to use any of your installed extensions, move down to the next method below.

Method 2: Re-enable every installed extension

Another fairly popular fix is to simply visit the Extension Manager menu and re-enable every extension that you currently have installed on your browser. A lot of users have reported that this procedure was successful for them, but some say that the fix is only temporary – the issue returns at the next browser startup.

If you don’t mind a temporary workaround, here’s a quick guide on re-enabling every installed extension:

  1. Open Google Chrome, type “chrome://extensions/” and press Enter to open up the Extensions tab.
    Open extensions page
    Accessing the Extensions menu
  2. Once you get there, set the toggle associated with each extension to disable it.
    Disabling every installed Extension in Google Chrome
  3. Once every Extension has been disabled, restart your Chrome browser and use step 1 again to return to the same extension menu.
  4. Once you get back to the Extension menu, re-enable all the extensions you previously disabled by switching their associated toggle to On.
    Enabling the previously disabled extensions
  5. See if your extensions have started functioning again.

If you’re still unable to use any of your installed extensions, move down to the next method below.

Method 3: Updating Google Chrome and Windows to latest builds

Outdated software can also be what’s causing your extensions to malfunction. A couple of affected users have managed to resolve the issue by making sure that both Chrome and Windows 10 is updated with the latest available updates.

Both Chrome and your operating system should be configured to update automatically. But certain 3rd party applications might modify this default behavior (particularly power saving applications) and leave your system behind the latest builds available).

Here’s a quick guide on how to make your extensions usable again by updating Chrome and Windows to the latest version.

  1. Let’s start by updating Google Chrome. To do this, click the action button (top-right corner) and go to Help > About Google Chrome.
    Go to Settings > Help > About Google Chrome
    Go to Settings > Help > About Google Chrome
  2. If a new version is available, the browser will automatically update itself to the latest version available.
    Update Google Chrome
    Update Google Chrome
  3. If a new version is available, follow the on-screen prompts to update, then close your Chrome browser completely.
  4. Press Windows key + R to open up a Run dialog box. Then, type “ms-settings:windowsupdate” and press Enter to open the Windows Update screen of the Settings app.
    Run dialog: ms-settings:windowsupdate

    Note: If you’re not on Windows 10, use the “wuapp” command instead.

  5. Inside the Windows Update screen, click on Check for Updates and follow the on-prompts to install every pending update until there is nothing left to update. If you’re prompted to restart in this process, do so and make sure to return to the Update screen at the next startup to continue the updating process until it’s complete.
  6. Once your computer is up to date, open Google Chrome and see if your extensions are now usable.

If you’re still unable to use any of your installed extensions, move down to the next method below.

Method 4: Creating a new user profile

Another root cause that might be triggering this particular behavior in Google Chrome is a corrupted user profile. Several users that have started facing the same issue after an unexpected shut down reported that they were able to fix it by creating a new user profile.

You can even avoid any data loss by creating a back-up of the Default folder before making the switch to a new profile. Here’s a quick guide on how to create a new user profile in Google Chrome & avoid any data loss:

  1. Make sure that Google Chrome is completely closed.
  2. Press Windows key + R to open up a Run dialog box. Then, type “%LOCALAPPDATA%\Google\Chrome\User Data\” and press Enter to open up the location containing the default Google Chrome folder.
    Opening the location of the Default Chrome profile
    Opening the location of the Default Chrome profile
  3. Once you get to that location, look for a folder named Default. Once you see it, right-click on it and choose Rename. Then, name the Default folder to Default-Bak to force the browser into creating a new one.
    Renaming the Default folder to Default-Bak
    Renaming the Default folder to Default-Bak
  4. Once the Default folder has been renamed, open Google Chrome once again and see if you can use your extensions once again.
    Note: Remember that you still have your old Default folder (renamed as Default-Bak). If you can open it to migrate any folders (Sync Data, Accounts, Extensions) you need from your old Default folder to your new one.

If this method didn’t allow you to restore the functionality of your Google Chrome extensions, move down to the next method below.

Method 5: Disable Experimental Settings in Google Chrome

If you messed around with Chrome’s experimental settings under about:flags, it’s very likely that some settings are conflicting with your extension manager. We’ve encountered this culprit more than often with similarly affected users.

Most users that managed to break the functionality of all their installed extensions by enabling some experimental settings have reported that the issue was resolved after they Reset all experimental settings to the default.

Here’s a quick guide on how to disable any previously enabled Experimental Settings in Google Chrome:

  1. Open Google Chrome, paste about:flags inside the navigation bar and press Enter. If it’s the first time you’re trying to access the experimental settings of Chrome, you will be prompted by a warning screen.
  2. Once you arrive at the Experimental Settings page, simply click on the Reset all to default button (top-right corner) to disable all settings.
    Resetting all experimental settings to default
  3. Once all previously enabled experimental settings have been disabled, restart your Chrome browser and see if your extensions become visible again.

If you’re still encountering the same error message, move down to the next method below.

Method 6: Performing an anti-malware scan with Malwarebytes

If you’ve come this far without a fix for your issue, it’s very possible that you might be dealing with a browser hijacker. There are quite a few variations of the Yeabd66.cc virus that is known to break the Extension Manager in Google Chrome.

Naturally, there are a lot of security solutions that you can use to get rid of the issue. But, based on our experience, we recommend a deep Malwarebytes scan as it’s definitely the best free alternative when it comes to scanning for and removing browser hijackers.

If you’re unsure on how to run a Deep scan with Malwarebytes, you can follow this article (here).

The post Fix: Chrome Extensions Stopped Working appeared first on Appuals.com.

Fix: Excel Formulas Not Updating

$
0
0

Microsoft Excel is a spreadsheet developed by Microsoft for Windows, macOS, Android, and iOS. It features calculation, graphing tools, pivot tables, and a macro programming language called Visual Basic for Applications. It has been a very widely applied spreadsheet for these platforms, especially since version 5 in 1993, and it has replaced Lotus 1-2-3 as the industry standard for spreadsheets. Excel forms part of the Microsoft Office suite of software.

Excel Logo

Usually, the formulas are automatically updated when the user presses enter or click out of the cell, However, quite recently a lot of reports have been coming in about the program not updating the formulas automatically and the formulas not updating when dragged. In this article, we will discuss the cause of the problem and provide you with viable solutions to solve the problem.

What Causes the Formulas to not Update automatically?

The causes of the problem are pretty simple and straight forward

  • Formula Settings: Sometimes, when you save a spreadsheet and exit the application the formula settings get reset. When you load the save file again the formula settings are sometimes set to be updated manually. This means that the formula cells will only update if you manually update them.
  • Format: In some cases, it was found that if the cell format of your formula is set to “Text” instead of “General” then the formulas will not update.
  • Mistyping: If there is a space in the start of the formula then the program will not detect it as a formula and just as simple text, therefore, it will not update. Also, sometimes there is an apostrophe at the start of the formula. This apostrophe cannot be seen unless you double click on the cell
  • Show Formula Button: Also, if the “Show Formula” button is toggled on the sheet you are currently working on or any other sheet it will show you the formula instead of the result. Thus, your formula won’t update.

Now that you have a basic understanding of the nature of the issue we will move on towards the solutions.

Solution 1: Changing Update Settings.

Sometimes, when you save a spreadsheet and exit the application the formula settings get reset. When you load the save file again the formula settings are sometimes set to be updated manually. This means that the formula cells will only update if you manually update them. In this step, we are going to be changing that setting

  1. Click on the Formulas tab on the top of the window.
    Clicking on the Formulas Tab
  2. Select the “Calculation Options” button on the right side.
    Selecting Calculation Options
  3. Select “Automatic” instead of “Manual“.
    Selecting Automatic
  4. Try to update your formulas now and see if they work.

Solution 2: Changing Format of Cell

In some cases, it was found that if the cell format of your formula is set to “Text” instead of “General” then the formulas will not update. Therefore, in this step, we will be changing the format of the Formulas.

  1. Select the cell with the formula in it
  2. Click on the Home tab on the top of the window
    Clicking on Home
  3. Inside the “Numbers Format” settings in the middle of the window, select “General” instead of text.
  4. DoubleClick on the Formula cell again and press “Enter” to update the formula automatically

Solution 3: Checking for Mistypes

If there is a space in the start of the formula then the program will not detect it as a formula and just as simple text, therefore, it will not update. Also, sometimes there is an apostrophe at the start of the formula. This apostrophe cannot be seen unless you double click on the cell. In this step, we are going to make sure that there are no mistypes.

  1. DoubleClick on your formula cell
  2. If an apostrophe or space appears up before the formula delete it.
    Space behind the Formula
    Apostrophe behind the formula
  3. Click out of your cell and DoubleClick on it again
  4. Press Enter to update the cell

Solution 4: Disabling “Show Formula” Setting

Also, if the “Show Formula” button is toggled on the sheet you are currently working on or any other sheet it will show you the formula instead of the result. Thus, your formula won’t update. In this step, we will be disabling that option.

  1. Click on the Formulas tab on the top of the page
    Clicking on the Formulas Tab
  2. Inside that, on the right side, there will be a “Show Formulas” button
    Disable the “Show Formulas” Tab
  3. Make sure that the option is not enabled
  4. On the bottom left, if there are any other Sheets opened up instead of the one you are working on, make sure that the “Show Formulas” button is disabled on them also.
  5. Now DoubleClick on your Formula cell and press “Enter

The post Fix: Excel Formulas Not Updating appeared first on Appuals.com.


Fix: No Man’s Sky Crashing

$
0
0

No Man’s Sky is an action-adventure survival game developed and published by the indie studio Hello Games. It was released worldwide for PlayStation 4 and Microsoft Windows in August 2016, and for Xbox One in July 2018. The game is built around four pillars: exploration, survival, combat, and trading. Players are free to perform within the entirety of a procedurally generated deterministic open-world universe, which includes over 18 quintillion planets.No Man’s Sky

However, quite recently a lot of reports have been coming in about the game “crashing” again and again. In this article, we will tell you some of the causes that are causing the game to crash and provide you with viable solutions in order to solve this issue.

What Causes No Man’s Sky to Crash?

The game can crash due to a number of different reasons some of which are:

  • Updates: There are often certain bugs in the game that need to be patched in order for the game to run correctly so it is possible that there is a bug that hasn’t been patched if you are running an old version of the game.
  • Missing Files: It is possible that some files of the game might be missing or corrupted. The game needs all the files to be complete in order to run correctly if a file or a number of files are missing the game can experience random crashes.
  • Corrupt Save Files: Sometimes the user save files can get corrupted if so the game will experience crashes while trying to load those files.
  • Shader Cache: It is possible that the shader cache might be corrupted. Shader Cache is utilized while loading the shaders but it can be automatically regenerated if it is missing. However, when corrupted the game tries to load the same cache, therefore, causing the game to crash
  • Mods: There are numerous Mods available for the game which can improve the gameplay or even the visuals. If the Mods are not updated to support the latest version of the game or the game version is not in line with the mods then the game could crash.

Now that you have a basic understanding of the nature of the issue we will move forward towards the solutions.

Solution 1: Updating the Game

There might be a bug in the game that is causing the game to crash therefore the most basic troubleshooting step would be to make sure the game is up to date. In this step, we are going to be updating the game to the latest version for that

  1. Open Steam and sign in to your account
  2. Right clickNo Man’s Sky” in your Steam Library and select “Properties
    Opening Game Properties in steam
  3. Click the “Updates” tab
    Opening Update Options
  4. Ensure “Automatic Updates” is set to “High Priority
    Setting it to high priority

Note: Make sure that the computer has an internet connection before this step.

Solution 2: Verifying the Game Integrity

It is possible that some files of the game might be missing or corrupted. The game needs all the files to be complete in order to run correctly if a file or a number of files are missing the game can experience random crashes. Therefore, in this step, we are going to verifying the integrity of the game files.

  1. Launch Steam and sign in to your account
  2. Go into the library section, rightclick on the game and select “Properties”.
    Opening Game Properties in steam
  3. After that Click on the Local Files option and click on the “Verify the integrity of Game Cache” option
    Opening Local files
  4. This will take some time to verify after it is done try to run the game

Solution 3: Remove your Save Files

Sometimes the user ‘save files” can get corrupted if so the game will experience crashes while trying to load those files. Therfore in this step, we are going to completely remove the save files

  1. Type “%Appdata%” in the Windows search bar and press Enter
    Opening the “AppData” folder
  2. Open the Hello Games Folder
    Opening the Hello games folder
  3. Open the “No Man’s Sky” Folder and delete everything in it
    Opening No Man’s sky folder and deleting everything in it

    Note: This is going to delete all of your save files so make sure to back them up before trying this solution.

  4. Try to run the game and see if the problem persists

Solution 4: Removing Shader Cache

Shader Cache is utilized while loading the shaders but it can be automatically regenerated if it is missing. However, shader cache, when corrupted the game tries to load the same cache, therefore, causing the game to crash. In this step, we will be completely deleting the shader cache for which

  1. Navigate to your game installation folder
    C:\SteamLibrary\steamapps\common\No Man’s Sky\GAMEDATA\SHADERCACHE
  2. Now delete every file in there
    Deleting Shader Cache
  3. The game will now be forced to make new ShaderCache when it is opened.
  4. Try to Run the game

This will solve your problem if the ShaderCache of the game was corrupted

Solution 5: Removing Mods

There are numerous Mods available for the game which can improve the gameplay or even the visuals. If the Mods are not updated to support the latest version of the game or the game version is not in line with the mods then this issue can be triggered. Therefore, we suggest you to try to load the game without any Mods applied. To do that

  1. Navigate to
    C:\SteamLibrary\steamapps\common\No Man’s Sky\GAMEDATA\PCBANKS
  2. Delete all the Mod Files that you copied in there in order to install the mod
    Deleting the Mod Files

    Note: Don’t Delete any other files except the ones that you added after installing the game in order to use Mods. As all the other files in here are important game files that the game needs in order to run properly

  3. Now try to Run the game.

The post Fix: No Man’s Sky Crashing appeared first on Appuals.com.

Fix: Error Can’t Connect to BATTLE.NET

$
0
0

Blizzard Battle.net is an Internet-based online gaming, social networking, digital distribution, and digital rights management platform developed by Blizzard Entertainment. Battle.net was launched on December 31, 1996, with the release of Blizzard’s action-role-playing video game Diablo.

The Error

However, quite recently there have been many reports of the Error “Can’t Connect to Battle.net”. Due to this problem users are facing difficulties while trying to connect to the store and also while trying to play games associated with the blizzard store. In this article, we will tell you the cause of this problem and guide you with viable solutions that will be explained to you in a step by step manner.

What Causes the “Can’t Connect to battle.net” Error?

Unfortunately, there is no specific cause of the problem and it can be caused due to a number of reasons. Some of the main causes that can be triggering the error are

  • VPN: If you are using a VPN or a proxy while trying to connect to the battle.net service then it is possible that the service might be blocking you due to security violations.
  • Firewall: Also, there is a possibility that the Windows firewall might be blocking the service from making contact with its servers, therefore, resulting in the error.
  • IP Ban: Unless you have a static IP the IP address that is provided by the ISP keeps on changing. Services like battle.net might ban your IP address if it was changed after the last time you connected.

Now that you have a basic understanding of some of the causes of the problem we will move on towards the solutions.

Solution 1: Restarting your Internet.

Sometimes a simple Internet reset might solve this problem in order to do that we will be power-cycling our internet router. For which:

  1. Unplug the power from your internet router.
    Unplugging Router From Power
  2. Wait for at least 5 minutes before you plug the power back in
  3. Once the internet access comes back on try to connect to the service

If this does not solve your problem don’t worry because this is the most basic troubleshooting step.

Solution 2: Granting Access in Firewall

If the Windows firewall is blocking the program from making contact with the servers this error can be triggered. Therefore, in this step, we are going to make sure that the program is not being blocked by the firewall

  1. Click on the search bar on the bottom left-hand side of the taskbar
    The search bar on the bottom right-hand side
  2. Type in Firewall and press enter
    Typing in Firewall
  3. Click on the Windows Firewall that appears
  4. On the Left-hand side of the Window, click on “Allow an app or feature through windows firewall
    Selecting the option
  5. Click on the “Change Settings” button to provide administrative privileges.
    Selecting Change Settings
  6. Scroll down and look for Battle.net or Blizzard client and allow it through both “Public” and “Private” Networks.
    Giving Permissions
  7. Try to connect to the service

If this step doesn’t work try to disable your antivirus and try again. Still, if the problem persists move on towards the next solution.

Solution 3: Flushing the DNS

The DNS is the address for a site that your network uses to reach various sites across the internet. If the DNS has not been refreshed the address that your network has cached is incorrect. This can cause problems while connecting to the server. So in this step are going to be Flushing the DNS for which

  1. Click on the search bar on the left-hand side of the taskbar
    The search bar on the bottom left-hand side
  2. Type in Command Prompt
    Typing in Command Prompt
  3. Right-Click on the Command Prompt Icon and Click on “Run as Administrator
    Running as Administrator
  4. Type in “ipconfg /flushdns” and press enter
    Applying Command in Command Prompt
  5. Now again restart your internet
  6. Try to connect to the battle.net

If this does not solve the issue then move on towards the next step

Solution 4: Reinstalling Blizzard Client

Blizzard is the client that is responsible for connecting to the battle.net service. In this step, we are going to be completely removing than reinstalling the client. This can get rid of any sort of corrupt cache that might be causing this issue for this

  1. Click on the search bar on the left-hand side of the taskbar and type in “Add or Remove Programs” and open it
    Typing Add or Remove Programs in the search bar
  2. Search for the blizzard client and left-click on it
    Uninstalling Blizzard Client
  3. Select Uninstall to remove the app completely from the system
    Note: This will completely remove the Blizzard app and its associated applications from your PC, therefore, it is recommended to backup any important data before proceeding with this step.
  4. Download the Blizzard client from here
  5. After the download finishes, Install the program and see if the problem is solved.

If the problem still persists try to check if the battle.net servers are under maintenance in your region. If not contact the customer support or try to install a fresh copy of the Windows 10 without keeping the previous settings.

The post Fix: Error Can’t Connect to BATTLE.NET appeared first on Appuals.com.

Fix: Fallout 76 Crashing

$
0
0

Fallout 76 was hyped by Bethesda and it has definitely gained fame after its release. However, players have reported that the game is actually full of bugs which sometimes make it almost unplayable. This article focuses on why the game is constantly crashing for some players, either on startup or while playing the game.

Fallout 76 has stopped working

The methods below will be useful for players whose setup supports the minimum specifications for the game and who don’t have major general issues with their setup. Follow the methods we have prepared below in order to prevent Fallout 76 from crashing further.

What Causes Fallout 76 Crashing?

The list of possible causes is short but it represents the majority of causes players have complained about. The problems are pretty much related to graphics problems:

  • FPS sometimes goes to high for users running the game with high-end setups. This causes the game to misbehave and crash. Try limiting the FPS.
  • Updates to your graphics card driver may have caused incompatibility to consider rolling back to the old driver.

Solution 1: Limit Your FPS Using the Configuration File

Since the game is not quite demanding for PC users, FPS (frames-per-second) can go up to 1000 considering your GPU’s power. However, that is not necessarily a good thing since it can cause all sorts of problems, including the game’s constant crashing.

This often occurs in menus or on the home screen. Follow the methods below in order to edit the Fallout76Prefs.ini file to enable V-Sync which will limit the framerate to your monitor’s refresh rate (usually 60 Hz, 70 Hz or 75 Hz).

  1. Navigate to the folder’s location in the File Explorer simply by opening a folder or by clicking the the folder icon from the taskbar.
  2. Anyway, inside a folder or the Libraries entry, double-click to open your Local Disk and navigate to Users >> Your Account’s Name >> Documents >> My Games >> Fallout 76. Navigating to Documents can also be shortened from the Quick Access bar which is located at the left part of any opened folder.
Navigating to the ‘Fallout76Prefs.ini’ file
  1. Right-click the file called named ‘Fallout76Prefs’ and choose to open it with Notepad.
  2. Use the Ctrl + F key combination or click Edit at the top menu and select the Find option from the dropdown menu in order to open the Search box.
  3. Type “iPresentInterval” in the box and change the value next to it from 0 to 1. Use the Ctrl + S key combination in order to save the changes or click File >> Save and exit Notepad.
Enabling V-Sync in the configuration file
  1. Try running the game again in order to check if the Fallout 76 crashing problem still appears!

Note: If you notice no changes to the game, it might be necessary to force V-Sync using the control panel of the graphics card you are using by tweaking the settings related to Fallout76. Follow the steps below (NVIDIA or AMD users).

NVIDIA:

  1. Right-click on your desktop, at the blank side without icons, and select the NVIDIA Control Panel entry from the context menu which will appear. You can also double-click the NVIDIA icon in the system tray if you see it. NVIDIA Control Panel can also be located in the regular Control Panel by switching to the Large icons view and locating it.
Opening NVIDIA Control Panel by right-clicking the Desktop
  1. Under the 3D settings section at the left navigation pane, click on Manage 3D settings at the left navigation side and navigate to the Program Settings
  2. Click on Add and make sure you browse your PC for the executable which is used to launch Fallout 76. It’s located in the folder where you decided to install the game.
Locate Fallout 76 in the list
  1. Under the Specify the settings for this program section, scroll down until you see the Vertical Sync Click the arrow and set it to On. This will force V-Sync for Fallout 76!
Switching V-Sync to ON in NVIDIA Control Panel

AMD:

  1. Right-click the graphics card icon on your taskbar (after choosing to view all apps) and choose Radeon Settings from the context menu.
  2. Click the Gaming tab in the home screen and choose Fallout 76 from the list of games you have on your computer.
AMD Radeon Settings Gaming tab
  1. Select the Profile Graphics option at the top and click the arrow next to the Wait for Vertical Refresh entry on the list.
  2. Choose the Always on option from the dropdown menu. You can also use the Enhanced Sync option if you are using some of the newer Radeon graphics cards.
Turning on AMD V-Sync
  1. Save the settings for the game and relaunch it to see if the game still crashes.

Note: There are players for which just the opposite worked! This means that they had V-Sync enabled while the crashing occurred and it stopped when they disabled it. This can be done the same enabling it using the methods above.

In the Fallout76Prefs.ini file, simply change the “ipresentinterval” line from 1 to 0 or choose the Off option in NVIDIA or AMD tools.

Solution 2: Install an Older Driver

A recent update to your graphics drivers may have caused the game to misbehave. This problem is usually reported to both the graphics card manufacturer and to Bethesda but it may take a while for either of them to patch the problem. In the meantime, it may help you to simply use an older version of the driver in order to fix the problem!

  1. Click the Start menu button, type in “Device Manager” afterwards, and select it from the list of available results by simply clicking the first one. You can also tap the Windows Key + R key combo in order to bring up the Run dialog box. Type in “devmgmt.msc” in the dialog box and click OK in order to run it.
Running Device Manager via Run dialog box
  1. Since it’s the video card driver you want to update on your computer, expand the Display adapters section, right click on your graphics card and choose the Uninstall Device
Uninstalling the display adapter’s driver
  1. Confirm any dialogues or prompts which may ask you to confirm the uninstallation of the current graphics device driver and wait for the process to complete.
  2. Look for your graphics card driver on NVIDIA’s or AMD’s Input the required information about the card and your operating system and click on Search.
Searching for drivers on NVIDIA’s website
  1. A list of all available drivers should appear. Make sure you scroll down until you reach the required entry, click on its name and the Download button afterwards. Save it to your computer, open it, and follow the instructions on-screen in order to install it. Check to see if Fallout76 still crashes!

Workaround:

If the methods above haven’t quite worked for you, you can try a workaround until the issue is resolved in later updates and patches. The workaround consists of selecting play from the game’s home screen and using the Alt + Tab key combination in order to go back to Desktop.

After you hear the in-game sounds meaning that the game has loaded successfully, click the game’s icon in system tray in order to restore it back in fullscreen. This can be annoying to do each time but it has worked for many players!

The post Fix: Fallout 76 Crashing appeared first on Appuals.com.

Fix: Toshiba Flash Cards Preventing Shutdown in Windows 10

$
0
0

This problem appears when either restarting or shutting down your Toshiba laptop or PC. The error message says that Toshiba Flash Cards are preventing the shut down. They can be forced to terminate by clicking the Shut down anyway button but this can be problematic and annoying since your PC won’t shut down if you forget to click this button.

Toshiba Flash Cards Preventing Shutdown – Windows 10

There are a few useful methods you can use in order to resolve this problem which have worked for other Toshiba users. Simply follow the instructions we have prepared in this article and the problem should be gone in no time!

What Causes the Toshiba Flash Cards to Prevent Windows 10 from Shutting Down?

There are a few distinct causes for the problem:

  • The Toshiba Function Key software might have gone corrupt and it started to malfunction. When Windows is about to shut down, it sends a signal for other apps to terminate but this software doesn’t obey.
  • Certain updates to your operating system might have rendered the software incompatible and you might want to consider downloading the latest version of the software.

Solution 1: Disable the Toshiba Function Key Main Module from Starting Up

The whole concept of flash cards consists of assigning hotkeys which can be executed by clicking the Fn key and some other key at the same time. This can be useful but it’s sometimes also not fully compatible with your operating system. It can directly cause the problem in the article and we can suggest this method as it will almost certainly work.

Note that this will prevent you from being able to use flash cards but it shouldn’t be a problem if you never used them before.

  1. Open Startup either by navigating to the Startup tab in System Configuration and clicking on the “Open Task Manager” option or by simply opening the Task Manager by using the Ctrl + Shift + Esc key combination.
Navigating to the Startup tab in Task Manager
  1. Make sure you navigate to the Startup tab in Task Manager either way.
  2. Locate the Toshiba Function Key Main Module entry under the list of programs being launched at startup and click the Disable button located in the bottom right corner.
Disabling the Toshiba Function Key main module
  1. Apply these changes and restart your computer.
  2. If the error messages stop appearing after you restart your computer, it was the real cause of the problem. If it doesn’t resolve the problem, you can re-enable the module if you wish to use it.

Solution 2: Uninstall the Software

There are users who have reported that they don’t have the Toshiba Function Key Main Module option is the Startup tab of Task Manager yet they still receive the same error code. There are other users who have followed the instructions from solution one yet they still failed to resolve the problem.

The next step is to simply uninstall the Toshiba Function Key software completely which should definitely resolve the problem but it will also prevent you from using flash cards until you reinstall it.

  1. Click on the Start menu and open Control Panel by searching for it. Simply type with the Start menu window open. Alternatively, you can click the gear icon in the lower left section of the Start menu in order to open the Settings app if you are using Windows 10.
  2. In Control Panel, select the View as: Category option at the top right corner of the Control Panel and click on Uninstall a Program under the Programs section.
Uninstall a Program in Control Panel
  1. If you are using the Settings app, clicking on Apps should immediately open a list of all installed programs on your PC so wait for a while in order for it to load
  2. Locate Toshiba Function Key in Control Panel or Settings and click on the Uninstall button located in the window. Follow any instructions which appear afterwards in order to uninstall it completely.
Locating the software in Uninstall a Program

Solution 3: Install the Newest Version of the Software

With constant new updates being released via new drivers and new changes to your Windows operating system, it’s quite possible that the new versions simply don’t cooperate well with your Flash Cards module and you might want to consider updating the module in order to avoid further problem. Do so by following the steps below! This method is great as you won’t lose the function key functionality.

Note: Before starting this method, it’s recommended you firstly uninstall the previous version of the software before downloading and installing the new version. Do so by following the steps from Solution 2!

  1. Visit this link using any of your favorite browser and enter the model or the serial number of your computer or your laptop. If you are unsure how to find it, you can find a helpful link just below the bar where you need to enter the information.
Entering your serial number in order to access the files
  1. After selecting the correct serial number, you will also have to select your operating system before a list of available downloads for your setup appears.
  2. Keep the Applications filter checked in the Filter By screen and scroll down until you see the Toshiba Function Key entry. Click on its name and click the DOWNLOAD button which will appear afterwards.
Downloading the Latest Version of the Software
  1. Run the file you just downloaded and follow the instructions which will appear on-screen in order to install it properly. Restart your computer and check to see if the same problem appears during shutdown.

Solution 4: A Registry Fix

The final method is more of a universal one as it will allow you to resolve these problems with almost every other app which may report the same error. When Windows is about to shut down, it sends a signal to running apps to save their progress and exit but it’s not that necessary if you always close them manually first. This method can actually skip this part and them without waiting.

  1. Since you are going to delete a registry key, we recommend you check out this article we have published for you to safely backup your registry to prevent other problems. Still, nothing wrong will occur if you follow the steps carefully and correctly.
  2. Open the Registry Editor window by typing “regedit” in either the search bar, the Start menu, or the Run dialog box which can be accessed with the Windows Key + R key combination. Navigate to the following key in your registry by navigating at the left pane:
HKEY_CURRENT_USER\Control Panel\Desktop
Running Registry Editor using the Run box
  1. Click on this key and try to locate an entry named AutoEndTasks. If you fail to find it, create a new String Value entry called AutoEndTasks by right-clicking at the right side of the window and choosing New >> String Value. Right-click on it, and choose the Modify option from the context menu.
Creating the required key in registry
  1. In the Edit window, under the Value data section change the value to 1 and apply the changes you have made. Confirm any security dialogs which may appear during this process.
  2. You can now manually restart your computer by clicking Start menu >> Power button >> Restart and check to see if the problem is gone. This will effectively automatically and hanging tasks without requiring you to press the Shut down anyway button!

The post Fix: Toshiba Flash Cards Preventing Shutdown in Windows 10 appeared first on Appuals.com.

Fix: Black Screen in Overwatch

$
0
0

Overwatch is a team-based multiplayer first-person shooter developed and published by Blizzard Entertainment and released on May 24, 2016, for PlayStation 4, Xbox One, and Windows. Described as a “hero shooter”, Overwatch assigns players into two teams of six, with each player selecting from a roster of 29 characters, known as “heroes”, each with a unique style of play, whose roles are divided into three general categories that fit their role.

Overwatch official

However, we quite recently we have received a lot of reports of users experiencing a black screen when they launch their game. The game neither crashes nor plays and users are stuck with a black screen. In this article, we will discuss some of the reasons behind this problem and provide you with viable solutions in order to eradicate them completely.

What Causes the Overwatch Black Screen?

The cause of the problem is not specific and it can be triggered due to a number of reasons but some of the most common ones are:

  • Settings: Sometimes, the in-game settings can get misconfigured and the game might face issues starting properly. Overwatch has a glitch where it sometimes does not run on “Fullscreen” properly.
  • Missing Files: It is possible that the game might be missing important files that are required by the game during startup. Therefore, due to the unavailability of these files the game might be facing issues during the launch.
  • Corrupt Cache: The game cache when corrupted can cause issues with the startup of the game. In order to make the loading process faster, the game temporarily stores certain files on the computer as cache but overtime this cache can be corrupted and cause issues with the startup of the game.
  • Game DVR: Game DVR is a windows 10 utility that allows the users to record, broadcast and take screenshots while playing the game. However, this utility can sometimes cause fps drops and even prevent the game from running properly.
  • Battle.net Tools: Outdated, corrupted, or missing folders or files can cause issues with the Blizzard Battle.net desktop app and game clients.

Now that you have a basic understanding of the nature of the problem we will move on towards the solutions.

Solution 1: Changing Game Settings.

Sometimes, the in-game settings can get misconfigured and the game might face issues starting properly. Overwatch has a glitch where it sometimes does not run on “Fullscreen” properly. The game tries to go into “Fullscreen” mode and ends up on the black screen to fix this:

  1. Open up the “Geforce Experience”
  2. Click on Games and select Overwatch from the left pane
    Opening the “Games” tab and selecting Overwatch
  3. Click on the “Custom Setting” icon
    Clicking on the “Custom Settings” Option
  4. Select “Borderless Window” in the Display Mode option.
    Selecting Borderless Window in the Geforce Experience
  5. After applying your settings, try to run the game and check to see if the problem persists.

Solution 2: Scanning and Repairing Game Files

It is possible that the game might be missing important files that are required by the game during startup. Therefore, due to the unavailability of these files the game might be facing issues during the launch. Therefore, in this step we are going to scan the game files and repair them if necessary through the Blizzard client for that:

  1. Open the Blizzard Client and click on “Games
    Clicking on “Games”
  2. From the right pane click on the overwatch icon
  3. Click on the “Options” button on the top left side.
  4. Select “Scan and Repair” from the list of options available.
    Selecting the Scan and Repair option from the dropdown
  5. Click on “Begin Scan” when the message prompts you to.
    Clicking on Begin Scan
  6. Depending upon your PC this might take some time wait for the launcher to finish the process
  7. When finished try to “Run” your game and check to see if the error persists.

Solution 3: Deleting the Game Cache.

The game cache when corrupted can cause issues with the startup of the game. In order to make the loading process faster, the game temporarily stores certain files on the computer as cache but overtime this cache can be corrupted and cause issues with the startup of the game. Therefore, in this step we are going to be deleting the game cache for that:

  1. Open the Task Manager by pressing “Ctrl+Shift+Esc
    Opening the Task Manager
  2. Click on the “More Details”  button to open up a detailed version of the program
  3. In the Processes Tab,  if an “agent.exe” or a “Blizzard Update Client” is running select it and press End Process button on the bottom of the program.
    Opening the Processes Tab and closing blizzard associated applications
  4. Now press Windowskey+R to open up the “Run Prompt
  5. Type “%Programdata%” in it and press Enter.
    Opening the Program Data  directory
  6. Delete the “Blizzard Entertainment” folder inside the directory
    Deleting the Blizzard Entertainment folder
  7. Restart the Blizzard client, run the game and check to see if the issue is solved.

Solution 4: Disabling the Game DVR

Game DVR is a windows 10 utility that allows the users to record, broadcast and take screenshots while playing the game. However, this utility can sometimes cause fps drops and even prevent the game from running properly. Therefore, in this step we are going to be completely disabling the application for which:

  1. Open the Start Menu and click on the Settings icon
    Opening Settings
  2. Click on “Gaming
    Clicking on “Gaming”
  3. Select “Game Bar” from the sidebar
    Selecting Game Bar
  4. Disable every option inside this.
  5. Select “Game DVR
    Selecting Game DVR
  6. Disable every option inside this
  7. Similarly, select “True Play” and turn it off.
    Selecting and Disabling True Play
  8. Run your game and check to see if the problem persists.

Solution 5: Deleting “Battle.net Tools”

Outdated, corrupted, or missing folders or files can cause issues with the Blizzard Battle.net desktop app and game clients. Therefore, in this step, we are going to be deleting the Battle.net files and the Blizzard Client will automatically reinstall them later for that:

  1. Open the Task Manager by pressing “Ctrl+Shift+Esc
    Opening the Task Manager
  2. Click on the “More Details”  button to open up a detailed version of the program
  3. In the Processes Tab,  if an “agent.exe” or a “Blizzard Update Client” is running select it and press End Process button on the bottom of the program.
    Opening the Processes Tab and closing blizzard associated applications
  4. Now press the Windows+R key to open up the “Run Prompt
    Opening the Run prompt
  5. Type “C:\ProgramData\” In the open field and press “Enter
    Opening the Program Data Directory
  6. Delete the Battle.net folder inside the directory
    Deleting the Battle.net client
  7. Run the Blizzard Client and check to see if the problem persists.

The post Fix: Black Screen in Overwatch appeared first on Appuals.com.

Viewing all 4495 articles
Browse latest View live