Google Chrome (commonly known simply as Chrome) is a cross-platform web browser developed by Google. It was first released in 2008 for Microsoft Windows and was later ported to Linux, macOS, iOS, and Android. The browser is also the main component of Chrome OS, where it serves as the platform for web apps.
Chrome Logo
However, sometimes Chrome can eat up a lot of the computer’s resources by running in the background. This can be pretty frustrating for those wanting to squeeze the most out of their computers. Therefore, in this article, we are going to provide you with the easiest method to completely stop the application from running in the background.
How to Stop Google Chrome from Running in the Background?
Normally, when you press the “x” button on the top right side of the window the application is closed but depending upon your settings sometimes the application continues to run in the background. Same is the case with Google Chrome. However, we can simply disable this option from the chrome settings. Therefore in order to stop the browser from running in the background:
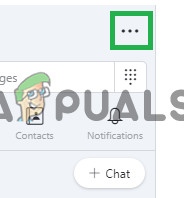
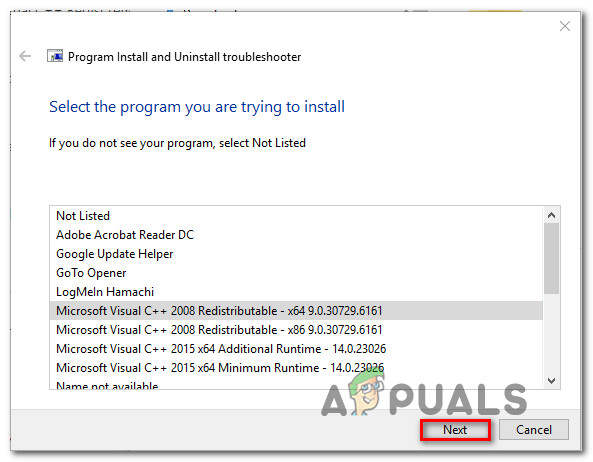
Open the Google Chrome application and click on the “Chrome Menu” option on the top rightOpening the Chrome Menu from the top right-hand side
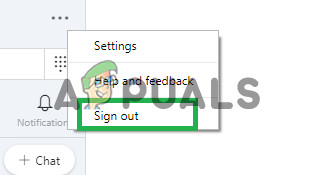
From the menu, select “Settings”
Selecting “Settings” from the Dropdown
In the settings page, scroll down and click on “Advanced Settings”
Clicking on “Advanced Settings” after scrolling to the bottom of the page
In the Advanced Settings, navigate to the “System” tab
Disable the “Continue Running Background Apps When Chrome is Disabled” option
Disabling the “Continue Running Background Apps even when Chrome is Closed” option
Now restart the application and when you close it afterward, it will no longer run in the background.
Note: Whenever you install an extension or a web service it continues to provide you with important notifications and updates even when the browser is closed. This feature can be very useful if you want to stay updated and you can even interact with the notifications without opening Chrome. However, If Chrome is prevented from running in the background this feature will no longer work. You would simply be leaving your social life behind when you close the application.
Some Windows users are reporting that an app is preventing the shutdown. Most affected users are reporting that there’s no name associated with the application (just an icon) when the “This app is preventing shutdown” error appears. This error message appears when you try to shut down Windows and there’s a third-party application that contains unsaved data. This behavior is reported to occur on Windows 7, Windows 8.1 and Windows 10.
This app is preventing shutdown
What is causing the “app is preventing shutdown” error message?
We investigated this particular issue by looking at various user reports and the repair strategies that most affected users have successfully deployed to resolve the issue.
The main cause why this particular error message (“This app is preventing shutdown” appears) when applications with unsaved data are still opened inside your operating system. Here’s a list with typical culprits that are known to trigger this particular error message:
Text Editors: Notepad++, Komodo, Brackets
Office suites: Microsoft Office, Libre Office, LibreOffice, Apache OpenOffice, SoftMaker FreeOffice, etc.
Image Editors: Photoshop, Illustrator, Sumopaint, Pixlr, GIMP, PhotoScape, InPixio, etc.
If you’re looking for a way to resolve or circumvent the “This app is preventing shutdown” error, this article will provide you with some troubleshooting steps. Down below, you’ll find several methods that other users in a similar situation have used to prevent the warning message from appearing (either by handling the app responsible or by disabling the warning prompt altogether.
The methods are ordered by efficiency and severity. If you want a minimum-invasive procedure, use methods 1 to 3. If you’re looking for a method that will ensure that you won’t see the error message again, use the last method.
Method 1: Closing all applications with unsaved data
If you are able to find the program that is referenced during the shutdown warning, you can resolve the warning message by opening the program dealing with the unsaved data and closing it. To do this, simply click Cancel, then open the responsible program and save the changes before trying the Shut Down procedure again.
Canceling the Shut Down procedure
Of course, these steps are not applicable if you’re dealing with a background app or you can’t figure out which process is causing the problem.
Update: If you’re seeing this warning message with a Brother printer or fax machine (belonging to the Brother Printer Help App), it might also mean that you an update is available for its driver. In this case, you will be able to update it via the notification bar.
Updating the Printer/Fax driver via the notification bar
If this method is not applicable or you’re looking for a method that will completely eliminate the warning message, move down to the next method below.
Method 2: Ending the task via Task Manager
As some users have reported, the issue can also occur with a background app. This is tricky since you have no apparent means of dealing with unsaved data in order to force the error message to disappear. There are a few common culprits that are known to trigger this particular behavior – mostly Brother Printer & Fax Machine drivers and similar printer drivers that only operate in the background.
Some affected users have managed to resolve the issue by using Task Manager to close the responsible process. Here’s a quick guide on how to do this:
Press Ctrl + Shift + Esc to open up Task Manager. Then, go to the Processes tab and look for the process with the same icon as the one mentioned in the alert.
Right-click on the process that you need to close and choose End Task.
Ending the Process responsible for the warning message
As soon as the responsible process is disabled, you should be able to complete the shutdown process without encountering the “This app is preventing shutdown” warning.
If this method wasn’t applicable or you’re looking for a permanent way to disable the warning message, move down to the next method below.
Method 3: Using Event Viewer to find the process responsible for the warning message
If you’re suspecting that an application process is responsible for the holdup but you can’t figure out which one, there is one way that will allow you to figure out exactly which app is causing the issue.
Some users finding themselves in a similar situation have reported that they were able to use the Event Viewer in order to figure out the application responsible for the warning message.
Here’s a quick guide on using the Event Viewer to figure out which process is responsible for the “This app is preventing shutdown” warning message:
Initiate a shutdown as you would normally do.
When you see the “This app is preventing shutdown” warning prompt, hit the Cancel button to quit the shutdown operation.
Canceling the Shut Down procedure
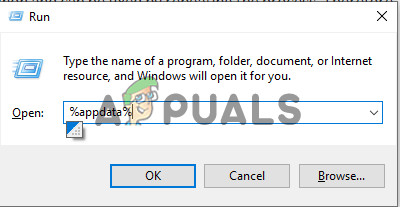
Press Windows key + R to open up a Run dialog box. Then, type “eventvwr.msc” and press Enter to open up the Event Viewer utility.
Opening up the Event Viewer utility via a Run command
Inside the Event Viewer utility, use the left-hand side menu to select Windows Logs. Then, double click on Application to bring up the Application events in the right-hand side pane.
Accessing the Application tab inside Event Viewer
Inside the Application section, look for an event that states “The following application attempted to veto the shutdown” in the General tab (under the list of events). Since you’ve just forced the warning message to appear, it should be one of the very first listings since the default order is by date/time.
Finding the application responsible for the warning message
You will be able to find the executable that is causing the warning message listed after the colon. In case you don’t recognize it, Google it and you will be able to find the program that it’s tied to.
Once you manage to identify the application responsible, press Ctrl + Shift + Esc to open Task Manager. Then, go to the Processes tab and close the application responsible.
Ending the Process responsible for the warning message
If this method wasn’t applicable and you’re looking for a method that will prevent the This app is preventing shutdown” warning message from ever appearing again, move down to the next method below.
Method 4: Using Registry Editor to prevent the alert
There is one permanent way that will allow you to get rid of the “This app is preventing shutdown” warning message. This method involves using a Registry Editor hack to program your OS to ensure that all open software which includes unsaved data will close automatically as soon as you commence the shutdown procedure in Windows.
While this makes it certain that you won’t receive the alert ever again, it also has the potential of making you lose some unsaved data if you mistakenly commence the shutdown procedure before you’re ready to.
Here’s a quick guide on preventing the “This app is preventing shutdown” altered by modifying the Registry:
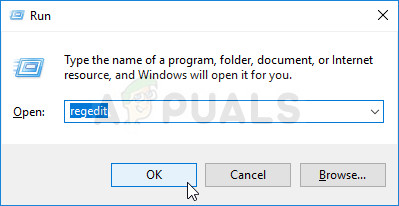
Press Windows key + R to open up a Run dialog box. Then, type “regedit” and press Enter to open up Registry Editor.
Running Registry Editor using a Run dialog box
Inside Registry Editor, use the left-hand pane to navigate to the following location:
Computer\HKEY_CURRENT_USER\Control Panel\Desktop
Note: You can navigate to this location directly by pasting the location directly in the navigation bar at the top of the Registry Editor screen and pressing Enter.
Once you reach the correct location, move over to the right-hand pane and right-click on an empty space. Then, select New > String value and name it AutoEndTasks.
Creating the AutoEndTask String value
Double-click on the newly created String value (AutoEndTasks) and set the value data to 1. Then, click Ok to save the changes.
Editing the AutoEndTasks
Close Registry Editor and restart your computer to save the changes.
At the next startup, the newly created string value (AutoEndTask) will ensure all software will close automatically as soon as you click the Shutdown button – even if they contain unsaved data.
This Steam-related problem appears after trying to log into your Steam account on the Desktop version of the app, just after you input the login info or after the auto-login process has started. The problem is a very serious one as multiple users haven’t been able to access the Steam client at all for a couple of days.
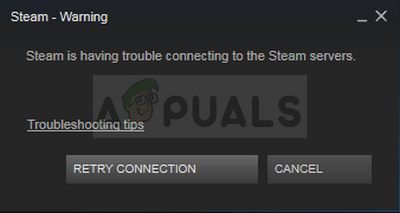
Steam is Having Trouble Connecting to the Steam Servers
Many different solutions to the problem emerged after a while and we have chosen the solutions which have helped the most users and presented them to you in a detailed article. Follow the instructions and hopefully, you will resolve the problem!
What Causes the “Steam is having trouble connecting to the Steam servers” Error Message in Steam client?
Various broken or misconfigured Internet connection settings which can be resolved with simple commands in administrative CMD
Administrator permissions being required by the Steam executable in order to solve permissions/networking problems
UDP protocols may not be a good thing to use to try forcing TCP protocols
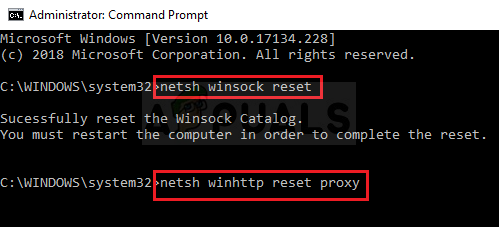
Solution 1: Reset WinSock
“netsh winsock reset” is a helpful command that you can use in Command Prompt to reset winsock catalog back to default setting or its clean state. You can try this method if you are experiencing the “Steam is having trouble connecting to the Steam servers” when trying to launch and login into Steam.
Search for “Command Prompt” by typing it either right in the Start menu or by pressing the search button right next to it. Right-click the first entry which will pop up as a search result and select the “Run as administrator” context menu entry.
Additionally, you can also use the Windows Logo Key + R key combination in order to bring up the Run dialog box. Type in “cmd” in the dialog box which appears and use the Ctrl + Shift + Enter key combination in order to run Command Prompt using administrator privileges.
Running Registry Editor using Run dialog box
Type in the following command in the window and make sure you press Enter after typing it. Wait for the “Winsock reset completed successfully” message or something similar to know that the method has worked and you haven’t made any mistakes while tying.
netsh winsock reset
netsh int ip reset reset.log hit
Resetting WinSock
Check to see if you still struggle with problems regarding your Steam problems.
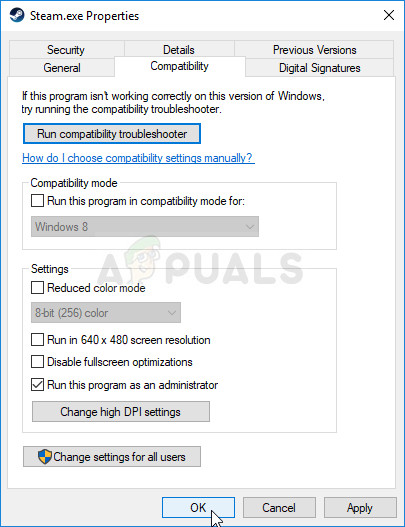
Solution 2: Run Steam as Administrator
Running anything with administrator permissions is sure to provide some help for plenty of errors and this one is not different. Simply running the Steam client as an administrator may be enough for you to stop seeing the annoying error once and for all.
Locate the Steam shortcut or executable on your computer and open its properties it by right-clicking its entry either on the Desktop or the Start menu or the Search results window and choose Properties from the pop-up context menu.
Navigate to the Compatibility tab in the Properties window and check the box next to the Run this program as an administrator option before saving the changes by clicking OK or Apply.
Running Steam as an administrator
Make sure you confirm any dialogs which may appear which should prompt you to confirm the choice with admin privileges and Steam should launch with admin privileges from the next startup. Open it by double-clicking its icon and try relaunching the login process to see if the error still appears.
Solution 3: Add an Exception for Steam Executables
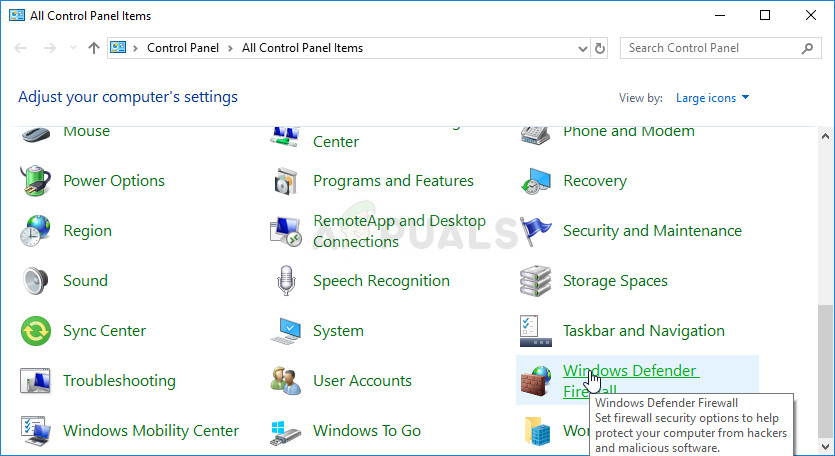
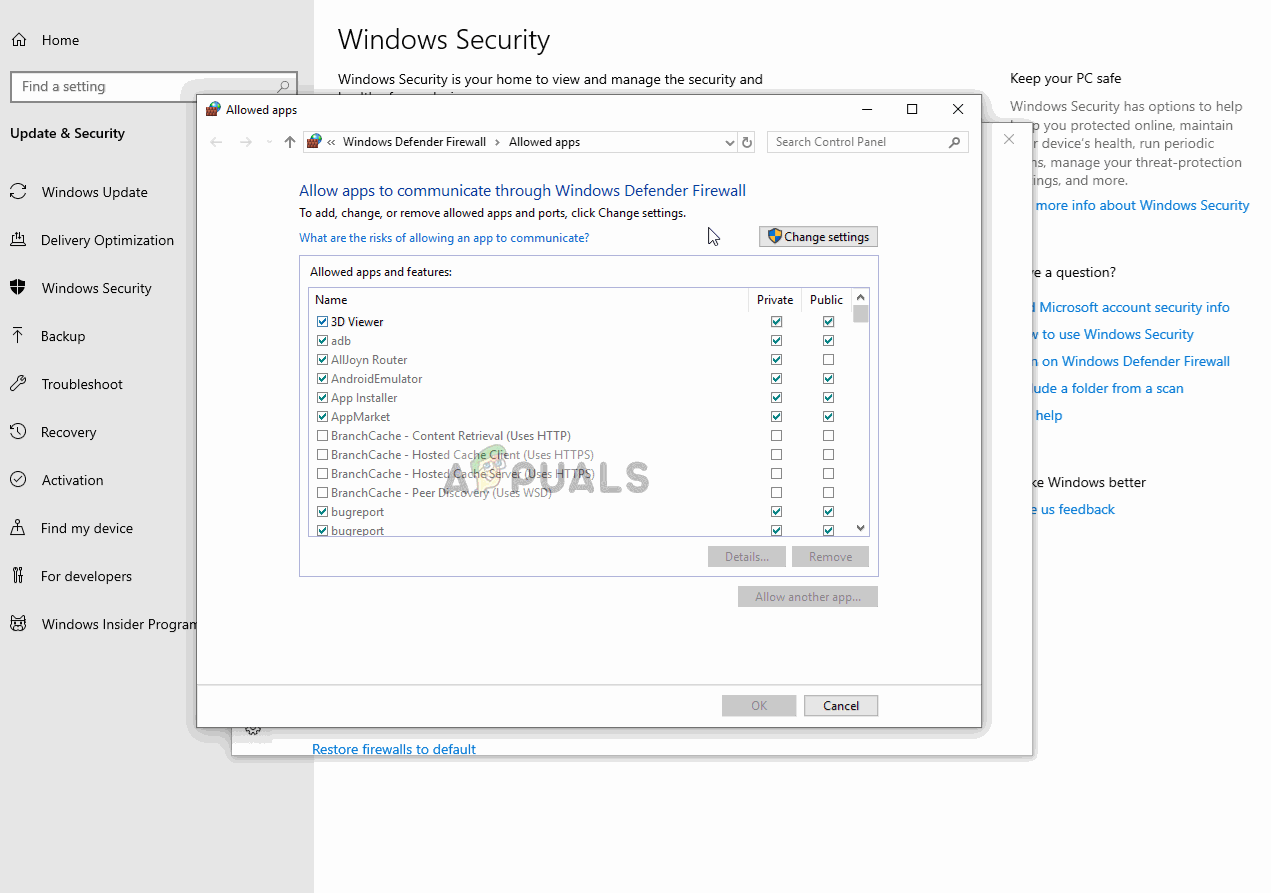
The latest Steam update was reported to cause issues with Windows Defender Firewall. If you have Windows Defender running on your computer, you might want to add an exception for the Steam executable in order to make it run properly.
Start up Control Panel by searching for the utility in the Start button or by clicking the Search button or the Cortana button at the left part of your taskbar (bottom left part of your screen).
After Control Panel opens, change the view to Large or Small icons and navigate to the bottom in order to open the Windows Defender Firewall.
Opening Windows Defender Firewall
Click on Windows Defender Firewall and click on the Allow an app or feature through Windows Firewall option from the left side list of options. A list of installed apps should open. Navigate to where you installed Steam and choose its main executable along with other executables in the folder.
Click OK and restart your computer before retrying the login process after launching Steam.
Solution 4: Add a Launch Option to the Steam Executable
This specific launch option ‘-tcp’ will force Steam to use the TCP protocol over UDP. This is not a much significant change from the user’s perspective but it has definitely helped users resolve the “Steam is having trouble connecting to the Steam servers” problem as the problem went away after performing the steps below:
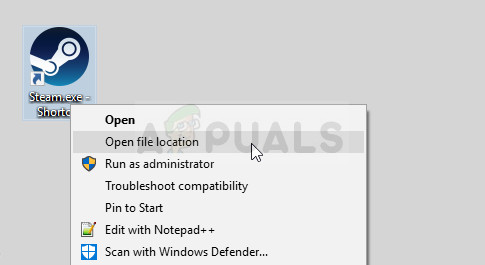
Navigate to your Steam installation folder. If you haven’t configured any changes during the process of installation regarding the required installation folder, it should be Local Disk >> Program Files or Program Files (x86).
However, if you have the Steam program’s shortcut on the desktop, you can simply skip the creation of a shortcut in the step below.
Steam – Open File Location
Locate the exe file in the main folder, right-click on it, and choose to Create a shortcut on Desktop. Navigate to that shortcut, right-click on it and stay in the Shortcut tab.
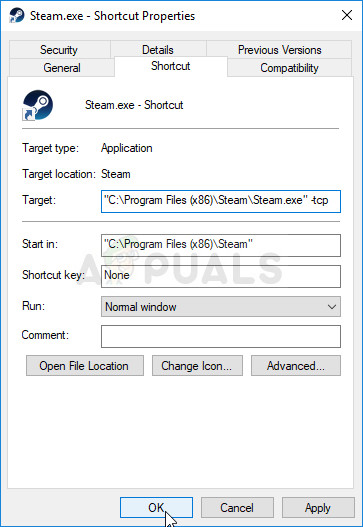
Setting Steam Launch Options
In the Target area, add a space after the last quotation mark and add ‘-tcp’ before clicking OK. Check to see if the problem still appears.
Solution 5: Reinstall Steam
Reinstalling Steam is one of the least popular methods and there is a reason why it’s placed so low on our list. The method has solved the problem for so many users but it should be a last resort as there are plenty of simpler methods you should try out before doing this.
Make sure you back up every library folder you wish to preserve on your computer and take note of their proper locations so that you can add them back once Steam is reinstalled.
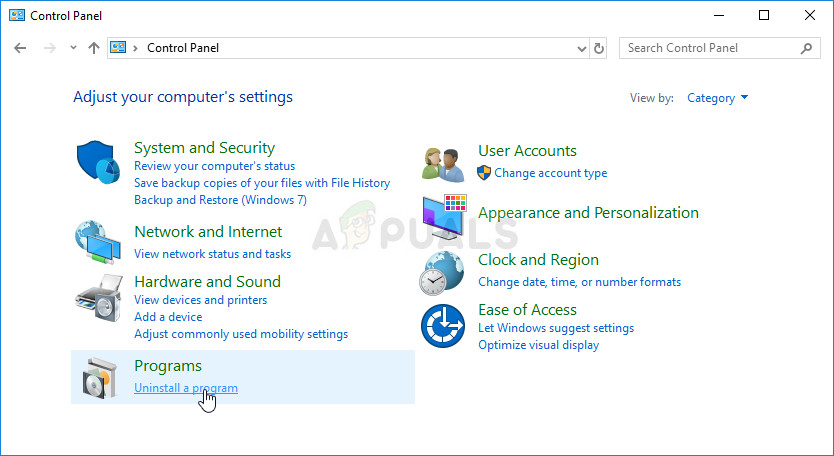
Click on the Start menu and open Control Panel by searching for it. Alternatively, you can click on the gear icon in order to open settings if you are using Windows 10.
In Control Panel, select to View as: Category at the top right corner and click on Uninstall a Program under the Programs section.
Uninstall a program in Control Panel
If you are using the Settings app, clicking on Apps should immediately open a list of all installed programs on your PC.
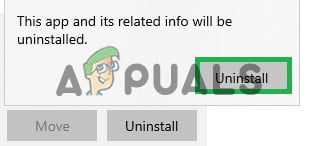
Locate the Steam entry on the list and click on it once. Click on the Uninstall button above the list and confirm any dialog boxes which may appear. Follow the instructions on-screen in order to uninstall Steam and restart your computer afterward.
Redownload the Steam client by navigating to this link and run the downloaded executable on your computer by locating it in the Downloads folder and double-clicking on it. Follow the instructions on the screen in order to install Steam again and check to see if the same problem appears on your computer again!
Far Cry 5 is an action-adventure first-person shooter video game developed by Ubisoft Montreal and Ubisoft Toronto and published by Ubisoft for Microsoft Windows, PlayStation 4 and Xbox One. It is the standalone successor to the 2014 video game Far Cry 4, and the fifth main installment in the Far Cry series. The game was released on March 27, 2018.
Error 20006
However, quite recently there have been lots of reports coming in about the “Error 20006 cannot start service“. This is basically a launcher error and the game’s executable does not even launch. The Error seems to be related to the EasyAntiCheat service that is nowadays used by most games in order to prevent cheating. In this article, we will discuss some of the causes of the error and try to provide you with viable solutions that will ensure complete eradication of the issue.
What Causes the “Error 20006” to be triggered?
There are mostly only two main reasons behind the issue which are:
EasyAntiCheat Service: The Far Cry 5 Error Code 20006 is almost exclusively either by a missing EasyAntiCheat service on your computer, or by the service being broken, out of date, or simply unresponsive when you launched the game. Ubisoft doesn’t want you to enter the game if you weren’t checked for cheating and hacking the game beforehand.
Missing Files: In some cases, the error was also known to be caused due to missing game files. If the game is missing certain files that are necessary for the game to be launched properly this error can be triggered.
Now that you have a basic understanding of the nature of the problem we will move on towards the solutions.
Solution 1: Repairing EasyAntiCheat Service
This is the Anti-Cheat service used by the game to recognize cheaters and hackers. It actively scans your setup for anything which could give you an unfair advantage over your opponents. However, sometimes this service gets broken and you might need to repair it yourself in order to get rid of the Far Cry 5 error code 20006.
You can search for the game’s main executable by clicking the Startmenubutton or the search button next to it and typing Far Cry 5. Anyway, right-click on the executable and choose the Open file location option from the context menu which will appear.
Either way, once you are inside the Far Cry 5 folder navigate to the “bin” folder and open the EasyAntiCheat folder.
Inside the folder, right-click on the EasyAntiCheat.exe and select “Run as Administrator”
The EasyAntiCheat.exe
Confirm any UACprompts that the file wants to make changes to your computer and wait for its window to open.
Make sure Far Cry 5 is selected from the games list and click the Repair Service button below. The “Installed Successfully” message should appear shortly after so try relaunching the game and checking to see if the Fornite error code 20006 still appears.
Selecting Far Cry 5 and repairing
Solution 2: Verify the Game’s Installation
It is possible that the game might be missing certain files or some files might have been corrupted. The game does not launch properly if certain files of the game are missing. Therefore, in this step, we are going to be verifying the game files and make certain that the game files are complete.
Launch Steam and sign in to your account
Go into the library section and Right–Click on the game
Select PropertiesRight-Clicking on the game and selecting properties
After that Click on the LocalFiles option and click on the “Verify the integrity of Game Cache” option Clicking on the Local Files option
This will take some time to verify after it is done try to run the game
Solution 3: Rename the EasyAntiCheat Driver
Renaming or removing the EasyAntiCheat.sys file in the System32 folder on your computer might be the right thing to do as the game will redownload as soon as you open it again. If its driver has gone corrupt, even repairing or reinstalling the tool might not work properly. This method is easy to perform and it may save you from further problems.
Navigate to this location on your computer “C >> Windows >> System32″ by navigating to it after launching the Windows Explorer. Firstly click This PC or My Computer from the leftside pane in order to locate and open your Local Disk C.
If you are unable to view the Windows folder, you may need to turn on the option which enables you to see hidden files and folders. Click the “View” tab in File Explorer’stop menu and click on the “Hidden items” checkbox in the Show/hide section of the menu. File Explorer will show the hidden files and will remember these settings until you change it again.
Hidden items in Local Disk (C:)
Locate the EasyAntiCheat.sys file in the System32 folder, right-click on it, and choose Rename. Change its name to something like EasyAntiCheat.old.sys and tap the Enter key to confirm your changes. Relaunch Far Cry 5 and check to see if you still see the error 20006 on startup.
Some users are reporting that they are unable to play sound through their headphones when using iTunes. Most affected users are reporting that the sound is still coming out of the speakers (even when the headphones are plugged in). Everything else, including Youtube, the default Music app and even games are outputting audio through the headphones. The issue is frequently reported on multiple Windows versions including Windows 7, Windows 8 and Windows 10.
Headphones not working on iTunes
What is causing the “Headphones not working on iTunes issue”?
We investigated this particular issue by looking at various user reports and the repair strategies that they used to get the error resolved. Based on our investigations, there are several potential culprits that might trigger this particular error message:
Default Audio is set to Windows Audio Session – One of the most common causes that will trigger this particular error message is if the Default Audio is set to Windows Audio Session. Some affected users have managed to resolve this particular issue by switching the setting to Direct Audio.
The headphones are not set as the default Playback devices – You might also encounter this behavior if your headphones are properly connected but aren’t set as the Default Playback devices under Windows Settings. In this case, accessing the Windows Sound settings and establishing the headset as the default playback device will resolve the issue.
Corrupted iTunes app – Another potential culprit that might trigger cause this behavior is file corruption inside the iTunes folder. In this particular scenario, reinstalling the iTunes app (desktop or UWP versions) should resolve the issue.
Bad driver installation – As some users have reported, this error might also occur if some Windows drivers are improperly installed or corrupted. Based on user reports, there are two drivers that are confirmed to cause this issue (Sound driver and USB Controller driver)
If you’re you’re looking for ways to resolve this particular error message, this article will provide you with several troubleshooting strategies that other users in a similar situation have used to get the issue resolved.
For the best results, follow the methods below in the order that they are presented since they are ordered by efficiency and severity. One of them is bound to resolve the issue in your particular scenario.
Method 1: Plugging headphones before launching iTunes
If you’re looking for a quick fix, starting (plugging in) the headphones before launching the iTunes app might resolve the issue automatically. This forces the application to recognize the audio output that is currently active during the initialization process.
Several affected users have confirmed that this procedure is effective for both the desktop app and the UWP (Universal Windows Platform) version.
However, this is is merely a workaround and you’ll have to remember to do this every time you want to listen to music through the Windows iTunes app.
If you want a permanent fix which ensures that iTunes sound is coming out of your headphones as soon as you plug them in, move down to the next method below.
Method 2: Changing the default Audio to Direct Sound
Several affected users have reported that they managed to fix the problem by going to the Preferences menu and changing the default Play Audio platform to Direct sound. This forces the application to dynamically change to any new device that is plugged in during the playback session.
This procedure is confirmed to be effective on Windows 7, Windows 8 and Windows 10. You should be able to follow the steps below regardless if you’re using the desktop or the UWP app.
Here’s what you need to do:
Open iTunes and go to Edit > Preferences using the ribbon menu at the top.
Inside the Playback Preferences menu, go to the Playback tab.
Change the drop-down menu associated with Play Audio Using to Direct Audio. Then, click Ok to save the changes.
Restart the iTunes app, plug your headphones/headset and play some audio. You should now be able to hear sound coming out of them.
Changing the default audio to Direct Sound
If you’re still unable to hear any sound coming out of your headphones while playing audio on iTunes, move down to the next method below.
Method 3: Changing the Default Playback device
Another potential reason that might cause the audio playback to fail on iTunes is if the headphones are not set as the default device inside the Sound settings menu. Several affected users have reported that the audio issue was resolved after they set their headphones as the Default Playback device.
Here’s what you need to do:
Press Windows key + R to open up a Run dialog box. Then, type “mmsys.cpl” and press Enter to open up the Sound settings screen.
Running dialog: mmsys.cpl
Once you get inside the Sound settings screen, right-click on your headphones and choose Set as Default Device.
Setting the Headphones as the default device
Restart iTunes and see if the audio has been fixed.
If you still don’t hear sound coming out of your headphones, move down to the next method below.
Method 4: Reinstalling the iTunes app
As it turns out, the audio playback component can also be affected if the iTunes folder contains corrupted files. This can occur if you’re dealing with a malware infection or after an antivirus scan has removed some files from the iTunes installation folder.
In this case, you’ll be able to resolve the issue by reinstalling the iTunes application. However, the steps of doing this will be different depending on which version of the iTunes application you installed (the desktop version or the UWP version).
Because of this, we created two separate guides that will help you reinstall the iTunes app. Make sure to follow the steps that are applicable to the iTunes application that you’re using.
Reinstalling the Desktop version of iTunes
Press Windows key + R to open up a Run dialog box. Then, type “appwiz.cpl” and press Enter to open up the Programs and Features window.
Type appwiz.cpl and Press Enter to Open Installed Programs List
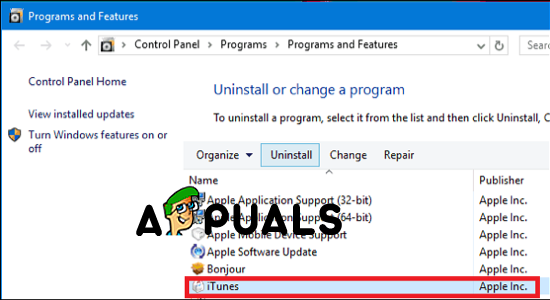
Inside the Programs and Features screen, scroll down through the list of applications, right-click on the iTunes app and choose Uninstall (or use the action menu above). Then, follow the on-screen prompts to complete the uninstallation process.
Uninstall the rest of complementary Apple software using the same procedure. Make sure you uninstall everything that has Apple Inc. listed as the publisher (including Apple Mobile Device Support, Apple Application Support, and Apple Software Update).
Once every Apple application has been uninstalled, restart your computer.
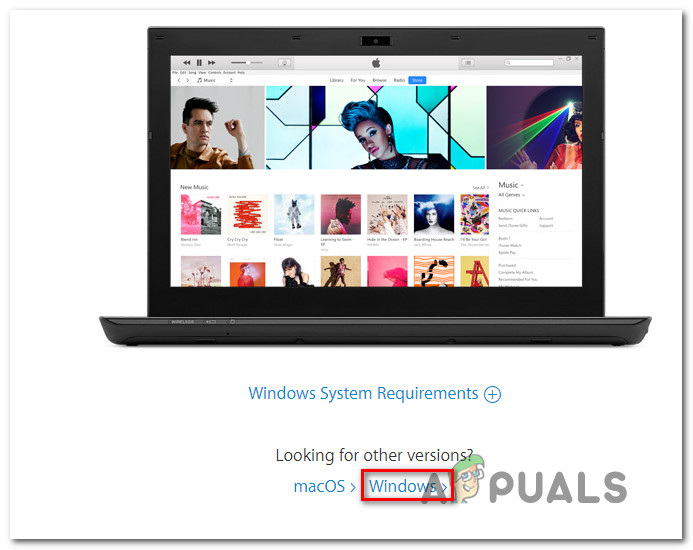
At the next startup, visit this link (here) from your browser and click on Windows (under Looking for other versions).
Downloading the desktop version of iTunes
Scroll down back to the top of the page and click on Download now (64-bit).
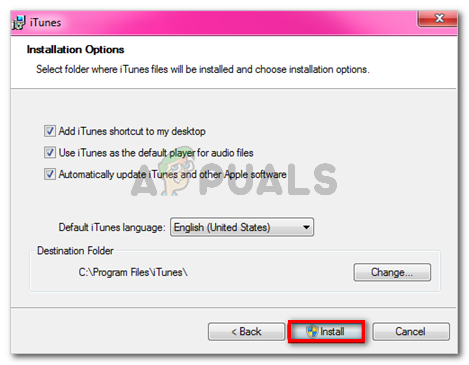
Once the download is complete, open the installation executable and follow the on-screen prompts to complete the installation process.
Installing iTunes on your computer
Once the installation is complete, restart your computer once again and see if the issue has been resolved.
Reinstalling the UWP (Universal Windows Platform) version of iTunes
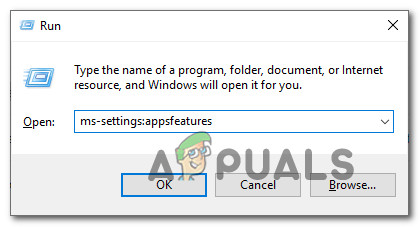
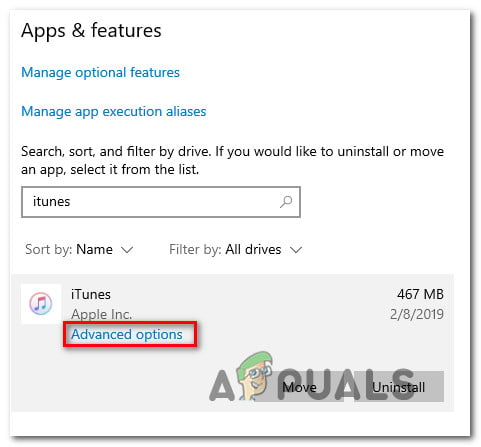
Press Windows key + R to open up a run dialog box. Then, type “ms-settings:appsfeatures” and press Enter to open the Apps & Features tan of the Settings app.
Accessing the Apps & Features menu of the Settings app
Once you reach the Apps & Features menu, use the search function under Apps & features to search for “iTunes“. Then, click on Advanced options (under iTunes).
Accessing the Advanced Options menu of iTunes
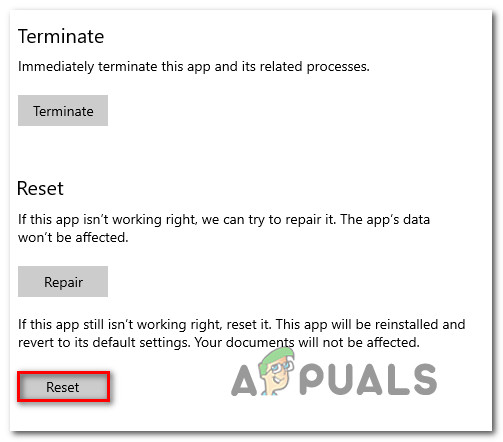
Inside the Advanced options menu of iTunes, scroll down to the Reset tab and click the Reset button.
Resetting the iTunes app
At the confirmation prompt, click the Reset button again to commence the resetting process. Once you do so, the app will be reinstalled and reverted back to its default settings. You’re locally downloaded media and playlists will not be affected.
Once the resetting procedure is complete, open iTunes again and see if the issue has been resolved.
If this procedure didn’t allow you to listen to iTunes music through your headphones, move down to the next method below.
Method 5: Reinstalling the sound driver and/or USB controller driver
If you’re encountering this particular issue (to some degree) with other applications, chances are you’re dealing with a faulty sound driver. Another potential scenario (if you’re using a headset that connects through USB) is that the USB controller driver is not properly recognizing the device.
Several affected users have reported that the issue was resolved after they reinstalled the Sound driver and/or the USB controller driver.
Here’s a quick guide on how to do this:
Press Windows key + R to open up a Run dialog box. Then, type “devmgmt.msc” and press Enter to open up Device Manager.
Run Device Manager using Run Dialog Box
Inside Device Manager, expand the Sound, video and game controllers drop-down menu. Then, right on every Audio device listed under there and choose Uninstall. At the confirmation prompt, click the Uninstall button to commence the uninstallation process.
Uninstalling the audio devices
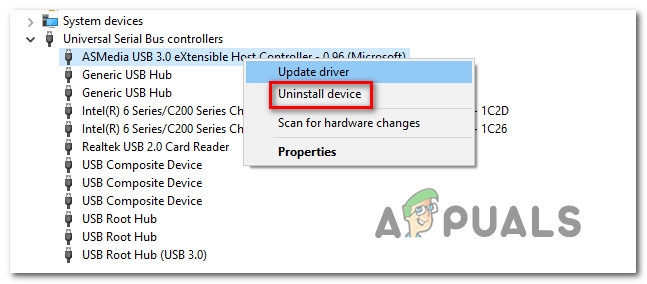
Expand the Universal Serial Bus controller drop-down menu and install every Host controller that you see there.
Uninstalling every available host controller
Note: Step 3 is not necessary if the headphones connect through the Jack.
Once all drivers have been uninstalled, restart your computer. At the next startup, Windows will automatically identify & install the missing drivers.
Plug-in the headphones and allow the initial installation to complete (If they connect through USB). If the issue was caused by a faulty driver, you should now be able to hear through your headphones.
Paladins: Champions of the Realm is a free-to-play online shooter video game by Hi-Rez Studios. The game was developed by Evil Mojo Games, an internal studio of Hi-Rez, and was released in 2018 for Microsoft Windows, PlayStation 4, Xbox One, and Nintendo Switch. The game takes place in a sci-fi fantasy world.
Paladins unable to find steam installation
However, quite recently we have been receiving a lot of reports of a “Paladins is unable to find steam installation” error. This error appears only for the users who installed the game through “Steam” instead of the standalone launcher. It has been a recurring problem and has been seen in many other games from “Hirez studios” as well such as SMITE etc. In this article, we will discuss some of the causes of the problem and provide you with viable solutions that will ensure complete eradication of the problem.
What Causes the “Paladins cannot find Steam Installation” Error?
The major causes for this problem are usually common for many users but there isn’t a single method which can be used to troubleshoot all problems. Still, here is the list of the most common causes:
Wrong installation directory: Sometimes the installation directory that is set for the game is wrong. This will fool the launcher to think that the game might not be installed at all. This can be fixed using the Hi-Rez troubleshooter.
Hi-Rez Service: In some cases, the Hi-Rez Service might not be running properly and you should consider uninstalling it manually. It will reinstall after you launch the game and it will hopefully resolve the problem.
Now that you have a basic understanding of the nature of the problem we will move on towards the solutions.
Solution 1: Changing the Installation Directory
It’s quite possible that an error on Steam’s or the game’s end has changed the real location where the game is installed. If you installed the game using Steam, it should be in one of the libraries folders you have chosen. Follow the steps below in order to change the game’s installation directory using the Troubleshooter
Open up your Steam client by double-clicking its icon from the Desktop or by searching for it in the Start menu or the round Cortana button ( or the search bar) next to it if you are a Windows 10 user.
Opening Steam via Start menu
Navigate to the Library tab in the Steam window and locate Paladins in the list of games you own in the library.
Right-click on the game and choose the Play Game entry which will appear at the top of the context menu. If you have the Steam game shortcut on your PC, locate it and double click on it.
Click the gear-like icon from the bottom left part of the Paladins launcher window to open Settings. Click the Troubleshoot button and wait for the Hi-Rez Game Support Diagnostic Tool to launch.
Locating the Troubleshoot button in Paladins launcher settings
Select “Paladins” in the list of Installed Games and change the Game Installation Directory to the one you used to install “Paladins”. The default path is usually ‘C:\Program Files (x86)\Steam\steamapps\common\Paladins’.
Changing the folder to the folder in which the game was installed
Apply the changes and check to see whether the “Paladins is unable to find Steam installation” error still appears when launching the game.
Solution 2: Re-installing the Hi-Rez Service
Sometimes this service simply doesn’t install properly on people’s computers and they are unable to do anything with their installation of Paladins, leading to this error appearing from the beginning. In other cases, the service appears to be corrupt and you should uninstall and let the game install it itself.
Since you have installed the game on Steam, open up your Steam client and navigate to the Library tab in the Steam window and locate Paladins in the list of games you own in the library.
Right-click on the game and choose the Properties entry which will appear at the top of the context menu. Navigate to the Local Files tab in the Properties window and choose the Browse Local FilesBrowse Local Files in Steam
Navigate to Binaries >> Redist and double-click to open InstallHiRezService.exe executable. If the service is installed, make sure you choose to uninstall it from within the executable. If it’s not installed, install it before reopening the game again. The location of the file you need to run
The game should proceed to install the Service before launching so check to see if you are now able to play properly.
Solution 3: Re-run Prerequisites
This is an option which appears after you run the Hi-Rez Game Support Diagnostic Tool by clicking Troubleshoot in the game’s launcher settings. Running it has resolved the problem for many players and you should definitely try it out.
Open up your Steam client by double-clicking its icon from the Desktop or by searching for it in the Start menu or the round Cortana button ( or the search bar) next to it if you are a Windows 10 user.
Opening Steam via Start menu
Navigate to the Library tab in the Steam window and locate Paladins in the list of games you own in the library.
Right-click on the game and choose the Play Game entry which will appear at the top of the context menu. If you have the Steam game shortcut on your PC, locate it and double click on it.
Click the gear-like icon from the bottom left part of the Paladins launcher window to open Settings. Click the Troubleshoot button and wait for the Hi-Rez Game Support Diagnostic Tool to launch.
The Re-run Prerequisites option in the troubleshooter
Locate the Re-run Prerequisites option at the bottom of the window and click on it. Wait for it to finish and try running the game again to check whether the “Paladins is unable to find Steam installation” error still appears.
Solution 4: Reinstall the Game
Reinstalling the game should be the last thing on the list but the good thing is everything is saved to your Steam account and you won’t have to start all over again. If you have a good Internet connection, the game should be reinstalled in no time and the error should now cease to appear.
Click on the Start menu button and open Control Panel by searching for it or by locating it in the Start menu (Windows 7 users). Alternatively, you can click on the gear icon in order to open the Settings app if you are using Windows 10 as the operating system on your computer.
In the Control Panel window, switch to View as Category at the top right corner and click on Uninstall a Program under the Programs section.
Uninstall a Program in Control Panel
If you are using the Settings on Windows 10, clicking on Apps section from the Settings window should open the list of all installed programs on your computer.
Locate Paladins in the list either in Settings or Control Panel, click on it once and click the Uninstall button located in the Uninstall a program window. Confirm any dialog choices to uninstall the game, and follow the instructions which will appear on the screen.
Alternative for Steam Users:
If you have installed the game on Steam, open up your Steam client and navigate to the Library tab in the Steam window and locate Paladins in the list of games you own in the library.
Paladins in Steam Library
Right-click on the game and choose the Uninstall button which will appear at the bottom of the context menu which will appear.
Follow the instructions which will appear on the screen and confirm any dialogs prompting you to confirm your choice to uninstall the game.
You will need to download it again from Steam by locating in the Library and choose the Install button after right-clicking on it. Check to see if the “Paladins is unable to locate Steam installation” message still appears.
Call of Duty: WWII is a first-person shooter video game developed by Sledgehammer Games and published by Activision. It was released worldwide on November 3, 2017, for Microsoft Windows, PlayStation 4 and Xbox One. It is the fourteenth main installment in the Call of Duty series and the first title in the series to be set primarily during World War II since Call of Duty: World at War in 2008.
Error message
The game also allows players to team up with their friends in a party and play together. However, we have received a lot of reports of the players having issue joining each other’s parties. An error message that reads “Unable to Connect to Host” pops up when trying to connect to a party. In this article, we will tell you some of the reasons due to which this error can be triggered and provide you with viable solutions to ensure complete elimination of the problem.
What Causes the “Unable to Connect to Host” Error?
The problem can arise due to a number of general misconfigurations some of which are:
Cache: In order to improve gameplay, temporary files and data are stored on the console. Over time this data can get corrupted and cause problems with connectivity, lag or random crashes.
Port: In some cases, it is also possible that the Ports have not been forwarded or are closed. Ports are simple virtual pipelines that allow two computers to communicate and send data back and forth. Port forwarding is used mostly by gamers to make the connection faster, reduce lobby waiting time etc. If the Ports have not been forwarded this issue can arise.
Connectivity Issues: Sometimes it is also possible that the Firewall on your computer might be preventing the game from making contact with the servers also it is possible that the modem might be facing connectivity issues with the ISP.
Now that you have a basic understanding of the nature of the problem we will move on towards the solutions.
Solution 1: Restarting Internet.
it is possible that the internet modem might be facing connectivity issues with the ISP. Therefore, in this step, we are going to power-cycle our internet router in order to remove any connectivity issues
Unplug the power to your InternetRouterUnplugging
Wait at least 5 minutes before plugging the power back in
Try to Host the party and see if the problem is solved
If this step does not work for you don’t worry as it is the most basic troubleshooting step.
Solution 2: Clearing Cache
In order to improve gameplay, temporary files and data are stored on the console. Over time this data can get corrupted and cause problems with connectivity, lag or random crashes. On PS4 and XBOX this can be cleared whilst on PC we can verify the integrity of the cache to do that:
For PS4:
In order to clear the cache on your PlayStation 4
Press and Hold the PlayStation button on the controller
PlayStation button on the controller
Chose “TurnoffPS4” option
Wait for the console to powerdown and wait for 5 minutes
Restart the console
Hold the L1+R1 Buttons before booting up Call of Duty World War II
L1+R1 button combo
The brightness and the choice of language are also reset in this process but the saved games remain.
For Xbox:
In order to clear the cache on your Xbox
Press and hold the Xbox Power button on the Console until the console shutsdown completely
Power button Xbox
Remove the PowerCord from the back of the XboxConsole
Wait for 5 Minutes and plug the cord back in
Wait for the IndicatorLight on the BatteryPack to turn Orange from White
Turnon the Console
Your cache has been cleared the console will take a while longer to bootup than usual.
For PC:
For PC, we will be checking the integrity of game files intead.
Launch Steam and signin to your account
Go into the library section, right–click on the game and select “Properties”.Opening Game Properties in steam
After that Click on the LocalFiles option and click on the “Verifytheintegrityof GameCache” option
Opening Local files
This will take some time to verify after it is done try to run the game
Solution 3: Changing NAT to Open/Port Forwarding
Port forwarding is used mostly by gamers to make the connection faster, reduce lobby waiting time etc. If the Ports have not been forwarded this issue can arise. Therefore, in this step, we will be forwarding the Port. But before we proceed, we have to find the IP addresses of the consoles
For PS4:
Go to Settings and select NetworkSelecting Network
Select “View Connect Status“
Make note of the numbers listed next to IPAddress
For Xbox:
Go to SettingsSelecting Settings
Go to NetworkSelecting Network
Select NetworkSettings from the rightSelecting Network Settings
In order to change the NAT to Open you will need a PC connected to the router that you use to play the game. This step requires to be done on a PC and will work for every console that you connects to the router. Therefore, we will be forwarding the ports on PC for which you need to:
Go to your file explorer
Click on Network on the RightSideClicking on Network
Right–click on your router located beneath NetworkInfrastructureRight Clicking on the Router
Select Properties and click on “Settings”
Right-Clicking on the Router, Selecting Properties then Settings
Click on “Add”
Clicking on ADD
Write a name beneath Description of service (it can be anything)
Write the IPaddress found on your PS4 / Xbox One / PC
In both External Port and Internal Port, write each TCP number that was included in the list (for example, for PC you will first write “3074” in both the “External Port for this service” and “Internal Port for this Service” option and press “OK” then repeat the process for “27015-27030, 27036-27037” numbers).
Writing Description, the IP address and the settings
After each TCP number has been entered, change the selection to UDP and do the same for those numbers as done with the previous TCPnumbers.
Adding UDP ports
When the Process is completed and all the TCP and UDP ports for your console have been added try to connect to the party.
Apex Legends is a newly released free to play battle royale which has recently taken the gaming community with a storm and acquired over 50 million players in just a span of two months. The game was developed by Respawn Entertainment and published by Electronic Arts. Apex Legends combines elements from TitanFall and many other class-based shooters.
Game logo
However, quite recently a lot of reports have been coming in of users experiencing random crashes while playing the game. In this article, we will inform you about some of the reasons due to which these crashes might be triggered and provide you with viable solutions in order to eradicate this problem completely.
What Causes the Apex Legends to Crash?
There is no specific reason behind the crashes but according to our reports some of the most common reasons were:
Full-Screen Optimization: Windows included a new feature that tries to run every game as a borderless window and to improve the gameplay but this feature can often cause issues with games that are not well optimized. It is possible that it might be causing the crashes on Apex Legends.
Administrative Privileges: There are certain elements of the game that need administrative privileges to function correctly if the game has not been granted administrative privileges it might cause it to crash.
Alt+Tab: With many users, the crashes occurred only if during the game the user pressed “Alt+Tab” in order to switch the tabs in Windows. This is a bug with the Apex Legends, whenever it is opened after minimizing it by pressing “Alt+Tab” it might crash.
Outdated Graphics Drivers: It is also possible that the graphics card drivers on your system are old and outdated. As Apex Legends is a newly released game it might malfunction if you are using drivers that don’t support it.
Missing Files: It is possible that some important files from the game might be missing. The game needs all the files in order for all of its elements to function correctly.
Now that you have a basic understanding of the nature of the problem we will move on towards the solutions.
Solution 1: Disable Full-Screen Optimization.
Full-Screen Optimization is a new feature that tries to run the game as a borderless window. This feature can often cause issues with games that are not well optimized. It is possible that it might be causing the crashes on Apex Legends. Therefore, we are going to disable it in this step.
Right-click on the Apex Legends shortcut and select “Open File Location” or search for it in the Windows search bar if you don’t have a shortcut on the desktop.
Opening File Location
Once inside the game installation folder, right–click on the “r5apex.exe” and select properties.
Right-Clicking and opening Properties
Inside the properties, click on compatibility and check the “Disable fullscreen optimizations” box.
Checking the “Disable Full Screen optimizations” box inside the “Compatibility” Tab
Apply your settings.
Applying Settings
Run the game and check to see if the problem persists.
Solution 2: Granting Administrative Privileges.
There are certain elements of the game that need administrative privileges to function correctly if the game has not been granted administrative privileges it might cause it to crash. Therefore, in this step we are going to be granting the game administrative privileges for that:
Right-click the “Apex Legends” shortcut on the desktop and select “Open File Location” or search for it in the Windows search bar.
Opening File Location
Once inside the Installation folder, right-click the “r5apex.exe” and click on “Properties“.
Inside the game properties, click on the “Compatibility” tab and check the “Run as Administrator” box.
Apply your settings.
Run the game and check to see if the problem persists.
The process
Solution 3: Updating Graphics Drivers.
In some cases, the graphics card drivers on the system are old and outdated. As Apex Legends is a newly released game it might malfunction if you are using drivers that don’t support it. Therefore, in this step, we are going to update the graphics card drivers and for that:
For Nvidia Users:
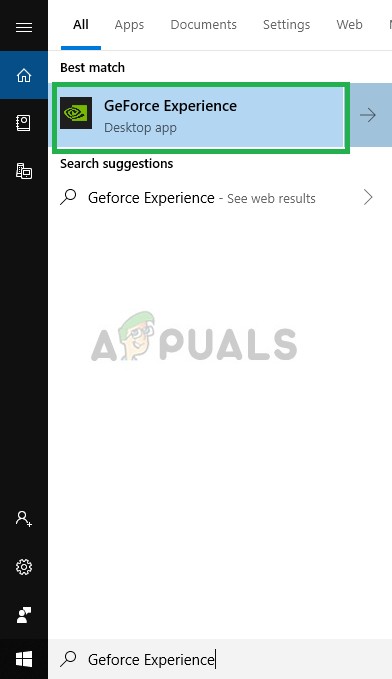
Click on the Searchbar on the left-hand side of the taskbar Search bar
Type in GeforceExperience and press enter
Click on the first icon to open the application Opening Geforce Experience
After signing in, Click on the “Drivers” option on the top left.
In that Tab, Click on the “Checkfor Updates” option on the top right
After that, the application will check if new updates are available
Checking for Updates
If the updates are available a “Download” button will appear Click on the Download button
Once you click on that the driver will begin to download
After the Driver is downloaded the application will give you the option for “Express” or “Custom” installation.
Click on the “Express” installation option and the Driver will automatically be installed
After the installation is completed, run the game and check to see if the problem persists.
For AMD Users:
Right–Click on the Desktop and select AMDRadeonSettings Opening AMD Radeon Settings
In the Settings, click on Updates in the lower right corner Clicking on Updates
Click on “Check For Updates” Clicking on “Checking for Updates”
If a new update is available a new option will appear
Click on the option and select Update Clicking on “Update Now”
The AMDinstaller will start, click on Upgrade when the installer prompts you to
The installer will now get the package ready, check all the boxes and click on Install
This will now download the new driver and install it automatically
Restart your computer and try to run the game.
Solution 4: Avoiding “Minimizing” the game.
With many users, the crashes occurred only if during the game the user pressed “Alt+Tab” in order to switch the tabs in Windows. This is a bug with the Apex Legends, whenever it is opened after minimizing it by pressing “Alt+Tab” it might crash. Therefore, try to avoid using “Alt +Tab” while playing the game and if you do restart in order to avoid crashing while playing the game.
Solution 5: Verifying Game Files.
It is possible that some important files from the game might be missing. The game needs all the files in order for all of its elements to function correctly. Therefore, in this step, we will be checking to see if all the game files are present. For that:
Open the Origin client and sign in to your account
Click on “Game Library” option on the left pane.
Opening “Games Library”
Inside the “Game Library” tab, right-click on “Apex Legends” and select “Repair Game”
Selecting “Repair Game”
The client will begin to verify the game files.
Once done, it will automatically download any missingfiles and replace the corruptedfiles if any.
Run the game and check to see if the problem persists.
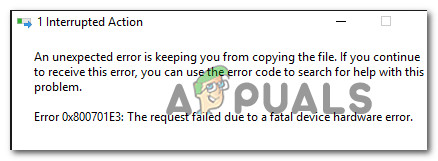
Several users are encountering the 0x800701E3 when performing a hard disk / SD card operation that involves copying or moving files on a Windows computer. In most cases, the issue is reported to occur when the user tries to move files from one hard drive to another. Other users report that the issue is occurring when they try to clean install Windows 10 or a different Windows version. Looking at the status code, the 0x800701E3 error DEVICE_HARDWARE_ERROR, “The request failed due to a fatal device hardware error.”
0x800701E3 -DEVICE_HARDWARE_ERROR, “The request failed due to a fatal device hardware error.”
What is causing the 0x800701e3 error code?
Unfortunately, this particular issue is associated with a serious hardware problem that usually can’t be fixed. Most of the time, the issue is a surefire sign that the drive is failing. Upon seeing this message, your first stop should be to recover as much data as possible before it’s not too late.
You can use this article (here) for two recovery solutions that will allow you to retrieve data from a faulty disk.
Update: As it turns out, the error message might also be caused by a failing peripheral like a SATA cable or an SD card adapter. You might also see a false positive if you get this error while trying to clean install a Windows version from an installation media creating through unofficial channels.
But even if the 0x800701e3 error is an obvious sign that the drive is failing, we managed to find a few workarounds that will allow you to circumvent the error message and complete the data transfer.
Since not every method will be applicable to your scenario, we advise you to follow the potential workarounds in the order that they are presented and skip the ones that are not applicable to your scenario.
Method 1: Dealing with bad sectors
If you’re seeing the0x800701E3 error when trying to clean install a Windows version, it’s probably because your HDD contains too many bad sectors. There are a couple of built-in utilities that are capable of fixing bad sectors to some degree.
Some affected users have reported that they were able to complete the installation without the 0x800701E3 error after performing CHKDSK and SFC scans on the affected drive. Here’s how to do this:
Start your computer and press any key to boot from the installation media while the prompt is showing.
Press any key to boot from installation media
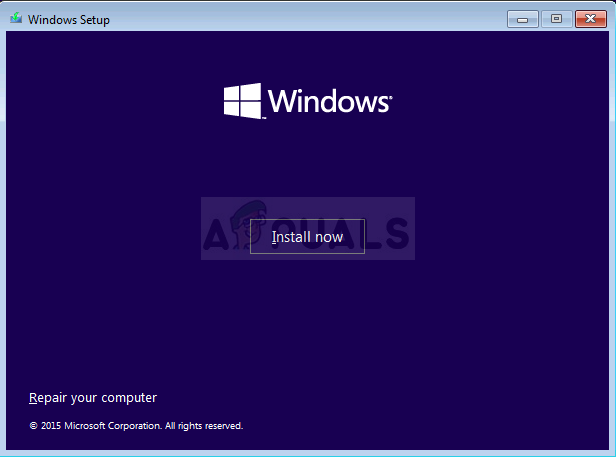
At the initial Windows installation screen, click on Repair your computer.
Choosing Repair your computer from Windows Setup
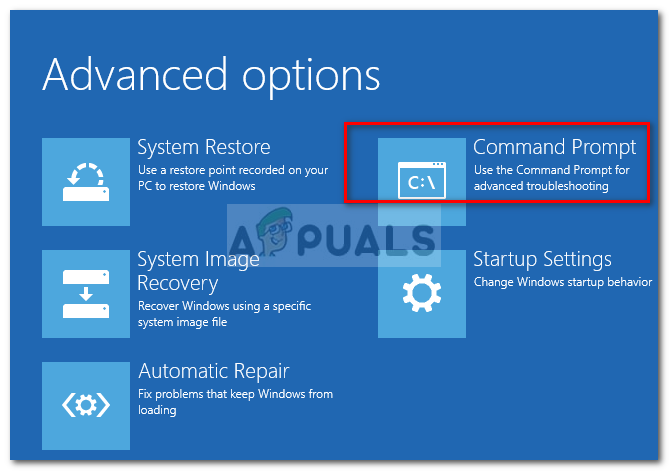
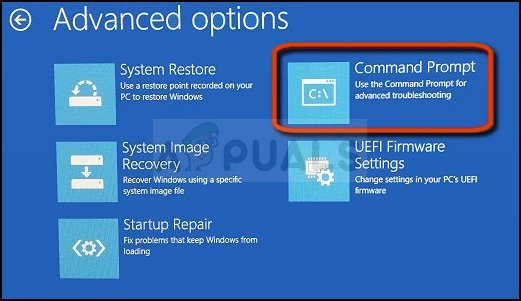
Inside the Advanced Options menu, go to Troubleshoot and then click on Command Prompt.
Opening Command Prompt
In the Command Prompt, type the following command and press Enter to run a CHKDSK scan on the affected drive:
chkdsk /f X:Note: X is simply a placeholder. Replace it with the letter of the affected drive.
This scan will scan and repair missing or corrupted system files.
Once the CHKDSK scan is finished, type the following command and press Enter to run an SFC (System File Checker) scan:
sfc /scannowNote: This command will scan all protected system files and replace corrupted files with a cached copy.
Once the second scan is finished, try to clean install the Windows version again and see if the process manages to complete without the 0x800701E3 error.
If this method was not applicable or didn’t resolve the issue, move down to the next method below.
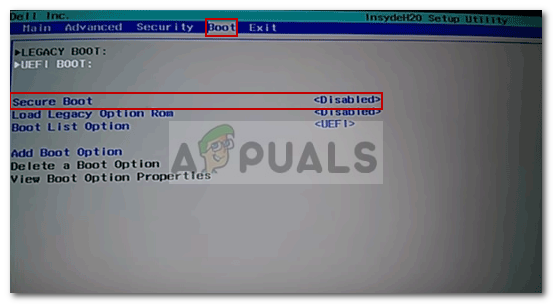
Method 2: Disabling Secure boot
Some affected users have reported that the 0x800701E3 error was no longer occurring during a clean installation of Windows after they disabled Secure boot from UEFI/BOOT.
Secure boot is an industry standard that was developed by the biggest manufacturers in the PC industry to ensure that the PCs are using software exclusively from Original Equipment Manufacturers (OEM). However, this security feature is known to create problems with installation media created outside of the official channels (using Rufus and other similar software).
Here’s a quick guide on disabling Secure boot:
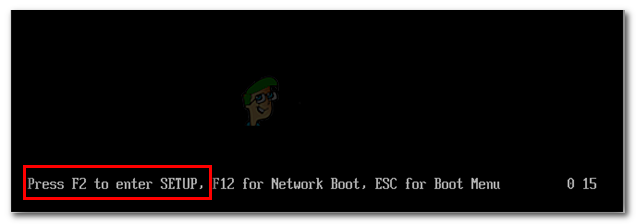
Press the Setup (Boot key) repeatedly after powering up your machine (during the initial bootup sequence).
Press the BIOS key during the startup procedure
Note: Most of the time, the Setup key is visible on the screen during the initial screen. But you can also search online for your particular Setup key or press typically keys that are used for this purpose: Esc key, F keys (F1, F2, F3, F8, F12) or Del key.
Once you gain entry into your BIOS menu, look for a setting named Secure Boot and set it to Disabled. The exact name and location will be different from manufacturer to manufacturer, but typically, you’ll find it inside the Security tab – you might also find it inside the Boot or Authentication tab.
Disable Secure Boot
Save the changes and exit your BIOS settings. Then, try to clean install Windows again and see if you’re still getting the 0x800701E3 error.
If you’re still seeing the same error message or this method wasn’t applicable to your current scenario, move down to the next method below.
Method 3: Changing the connection cable/card adapter
This error is typically indicative to an electronic problem inside the hardware/ SD card enclosure. However, there are some cases where the issue was actually caused by a peripheral like a SATA cable or an SD card adapter.
If possible, change the connectivity cable / SD card adapter and check if the issue is still occurring.
In the event that this method is not applicable to your current scenario, move down to the next method below.
Method 4: Retrying the operation over & over again
If the data you are trying to copy or move is very important, you might be able to recover bits and pieces by retrying the process over and over again.
And instead of copying / moving all the files at once, try to move the data separately and see if you are successful.
Several affected users have reported that they were able to gradually copy the data that was previously failing with the 0x800701e3 error by copying data individually and retrying multiple times until the transfer was successful.
But keep in mind that this method is only effective with failing SD cards. And even then, it will only work as long as whole sections of the chip inside are not failing.
If this method is not applicable, move down to the next method below.
Method 5: Using a third party software to recover data
There are a few specialized software that will help you recover data in cases where traditional transfer attempts fail. Most of this software is designed to try different coping strategies, retry and skip the blocks that are beyond transferable.
We tried different free recovery software and we can recommend any of the following:
But for the sake of keeping things simple, we’re going to feature a recovery guide with Unstoppable Copier since it’s widely regarded as the most reliable recovery feature out of the bunch. Here’s how to use it:
Visit this link (here), select your Windows version and hit the Download button to commence the download of the installer.
Downloading Unstoppable Copier’s installer
Open the installation executable and follow the on-screen prompts to complete the installation of Unstoppable Copier.
Installing Unstoppable Copier
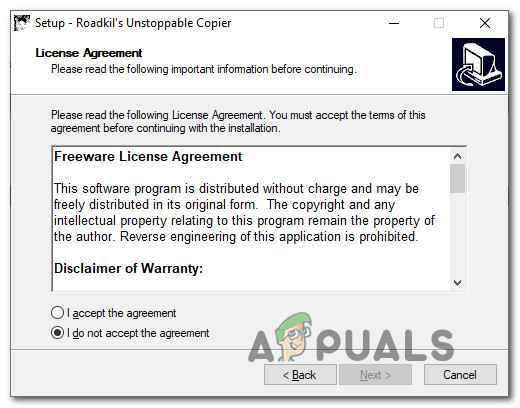
Once the installation is complete, launch Unstoppable Copier and agree with the End User Licence Agreement.
Accepting the User Agreement
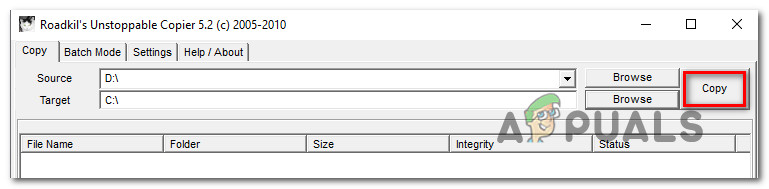
Inside Unstoppable Copier, go to the Copy tab and set the failing drive as the Source. Then, set a healthy drive as the Target. Then, simply hit the Copy button to commence the transfer.
Transferring data with Unstoppable Copier
Once the process has been commenced, the program will automatically try different transferring strategy and ignore bad sectors that can’t be recovered. When the process is finished, navigate to the Target location and see if you managed to recover your data.
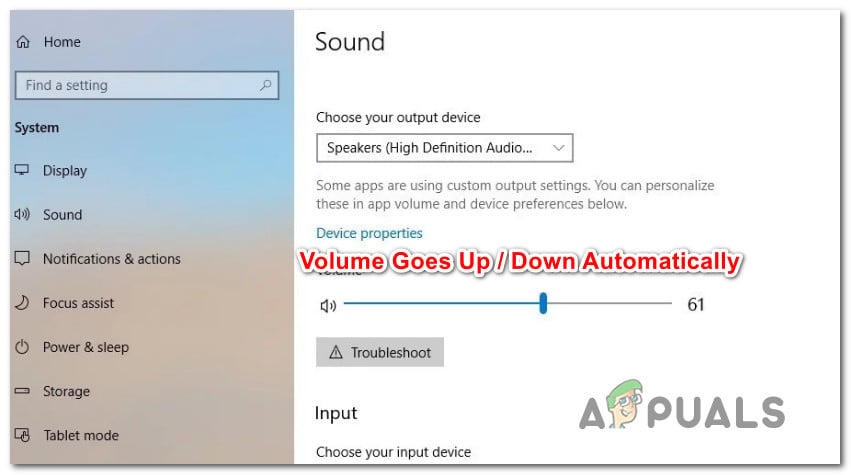
Some users have been reporting that their volume automatically goes up or down over time without any manual adjustment. Some affected users report that the issue only occurs when they have more than one windows/tab that produces sound. Other users report that the volume randomly jumps to 100% with no apparent trigger. In most cases, the values of the volume mixer are not changing even if the volume of the sound has clearly been modified. The vast majority of reports are confirmed to occur on Windows 10.
Volume Automatically goes down / up on Windows 10
What is causing the ‘automatic volume adjustment’ issue on Windows 10?
We investigated this particular issue by looking at various user reports and the repair strategies that have been successfully used to resolve this problem. Based on our investigations, there are several common culprits that are known to trigger this odd behavior on Windows 10:
Sound Effects or Immediate Mode are causing this – Realtek audio drivers do include a few features that might cause this particular behavior. Most of the time. Realtek’s Immediate Mode and a few other sound effects can cause automatic volume adjustment to some degree. Several users in similar situations have reported that the issue was fixed after they disabled any additional sound effects.
Issue is being caused by Windows Communications feature – There’s one Windows feature that ends up creating this particular issue for a lot of users. Although it’s designed to automatically adjust the volume when the PC is used for communication purposes, it can sometimes pick up false-positive which will end up reducing the volume when it’s not the case. In this case, changing the default behavior to ‘Do nothing’ will resolve the issue.
Windows audio driver is causing the issue – As a lot of users have reported, the default Realtek driver will get updated over time, which will end up causing this particular issue on some machines. If this scenario is applicable, downloading to a generic Windows driver should resolve the issue.
Dolby Digital Plus is adjusting the volume – One of the few 3-rd party audio drivers that are known to cause this issue is Dolby Digital Plus. This happens due to an audio feature called Volume Leveler. Unfortunately, disabling it will still preserver the same behavior, so you’ll need to disable Dolby Digital Plus altogether to resolve the issue.
A physical trigger is lowering/raising the volume – Stucked volume keys on your keyboard or a mouse USB dongle that is acting up are all potential causes that might lead to this particular problem. Unplugging the connected devices or getting the stuck keys unstuck will resolve the issue in this case.
If you’re looking for ways to prevent your Windows volume for getting automatically adjusted, this article will provide you with several troubleshooting steps. Down below, you’ll discover a collection of methods that other users in a similar situation have successfully used to prevent this behavior from occurring.
Method 1: Disabling Sound Effects and Immediate Mode
As it turns out, several Realtek drivers are known to cause this particular problem. We haven’t managed to find an official explanation on why this issue occurs, but it seems like the most popular trigger is playing something with sound, pausing it and then playing it again. For most affected users, this scenario will result in a volume change that doesn’t get recognized inside the speaker volume meter.
Fortunately, some affected users have reported that this odd behavior no longer occurred after they accessed the Sound settings and disabled all sound effects + Immediate mode. Here’s a quick guide on how to do so:
Press Windows key + R to open up a Run dialog box. Then, type “mmsys.cpl” and press Enter to open up the Sound window.
Go to the Playback tab, select the playback device that you’re having issues with, right-click on it and choose Properties.
In the Properties screen, go to the Enhancement tab and check the boss associated with Disable all enhancements (Disable all sound effects). Then, hit Apply to save the changes. Note: If you’re speaker/headset settings include Immediate Mode, disable that also.
Restart your computer and see if the issue has been resolved at the next startup.
Disabling Sound Enhancements on Windows 10
If you’re still noticing that the sound volume tends to go up or down over time, move over to the next method below.
Method 2: Disabling automatic volume adjustment via Communications tab
As it turns out, another possible culprit that might end up lowering your audio volume is a Windows feature that is designed to automatically adjust the volume when you are using the PC to place or receive telephone calls. While this feature is great when it functions correctly, we saw a lot of user reports where Windows is wrongly interpreting incoming or outgoing communications and lowering the volume when it’s not necessary.
If this scenario is applicable to your current situation, you’ll be able to resolve the issue by going to the Communications tab of the Sound menu and modify the default behavior to ‘Do Nothing‘ when a new communication is detected.
Here’s how to do this:
Press Windows key + R to open up a Run dialog box. Then, type “mmsys.cpl” and press Enter to open up the Sound screen.
Inside the Sound window, go to the Communications tab and set the Do nothing toggle under ‘When Windows detects communications activity’.
Hit Apply to save the changes, then restart your computer to see if the issue has been resolved.
Disabling automatic volume adjustment during communications
If you’re still encountering the same odd behavior with your sound volume, move down to the next method below.
Method 3: Downgrading to a generic Windows driver
If none of the methods below have helped to stop your sound volume from getting automatically adjusted, you can probably start blaming your sound driver that is currently active. We have seen a lot of reports where it was confirmed that the issue ended up being caused by a Realtek driver that Windows Update automatically installed.
If you’re using a Realtek sound driver, chances are you will be able to resolve this particular problem by downgrading your current sound driver to the generic Windows driver that is already stored on your system. Here’s how to do so:
Press Windows key + R to open up a Run dialog box. Then, type “devmgmt.msc” and press Enter to open up Device Manager.
Inside Device Manager, expand the Sound, video and game controllers drop-down menu.
Right-click on the Audio device that is acting up and choose Update driver (Update Driver software).
At the first prompt, click on Browse my computer for driver software.
Then, on the next screen, click on Let me pick from a list of available drivers on my computer.
Next, start by checking the box associated with Show compatible hardware. Then, select High Definition Audio Device from the list and click Next.
Click Yes at the warning prompt to install this driver over your current driver installation.
Restart your computer to save the changes and see if the volume issue is resolved at the next startup.
Downgrading to a generic audio driver
Method 4: Disabling Dolby Digital Plus Advanced Audio
If you’re using audio equipment that supports Dolby Digital Plus, there’s a high chance that the program behind it is causing automatic volume changes. This happens due to an audio feature called Volume Leveler. But, unfortunately, disabling this effect will not resolve the issue. Sadly, you’ll need to disable Dolby completely in order to prevent it from conflicting with your playback device.
Several users in a similar situation have reported that the issue was resolved after they visited the Sound menu and disabled Dolby Digital Plus entirely. Here’s how to do this:
Press Windows key + R to open up a Run dialog box. Then, type “mmsys.cpl” and press Enter to open up the Sound screen.
Running dialog: mmsys.cpl
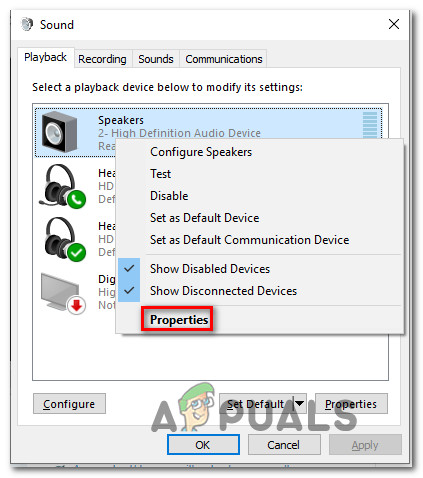
In the Sound menu, select the speakers that are getting automatically adjusted and choose Properties.Accessing the Properties screen of the Dolby speakers
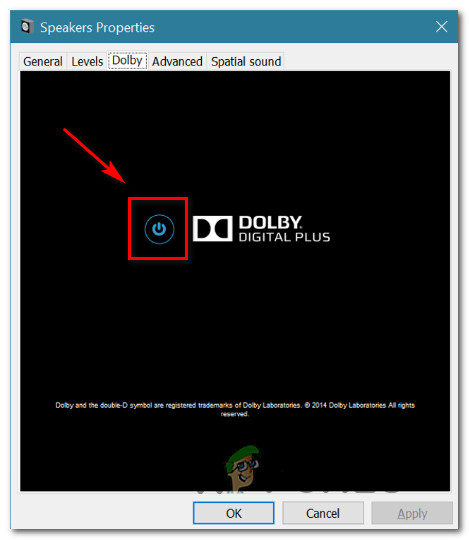
Then, go to the Dolby tab and click the Power button (near Dolby Digital Plus) to disable it.
Disabling Dolby Digital Plus
Restart your computer and see if the automatic volume adjustment stops with the next system startup.
If you’re still having the same automatic volume adjustment issues, move down to the next method below.
Method 5: Dealing with physical triggers
Now that we’ve burned through all the potential software culprits that might end up causing the issue, let’s investigate for a physical trigger. You’d be surprised on the number of people that have discovered that the issue was being caused by a mouse wheel or a volume key being stuck.
If you’re using a USB mouse with a wheel that can be used to reduce the volume, a mechanical (or driver) problem can cause it to become stuck on downgrading or upgrading the volume. In this case, unplugging the mouse and rebooting the laptop will most likely resolve the issue.
Another potential physical trigger is a physical volume key being stuck (most keyboard models have volume keyboards). If you’re using a monitor with speakers, a stuck key on the monitor might alter your sound volume.
Some users are seeing the 0x80072f76 – 0x20016 error code when trying to use the Media Creation Tool or when trying to install Windows 10 or Windows 8 via Windows Installer. The error is typically reported to occur a few seconds after the Media Creation Tool or Microsoft Refresh Tool is launched.
“Something happened 0x80070002 – 0x20016” Error
What is causing the 0x80072f76 – 0x20016 Error Code in Media Creation Tool?
We investigated this particular issue by looking at various user reports and the repair strategies that most affected users have successfully used to get to the bottom of the issue. Based on our investigations, there are several repair strategies that are known to trigger this particular error:
Media Creation Tool is set to open with Windows XP Compatibility Mode – Several affected users have reported that in their case, the Media Creation Tool was trying to open with Windows XP set as the Compatibility mode. Changing the settings to Windows 8 and granting administrative privileges resolved the issue for some users.
Corruption among Windows Update files – This particular issue can also be caused by system file corruption in the Windows Update component files – In this case, renaming the SoftwareDistribution and Catroot2 folder should resolve the issue. Another potential fix for this scenario is to clear the $WINDOWS.~BT and$Windows.~WS cache folders.
Windows version is configured to reject the upgrade – You might also be seeing this particular error if your current Windows configuration is rejecting the OS upgrade. You can resolve the issue in this particular scenario by changing the value of AllowOSUpgrade using Registry Editor.
S.M.A.R.T Monitoring is conflicting with the os installation – SMART HDD/SSD monitoring is a feature known to conflict with the OS installation (using the Windows Installer) with certain PC configurations. In this case, you can resolve the issue by disabling the SMART feature from the BIOS settings.
If you’re struggling to find fixes that will resolve this particular error message, this article will provide you with several troubleshooting guides. Down below, you’ll discover a collection of methods that other users in a similar situation have successfully used to resolve the 0x80072f76 – 0x20016.
The potential fixes below are ordered by efficiency and severity, so please follow them in the order that they are presented. One of them is bound to resolve the issue in your particular scenario.
Method 1: Running the Windows Update troubleshooter
Some affected users have reported that the issue was resolved after they ran the Windows Update Troubleshooter – a Microsoft tool that is equipped with various repair strategies that might end up resolving the issue automatically.
Here’s a quick guide on how to run the Windows Update troubleshooter:
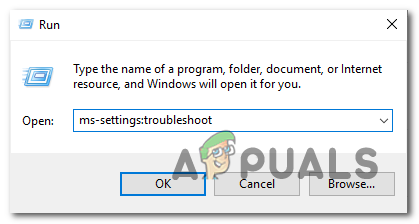
Press Windows key + R to open up a Run dialog box. Then, type “ms-settings:troubleshoot” and press Enter to open up the Troubleshoot tab of the Settings app.
Opening the Troubleshooting tab of the Settings app via a Run box
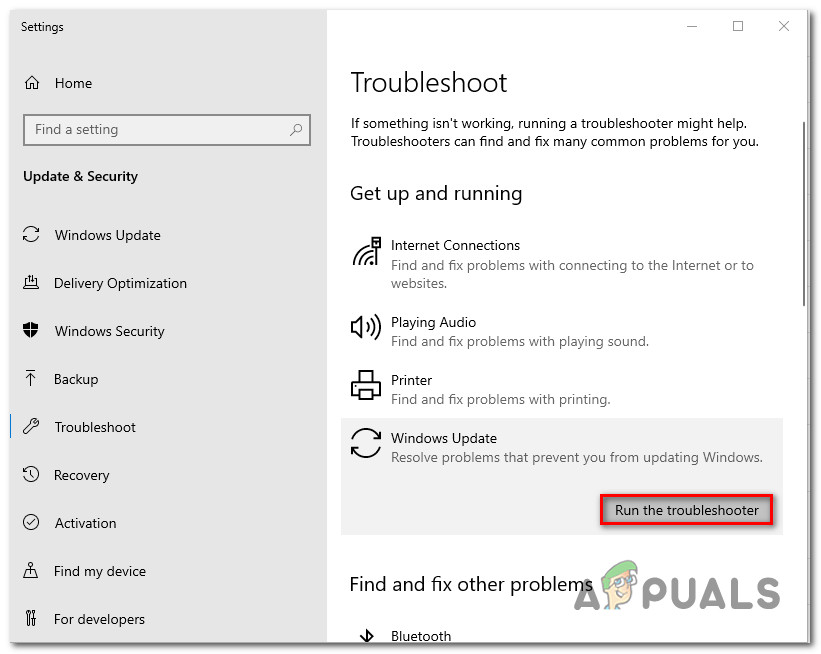
Inside the Troubleshoot tab, click on Windows Update (under Get up and running) and choose Run the troubleshooter.
Running the Windows Update troubleshooter
Wait until the investigation part is complete, then click on Apply this fix to enforce the recommended repair strategy automatically.
Once the repair strategy is applied, restart your computer and see if you’re still encountering the 0x80072f76 – 0x20016 error when opening the media creation tool or when trying to install/upgrade Windows.
If you’re still encountering the same error message, move down to the next method below.
Method 2: Setting the Compatibility Mode to Windows 8
Some users have been able to resolve the 0x80070002 – 0x2001 error after discovering that the Media Creation Tool was opening in Compatibility mode set to Windows XP. Most users have reported that changing the Compatibility Mode to Windows 8 and making sure that the Media Creation Tool is opening with administrative privileges ended up resolving the issue for them.
Here’s a quick guide on ensuring that Compatibility Mode is set to Windows 8 for the Media Creation Tool (with admin access):
Navigate to the location where you downloaded the Media Creation Tool, right-click on it and choose Properties.
Inside the Properties screen of the Media Creation tool, go to the Compatibility tab and check the box associated with Run this program in compatibility mode for.
Next, move down below and make sure that the box associated with Run this program as an administrator is checked.
Click Apply to save the changes, then open the Media Creation Tool again and see if you’re still seeing the same error message.
Running the Media Creation Tool in Compatibility Mode
If you’re still encountering the 0x80072f76 – 0x20016 error, move down to the next method below.
Method 3: Resolving corruption related to Windows Update
As it turns out, this particular issue can also occur if the culprit that ends up causing the 0x80070002 – 0x2001 is corruption with the Windows Update component files. If this scenario is applicable to your current situation, then resetting the Windows Update component should resolve the issue and allow you to use Media Creation Tool without encountering the 0x80070002 – 0x2001 error.
Here’s a quick guide on how to do this:
Press Windows key + R to open a Run dialog box. Then, type “cmd” and press Ctrl + Shift + Enter to open up an elevated Command Prompt. When prompted by the UAC (User Account Control), click Yes to grant admin privileges.
Inside the elevated Command Prompt, type the following commands in order and press Enter after each one to stop the necessary services:
net stop bits
net stop wuauserv
net stop appidsvc
net stop cryptsvc
Note: This command will stop the BITS service, the Windows Update service and the Cryptographic service.
Once the required services have been stopped type the following commands to rename the software distribution folders backup copies:
Note: This command will force your OS to create new folders for software distribution, which will circumvent any issues cause by file corruption.
Restart the services that we previously stopped by running the following commands and pressing Enter after each one:
net start bits
net start wuauserv
net start appidsvc
net start cryptsvc
Restart your computer and recreate the action that was previously triggering the 0x80070002 – 0x20016 error and see if the issue has been resolved.
If you’re still seeing the same error message, move down to the next method below.
Method 4: Clearing the $WINDOWS.~BT & $Windows.~WS folders
Some users have reported that the 0x80070002 – 0x20016 error was finally resolved after they erased the contents of the $WINDOWS.~BT and $Windows.~WS cache folders. These contain files needed to create the installation media, so clearing their contents might resolve corruption-related issues.
Note: Chances are the two folders are not visible when you access your Windows drive. In this case, using the ribbon bar at the top, go to View and make sure that the box associated with Hidden items is checked.
Click View Then Check Unhide Hidden Items To Make Sure All The Folders Are Shown
Once the two folders are visible, open each folder individually and empty its contents by selecting every item and choosing Delete.
Deleting the contents of $WINDOWS.~BT and $Windows.~WS cache folders
Once the two cached folders have been cleared, restart your computer and see if you’re still encountering the 0x80070002 – 0x20016.
If you’re still seeing the same error message, move down to the next method below.
Method 5: Editing the AllowOSUpgrade value via Registry Editor
You might be seeing this particular error message because your current Windows version is configured to reject an OS upgrade. If this scenario is applicable, you’ll see the Something happened 0x80070002 – 0x20016” error when trying to run the Media Creation tool to upgrade an existing installation.
This is typically reported to occur with Windows 7 or Windows 10 computers that are eligible to upgrade to Windows 10 but haven’t received the notification to reserve a copy because of a Registry value.
Here’a step-by-step guide that will help you change the AllowOSUpgrade value. This will allow you to use the Media Creation tool without receiving the 0x80070002 – 0x20016 error. Here’s what you need to do:
Press Windows key + R to open up a Run dialog box. Then, type “regedit” and press Enter to open up a Run dialog box. When prompted by the UAC (User Account Control), click Yes to grant administrative privileges.
Once you’re inside the Registry Editor, use the left-hand side pane to navigate to the following location:
Note: If the OSUpgrade key is not created yet, right click on WindowsUpdate and choose New > Key. Then name the newly created key to OSUpgrade.
With the OSUpgrade key selected, move over to the right-hand side panel and right-click on an empty space. Then, select New > DWORD (32-bit) value and name it AllowOSUpgrade.
Double-click on AllowOSUpgrade and change the Value to 1 and the Base to Hexadecimal.
Once the value has been adjusted, close regedit and restart your computer.
At the next startup, recreate the action that was previously triggering the 0x80070002 – 0x20016 error and see if the issue has been resolved.
Configuring the AllowOSUpgrade Registry key
If you’re still encountering the same error message, move down to the next method below.
Method 6: Performing a Refresh via Windows Defender Security Center
If you went through all these methods without success and you’re trying to use the Refresh tool from Microsoft, you can complete the procedure from Windows Defender Security Center.
This procedure will allow you to Refresh your PC in those instances where the official Microsoft Refresh tool produces the 0x80070002 – 0x20016 error. This procedure is typically known to be effective on Windows 10 builds that already have the Creators Update.
Here’s what you need to do to perform a Refresh via the Windows Defender Security Center:
Press Windows key + R to open up a Run dialog box. Then, type “ms-settings:windowsdefender” and press Enter to open up the Windows Security tab.
Once you get to the Windows Security tab, click on Open Windows Security.
When you’re inside the home screen of Windows Security, click ok Device performance & health.
In the Device performance & health tab, scroll down to Fresh start and click on Additional info.
Under Fresh start, click on Get Started to begin the process of refreshing your PC. This is the equivalent of installing a clean, up to date installation of windows.
Follow the on-screen prompts to complete the Fresh start process and complete the refresh.
Performing a Refresh via Windows Defender Security Center
Method 7: Disabling S.M.A.R.T
Some affected users have reported that they managed to resolve the issue by disabling the S.M.A.R.T. feature from their BIOS settings. As it turns out, this HDD/SSD monitoring system can end up triggering 0x80070002 – 0x20016 error on certain PC configurations.
If this scenario is applicable, disabling the S.M.A.R.T. feature might allow you to perform the operation without encountering the error message again. Here’s a quick guide on disabling the S.M.A.R.T. feature:
Power on your computer and press the Setup key during the initial booting sequence to enter your BIOS settings. The Setup key should be visible on-screen, but just in case you don’t find it, you can search online for the specific key according to your motherboard manufacturer. Press [key] to enter setup
Once you get inside your BIOS settings, go to the Main tab, so you get an overview of all your HDDs / SSDs. Then, select the HDD that you’re encountering the issue with and set SMART Monitoring to Disabled.Disabling SMART Monitoring for the affected HDD
Save the changes and allow your computer to boot back up.
Once the next boot sequence is complete, recreate the same action that was previously triggering the 0x80070002 – 0x20016 error and see if the issue was resolved.
Skype is a telecommunication service that provides support for Video calls, voice calls, and instant text messages. The application is available for Windows, Android, IOS, Xbox and many other consoles and operating systems. By 2010 there were an estimated 600 million users of the application with 300 million active monthly in 2015. The application is known for being used mostly in video conferences.
Unable to load Directory Results
However, quite recently a lot of reports have been coming in of the application displaying the error message “Unable to load Directory Results” whenever the user tries to search for contacts. In this article, we will discuss some of the reasons due to which this error can be triggered and provide you with viable solutions in order to completely eradicate the problem.
What Causes the “Unable to Load Directory Results” Error on Skype?
There are many reasons due to which this error can be triggered but some of the most common ones are:
Connectivity Issues: The error is mostly caused due to the application being unable to connect to the server. This issue can arise due to slow internet or denied access to the application by the Windows firewall.
Cache: Cache is stored on the computer by every application in order to reduce the loading times. However, over time this cache can get corrupted and cause issues with the application. Same goes for Skype.
Improper Sign in: Sometimes, the integrity of the sign in might have been compromised due to a temporary disconnection while signing in. This issue is pretty common and can be fixed by repeating the process.
Corrupt Application: In some cases, the application can get corrupted due to missing files or even if the files are intact it might be facing issues with loading those files properly.
Shared.xml file: This is another file that is stored by the Skype application and it is known to cause issues with the application. This file is easily recreated by the application when deleted therefore, replacing it might sometimes solve the issue.
Now that you have a basic understanding of the nature of the problem we will move on towards the solutions.
Solution 1: Granting Access in Firewall.
Windows Firewall can sometimes block certain features of the application from making contact with the server and thus cause issues with the application. In this step, we will be granting the application access in Firewall.
Click on the StartMenu and open the “Setting” icon.
Click on “Update & Security” option.
Select the “Windows Security” option from the left pane.
Inside the Windows Security option, select “Firewall & Network Protection“.
Now click on “Allow an app through Firewall“.
Opening the “Allow an app through the Firewall” Settings
Click on “Change Settings” to provide the administrative privileges.
Scroll down and make sure that Skype is allowed in both “Private” and “Public” networks.
Allowing the app through Firewall
Click on “OK“, run the application and check to see if the error persists.
Solution 2: Deleting the “Shared.xml” file.
This is a file that is stored by the Skype application and it is known to cause issues with the application. This file is easily recreated by the application when deleted therefore, replacing it might sometimes solve the issue. Therefore, in this step we are going to delete this file for which:
Close all instances of the Skype application.
In the search bar type “Run” and press “Enter“.
This will open up the “RunPrompt“, type “%appdata%\skype” in the Run prompt and press “Enter“.
Typing in run prompt
This will open up the Skype application data folder, delete the “Shared.xml” file if it is present inside that folder.
Now restart your computer, run skype and check to see if the problem persists.
Solution 3: Sign in Again.
Sometimes, the integrity of the “sign in” might be compromised due to a temporary disconnection while signing in. This issue is pretty common and can be fixed by repeating the process. Therefore, in this step we are going to be signing out of Skype and then signing back in for that:
Click on the Menu option of the top right side of the left pane.
Clicking on the Menu button
Select “Sign out” from the dropdown.
Selecting “Sign out”
Now signbackin with your details and check to see if the problem persists.
Solution 4: Deleting Cache.
Cache is stored on the computer by every application in order to reduce the loading times. However, over time this cache can get corrupted and cause issues with the application. Same goes for Skype. Therefore, in this step, we are going to be deleting the application’s cache.
Make sure to close all instances of the application.
In the Windows search bar, type “Run“
In the Run prompt, enter “%appdata%” and press enter.
Typing in Run prompt
Delete the “Skype” folder inside the application data folder that opens up.
Deleting the Skype Folder
Now similarly open the “Runprompt” again.
Type in “%temp%” inside the Run prompt.
Typing in Run prompt
This will open up the temporary files folder, inside that delete any folder that has “Skype” in its name.
Deleting the folder
Now Restart your computer.
Run Skype and check to see if the problem persists.
Solution 5: Reinstalling the Application.
In some cases, the Skype application’s files can be corrupted or the installation process of the application might not have installed it correctly. Therefore, in this step, we are going to be deleting the Skype application from our computer and download it again.
Open the StartMenu and click on the settings icon.
Clicking on the settings icon
Inside the settings, select the “Apps” option.
Selecting the “Apps” option.
On the right pane select “Apps & Features“.
Selecting the “Apps & Features” option.
Find the “Skype” app from the list of apps and click on it.
Click on the “Uninstall” button that appears below the name of the application.
Clicking on the “Uninstall” button
Click on “Uninstall” again.
Clicking on Uninstall again.
Click “Next” on the setup and it will automatically uninstall Skype and all of its components from the computer.
Now DownloadSkype from the MicrosoftStore and install it.
Run the application and check to see if the problem persists.
Google Docs is a word processor included as a part of the free web-based software offered by Google. The software allows users to create and edit word files while collaborating with other users online. Google Docs is available as a web service and as a mobile application for IOS and Android. Also, the application is compatible with Microsoft Office file formats.
Google Docs not Working
However, quite recently a lot of users have reported of the application not working correctly and displaying the error “Google Docs encountered an error. Please try reloading this page“. In this article, we will discuss some of the reasons due to which this error can be triggered and provide you with viable solutions in order to ensure complete eradication of the error.
What Causes Google Docs to Stop Working?
The error can be triggered due to a lot of reasons some of which are:
Cache and Cookies: Caches and Cookies are stored by the browser in order to decrease the application loading times and also the site loading times. But sometimes they can get corrupted and cause issues with loading certain sites.
Extensions: Sometimes, certain plugins or extensions can interfere with the browser while loading a site and therefore cause the issue.
Software: In some cases, certain software on your computer can interfere with the browser and cause issues in loading certain websites thus causing issues with the loading of the Google Docs site.
Browser: Sometimes, a certain browser might be facing issues connecting to the site due to any bug with the browser. Also, the site might be experiencing trouble loading on a specific browser.
Firewall: It is also possible that the Windows firewall might be interfering with your browser and preventing it from connecting to certain websites.
Now that you have a basic understanding of the nature of the problem we will move on towards the solutions.
Solution 1: Clearing Cache and Cookies.
Caches and Cookies are stored by the browser in order to decrease the application loading times and also the site loading times. But sometimes they can get corrupted and cause issues with loading certain sites. Therefore, in this step, we are going to be deleting the cache and cookies for your browser.
For Chrome:
Open Chrome on your computer and click on “More button” on the top right.
Menu button
Select “More tools” from the list and click on “Clear Browsing Data“.
Clearing browsing data
This will open up a new tab, select “Advanced” in the new tab.
Selecting the advanced tab
Select “All time” as the timerange, and check all the boxes.
Click on “Clear Data”.
Clicking on clear data
For Firefox:
Click on the Menu button on the top right corner.
In the History menu, select “Clear History” Note: Press “alt” if the menu bar is hidden
In the “Time range to clear” dropdown menu, select “All time”
Select all the options below.
Click on “Clear Now” to clear your cookies and cache.
For Microsoft Edge:
Click on the star with threehorizontal lines on the top right side.
the star button
Click on “history” on the right pane.
Clicking on history
Select the “Clear History” button on the top of the pane.
Clicking on Clear history
Check all the boxes and select “Clear”
Clearing history
Note: If you are using a different browser you can check this information on their support site.
Solution 2: Disable Extensions.
Sometimes, certain plugins or extensions can interfere with the browser while loading a site and therefore cause the issue. In this step, we are going to be disabling all the extensions on our browser to make sure that no extension is interfering with the browser.
For Chrome:
Click on the “More” icon on the top right.
Menu button
Select “More tools” and click on “Extensions” in the list.
Opening Extension Settings.
Now turn off every extension that is active except for the “Google Docs Offline” one.
Disabling Extensions
For Firefox:
Click on the Menu icon on the top right side.
Select the “Add-On” options from the list.
Clicking on Add-ons
Click on the “Extensions” button on the left.
Now select all the Extensions one after the other and click on “Disable“.
For Microsoft Edge:
Click on the Menu button on the top right corner.
clicking on the menu button
Click on “Extensions” from the drop–down.
Clicking on Extensions.
Selectall the extensions one by one and click on disable.
Note: If you are using any other browser then you can look for the method on your browser’s support site.
Solution 3: Closing Other Software.
In some cases, certain software on your computer can interfere with the browser and cause issues in loading certain websites thus causing issues with the loading of the Google Docs site. Therefore, make sure that no other software is running while you try to open the site. You can also try to run the Antivirus and make sure that no Malware is running on your computer that is stopping you from connecting to the site.
Solution 4: Switching Browser.
Sometimes, a certain browser might be facing issues connecting to the site due to any bug with the browser. Also, the site might be experiencing trouble loading on a specific browser. Therefore, you can try to load the site on a different browser and check to see if that helps in getting rid of the issue.
Solution 5 Granting Access in Firewall.
It is also possible that the Windows firewall might be interfering with your browser and preventing it from connecting to certain websites. Therefore, in this step, we are going to grant our browser access in the Windows firewall.
Click on the start menu and select the “Settings” icon.
Click on “Update& Security“.
Select the “Windows Security” option from the left pane.
Click on the “Firewall & network protection” option.
Select the “Allow an app through Firewall” option.
Click on “Change Settings” and make sure that your browser is allowed through both “public” and “private” networks.
Click on “OK” to save your settings.
Try to connect to the site and check to see if the problem persists.
The process of allowing browser through the firewall
Some users are getting the 0x80071771 error when trying to open or handle a file on Windows 10. This is typically reported to occur after the user has upgraded to the latest Windows version from an older version. The error message is sometimes accompanied by the message “The specified file could not be decrypted“.
Error 0x80071771 on Windows 10
What is causing the 0x80071771 error?
We investigated this particular issue by looking at various user reports and the repair strategy that affected users have been using to resolve the problem.
As it turns out, this particular error code is mostly encountered when the user tries to access a file that was previously created and encrypted on a different computer.
This particular error message is mostly associated with files that have been encrypted with the Encrypting File System (EFS). This is a Windows built-in encryption that is widely being used to encrypt files and folders to protect them from unwanted access.
This encryption system was designed to keep your confidential data from being accessed by threats or attacker with access to your computer. The thing is, once the file is encrypted, a certificate is required in order to access it from a different device. Because of this, an encrypted file can only be accessed on the machine that is was encrypted with no additional operations.
With this in mind, there are two ways that you can access an encrypted file on a different computer:
By decrypting a file before moving it to a new computer.
By moving the encrypted file to the new computer along with the certificate or encryption key.
If you’re currently looking for a way to resolve the 0x80071771 error, this article will provide you with a couple of troubleshooting steps. Chances are not every method featured below will be applicable to your scenario.
Because of this, we advise you to follow the methods in the order that they are presented in and disregard those that can’t be replicated. You should eventually stumble upon a method that will resolve the issue for you.
Method 1: Obtaining full permission to access the file
One way that might allow you to access the encrypted file is to give yourself full permission to access the system files and then follow one of the internal decrypting methods to unlock the files. But keep in mind that this method will not work in those scenarios where the file was originally encrypted on a different machine.
You’ll need to follow the steps below on the computer where the file was originally encrypted. Upon completing them, you will be able to move the file and open it on a different computer without encountering the 0x80071771 error.
Several affected users have reported that they were able to resolve the 0x80071771 error by following the steps below. Here’s what you need to do:
Inside File Explorer, right-click on the drive letter that you’re encountering the issue with and choose Properties.Accessing the Properties screen of the affected drive
Inside the properties screen, go to the Security tab and click the Edit button (near To change permissions, click Edit).
Changing permissions from the Security tab
From the security tab, click the Add button under Group or user names.
Adding more permissions to the volume
Inside the Select Users or Groups window, type Everyone in the box under Enter the object names to select (examples) and click Ok to save the changes.
Adding the Everyone group to the permissions for the volume drive
Once you return to the Permissions window, select the Everyone group and put all checkmarks to the allow box under Permissions for Everyone.
Allowing Full Control for the Everyone group
Hit Apply to save the changes. Next, return to the Security tab in the Properties of the affected volume, but this time click the Advanced button (associated with Special permissions or advanced settings)
Accessing the special permissions menu of the affected drive
From the Advanced Security Settings window, go to the Permissions tab and click on Change.Changing the default owner
Then, from the Select User or Group window, type Everyone under Enter the object name to select and hit Ok to save the changes.
Adding the Everyone group to Special Permissions
Next, make sure to check the box associated with Replace owner on subcontainers and objects.
Replacing the owner on sub containers and objects
With the owner as Everyone, go to the Auditing tab and click on Add.Accessing the Auditing tab of the affected drive
Under the Auditing Entry for the affected volume, select Everyone as Principal, then go to the Basicpermission section and check the box associated with Full control. Finally, click Ok then Apply to save the changes.
Establishing Full Control over the Basic Permissions
After completing the steps above, your computer just obtained full permissions to access the file. Next, follow the steps below to use an elevated Command Prompt to decrypt the file:
Press Windows key + R to open up a Run dialog box. Then, type “cmd” and press Ctrl + Shift + Enter to open up an elevated Command Prompt. When prompted by the UAC (User Account Control), click Yes to grant administrative privileges.
Running CMD as an admin
Once you arrive into the elevated Command Prompt, type the following command to decrypt the file that was previously showing the 0x80071771 error: cipher /d “full path of file with extension”
Note: “full path of file with extension” is obviously a placeholder. You need to replace it with the actual file path. For example: C:\Users\madro\Desktop\appuals\0x80071771.jpg.
Try to open the file and see if the error has been resolved.
If you’re still encountering the 0x80071771 Error – “The specified file could not be decrypted” issue when trying to open the file, move down to the next method below.
Method 2: Importing the EFS File Encryption Certificate + Key in Windows 10
The only way that will allow you to open an encrypted file (EFS file) on a different computer is to import it along with the certificate and key. Any individual app that doesn’t have the appropriate file encryption key will not be able to open it.
But in order for this method to be applicable, you need to have access to the computer that was used to encrypt the file and export the key + certificate. Here’s a quick guide on how to do this:
Exporting the EFS Certificate + Key
Press Windows key + R to open up a Run dialog box. Then, type “certmgr.msc” and press Enter to open the Certificates Manager utility.
Inside the Certificates Manager utility, select Certificates from the left-hand pane and click on Personal. Then, move over to the right-hand side panel and double-click on Certificates.
Right-click on the Certificate that you need to import to the new computer and choose All Tasks > Export.
Click Next on the first screen and choose Yes, export the private key at the next screen.
Select Personal Information Exchange – PKCS #12 and make sure that the boxes associated with Include all certificates in the certification path, Export all extender properties and Enable certificate privacy are checked. Then, hit Next to proceed to the next screen.
Set a password for the PFX file and confirm it. Make sure to leave the encryption to TripleDES before clicking Next again.
Hit the Browse button and set a location where you want the PFX file to be saved. Then, click Next once again.
Finally, click Finish to complete the process.
Exporting a PFX file
The steps below will show you how to import the PFX file that is used for your file encryption certificate and the key used with the EFS on a different computer. There are two different methods that you can use to import that certificate + key.
Both methods will work for any version of Windows 10, so follow whichever one is more convenable to your current situation:
Option One: Importing EFS File Encryption Certificate and key via PFX file
Once you retrieved the PFX file from the first computer, move it to the one where you’re encountering the 0x80071771 error on.
Once the PFX file has been moved to the new computer, right-click on it and choose Install PFX.
Under Store Location, choose Current User and hit Next to proceed.
Make sure the correct PFX file is selected from the File to Import window and click Next once again.
In the next screen, enter the password that you used when you encrypted the file under the Password field. Then, check the boxes associated with Mark this key as exportable and Include all extended properties.
Next, select the toggle associated with Automatically select the certificate store based on the type of certificate and click next once again.
Note: You might also see a Security warning if Windows cannot validate the certificate. If this happens and you trust the origins of the file, click Yes to confirm.
Click Finish to confirm the importing process. At the final prompt, click Ok to apply the final confirmation.
Importing Key + Certificate via PFX file
Option Two: Importing EFS File Encryption Certificate and key via Certificates Manager
Press Windows key + R open up a Run command. Then, type “certmgr.msc” and press Enter to open up the Certificates Manager.
Once you’re inside the Certificate Manager utility, go to the left-hand pane and right-click the Personal folder (under Certificates – Current User).
Then, select All Tasks and choose Import to bring up the importing wizard.
At the first screen, make sure that Current User is selected and click Next to proceed.
From the next screen, click the Browse button and navigate to the location of the PFX file that you’re trying to import. Then, click Open and select Next once again to proceed further with the importing wizard.
In the next screen, type the password of the PFX file and make sure that the boxes associated with Mark this key as exportable and Include all extended properties are checked.
Next, select the toggle associated with Automatically select the certificate store based on the type of certificate and click Next once again.
Hit Finish to complete the importing process, then Click Ok at the final prompt.
Several Windows users are encountering the “0x80070666” error when trying to install Microsoft Visual C++, Lumberyard or a similar distribution package. The error message is typically reported to occur at the very start of the installation process. This particular issue is not specific to a certain Windows version since it’s confirmed to occur on Windows 7, Windows 8.1 and Windows 10.
Setup failed – 0x80070666
What is causing the 0x80070666 Error when Installing Microsoft Visual C++?
We investigated this particular issue by looking at various user reports and the repair strategies that most affected users have deployed in order to resolve this particular error message. From what we gathered, there are several different scenarios that will trigger this error message:
Another Visual C++ installation is already present – As it turns out, Visual C++ 2015 and Visual C++ 2017 will contain some common binary files that are known to conflict. If you already have Visual C++ Redist 2017 and you’re trying to install the 2015 Redist, you’ll likely see this particular error message. In this case, uninstalling the newer Visual C++ should resolve the issue.
Bad Visual C++ installation – There are certain scenarios that might end up contributing to a bad installation of the Visual C++ Redistributable package. Whenever this occurs, you have little other choices that running a specialized Fix-it tool or trying to force the Repair screen to pop up using Command Prompt.
Windows Update is planning on installing the same Visual C++ package – Another scenario in which you might encounter this particular issue is if the updating component (Windows Update) has a pending update that will update the same Visual C++ package. In this case, installing every pending Windows update should resolve the issue automatically.
If you’re currently for a fix that will allow you to bypass the 0x80070666 error and complete the installation of the distribution package, this article will provide you with several troubleshooting methods. Down below, you have several potential fixes that other users in a similar situation have successfully used to get the issue resolved.
The methods are ordered by efficiency and severity, so please follow them in the order that they are presented. One of them is bound to resolve the issue in your particular scenario.
Method 1: Uninstalling all current Visual C++ Redistributable packages
As a lot of users have reported, this particular issue is mostly occurring if your computer already contains a version (older or newer) of the same distributable package that you’re trying to install.
In most cases, the error appears when the user tries to install Visual C++ Redist 2015 but a newer installation is already present on that system. Several affected users have reported being able to resolve the Setup failed – 0x80070666 installation error by uninstalling the newer version.
Here’s a quick guide on how to do this:
Press Windows key + R to open up a Run dialog box. Then, type “appwiz.cpl” and press Enter to open up the Programs and Features screen.
Type appwiz.cpl and Press Enter to Open Installed Programs List
Inside the Programs and Features screen, scroll down through the list of installed programs and locate all your Microsoft Visual C++ Redist installations.
Right-click on every Microsoft Visual C++ Redist installation and choose Uninstall. Then, follow the on-screen prompts to complete the uninstallation for every redist package.
Uninstalling every Visual C++ Redist package
Once every Visual C++ package has been uninstalled, restart your computer and wait for the next startup to complete.
Attempt to install the same Redist package that was previously failing with the 0x80070666 error.
If you’re still encountering the same error message, move down to the next method below.
Method 2: Running the Fix-It tool
There is one Microsoft Fix It tool that several affected users have successfully used to resolve the problem that was preventing the redist package from being installed automatically. This particular Fix It tool will perform several repair strategies that will repair several components (including corrupted registry keys) used during the installation of new programs.
Note: This Fix it tool will work for Windows 7, Windows 8, Windows 8.1 and Windows 10.
Here’s a quick guide on using this Fix It tool to resolve the 0x80070666 error:
Visit this link (here) and click the Download button to download the Fix It tool.
Downloading the Fix it Tool
Once the tool has been downloaded, double click on the .diagcab file to open up the Fix It tool. Once you see the initial screen, click on Advanced and make sure that the box associated with Apply repairs automatically is checked. Then, click Next to advance to the next menu.
Applying repairs automatically
At the next screen, click on Installing.
Problems with Installing programs
Wait until the inspection phase is complete, then select which redist package you’re encountering the issues with and click Next.Selecting the redist package that you’re having issues with
Follow the recommended repair strategies until you reach the end of the program.
Trying out the recommended fixes
Once the Fix It tool has run its course, restart your computer and see if you’re able to install the redist package at the next startup without issues.
If you’re still encountering the 0x80070666 error, move down to the next method below.
Method 3: Installing any pending Windows Updates
As it turns out, you might be encountering the 0x80070666 error because Windows Update is already preparing to install the same redist package. Several affected users reported that upon making the necessary Windows update, the redist package that was previously failing with the 0x80070666 error was installed automatically.
Here’s a quick guide on installing any pending Windows update:
Press Windows key + R to open up a Run dialog box. Then, type “ms-settings:windowsupdate” and press Enter to open up the Windows Update tab of the Settings app.
Run dialog: ms-settings:windowsupdate
Note: If you’re not on Windows 10, use the “wuapp” command instead.
Once you arrive at the Windows Update screen, click on Check for updates and follow the on-screen instructions to install all the pending windows updates.
Installing every pending Windows update
Once every pending update has been installed, restart your computer and see if the redist package is not already installed. If it isn’t, try to install it and see if you’re still encountering the same error message.
If you’re still haven’t managed to get rid of the 0x80070666 error, move down to the next method below.
Method 4: Using Command Prompt to repair the Visual C++ installation
Several affected users have reported that they suspected that the Visual C++ installation was corrupted, but they had no means of repair it since the program didn’t appear inside the Add or Remove Programs list. This typically happens with the Visual C++ 2015 Redistributable package.
Fortunately, they were able to fix this by downloading the installation executable and forcing the repair window to appear via Command Prompt. Here’s a quick guide on how to do this:
Make sure that the installer of the redistributable package that you’re trying to install is present on your computer. Make sure that know it’s exact location. If the installer is not present on your PC, download it again.
Press Windows key + R to open up a Run dialog box. Then, type “cmd” and press Enter to open up Command Prompt.
Inside the Command Prompt, use the following command to change the directory to the one holding the file. For example, if the redist installer (e.g. vc_redist.x64.exe) is located inside the Download folder, then you’ll need to use the following command to change to the relevant directory:
CD C:\Users\*YourUser*\Downloads
Once you’ve made sure that the terminal is working in the right directory, type the name of the installation executable followed by /uninstall to force the install window to appear. Like this:
vc_redist.x64.exe /uninstall
Then, click Repair and follow the on-screen prompts to repair your Visual C++ redist installation.
Forcing the Repair window to appear via Command Prompt
Some users have been reaching us with questions after their cloned SSD is failing to boot. This issue is typically reported to occur if the user has used Acronis True Image or Macrium Reflect to clone a traditional HDD in order to avoid losing any data during the migration process. But the problem is the system doesn’t recognize the cloned SSD as a viable booting option so the user has no way of completing the startup sequence. Some affected users are encountering an error message (it differs from manufacturer to manufacturer) while others report that they only see a black screen.
Cloned SSD won’t boot
What is causing the cloned SSD to fail the booting sequence?
We investigated this particular issue by looking at various user reports and the repair strategies that most affected users have deployed to get the issue resolved. Based on our investigations, there are several different culprits that are known to trigger this particular error message:
Source disk can’t boot – This typically happens in those scenarios where the source disk that was cloned had contained bad sectors. Naturally, those we’re migrated to the new drive and might have messed up the boot data. In this particular scenario, there is no repair strategy other than using a recovery tool to fetch the data from the old HDD and clean installing Windows on the SSD.
The drive is not set to boot – During the process of cloning the source disk and connecting the SSD to the new computer, the drive will not preserve its boot priority. This means that you’ll need to access your BIOS/UEFI settings and instruct your computer to boot from the new SSD drive.
Cloned SSD and source drive have the same unique ID – There are a lot of cloning software products (including Samsung Magician) that will mistakenly copy the unique ID during the cloning process. This ends up confusing the boot manager. In this case, removing/wiping the original drive will resolve the issue.
Faulty SATA cable / SATA port – We have seen several reports in which the SSD drive was refusing to boot due to a problem with the SATA cable used for the connection. Several users have managed to resolve this particular issue by using a different SATA cable or SATA port.
Secure boot is enabled – HDD cloning and Secure Boot will not play well on most PC configurations. Since the majority of free migration software will copy some uniques IDs over to the cloned SSD, the secure boot feature might prevent the system from booting from the new drive. In this case, disabling the Secure Boot feature from the BIOS settings should resolve the issue.
GPT/MBR conflict – In cases where the user cloned a GPT HDD to MBR SSD (or MBR HDD to GPT HDD), it’s necessary to change the boot mode from UEFI to Legacy or from Legacy to UEFI. If the wrong boot mode is set, the cloned SSD will not boot up at all.
Boot configuration data got corrupted during migration – Cloning an SSD will always be a bit of a gamble. Depending on the source disk and the SSD you’re trying to clone on, you might find that the BCD data gets corrupted during the migration process. In this case, using the WinRE utility or BootRec.exe utility should resolve the issue in most cases.
If you’re struggling to resolve this particular error message, this article will provide you with several troubleshooting guides that other users in a similar situation have successfully used to force the cloned SSD to boot normally.
Keep in mind that not every potential fix will be applicable to your current scenario. Because of this, we advise you to follow the methods below in the order that they are presented. One of them is bound to resolve the issue in your particular scenario.
Method 1: Setting the correct Drive to boot from
One of the most common reasons that will make a cloned SSD unbootable is the fact that the user has forgotten to set the correct drive to boot from. If this scenario is applicable, a trip to the BIOS / UEFI settings and changing the boot priority accordingly should resolve the issue immediately.
Here’s a quick guide on how to do this:
Restart your computer.
During the initial screen, start pressing the Setup key to enter the BIOS / UEFI settings. The specific setup key should be visible on the initial screen, but just in case you don’t manage to spot it, you can search online for the Setup key according to your motherboard manufacturer. Press [key] to enter setup
Once you get inside the setup screen, look for the Boot tab and make sure that the cloned SSD has priority.
Setting the cloned SSD at the top of the list
Save the changes, exit the Setup screen and see if the issue is resolved at the next startup.
If you’re still unable to boot from your cloned SSD, move down to the next method below.
Method 2: Changing the SATA cable used to connect the cloned SSD (if applicable)
We have seen several confirmed reports where this particular issue was occurring due to a faulty SATA cable or a faulty SATA port. If you’re suspecting that the issue might be caused by a connection problem, it’s recommended to try changing the SATA cable and the SATA port (if applicable) and see if the issue is still occurring.
And since you’ll open the case, it’s also worth a shot to disconnect any non-essential from the power supply just to make sure that the power supply gives the SSD enough power.
Method 3: Remove / Wipe the previous drive
Several cloning utilities including Samsun’s Magician will also copy the drive’s uniques ID, which ends up confusing the system. Since it won’t know where to boot from, it will likely make only one of the drives usable.
Fortunately, you can resolve this particular issue by simply removing the source disk (the one that you cloned). If your system is able to boot from the cloned SSD, you’ll need to wipe the original drive in the event that you want to use both on the same PC configuration.
Method 4: Disabling Secure Boot
Secure boot is a security standard developed by members of the PC industry in order to ensure that the PC will only boot with the software trusted by Original Equipment Manufacturers (OEMs). As you might imagine, this can create problems with cloned SSDs since the migration software that you used might copy over some unique IDs which might be regarded as a security breach by the secure boot feature.
In this case, you have little choice but to disable secure boot. Here’s a quick guide on how to do this:
Start your computer and press the Setup key during the initial screen. Your specific Setup key should be visible on the initial screen, but just in case it isn’t, search online for it according to your motherboard manufacturer. Press [key] to enter setup
Once you get inside your BIOS/UEFI settings, go to the Security tab and set Secure Boot to Disabled. Disabling Secure Boot
Note: BIOS / UEFI menus are very different from one manufacturer to another. Under certain configurations, you will be able to disable Secure Boot from System Configuration, Authentication or the Boot tab.
Method 5: Changing the BIOS Boot mode
If you’ve cloned a GPT HHD to MBR SSD or an MBR HDD to GPT SSD, keep in mind that it’s necessary to also change the boot mode from UEFI to Legacy or vice versa in order for the boot sequence to be successful. Otherwise, the SSD drive will not boot after the cloning process is complete.
If this particular scenario is applicable, you can resolve the issue by changing the boot mode. Here’s a quick guide on how to do this:
Power on your computer and press the specific boot key (Setup key) during the initial startup sequence. Typically, the setup key is either one of the F keys (F2, F4, F6, F8, F10, F12), the Del key (on Del computers) or the Esc key.
Pressing the Setup key to enter BIOS settings
Once you get inside your BIOS setup screen, go to the Boot tab and change the Boot Mode. If it’s set to Legacy, change it to UEFI and vice versa.
Changing the Boot Mode
Note: Keep in mind that depending on your motherboard manufacturer, this menu might look very different on your screen.
Save the current BIOS configuration and restart your computer to see if you are able to boot from the cloned SSD drive.
Method 6: Running the Windows Recovery Environment utility
The Windows Recovery Environment (WinRE) is capable of fixing a lot of common scenarios where the drive becomes unbootable. Several affected users have reported that they were allowed to boot normally after they repaired the Windows installation from the cloned SSD using WinRe.
But keep in mind that in order to perform this procedure, you’ll need to get a hold a Windows Installation media with your operating system version. You can follow this article (here) for Windows 7 or this one (here) for Windows 10 to create an installation media if you don’t have one.
Here’s a quick guide on how to run the Automatic Repair utility:
Insert the installation media and restart your computer. During the beginning of the startup sequence, press any key to boot from the Windows installation media.
Press any key to boot from installation media
Once the Windows setup is loaded, click on Repair your computer (bottom-left corner of the screen.
Choosing Repair your computer from Windows Setup
Once you get to the next menu, go to Troubleshoot, then click on Advanced Options. Next, from the Advanced options menu, select Startup repair.
Launching the Startup Repair utility
Wait for the utility to launch, then click Continue to proceed to the diagnostics phase. If you have a password, you will be asked to provide it.
Providing the required credentials
Wait until the WinRE utility is finished scanning and repairing the boot problems related to your cloned drive.
The Automatic Repair Utility is scanning the PC
Once the process is complete, your computer will restart. At the next startup, check to see if the issue is still occurring.
If you’re still unable to boot from your cloned SSD drive, move over to the next method below.
Method 7: Running the Bootrec.exe utility
If WinRE was unable to resolve the booting sequence of your cloned SSD drive, you might be able to do it manually by using Bootrec.exe via Command Prompt. This built-in Microsoft utility is capable of fixing the master boot record, the boot sector, and the boot configuration data. All of these three items can be affected during the migration process.
Note: Similar to Method 6, you’ll need to get a hold a Windows Installation media with your operating system version. You can follow this article (here) for Windows 7 or this one (here) for Windows 10 to create an installation media if you don’t have one. If you don’t have one, you can also force the Startup Recovery menu to appear by forcing three consecutive startup interruptions.
Here’s a quick guide on running the Bootrec.exe utility:
Insert the Windows installation media and press any key when prompted to boot from it. Once you see the initial Windows installation window, click on Repair your computer.
Accessing the Recovery menu via the Repair your computer button
Once you get to the Advanced Options menu, go to Troubleshoot then select Command Prompt.
Choosing Command Prompt in Advanced Options
Once Command Prompt is opened, type the following commands in the order that they are written and press Enter after each one to rebuild the entire build configuration data:
bootrec.exe
Overwatch is a multiplayer first-person shooter video game developed and published by Blizzard Entertainment. The game was released in 2016 and instantly became a popular sensation in the gaming community. The game acquired above 10 million players during the first open beta and after two years the player count was reported to be above 40 million.
Could not locate resources error overwatch
However, quite recently a lot of reports have been coming in of users who are unable to launch their game and every time they try to run it through the blizzard client the game doesn’t launch and displays the error “Could not locate resources (0xE00300E0)“. In this article, we will tell you the reason dues to which this error is triggered and provide you with viable solutions in order to completely eradicate this error.
What Causes the Could Not Locate Resources Error in Overwatch?
The cause of the error is specified to be:
Corrupt Executables/Files: If you are facing this issue on your computer it is possible that the installation of your game has been corrupted or the executables that are triggered in order to launch the game have been corrupted.
Now that you have a basic understanding of the nature of the problem we will move forward towards the solutions.
Solution 1: Replacing the Executables.
It is possible that the executables that are used to trigger the launch of the game have become corrupted and are thus preventing the blizzard client from launching the game therefore in this step we are going to be deleting them and then replacing them through the blizzard client.
Right-click the Overwatch shortcut on the desktop and select “Open File Location” or type “Overwatch” in the windows search bar right-click the icon and select “Open File Location“.
Once inside the game installation folder, delete both the “OverwatchLauncher.exe” and the “Overwatch.exe“.
Open the BlizzardClient and click on “Games” Clicking on “Games”
From the rightpane click on the overwatch icon
Click on the “Options” button on the top left side.
Select “ScanandRepair” from the list of options available. Selecting the Scan and Repair option from the dropdown
Click on “BeginScan” when the message prompts you to. Clicking on Begin Scan
Now the Launcher will automatically replace the two executables.
Depending upon your PC this might take some time wait for the launcher to finish the process
When finished try to “Run” your game and check to see if the error persists.
Solution 2: Reinitializing the Game.
This step worked for a lot of our users and basically, in this step we are going to be “Reinitializing’ the game for the blizzard client. For that:
Close the BlizzardClient.
Copy your overwatch game installation files to a different folder.
Copying Overwatch files
Delete the genuine game installation folder.
Launch the blizzardclient and begin downloading the game.
Approximately thirty seconds after the launcher goes from “Fetching” to “Downloading” pause the download and exit the client completely.
Now Paste the overwatchgameinstallation files to the folder in which you designated the game to be downloaded.
Copy pasting the files
Once the copy finishes, delete the “Overwatch.exe” and the “OverwatchLauncher.exe” files.
Now open the BlizzardClient again and resume the download.
The download will jump to 100% in approximately 2 or 3 minutes.
After this, run your game and check to see if the error persists.
Overwatch is a first-person shooter multiplayer game that was developed and published by Blizzard Entertainment. The game was released worldwide in May of 2016. It drew in a total of 10 million players in its open beta and boasts 40 million users after 2 years time. The game was appreciated widely for its accessibility and the diverse appeal of its hero characters.
Overwatch
However, quite recently a lot of reports have been coming in of the game crashing due to an application error. The game crashes while playing and sometimes even during the launch and displays the message “The application was unable to start correctly (0xc0000005). Click OK to close the application“. In this article, we are going to inform you about some of the reasons due to which this error can be triggered and provide you with viable solutions to ensure complete eradication of the problem.
What Causes the Overwatch Application Error?
The cause of the error is not specific and it can be triggered due to a number of reasons some of which are:
Cache: Games and applications store cache in order to decrease the loading times. However, over time this cache can get corrupted and therefore cause issues with the proper launch of the application.
Missing Files: In some cases, the game crashes due to missing files because it needs all of its files to be present in order to function correctly.
Battle.net Tools: Sometimes, the battle.net tools can get corrupted and therefore hinder the proper launch of the game because Overwatch needs the battle.net tools in order to function correctly.
Outdated Drivers: If the Graphics Card Drivers are outdated it can also cause issues with the game because Overwatch needs the latest version of the graphics drivers in order to function correctly.
Background Applications/Services: In some cases, it was found that certain services and applications that are launched automatically in the background were interfering with certain elements of the game and causing it to crash.
Antivirus: Sometimes, the antivirus installed on the computer was causing issues with the game as it blocks certain elements of the game from making contact with the servers and thus the game crashes.
Now that you have a basic understanding of the nature of the problem we will move on towards the solutions.
Solution 1: Deleting Game Cache
Games and applications store cache in order to decrease the loading times. However, over time this cache can get corrupted and therefore cause issues with the proper launch of the application. This cache is recreated automatically by the game if deleted, therefore, in this step, we are going to delete the cache in order to ensure that it is not causing the issue. For this:
Open the TaskManager by pressing “Ctrl+Shift+Esc” Opening the Task Manager
Click on the “MoreDetails” button to open up a detailedversion of the program
In the ProcessesTab, if an “agent.exe” or a “BlizzardUpdateClient” is running select it and press EndProcess button on the bottom of the program. Opening the Processes Tab and closing blizzard associated applications
Now press Windowskey+R to open up the “RunPrompt“
Type “%Programdata%” in it and press Enter. Opening the Program Data directory
Delete the “Blizzard Entertainment” folder inside the directory Deleting the Blizzard Entertainment folder
Restart the Blizzardclient, run the game and check to see if the issue is solved.
Solution 2: Verifying Game Files
In some cases, the game crashes due to missing files because it needs all of its files to be present in order to function correctly. In the blizzard client, we can verify the integrity of the game files. If any file is found missing by the client it is automatically replaced. Therefore, in this step we are going to be repairing the game files through the Blizzard client for which:
Start the BlizzardClient and click on “Games” Clicking on “Games”
From the rightpane click on the overwatch icon
Click on the “Options” button on the top left side.
Select “ScanandRepair” from the list of choices available. Selecting the Scan and Repair option from the dropdown
Click on “BeginScan” when the message indicates you to. Clicking on Begin Scan
Depending upon your PC this might take some time, wait for the launcher to finish the process
When completed, try to “Run” your game and check to see if the error persists.
Solution 3: Deleting Battle.net tools
Sometimes, the blizzard battle.net files can get outdated, corrupted or go missing thus causing issues with the blizzard client. In this step, we are going to be deleting the battle.net files which will then automatically be downloaded by the blizzard client and therefore, the files will be renewed. For that:
Open the TaskManager by holding “Ctrl+Shift+Esc” Opening the Task Manager
Click on the “More Details” button to open up a detailed variant of the program
In the Processes Tab, if an “agent.exe” or a “Blizzard Update Client” is running select it and press End Process button on the bottom of the application. Opening the Processes Tab and closing blizzard associated applications
Now press the Windows+R key to open up the “RunPrompt” Opening the Run prompt
Type “C:\ProgramData\” In the open field and press “Enter” Opening the Program Data Directory
Delete the Battle.net folder inside the directory Deleting the Battle.net client
Run the BlizzardClient and check to see if the problem persists.
Solution 4: Updating Graphics Card Drivers
If the Graphics Card Drivers are outdated it can also cause issues with the game because Overwatch needs the latest version of the graphics drivers in order to function correctly. Therefore, in this step, we are going to update the graphics card drivers to the latest versions.
For Nvidia Users:
Click on the Searchbar on the left-hand side of the taskbar Search bar
Type in GeforceExperience and press enter
Click on the first icon to open the application Opening Geforce Experience
After signing in, Click on the “Drivers” option on the top left.
In that Tab, Click on the “Checkfor Updates” option on the top right
After that, the application will check if new updates are available
Checking for Updates
If the updates are available a “Download” button will appear Click on the Download button
Once you click on that the driver will begin to download
After the Driver is downloaded the application will give you the option for “Express” or “Custom” installation.
Click on the “Express” installation option and the Driver will automatically be installed
After the installation is completed, run the game and check to see if the problem persists.
For AMD Users:
Right–Click on the Desktop and select AMDRadeonSettings Opening AMD Radeon Settings
In the Settings, click on Updates in the lower right corner Clicking on Updates
Click on “Check For Updates” Clicking on “Checking for Updates”
If a new update is available a new option will appear
Click on the option and select Update Clicking on “Update Now”
The AMDinstaller will start, click on Upgrade when the installer prompts you to
The installer will now get the package ready, check all the boxes and click on Install
This will now download the new driver and install it automatically
Restart your computer and try to run the game.
Solution 5: Running a Clean Boot
In some cases, it was found that certain services and applications that are launched automatically in the background were interfering with certain elements of the game and causing it to crash. Therefore, in this step, we are going to be rebooting the computer without any background services or applications running.
Log in to the computer as an administrator.
Click on the Windows Search bar, type in “msconfig” and press Enter
Click on “Services” and check the “Hide all Microsoft Services” box
Now click on “Disable All” in order to disable all the third party services from running in the background.
How to disable all services
Now right-click the “Task Bar” and select Task Manager
Click on the Startup tab and make sure that all the applications are disabled.
Disabling Startup Applications
Now Reboot your computer
Run the game and check to see if the error persists.
Solution 6: Disabling Anti-Virus
If you have an Antivirus installed on your system it is possible that it might be interfering with important elements of the game and thus preventing them from running correctly. Therefore, it is recommended that you disable the antivirus before trying to run the game and then check to see if the error persists.
Dragon Age Inquisition is an action role-playing game which was developed by Bioware and published by Electronic Arts. It is the third major addition in the Dragon Age franchise and is a sequel to the previously released Dragon Age: Origins. The game was released worldwide in November 2014 for Microsoft Windows, Xbox 360, Xbox One and PlayStation.
Dragon Age Inquisition
However, quite recently a lot of reports have been coming in of the game not launching in Windows 10. Although, users try to run the executable multiple times the game does not launch. In this article, we will inform you about some of the reasons due to which this problem can be triggered and provide you with viable solutions to ensure complete eradication of the problem.
What Prevents Dragon Age: Inquisition From Launching?
The reason behind the problem is not specific and it can be triggered due to a number of misconfigurations some of which are:
Background Services: It is possible that a service running in the background might be causing the issue. Often, Windows services or even other third-party applications can prevent all the elements of the game from functioning correctly, therefore, causing the problem.
Missing Files: In some cases, certain game files can become corrupted or even go missing. All the game files are necessary in order for it to function and launch correctly therefore if even a single file is missing the game won’t launch correctly or cause issues in the game.
Direct X/VC Redist: The Direct X and VC Redist are provided with the game inside the game installation folder. It is possible that the version of Direct X or VC Redist that you installed might be coinciding with the game and preventing it from launching.
Administrative Privileges: The game might require administrative privileges in order for some of its elements to function correctly. If the game has not been granted those privileges it can lead to many issues with its functionality.
Full-Screen Optimizations: In some cases, the full-screen optimization feature of the Windows that was introduced to run the game as a “borderless Window” and to smoothen the gameplay might be interfering with certain elements of the game thus preventing it from launching,
Compatibility: Another possible reason could be the game’s incompatibility with Windows 10. Many programs are not adjusted to the architecture of the Windows 10 properly and thus cause issues. But luckily Windows 10 includes a feature in which you can run any program in compatibility mode for the previous versions of Windows.
Now that you have a basic understanding of the nature of the problem we will move forward towards the solutions.
Solution 1: Running a Clean boot.
It is possible that a service running in the background might be causing the issue. Often, Windows services or even other third-party applications can prevent all the elements of the game from functioning correctly, therefore, causing the problem. In this step, we are going to be booting into Windows without any third party service or unnecessary Windows Services running. For that:
Log in to the computer as an administrator.
Click on the Windows Search bar, type in “msconfig” and press Enter
Click on “Services” and check the “Hide all Microsoft Services” box
Now click on “Disable All” in order to disable all the third party services from running in the background.
How to disable all services
Now right-click the “Task Bar” and select Task Manager
Click on the Startup tab and make sure that all the applications are disabled.
Disabling Startup Applications
Now Reboot your computer
Run the game and check to see if the error persists.
Solution 2: Verifying Game Files.
In some cases, certain game files can become corrupted or even go missing. All the game files are necessary in order for it to function and launch correctly therefore if even a single file is missing the game won’t launch correctly or cause issues in the game. In this step, we are going to be verifying the files of the game. For that:
Open the Originclient and signin to your account
Click on “Game Library” option on the left pane.
Opening “Games Library”
Inside the “Game Library” tab, right-click on “Apex Legends” and select “Repair Game”
Selecting “Repair Game”
The client will begin to verify the game files.
Once done, it will automatically download any missingfiles and replace the corruptedfiles if any.
Run the game and check to see if the problem persists.
Solution 3: Re-Installing the Direct X and VC Redist
The Direct X and VC Redist are provided with the game inside the game installation folder. It is possible that the version of Direct X or VC Redist that was installed might be coinciding with the game and preventing it from launching. Therefore, in this step, we are going to be installing the DirectX and VC Redist that is recommended. For That:
Navigate to the
C:\Program Files (x86)\Origin Games\Dragon Age Inquisition\__Installer\directx\redist
Run the “DXSetup.exe” and replace the previous versions.
Similarly, Navigate to
C:\Program Files (x86)\Origin Games\Dragon Age Inquisition\__Installer\vc
Run all the “VCRedist.exe” executables that are present inside the folder and replace the previous versions.
Now restart your computer and check to see if the problem persists.
Solution 4: Granting Administrative Privileges.
The game might require administrative privileges in order for some of its elements to function correctly. If the game has not been granted those privileges it can lead to many issues with its functionality. In this step, we are going to be granting the game administrative privileges. For that:
Open the gameinstallationfolder, and right–click on the game executable.
Select Properties and click on the Compatibility tab.
Inside the Compatibility tab check the “Run as Administrator” box.
Now run the game and check to see if the problem persists.
Running as administrator
Solution 5: Disabling Full-Screen Optimizations.
In some cases, the full-screen optimization feature of the Windows that was introduced to run the game as a “borderless Window” and to smoothen the gameplay might be interfering with certain elements of the game thus preventing it from launching. In this step we are going to be disabling the Full-screen optimizations for which:
Open the game installation folder.
Right–Click on the game executable
Select Properties and click on the Compatibility tab
Inside the Compatibility tab, check the “Disable Full Screen Optimizations” box.
Now apply your settings.
Run the game and check to see if the problem persists.
Disabling Fullscreen optimizations.
Solution 6: Troubleshooting Compatibility.
Some games don’t fully support the architecture of Windows 10 and therefore often run into issues while trying to launch or while playing. Therefore, in this step, we are going to be using the Windows troubleshooting tool to determine the best operating system version to run the game on. For that:
Open the game installation Folder
Right-Click on the game executable and select properties.
Click on the “Compatibility” tab and click on the “Run Compatibility Troubleshooter“.
Now Windows will automaticallydetermine the best operating system to run the game in compatibility mode for.
Click on “Try Recommended Settings” and select “Test“.
If the program runs fine, apply the settings and exit.
Run the game and check to see if the problem persists.
Running Compatibility troubleshooter
Fortnite is an online video game developed by Epic Games and released in 2017. Fortnite Battle Royale became a resounding success, drawing in more than 125 million players in less than a year and earning hundreds of millions of dollars per month, and since has become a phenomenon in the gaming scene. The game earned more than 2 billion dollars last year alone.
Fortnite Logo
However, quite recently a lot of reports have been coming in of the game not launching through the launcher neither through the direct executable, the game does not give any error message either. Therefore, in this article, we are going to tell you about some of the reasons due to which this error can be triggered and provide you with viable solutions in order to ensure complete eradication of the problem.
What Causes the Fortnite to not Launch?
There are a number of reasons which might be triggering the problem. Some of the most common ones are:
Missing Files: It is possible that some important files that are necessary for the game to function properly are missing. This problem can also arise due to the files being corrupt.
EasyAntiCheat: The EasyAntiCheat service is a program that is used by the developers to prohibit any sort of hack or mod to the game. If that service does not run properly the game does not launch.
Administrative Privileges: Another common cause of the problem can be due to the game not having enough privileges in order to run correctly. The game needs certain permissions in order to write/read files on the computer if those permissions are not granted you may experience problems with launching the game.
Now that you have a basic understanding of the nature of the problem we will move on towards the solutions.
Solution 1: Providing Administrative Privileges
As explained before if the game lacks these privileges some components of the game have a problem working efficiently so in this step we will make sure that the game has every privilege that it needs in order to work correctly for this
Open the folder in which you downloaded Fortnite
Navigate to
FortniteGame\Binaries\Win64
Right-Click on FortniteClient-Win64-Shipping and select Properties Right-Clicking on the game icon and then clicking on properties
Now click on Compatibility and make sure that the Run as Administrator box is checked. Selecting Compatibility and giving the game administrative privileges
Now apply and click OK
Repeat this process for FortniteClient-Win64-Shipping-BE, FortniteClient-Win64-Shipping-EAC, and FortniteLauncher.
This process should solve any problem due to insufficient permissions if it does not move on to the next step.
Solution 2: Verifying Anti-Cheat Driver.
The “sfc /scannow” command will scan all protected system files, and replace corrupted files with a cached copy that is located in a compressed folder at %WinDir%\System32\dllcache. This will delete any miss-spelled anti-cheat file and replace it with the one that was the last working correctly. For this process
Click on the search bar in the bottom left-hand corner and search for “Command Prompt” Command Prompt Windows 10
Now Right-Click on the Command Prompt icon and click on the “Run as administrator” option.
Now in the Command Prompt type “sfc/scannow” and press Enter Typing sfc/scannow in the command prompt
Now, wait for a few minutes as this process takes some time to complete.
Close the command prompt and restart your computer
Now try to run Fortnite and see if your issue is resolved.
Solution 3: Repair the EasyAntiCheat Service
This is the Anti-Cheat service used by the game to recognize cheaters and hackers. It actively scans your setup for anything which could give you an unfair advantage over your opponents. However, sometimes this service gets broken and you might need to repair it yourself.
You can search for the game’s main executable by clicking the Start menu button or the search button next to it and typing “Fortnite”
Right-click on the executable and choose the “Open file location” option from the context menu which will appear.
The default folder for the installation is “C >> Program Files >> Epic Games >> Fortnite” but it depends on your computer’s architecture as well. You can also search for Fortnite after clicking the “Start menu” or the search button, right-click the first entry, and choose Open File Location.
Navigating to the folder
Once you are inside the Fortnite folder, navigate to “FortniteGame >> Binaries >> Win64 (or Win32 depending on your OS) >> EasyAntiCheat“. Inside you should see the “EasyAntiCheat_Setup.exe file“.
Right-click the “EasyAntiCheat_setup.exe” file in the folder and choose the “Run as administrator” option from the context menu which will appear.
Confirm any UAC prompts that the file wants to make changes to your computer and wait for its window to open.
Inside the window, Select “Fortnite” from the list of available games and select “Repair Service“
EasyAntiCheat Repaid Service
The “Installed Successfully” message should appear shortly afterward.
Installed Successfully message appears
Try to Launch your game and check to see if the error persists.
Solution 4: Verifying Game Files
In this step, we will verify the game files through The Epic Games Launcher and if a certain file is missing or is renamed it will automatically be downloaded and added to the installation directory of your game. In order to do this
Open the Epic Game Launcher
Click on Library and click on the gear icon by the Fortnite launch button Clicking on the gear icon by the launch button
Now click on Verify and wait for the launcher to verify all the game files. Clicking on the Verify button in the game options
This process will clear any issue related to a missing game file, if this issue does not solve your problem then the last thing that you can try is to reinstall the game and the Epic games launcher.