Quantcast
Channel: Kevin Arrows | Network Engineer | Appuals.com
Viewing all 4499 articles
Browse latest View live

Fix: The Time Limit for Logging on was Reached in Outlook

$
0
0

The time limit for logging on was reached in Outlook error occurs because of Outlook running in compatibility mode, connection issues in cached mode, corrupted/conflicting temp folder contents, wrongly configured proxy settings, conflicting ISPs’ restrictions, wrongly configured network settings, conflict with 2-factor verification, and other internal Outlook related problems.
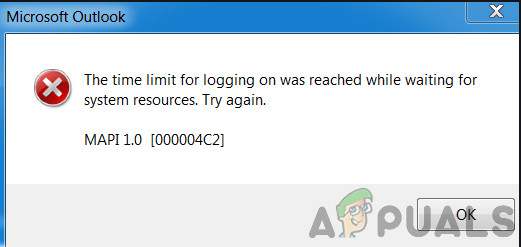
Time Limit for Logging on Was Reached Outlook

This is a very frequent issue which users face in both cases; when they are logged in Outlook and when they trying to login using their credentials. Here in this article, we will discuss all the different causes and then go through the solutions on how to fix the problem.

What causes the Time Limit for Logging on Was Reached Outlook Error?

  • Outlook running in Compatibility Mode: Compatibility mode is used to run applications that cannot be run in the current OS. If your Outlook version is running in compatibility mode then it can cause the error message.
  • Cached Mode: In cached connection mode, Outlook keeps an offline copy of the user’s exchange data. If Outlook is using cached connection mode to the Microsoft Exchange server and is having connection issues,  then it can prevent the user from logging into the system.
  • Corrupted/Conflicting Temp Folder Contents: Like any other Windows application, Outlook uses the Windows Temp folder to store its temporary files. If this folder has contents that are corrupt or conflict with Outlook, then it can be the reason why you are having problems logging in.
  • Wrongly Configure Proxy Settings: Proxy settings are used to allow client computers to use indirect network connections to other network services. If your system is using a proxy to connect to the network which is not configured properly, then it can force the current Outlook error.
  • Network Restrictions: ISPs deploy different techniques to keep things under check and control but these restrictions can sometimes restrict access to your Outlook account.
  • Wrongly Configured Network Settings: Outlook works best with the default TCP/IP settings of the network. If your network settings are not configured properly or are different than the default settings, then Outlook may show the current error.
  • Multi-Factor Authentication: Multi-Factor Authentication is an added layer of security for your Microsoft Account. Sometimes this 2-factor authentication conflicts with communications of Outlook and can cause issues while accessing your account.
  • Anti-Virus False Positive: Outlook has a known history of conflicts with Anti-virus applications like Kaspersky which mark Outlook as a false positive and restrict its access to resources and system modules.
  • Corrupted MAPI32.dll File: Mapi32.dll enables Windows to perform various email functions and launch messaging programs like Microsoft Outlook. If MAPI32.dll file is corrupt, it can have adverse affects in Outlook.
  • Corrupted Outlook Navigation Pane Settings File: Outlook holds user shortcut customization in the Navigation Pane settings file. If there is some bug or issue with this pane and Outlook cannot handle it properly, you will recieve the error message under discussion.
  • Corrupted Non-Exchange Data Files: Outlook uses different files to hold different types of data for email accounts like calendars etc. These are called ‘non-exhange’ data files. Even though these have no link with the account module in Outlook, they may sometimes cause the user issues when logging in.
  • Conflicting Applications: If there are applications present on your system that conflict with Outlook’s legitimate operation, then they can conflict with Outlook and cause the error message.
  • Corrupted/Conflicting Outlook Add-ins: Outlook add-ins improve Outlook’s functionality a lot but if any of these add-ins have corrupt or are conflicting with operations of Outlook, then Outlook can have issues when the user logs in.
  • Corrupted PST File: Outlook’s PST file is the backbone of its communications and if this file has corrupted then it can cause many issues for the Outlook including the current one.
  • Corrupted Outlook Profile: If the user’s Outlook profile is corrupt, then this corruption can lead to the current Outlook issue.
  • Corrupted Windows Local User Profile: Corrupt user profiles are also known to cause issues when logging into Outlook.

Things to Consider Before Trying the Solutions:

Before trying any of the solutions,

  1. Make sure that the user has local administrator access to his computer.
  2. Create a system restore point before trying any solution.
  3. Run SFC command to rule out any corruption of system files.
  4. Update Windows to its latest build.
  5. Update device drivers especially video drivers
  6. Remove any external monitors.
  7. Make sure that your system’s Date and Time are accurate.
  8. Make sure that you are using DHCP IP Configuration
  9. Log out the user from all email interfaces (Outlook, SWA, IMAP, POP3, SMTP, OWA, etc) and then log back in.
  10. Make sure that you are using the updated version of Dotnet Framework
  11. If you are using a 64-bit version of Windows, make sure that the MAPI version in the following folders is same
    c:\windows\system32

    and

    c:\windows\sysWow64

    and if not then delete the MAPI files as mentioned in Solution 9 of fix MAPI and use Solution 16 to repair office.

  12. Make sure there is no other Microsoft applications like Skype For Business is having sign-in problem or is stuck in operation.

How to Fix the Time Limit for Logging on Was Reached?

1. Launching Outlook in Normal Mode (Non-Compatibility Mode)

Applications are used in compatibility mode when these applications are not compatible with the current OS. If Outlook is launched in compatibility mode then you can suffer from the time limit error in Outlook (even though these two mechanisms have no direct link). Launching Outlook in normal mode (non- compatibility mode) may solve the problem.

  1. Exit Outlook.
  2. On your Desktop, right-click an Outlook icon and select Properties.
  3. Click on the Compatibility tab.
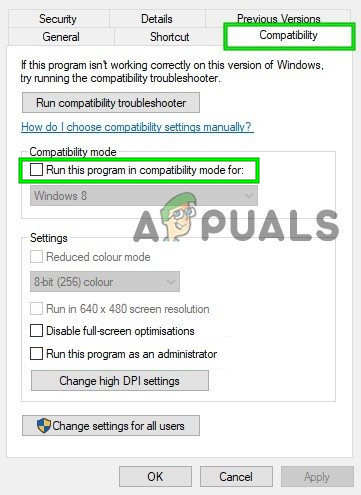
  4. Find the Option Run this program in compatibility mode and uncheck it if selected.
    Uncheck Run this Program in Compatibility Mode
  5. Click Apply and then OK.
  6. Open Outlook and check if it is operating normally.

2. Use Online Mode of Outlook

Outlook uses either Online Mode or Cached Mode to connect with a Microsoft Exchange Server. In the cached mode, Outlook keeps a local copy of the user’s data. So, if Outlook is having connection problems in the cached mode then it can cause timeout problems in the application. In that case, changing the connection mode from Cached to Online may solve the problem.

  1. Open Outlook and then click on the File tab.
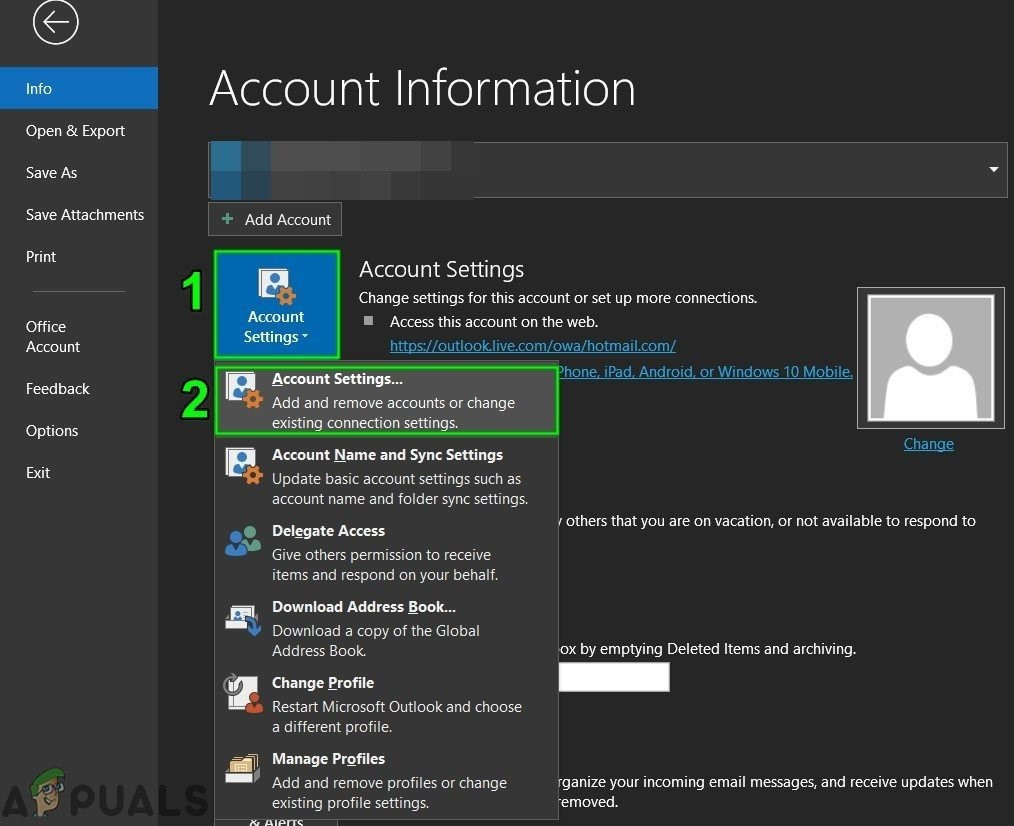
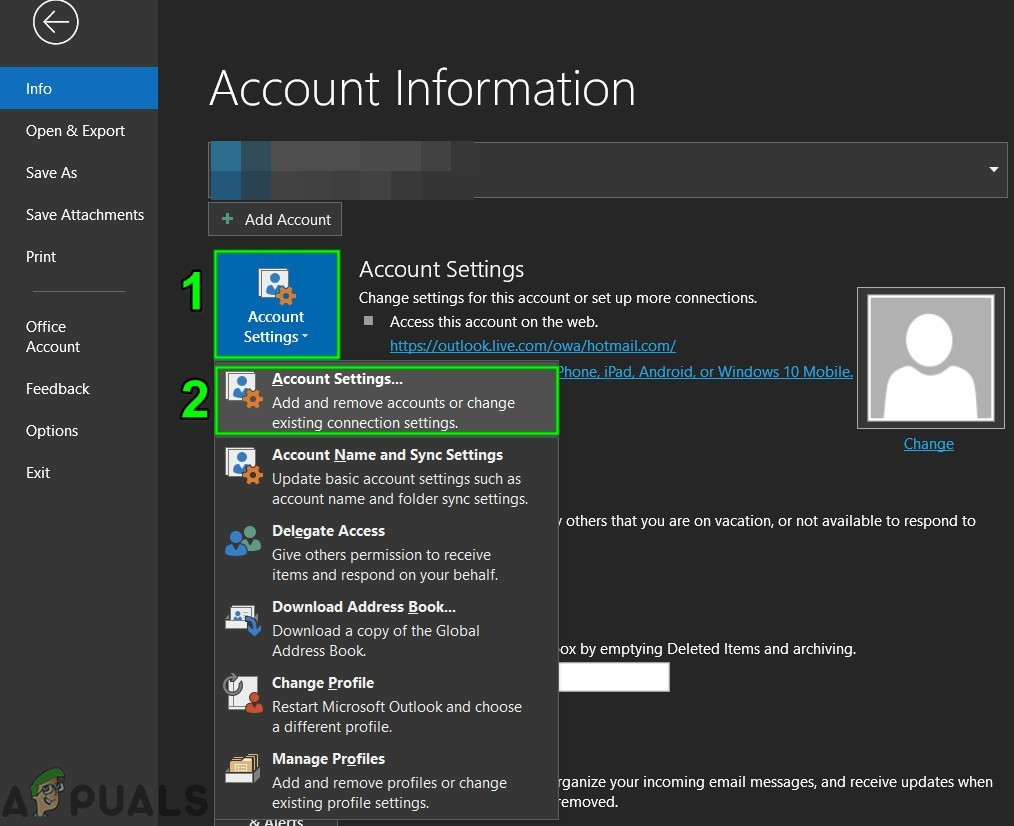
  2. Now in the right pane of the window, click on the Account Settings and in the drop-down list, click on Account Settings.
    open Account Settings of Outlook
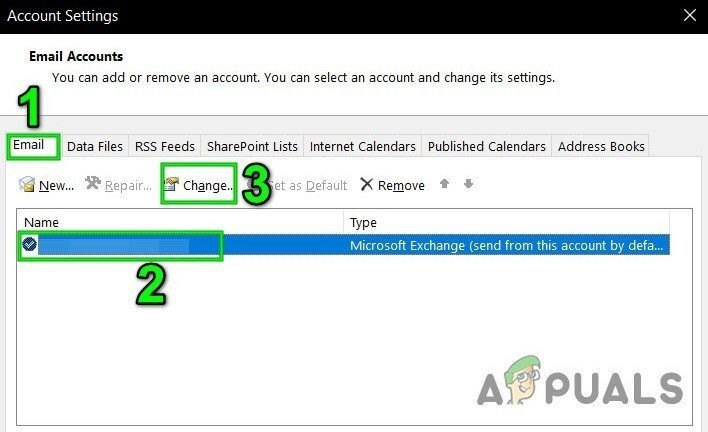
  3. Now in the Email tab of Account Settings, select the user account and then click on Change.
    Change Email Account Settings
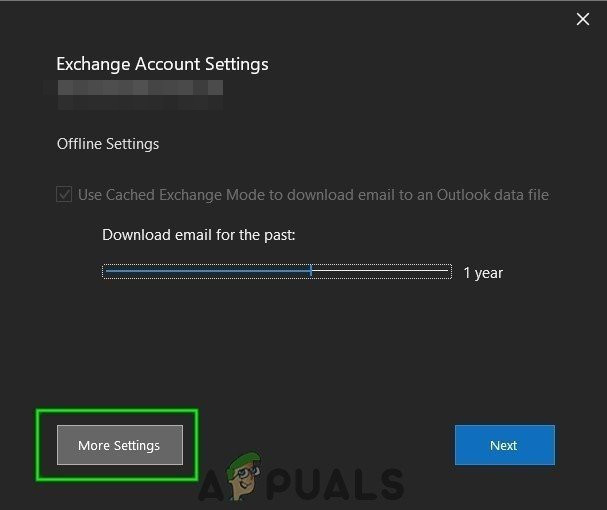
  4. Now click on More Settings.
    Open More Settings of Outlook
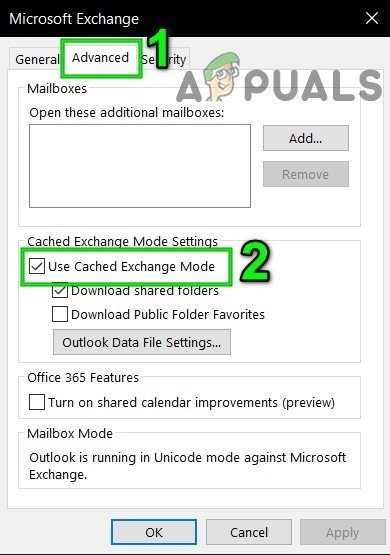
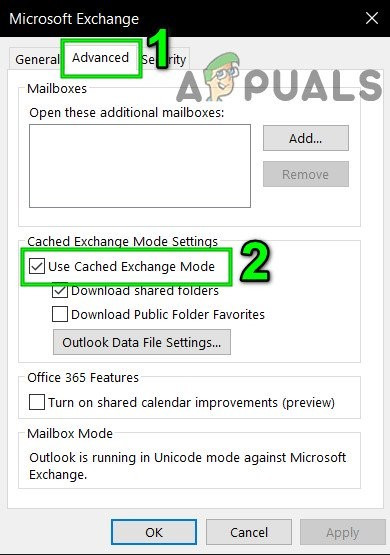
  5. Now in the Microsoft Exchange setting window, go to the Advanced tab and then Uncheck the checkbox of “Use Cached Exchange Mode”.
    Uncheck Use Cached Exchange Mode
  6. Click Apply and then click Ok.
  7. Now restart Outlook and check if it is functioning without any issue.

3. Delete Temp Windows Folder Contents

Temp files are stored in the Temp Windows folder and are used by Windows applications. Outlook also uses a temp Windows folder. If there are conflicting or corrupted files in the Windows Temp folder then it can cause the  timeout error under discussion. In that case, deleting the contents of the Windows Temp folder may solve the problem.

  1. Exit Outlook.
  2. Press Windows+E to open File Explorer.
  3. Navigate to the following path
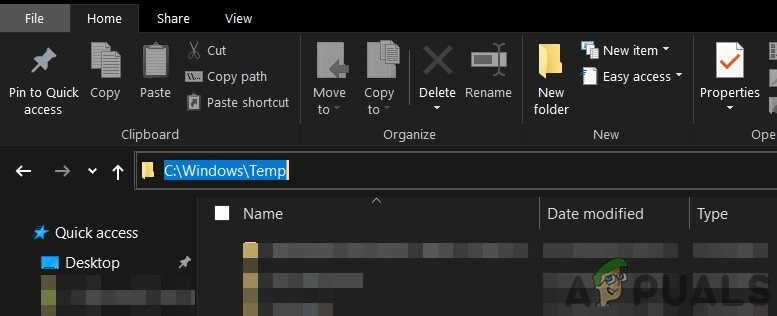
    c:\windows\temp
    Open Windows Temp Folder
  4. Press Ctrl+A to select all the items of the folder and press Shift+Delete to delete all the items (do not worry! You will not be able to delete some of the items, ignore them).
  5. Restart the system and then launch Outlook and check if it is operating fine.

4. Turn Off Proxy

If you are using Proxy on your system to connect to the server, then the wrong configuration of proxy can cause  connection issues which can in turn cause timeout problems with Outlook. In that case, turning off the proxy may solve the problem.

  1. Exit Outlook.
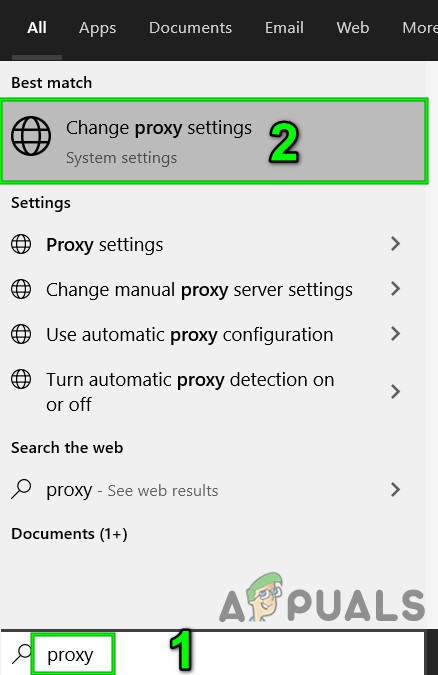
  2. Press Windows key and type “proxy” and in the resulting list click on “Change Proxy Settings”.
    Open Change Proxy Settings
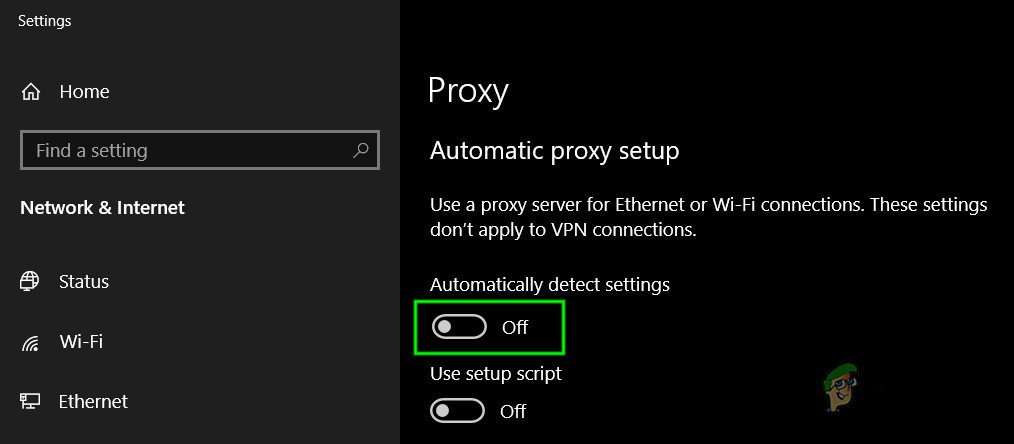
  3. In the proxy settings, toggle the “Automatically detect settings” to off.
    Turn Off Automatically Detect Settings of Proxy
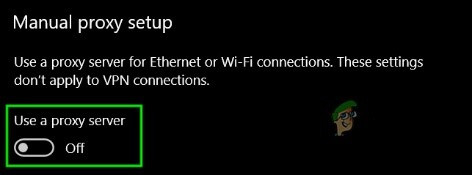
  4. Now in the Manual Proxy section, toggle the switch “Use a proxy server” to off.
    Turn Off Use a Proxy Server in Manual Proxy Setup
  5. If you are using proxy settings just in your browser, even turn that off.
  6. Now restart the system and launch Outlook and check if it has started to function normally.

5. Switch to Another Network

ISPs deploy different protocols and technologies to keep things under control and check, and this deployment may sometimes restrict the access of Outlook to connect to its servers. Using another Network may solve the problem.

  1. Connect to another network. You can use your mobile hotspot. You may use a VPN.
  2. Now launch Outlook and check if it has started to function normally.

6. Reset Network Settings (Reset Winsock)

Outlook works best with the default TCP/IP settings of your network. So, if the settings of your system are different than the default settings, Outlook may show the time limit for logging on was reached error. In that case, resetting Winsock to default which will reset TCP/IP settings to their default may solve the problem.

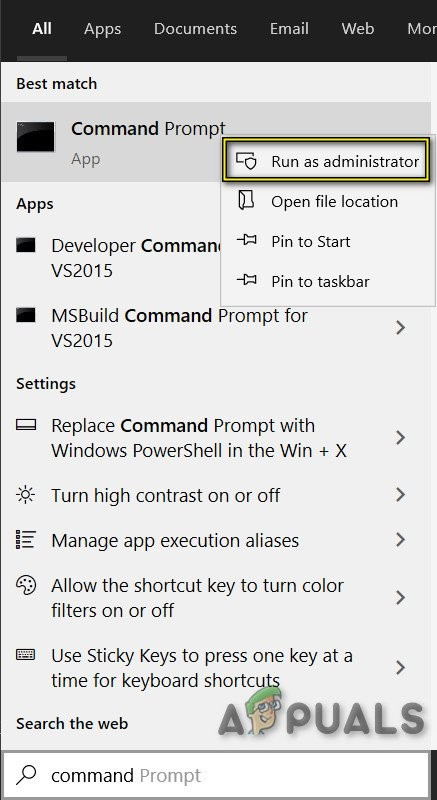
  1. Press the Windows key and type “command prompt” and in the resulting list Right-click on the “command prompt” and click on “Run as Administrator”.
    Open Command Prompt as Administrator
  2. Enter the following command in the elevated command prompt:
netsh winsock reset

and press Enter

Run Winsock Command

3. After Winsock is reset, Restart the system.
4. Launch Outlook and check if it has started to function properly.

7. Turn Microsoft Multi-factor Authentication Off

Two Factor Authentication is a great layer of security for your Microsoft Account. But sometimes this added layer of security creates issues with Outlook. In that case, temporarily disabling Multi-factor authentication may solve the problem.

  1. Exit Outlook.
  2. Open your web browser and then visit the Security section of your Microsoft Account.
  3. Under Two-step verification, click on Manage.
    Manage 2 Step Verification of Microsoft Account
  4. Click Turn off two-step verification.
    Turn Off Two-Step Verification of Microsoft Account
  5. Now close the browser.
  6. Launch Outlook and check if it has started to function properly.

8. Tweaks with the Antivirus Application

Anti-virus applications are known to have issues with Microsoft Outlook by detecting it or any of its add-ins as a malware (false positive). In that case, disabling anti-virus temporarily may solve the problem.

Warning: Use this solution at your own risk as changing your antivirus settings makes your system more vulnerable to fraudulent, viral or malicious attacks. This step is not recommended by us.

  1. Turn off your Anti-virus.
  2. Launch Microsoft Outlook and check if it has started to work properly.
  3. If it is working fine then you have to create an exception for the Outlook or otherwise replace your antivirus with a non-conflicting antivirus application.
  4. Moreover, excluding the local user’s temp directory from the antivirus client can also solve the problem. The temp directory is usually located at :
    C:\Windows\Temp

9. Delete and Fix the MAPI32.dll File

Mapi32.dll is a Windows Messaging (API) which Windows uses to perform many email-based functions & launch messaging programs like Microsoft Outlook. If the MAPI32.dll file is corrupt or has compatibility issues, then it may cause the current Outlook error message. In that case, using the Built-in Windows utility FixMAPI.exe may solve the problem.

  1. Exit Outlook.
  2. Press Windows+E to open File Explorer.
  3. In File Explorer, navigate to
    C:\Windows\System32\
  4. Find MAPI32.dll and Right-click on it and click on Rename.
    Rename MAPI32
  5. Now Enter the name MAPI32.old.
  6. Now restart your system and launch Outlook.
  7. Check if Outlook has started to operate normally.
  8. If not, then exit Outlook.
  9. Press Windows+E to open File Explorer.
  10. In File Explorer, navigate to
    C:\Windows\System32\
  11. Now locate FixMAPI.exe and right-click on it and then click on Run as Administrator.
    Run FixMAPI as Administrator
  12. Click yes if UAC prompts.
  13. Now restart the system and launch Outlook and check if it has started to function normally.

10. Reset the Outlook Navigation Pane

The Navigation Pane in Outlook lets you access various helpful shortcut icons for easy access to the emails, calendar, tasks, etc. And if the Navigation Pane settings file is corrupt, it can cause problems with the launching of account module in Outlook. In that case, we can use Outlook’s built-in command to remove the customization of the Navigation Pane and see if this solves the problem.

  1. Exit Outlook.
  2. Press Windows key and then type Run and in the resulting list click on Run.
    Open Run Command
  3. Now in the run box, type
    Outlook.exe /resetnavpane
    

    and press enter.

    Run Reset Outlook Navigation Pane
  4. Launch Outlook and check if Outlook has started to function properly.
  5. If not, then Exit the Outlook.
  6. Navigate to  the following location as per your Windows version
    • Windows 10
    C:\Users\%USERNAME%\AppData\Roaming\Microsoft\Outlook\
    • Older versions of Windows
    drive:\Documents and Settings\user\Application Data\Microsoft\Outlook\
  7. In the folder find file Outlook.xml and press Shift+Delete to delete the file.
    Delete Outlook XML File
  8. Launch Outlook and check if it has started to operate normally.

11. Remove Non-Exchange Data Files

Outlook uses different data files for different user accounts. It also uses different files for SharePoint Lists, Internet Calendars, Published Calendars and Address Books. There is a known bug where if these files are corrupt, Outlook may start throwing the time out error message. In that case, just keeping the Exchange Account and removing all others may solve the problem.

  1. Exit Outlook.
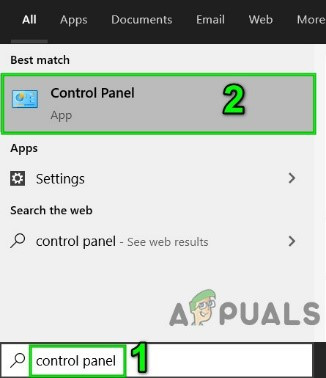
  2. Press Windows key and type Control Panel and in the results click on Control Panel.
    Open Control Panel
  3. Now near the top right of the control panel windows, change View by from Category to Large Icons.
    Change View of Control Panel From Category to Large Icons
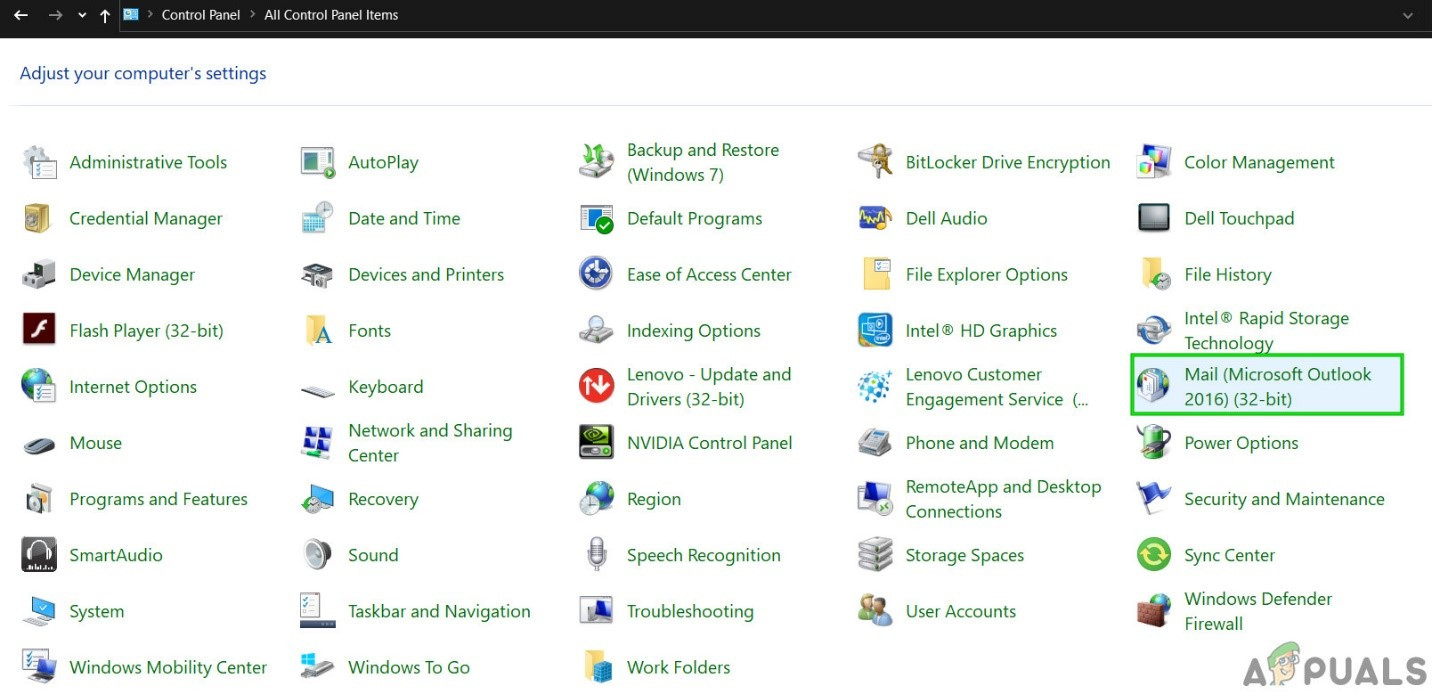
  4. Now click on Mail.
    Open Mail from Control Panel
  5. In the Mail window, click on E-Mail accounts.
    Open Email Accounts from Mail Setup
  6. Now click on Data Files and select all other files one by one except your Exchange Account file and then click on Remove to remove these files one by one.
  7. Now repeat the same process on the tabs of RSS Feeds, SharePoint Lists, Internet Calendars, Published Calendars and Address Books.
    Remove Non-Exchange Items From Tabs of Account Settings
  8. Restart the system.
  9. Launch Outlook and check if Outlook has started to function normally.

12. Clean Boot Windows or Use Windows Safe Mode with Networking

The timeout error in Outlook can also be caused due to conflicting applications like Skype For Business etc. To check this you can either clean boot Windows or use Windows Safe Mode, which can solve the problem.

  1. Clean Boot Windows or Boot Windows in Safe Mode with Networking.
  2. Launch Outlook and check if it has started to function properly, and if so, then try to identify the problematic application and sort out the issue between that application and Outlook.

To find the problematic applications keep in mind the following steps.

  1. Boot Windows in normal mode.
  2. Press Windows and type Task Manager and in the resulting list, click on Task Manager.
    Open Task Manager
  3. Now find if there is more than one Outlook process then right click on that process and click on “End Process”.
  4. Also, look for Skype For Business or Lync running. If they are running then right-click on each one of them and click on “End Process”.
  5. Moreover, look for UCMapi.exe and if it is running then also end process it.

13. Open Outlook in Safe Mode and Disable Outlook Add-ins

Add-ins help you to get things done right from your inbox. But sometimes these Add-ins start to conflict with the legitimate operation of Outlook. Salesforce (Standard Salesforce plug-in is discontinued for new users in the winter of 2019, therefore, ensure that you have succeeding tools installed), Skype For Business and iTunes add-ins are known to create the current issue for Outlook. Outlook has a built-in Safe Mode, in which Outlook Runs without these add-ins. Running Outlook in Safe Mode may solve the problem.

  1. Exit Outlook.
  2. Press Windows+R buttons simultaneously to open Run command.
  3. Type Outlook.exe /safe (There is a space after Outlook and the /) and then click OK.

If Windows can’t find Outlook.exe /safe, try using the full path to Outlook.exe.

Now check if Outlook is operating fine. If it is working fine then disable Outlook Add-ins one by one by using the following steps

  1. Open Outlook in normal mode and then click on the File tab and in the left pane of the window click on Options.
    Open Outlook Options
  2. Now click on Add-Ins.
    Open Add-ins in Outlook Options
  3. Locate the “Manage” dropdown list and select which type of add-ins you would like to enable/disable e.g. COM Add-ins and then click on “Go”.
    Manage Com Add-ins
  4. Now uncheck all the Add-in and restart the Outlook and check if outlook has started to work normally. If so, then enable add-ins one by one to find out the problematic one and then keep it disabled. Now search for an updated version of that problematic add-in and install that updated version to see if it solves the problem.

14. Repair the PST File

When you perform Send/Receive operation in Outlook, then Outlook uses the user’s folders to fetch out the required data. A PST file is used for this purpose but if the PST file is corrupt, then this corruption can cause the timeout error message. SCANPST.EXE is a built-in utility by Microsoft to fix the corruption of PST and using this utility to repair the PST file may solve the problem.

  1. Exit Outlook.
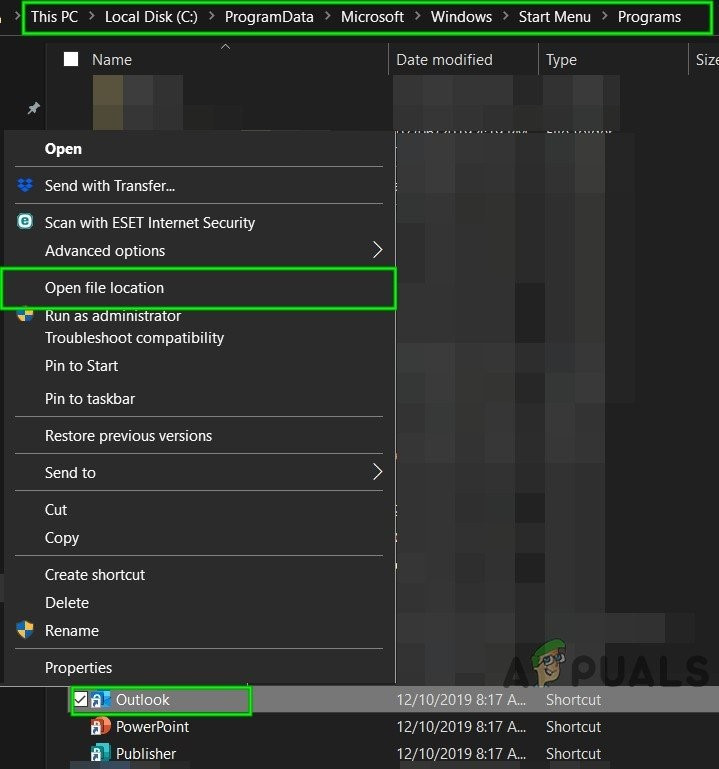
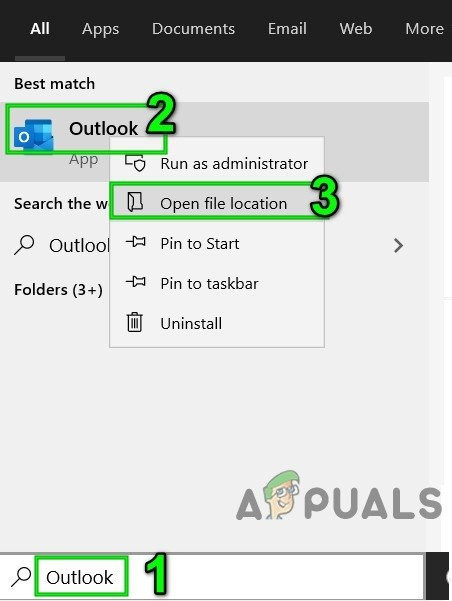
  2. Click on the Windows button and then in the search box type Outlook and in the resulting list, Right-click on Outlook and then click on “Open File Location”.
    Open File Location of Outlook from Windows Start Menu
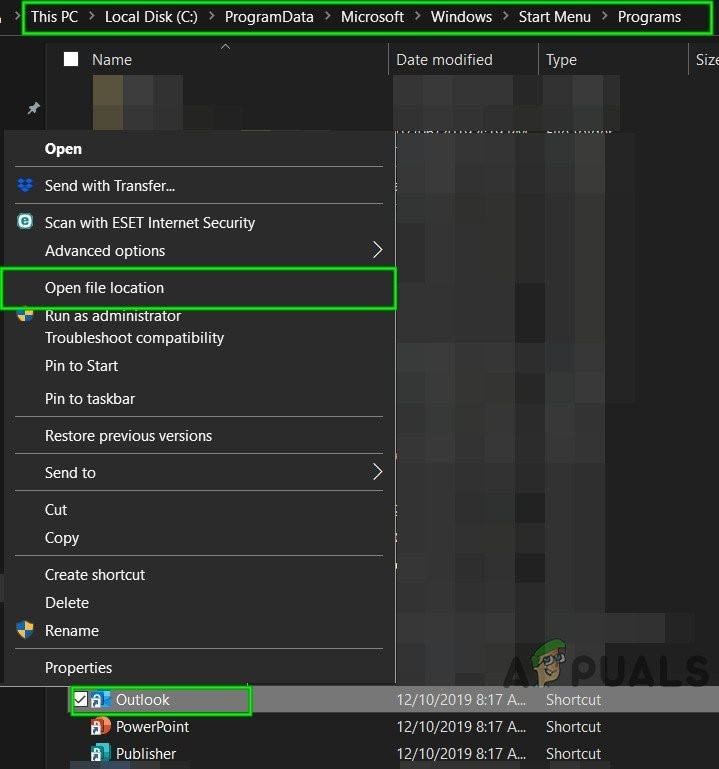
  3. You will be directed to the following folder of shortcuts of startup programs.
    C:\ProgramData\Microsoft\Windows\Start Menu\Programs

    In the folder, Right-click on the shortcut icon of Outlook and then again click on the “Open File Location”.

    Open File Location From Programs Shortcut Folder
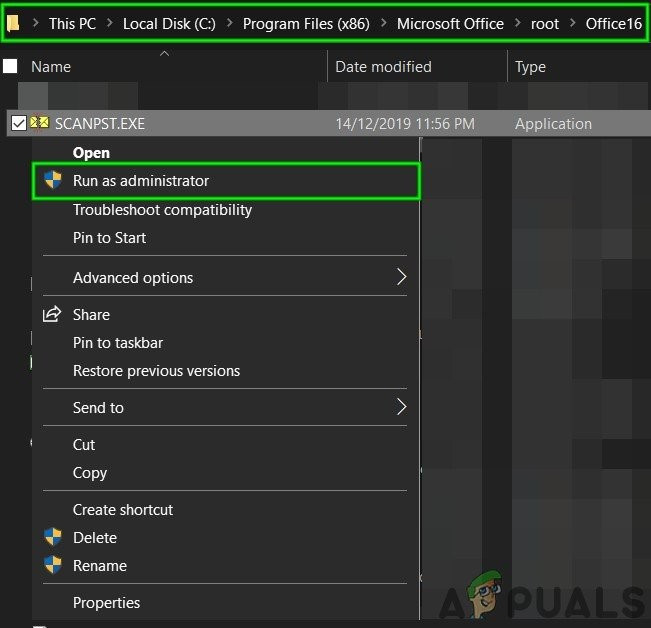
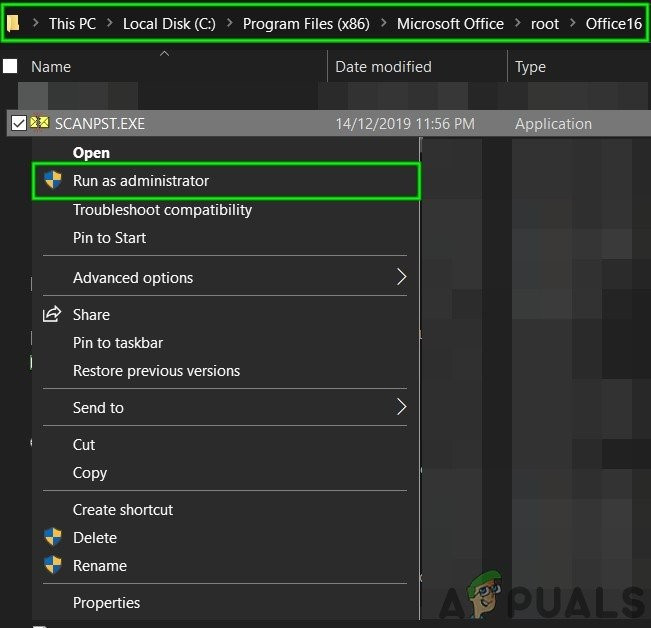
  4. You will be directed to the following Office folder.
    C:\Program Files (x86)\Microsoft Office\root\Office16

    Now in this Office folder, find and right-click the SCANPST.EXE and then click on “Run as Administrator”.

    Run ScanPST as Administrator
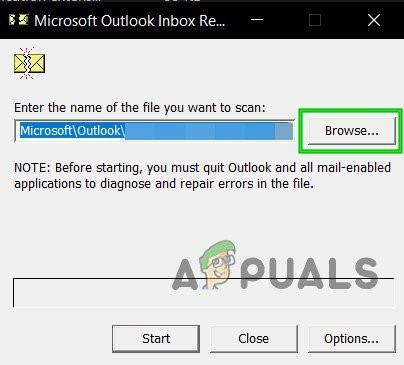
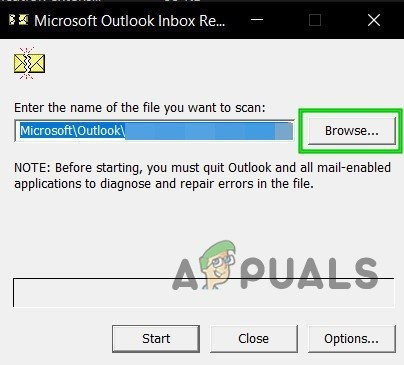
  5. Now in the Microsoft Outlook Inbox Repair windows click on the Browse button.T hen select the PST file to be repaired. (Location of the PST file is explained at the end of solution’s steps).
    Browse to Corrupted PST File
  6. Then click on the Start button to start scanning the PST file.
  7. After completion of the scan, check the option Make a backup of scanned file before repairing.
  8. Then click Repair. A Repair complete message will be displayed if the repairing was successful. If the Inbox Repair Tool was unable to repair the file, you will need to use the backup of your file.
  9. After the repair is complete, Launch Outlook and check if Outlook has started to operate without any issue.

The location of the PST file varies for different users depending upon different factors like Outlook version, Windows version, and how the user’s account is configured. Following locations are the default locations of the PST file for the Windows version:

  • Windows 10
drive:\Users\<username>\AppData\Local\Microsoft\Outlook
drive:\Users\<username>\Roaming\Local\Microsoft\Outlook
  • Older Windows Version
drive:\Documents and Settings\<username>\Local Settings\Application Data\Microsoft\Outlook

15. Delete the Old Outlook Profile and Create a New Outlook Profile

‘The time limit for logging on was reached Outlook’ error could occur due to the wrong configuration of a user profile or a corrupted user profile. In that case, deleting the current user profile and creating a new one may solve the problem. Keep in mind that this step completely deletes your Outlook profile, and you have to create a new one and reconfigure your connection.

  1. Exit Outlook.
  2. Press the Windows key and type Control Panel, in the resulting list click on Control Panel.
    Open Control Panel
  3. Near the top right corner, change View by from Category to Large.
    Change View of Control Panel From Category to Large Icons
  4. Now click on Mail.
    Open Mail From Control Panel
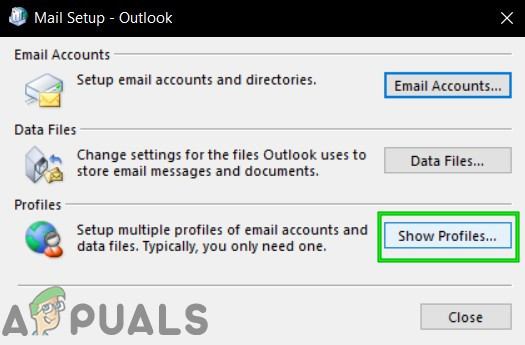
  5. Then in the Mail Setup, click on Show Profiles.
    Show Profiles in Mail Setup
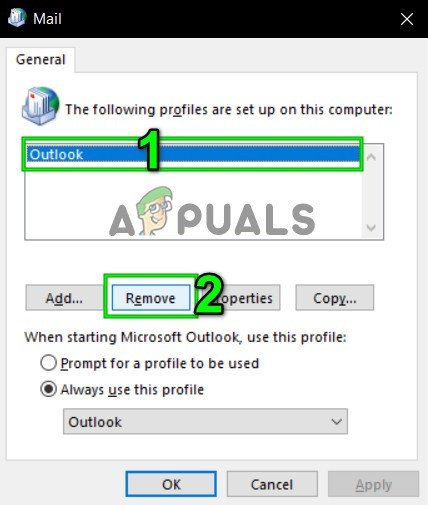
  6. Now select the current Outlook profile and then click on Remove to delete the current profile.
    Remove Outlook Profile
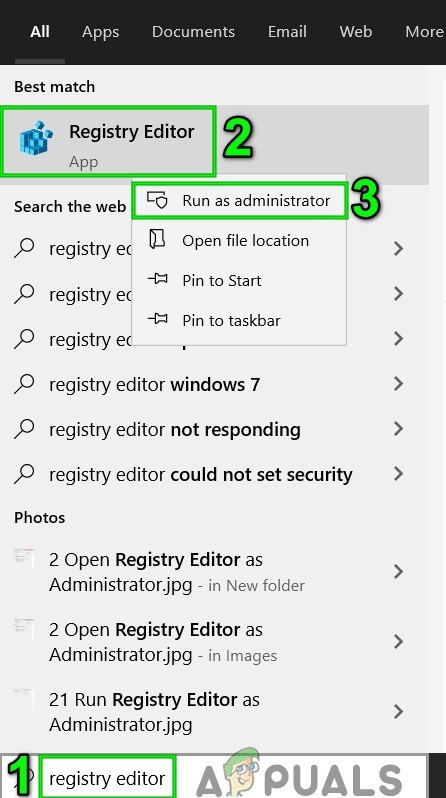
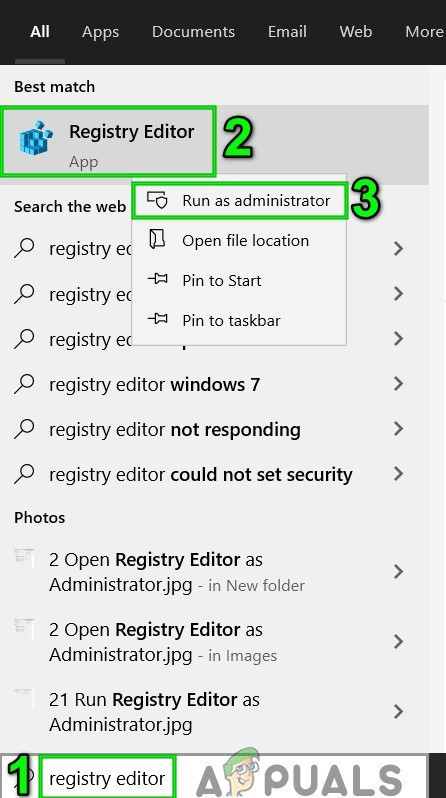
  7. Now click on the Windows button and type “Registry Editor” and in the results, right-click on Registry Editor and then click on “Run as Administrator”.
    Open Registry Editor as Administrator
  8. In the registry editor, navigate to the following registry key which depends upon your version of Outlook
    • Outlook 2019, 2016 & 365:
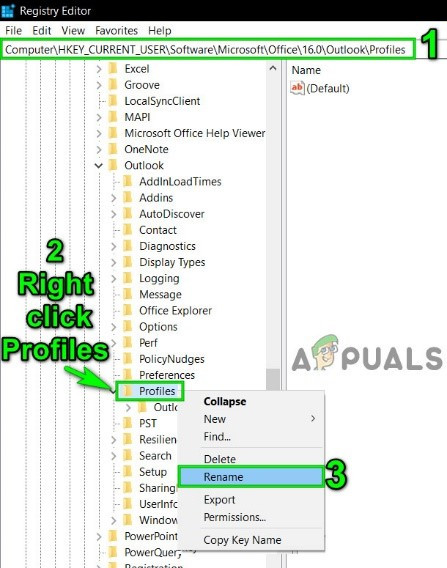
    HKEY_CURRENT_USER\Software\Microsoft\Office\16.0\Outlook\Profiles
    • Outlook 2013:
    HKEY_CURRENT_USER\Software\Microsoft\Office\15.0\Outlook\Profiles
    • Outlook 2010 and older:
    HKEY_CURRENT_USER\Software\Microsoft\Windows NT\CurrentVersion\Windows Messaging Subsystem
    1. In the Registry Editor, right-click on Profiles and then click Rename.
      Rename Outlook Profiles in Registry Editor
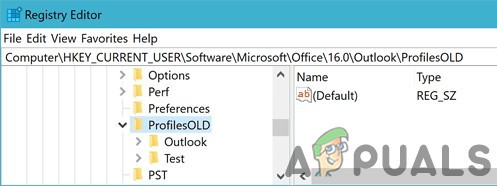
    2. Add Old at the end of Profiles to keep things in order i.e. PofilesOld.
      Profiles Renamed to ProfilesOLD
    3. Now close registry editor.
    4. Then add a new profile.
    5. Now repeat steps 1-5 to open Mail in Control Panel.
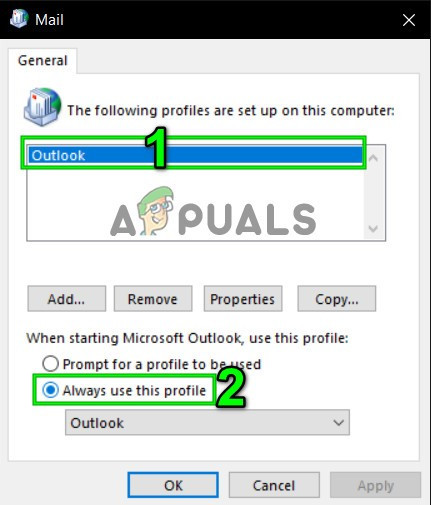
    6. Now in the Mail, select the newly created profile and select Always use this profile.
      Select Always Use this Profile in Mail
    7. Now click on Apply and then on OK.
    8. Relaunch Outlook and check if it has started to work normally. If so, then delete the renamed registry key.

    16. Repair Office/ Outlook

    If Microsoft Office/Outlook’s installation itself is corrupt, then it will cause numerous problems with the Outlook module. Using the Microsoft Office built-in repair tool will clear out any problems with the Office installation and thus may solve the problem.

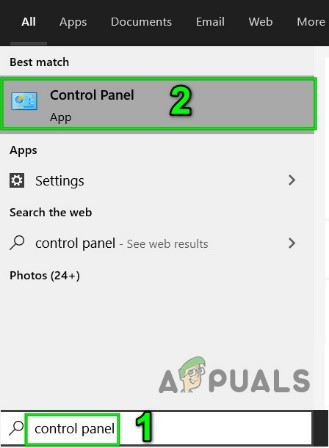
    1. Press the Windows key and then type Control Panel and in search results click on Control Panel.
      Open Control Panel
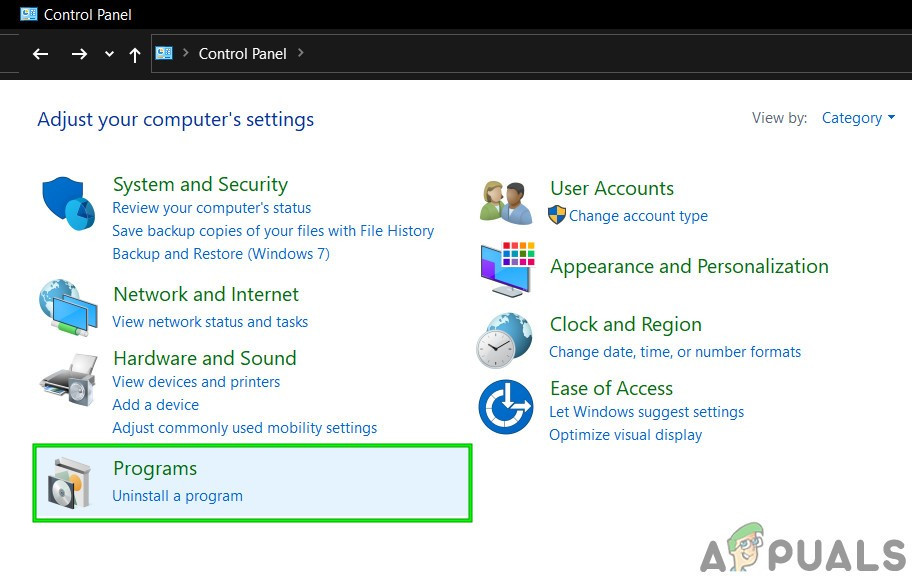
    2. Click Programs.
      Click on Programs in Control Panel
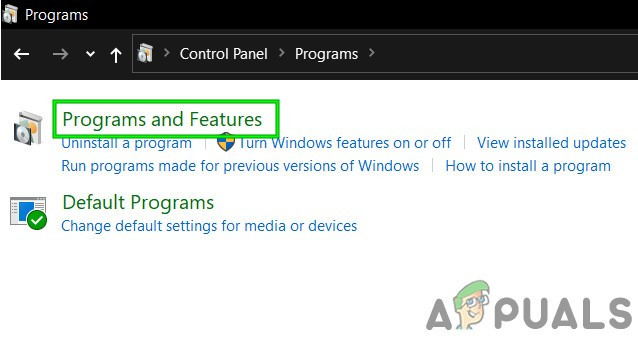
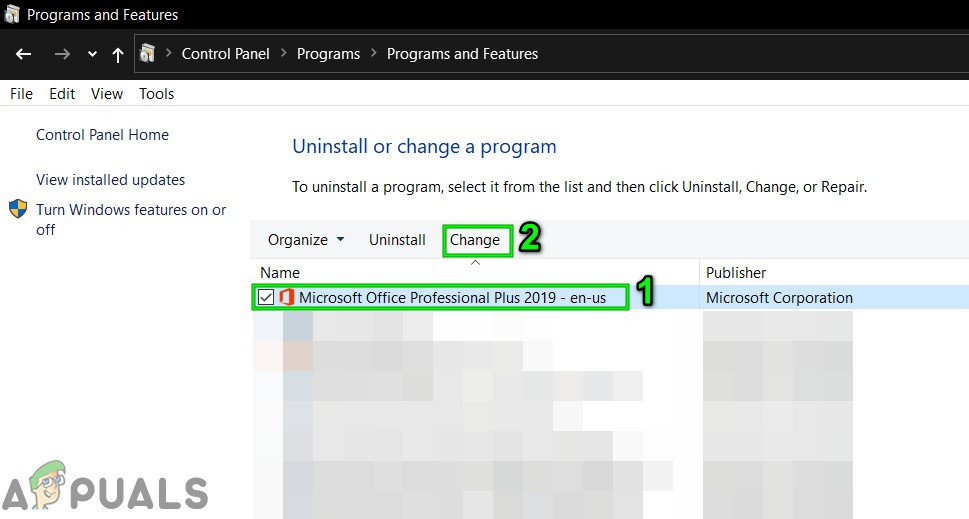
    3. Now click on Programs and Features.
      Open Programs and Features
    4. Click to select the Office suite installation that you want to repair, then click on Change.
      Change Office Installation
    5. If UAC prompts, click yes.
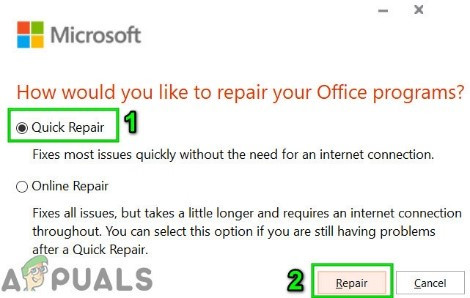
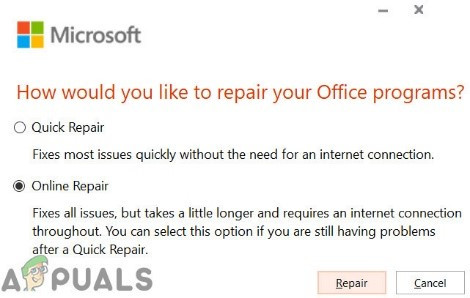
    6. Then select Quick Repair.
      Quick Repair of Office Installation
    7. Click Repair, and then click Continue.
    8. After completion of the repair process, restart your computer.
    9. Launch Outlook and check if Outlook is functioning normally.
    10. If not, then repeat step-1 to step-5.
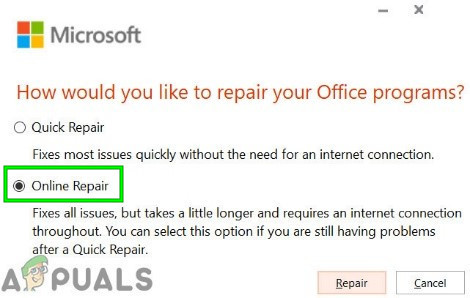
    11. This time select the option Online Repair.
      Online Repair Office Installation
    12. Now click Repair and afterwards click Continue.
    13. After completion of the repair process, restart your system and launch Outlook and check if Outlook is operating properly.

    Note: This will repair the whole Office suite even if you want to repair just Outlook. If you are using a standalone version of Outlook, then in the control panel search for Outlook by name and repair it by following the steps mentioned above.

    17. Perform a System Restore

    System Restore is a Windows utility used to restore Windows. This technique is quite useful in case the system gets infected, any system Windows files get corrupted or changes made to the system that affects system legitimate operation. If the time limit for logging error has started to occur recently, then using the System Restore to revert the system to point of time when Outlook was working fine may solve the problem.

    To restore the system, please follow the guidelines provided in our article How to Configure System Restore.

    After performing a system restore, check if the Outlook has started to work fine.

    18. Create the New Windows Local User Profile

    If the local user profile is corrupt, then it may cause numerous problems with alot of applications including Outlook (Outlook communicates directly with the Windows user profile). In that case, creating a new local user profile may solve the problem.

    1. Exit Outlook.
    2. Create a New Local User Profile.
    3. Now restart the system and log-in using the new local user profile.
    4. Launch Outlook and use the credentials that you were using before and check if Outlook has started to function properly.

    19. Run Microsoft Support and Recovery Assistant

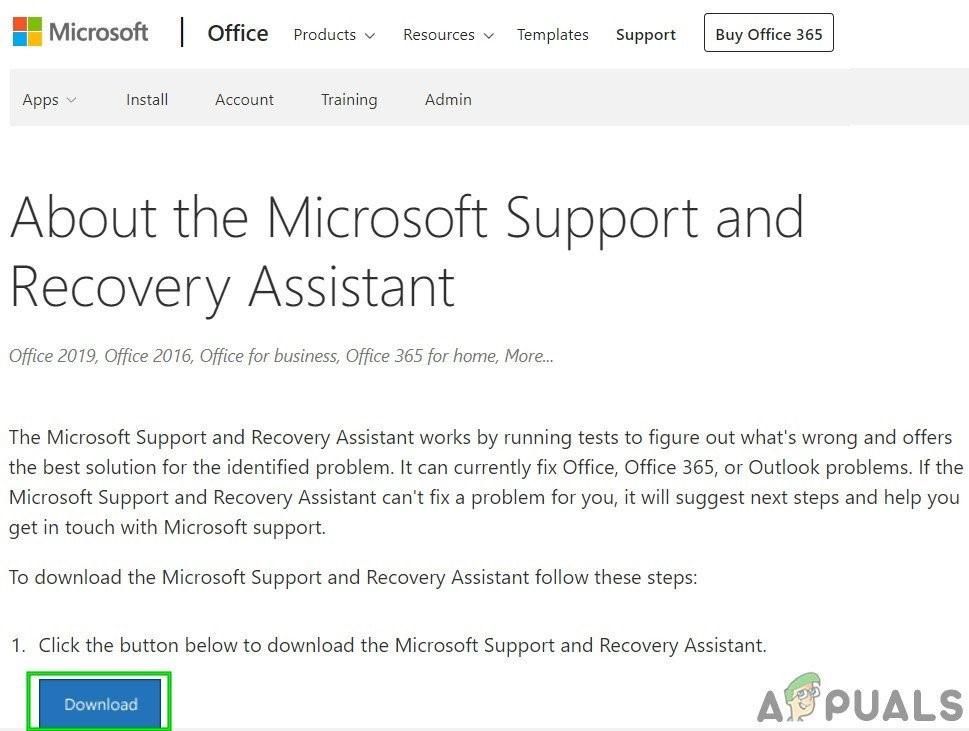
    The Microsoft Support and Recovery Assistant run tests to figure out what is problematic and offers the best possible solution for the identified problem. This tool can currently fix Outlook as well as Office/Office 365 issues. If the Microsoft Support and Recovery Assistant shortly SaRA cannot fix a problem then it will suggest the next steps in troubleshooting the problem. So, running the Microsoft Support and Recovery Assistant may solve the problem.

    1. Visit the official Microsoft Website and Download Microsoft Support and Recovery Assistant.
      Download Microsoft Support and Recovery Assitant
    2. Launch the downloaded SaRA file after completion of the download.
    3. After reading & understanding the Microsoft Services Agreement, click I Agree to agree.
    4. Choose the Outlook and then click Next.
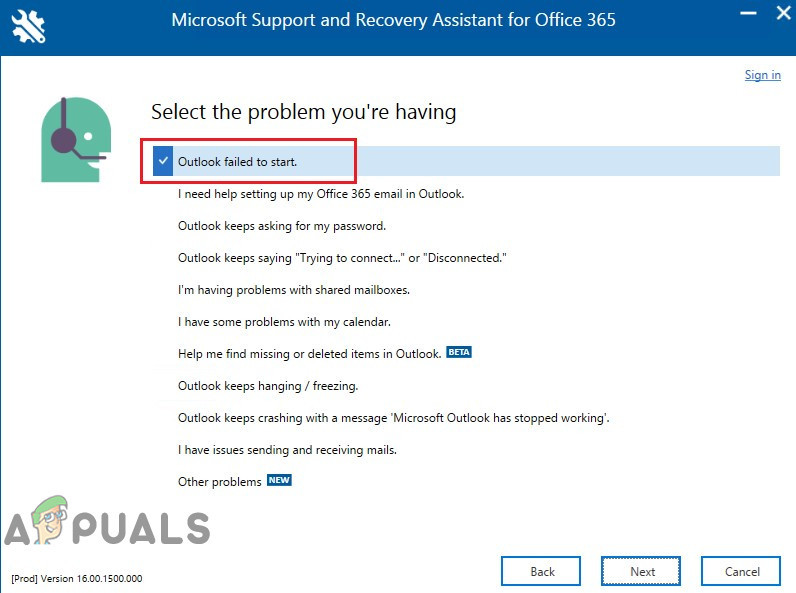
    5. Now select Outlook failed to start option and click Next.
      Select Outlook Failed to Start in SaRA
    6. Follow the directions displayed by the Microsoft Support and Recovery Assistant provides to solve the Outlook issue.

    Last Words:

    Hopefully, now you are enjoying Outlook without any problem. If you are still having a problem using Outlook then Use Outlook Web App (OWA). You can also try uninstalling and reinstalling Office/Outlook.

    Keep visiting us for new tips and tricks!

    The post Fix: The Time Limit for Logging on was Reached in Outlook appeared first on Appuals.com.

How to Fix Microsoft Intune not Syncing?

$
0
0

Microsoft Intune stops syncing because of closed Firewall ports. This also occurs if the device is registered to multiple organizations or has disabled Enterprise Mobility + Security.

Microsoft Intune

What Causes Microsoft Intune Not Syncing?

  • Closed Firewall Port 444 of the System: Microsoft Intune uses Firewall port 444 to communicate with its servers. If port 444 is closed then it can cause syncing issues.
  • Device Registered to Multiple Organizations: If your device is registered to more than one organization, then it can force Microsoft Intune not to sync to a single account.
  • Disabled Enterprise Mobility + Security: If Enterprise Mobility + Security is disabled then it can cause Microsoft Intune into the current issue.

Before trying the solution make sure that you have admin access to the system. Also, you will need admin access to the office 365 portal.

1. Open Firewall Port 444

Microsoft Intune uses specific Firewall port 444 to communicate with its servers and the internet, this port should be opened for the application. In some cases, the port is opened automatically by the application and it has instant access to the internet. However, in some cases, the port needs to be opened manually otherwise the application is blocked from using the internet until the port is opened. We will use Windows Defender Firewall to demonstrate the process of opening port 444, you may user instruction specific to your system’s firewall.

  1. Press Windows key and type ‘Windows Defender Firewall’ and in the resulting list, click on Windows Defender Firewall with Advanced Security.
    Windows Defender Firewall with Advanced Security.
  2. In the left pane of the window, Right-click Inbound Rules and then select New Rule.
    Create New Rule in Firewall
  3. Select Port and click Next.
    Select Port in New Rule in Firewall
  4. Select the TCP or UDP protocol option for your port.
  5. Then enter the port number 444 in the Specific local ports.
    Enter port number 444 in the Specific local ports box
  6. Select the Allow the connection.
  7. Click the Next button to open Profile options.
  8. Click Next again, and then enter a title for the firewall rule.
  9. Press the Finish

2. Unregister the Device from Other Organizations

If a user device is registered with multiple organizations then Intune shows the error of sync could not be initiated. In that case, unregistering the device from all organizations except one may solve the problem.

  1. Press the Windows button and type “settings” and in the resulting list click on “settings”.
    Open Settings in Windows Search
  2. Select Accounts in Settings.
    Open Accounts in Windows Settings
  3. Click Access work or school on the left of the Settings window.
    Access Work or School Account
  4. If the device is connected with another organization, select the listed account for it.
  5. Then click the Disconnect button for the selected account. Then the user will have one organization account for Intune listed there.
  6. Restart the system and check if Microsoft sync has started to work.

3. Enable Enterprise Mobility + Security in Office 365 Portal

If Enterprise Mobility + Security in Office 365 admin portals is disabled then Microsoft Intune stops syncing. Even though this isn’t a requirement of the feature, it seems that there is a bug that prevents the syncing process from starting. Enabling Enterprise Mobility + Security may solve the problem.

  1. Open office 365 admin portal.
    Office 365 Admin Center
  2. Select the user account that is facing the syncing error.
  3. Click the Edit button for Product licenses.
  4. Then turn on Enterprise Mobility + Security E if it’s not enabled.
  5. Restart the affected device to resync it. Open the Settings app in Windows 10.
  6. Then click Access work or school and resync the device from there.

The post How to Fix Microsoft Intune not Syncing? appeared first on Appuals.com.
Fix: Outlook Error 0x8004060c

$
0
0

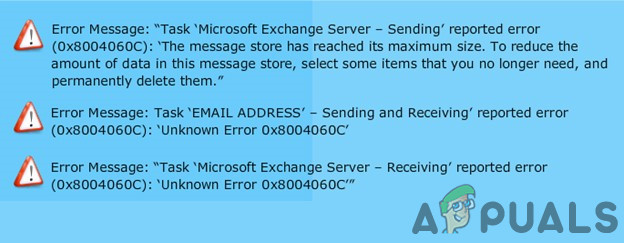
Outlook error 0x8004060c occurs because the PST file has reached its size limit, there is a corrupted PST file, Sync Issues in cached mode and an outdated Outlook. There could be diverse error 0x8004060C messages that can appear in this particular problem but all result in no incoming and outgoing email using the Outlook client.

Outlook 0x8004060c Error

What Causes Outlook Error 0x8004060c?

  • Maximum Size of PST file has reached: PST file is the backbone of Outlook communication. If your PST file has reached its maximum size then it can cause the 0x8004060c error.
  • Corrupted PST/OST file: If PST/OST files hold different types of important Outlook data and if these files are corrupt, then it can force the Outlook to show the current issue.
  • Sync Issues in Cached Mode: In the Cached mode Outlook keeps a local copy of the user’s data. If Outlook in the cached mode is facing sync issues with the Microsoft Exchange Server, then it can result in the error in hand.
  • Outdated Outlook: Microsoft adds new features and improvements to Outlook by releasing updates for it. If your version of Outlook is outdated then you are likely to face many types of problems.

1. Compact the PST file

Outlook reduces the size of PST files by compacting it. When an email is deleted, the background process ensures that the file size of PST is also corrected by compacting it. The process of compacting can be initiated manually, however, offline Outlook Data File (.ost) could not be compacted.

  1. Open Outlook and then click on the File
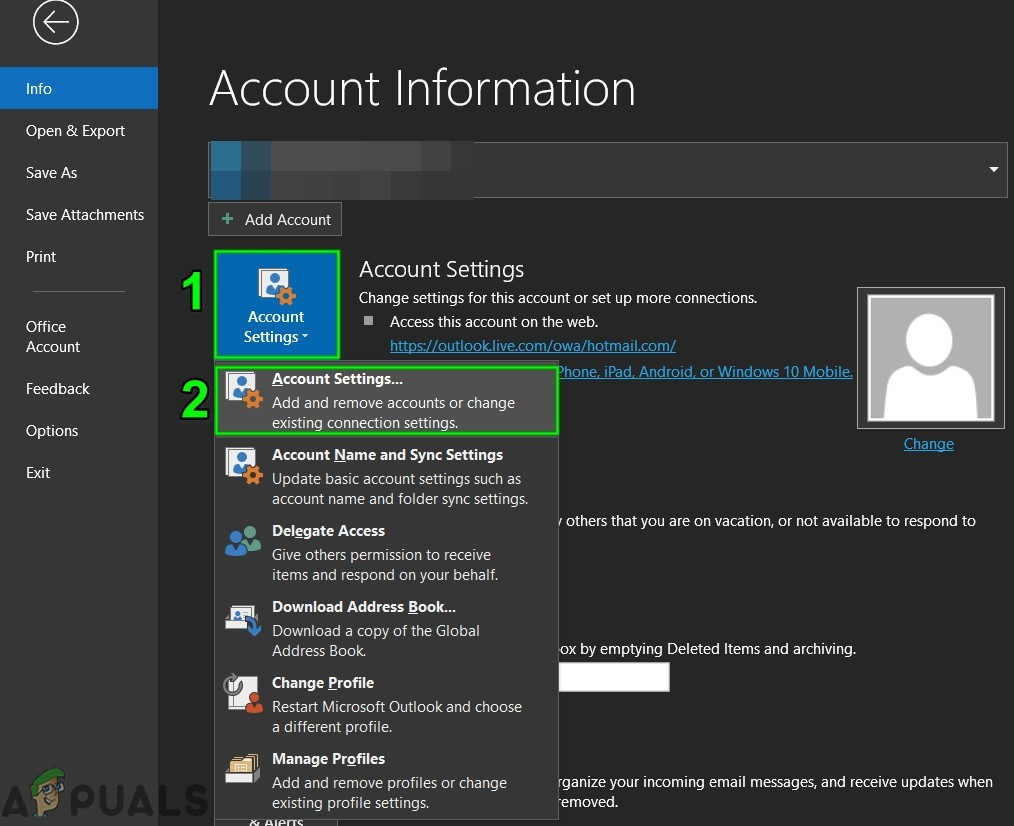
  2. Then in Info click on the Account Settings and in the drop-down list click on Account Settings.
    Account Settings of Outlook
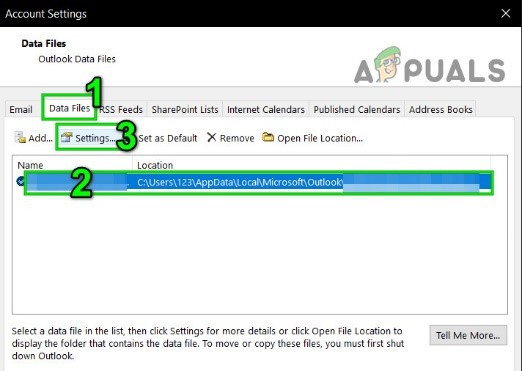
  3. Now in the Account Settings window, click on Data File.
  4. Now select the PST file that you want to compact and then click on Settings.
    Settings of PST File
  5. Click on the Advanced tab and then click on Outlook Data File Settings.
    Open Outlook Data File Settings
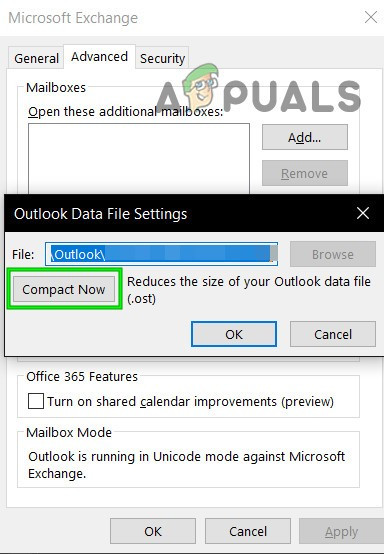
  6. Press the Compact Now button on the Outlook Data File window.
    Compact Now of Outlook Data File
  7. Close the Outlook then Reopen Outlook and check if it has started to operate normally.

2. Update Outlook/Office

Microsoft releases frequent updates for its products for improvement in features and to keep these products bug free and Outlook is not an exception. If the current error of Outlook is due to a known bug that Microsoft has already patched in its Updates, then updating Outlook/Office to the latest version may solve the problem.

  1. Open Outlook and then click on the File tab.
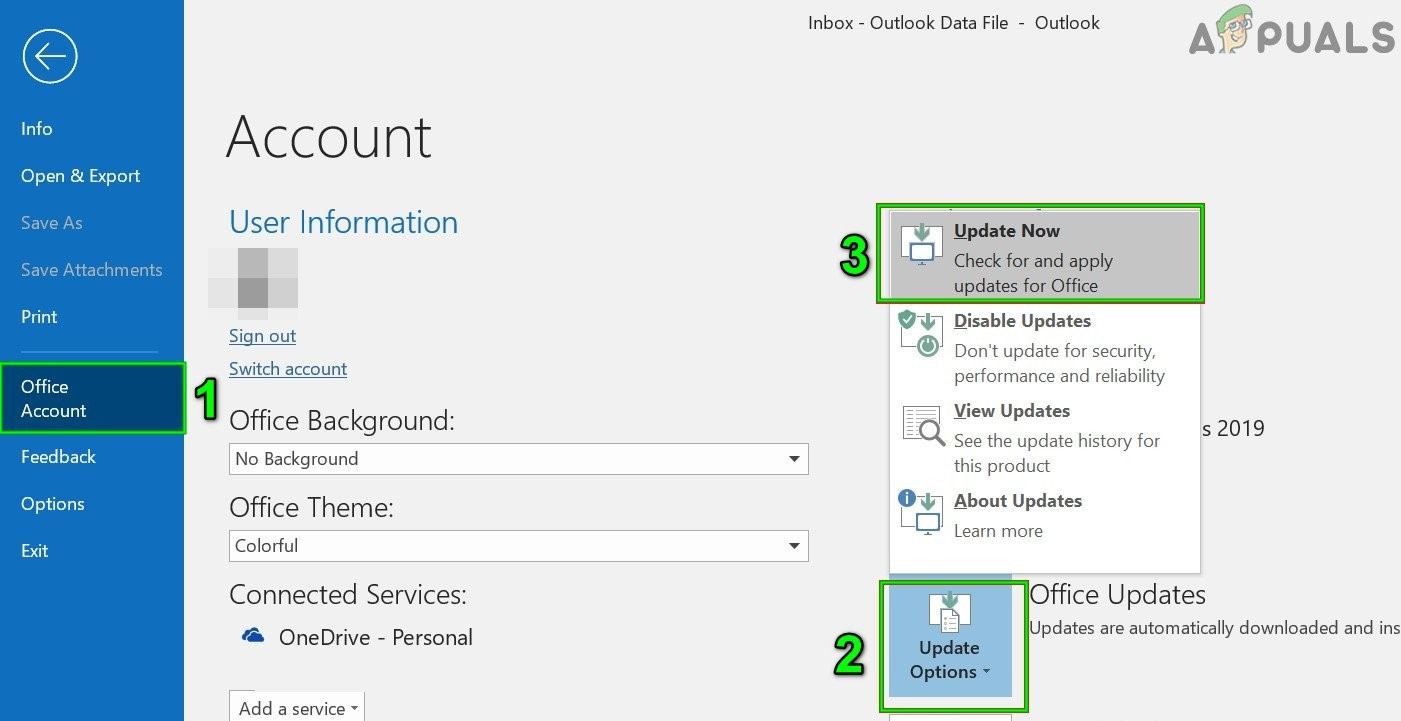
  2. Click on the Office account option and then click on the Update Options button.
  3. Now in the drop-down list, click on the Update Now for updating the software.
    Run Update Now of Outlook
  4. After updating, restart Outlook and check if it has started to function without any error.

3. Use Online Mode

Outlook has two modes, Online Mode and Cached Mode to connect with an Exchange Server. In the cached mode, Outlook keeps a copy of the user’s Exchange mailbox locally. So, if Outlook is having trouble in cached mode then it can force Outlook into Outlook error 0x8004060c. In that case, changing the connection mode from Cached to Online may solve the problem.

  1. Open Outlook and click on File menu
  2. Now Click on the Account Settings drop-down menu and again click on Account Settings.
    Run Update Now of Outlook
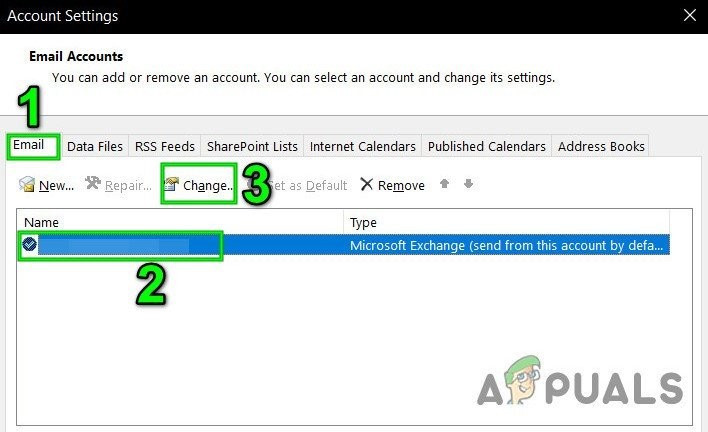
  3. Now in the Email Tab, select your account and then click on Change.
    Change Outlook Settings
  4. Now in Exchange Account Settings, Click on More Settings.
    Open More Settings of Outlook
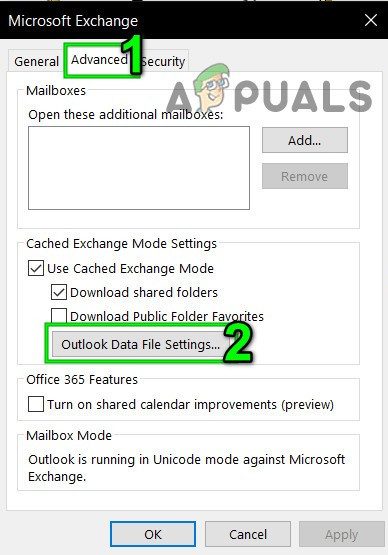
  5. Now click on Advanced tab and then Uncheck “Use Cached Exchange Mode
    Uncheck Use Cached Mode
  6. Now restart Outlook and check if it has started to function properly.

4. Repair Outlook’s PST File

When you Send/Receive operation is performed in Outlook then it uses the user’s folders for the attachments and email message. Outlook has the “.pst” file for this purpose, which can be stored locally on the system or a server if you are on a corporate network. If the .pst file is corrupted, then it can force Outlook error 0x8004060c. Luckily, Microsoft has included a utility “SCANPST.EXE” which can fix .pst file and thus may solve the problem.

  1. Exit Outlook.
  2. Click the Windows button and then in the search box type Outlook and in the results displayed, Right-click on Outlook and then click on “Open File Location”.
    Open Outlook File Location from Windows Search
  3. The following folder will be opened that holds shortcuts of programs.
    C:\ProgramData\Microsoft\Windows\Start Menu\Programs
  4. In this program folder, Right-click on the Outlook icon and then click on the “Open File Location”.
    Open File Location from File Explorer
  5. The following folder will be opened.
    C:\Program Files (x86)\Microsoft Office\root\Office16
  6. Now in Office 16 folder, locate SCANPST.EXE file and then right-click on it and click on “Run as Administrator”.
    Run ScanPST as Administrator
  7. Press the Browse button in Microsoft Outlook Inbox Repair.
    Microsoft Outlook Inbox Repair
  8. Then select the problematic PST file. (Location of the PST file is explained at end of these steps).
  9. Now Click on the Start button to initiate scanning.
  10. If prompted, then click on Repair to fix the issues with the file.
  11. Restart Outlook and check if it is functioning without any problem.

The location of the .pst file depends on various factors like on the version of Outlook, version of Windows, and how the user’s account is set up. Following are default locations of your .pst file as per the OS:

  • Windows 10
drive:\Users\<username>\AppData\Local\Microsoft\Outlook
drive:\Users\<username>\Roaming\Local\Microsoft\Outlook
  • Older Windows Version
drive:\Documents and Settings\<username>\Local Settings\Application Data\Microsoft\Outlook

5. Empty the “Deleted Items” Folder

As the problem is storage size related, and your overloaded Deleted items folder can be occupying a lot of share from total Outlook file storage capacity. In that case, emptying the Deleted items folders may solve the problem.

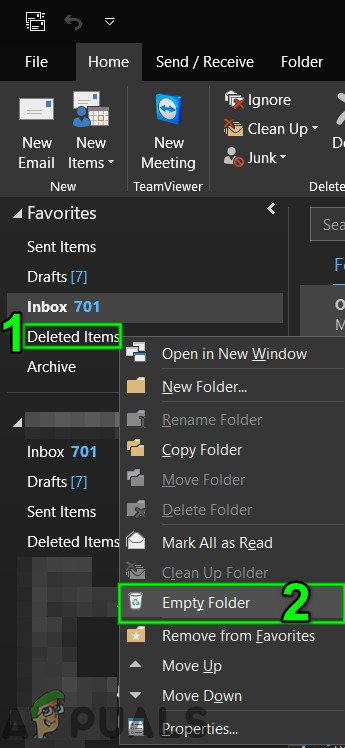
  1. Open Outlook, and in the left pane of Outlook Window, Right-click on Deleted Items folder.
  2. In the resulting menu, click on Empty Folder to empty the folder
    Empty Deleted Items Folder
  3. Close Outlook then reopen it and check if Outlook has started to function without any issue.

To empty this folder automatically, follow the steps below:

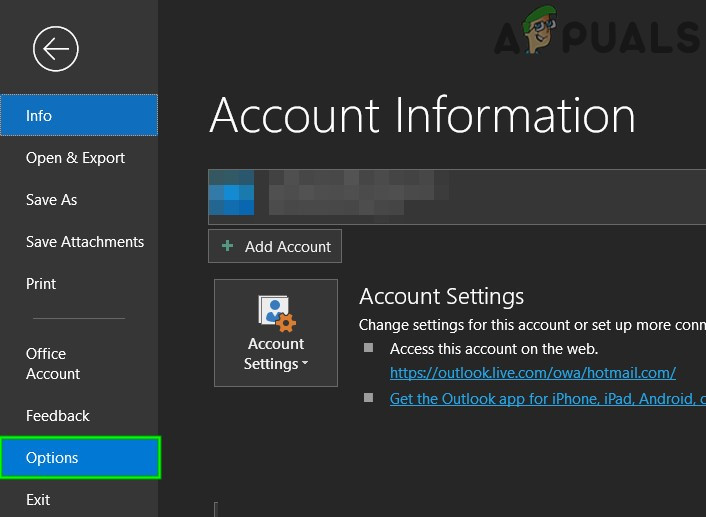
  1. In the Outlook window, click on the File tab and then click on Options.
    Open Outlook Options
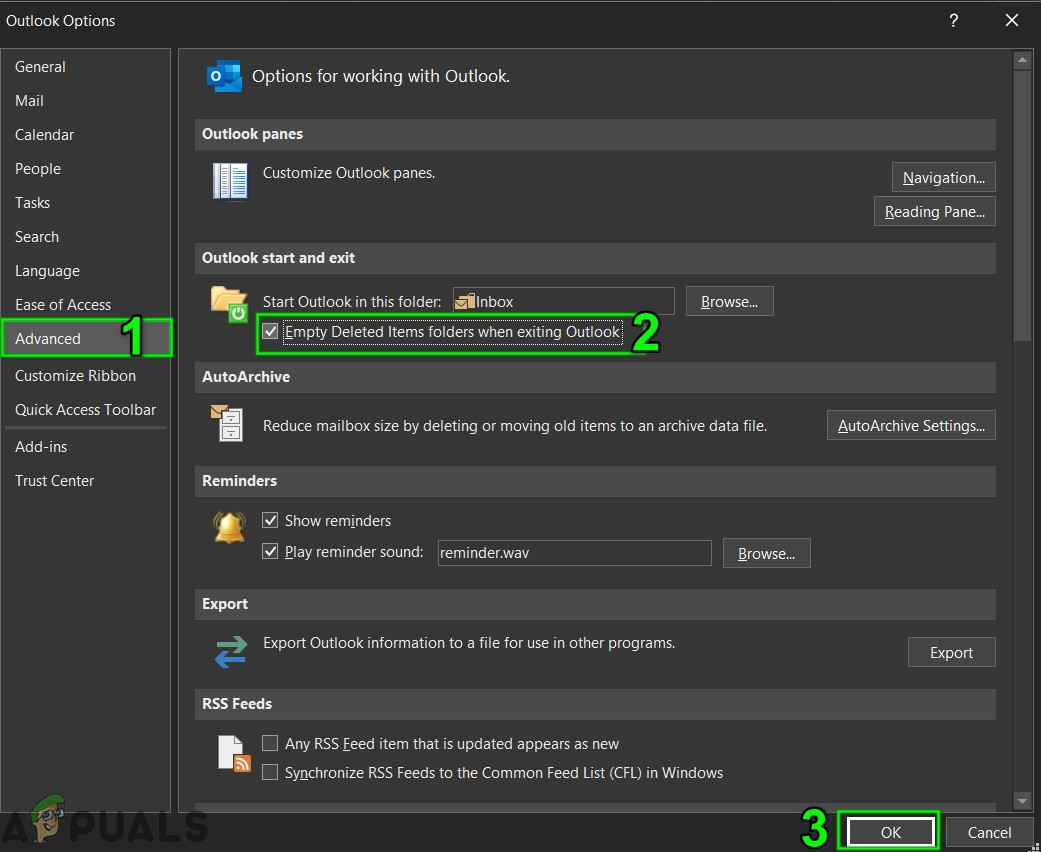
  2. Now in the left side of the window click on Advanced and then in the right pane of the window find Outlook start and exit section and then check the checkbox of ‘Empty Deleted Items folders while exiting Outlook
  3. Click OK to save the changes.
    Empty Deleted Items Folder When Exiting Outlook

6. Delete Unnecessary Emails

There could be a lot of junk emails accumulated over time and these emails will be taking a large portion of the size of Outlook data file.

Also, by default, a copy of every email that you forward to your associate resides in your Inbox and your Sent Items folder. In this way, the copied emails occupy unnecessary Outlook space.

So, removing unnecessary emails and deleting the copied forwarded emails may solve the problem.

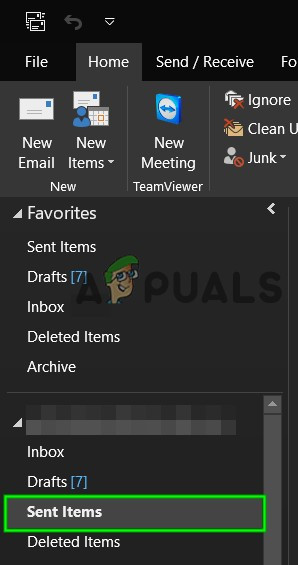
  1. Open Outlook and click on Sent Items.
    Open Sent Items Folder
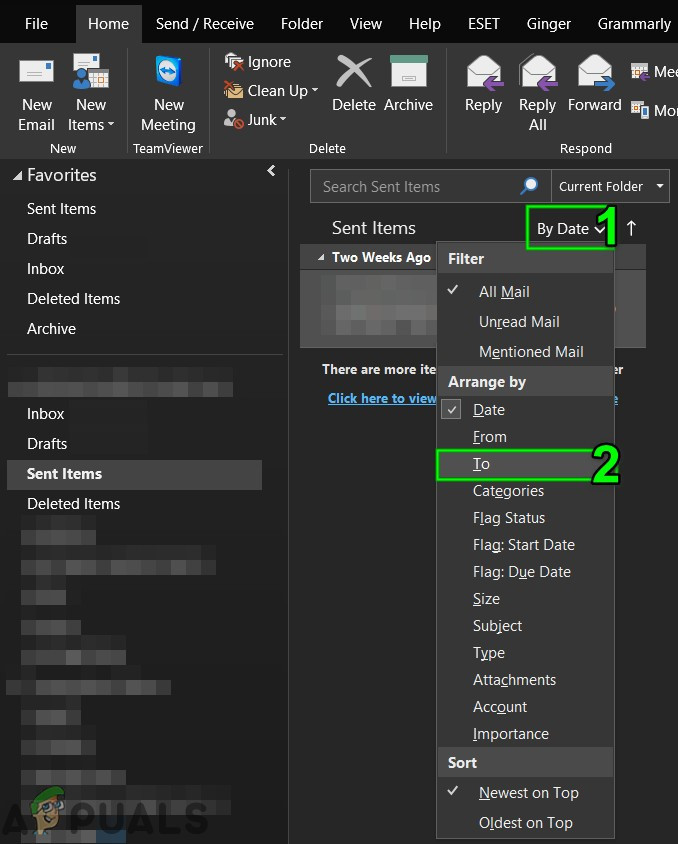
  2. Now in the Sent Items, Click on By Date Filter and Select “To” filter emails by recipients.
    Filter Sent Mails by To
  3. Now delete all the duplicate, unwanted, unnecessary emails or attachments (that you no longer need) from your mailbox. To do that, hold the Ctrl key and select multiple emails. Then press the Delete button to erase them.
  4. Relaunch Outlook and check if it has started to function normally.

To stop saving a copy of the forwarded message automatically follow the instructions below:

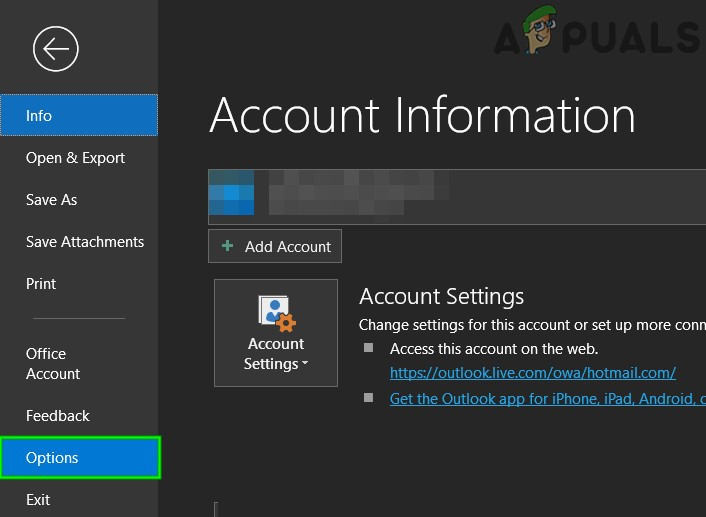
  1. Open Outlook then click on the File tab and then select Options
    Open Outlook Options
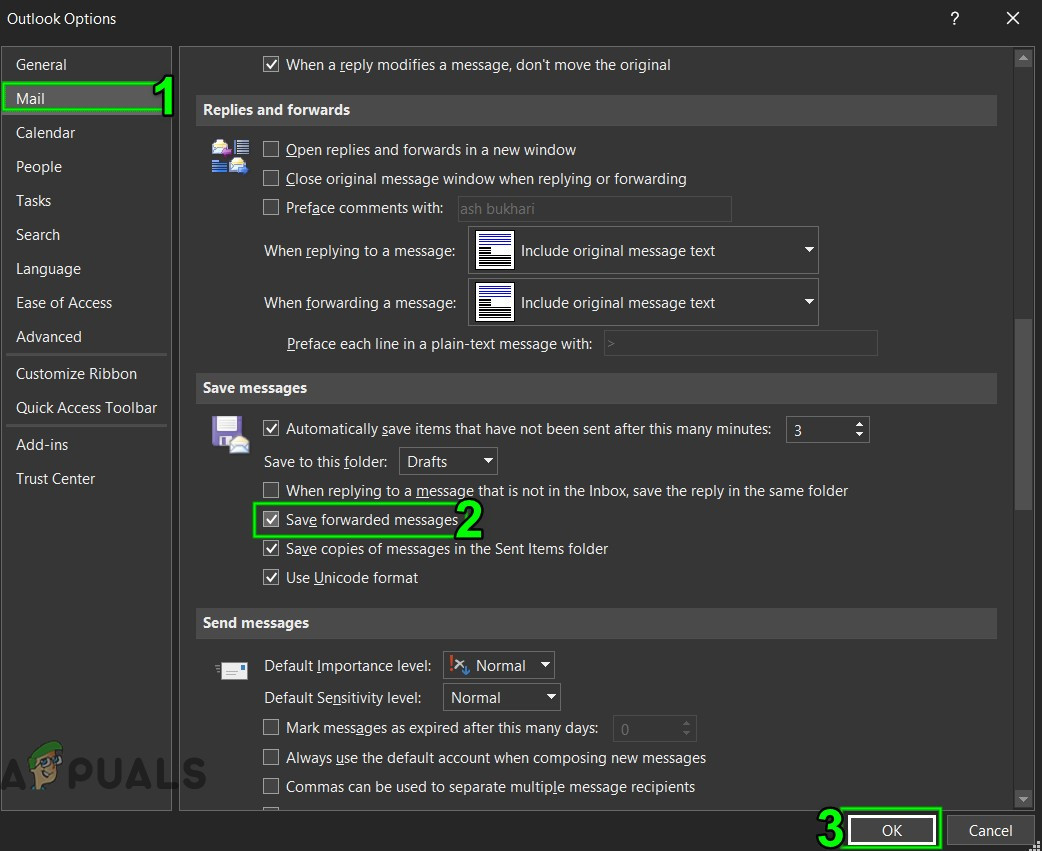
  2. Now click on the Mail and in the Save Message section, uncheck the option ‘Save forwarded messages’
    Uncheck Save Forwarded Messages
  3. Click OK to save the changes.

7. Run Mailbox Cleanup Tool

As the issue is storage size-related, Outlook has a built-in utility Mailbox Cleanup which can help figure out large size emails easy. And thus, may solve the problem.

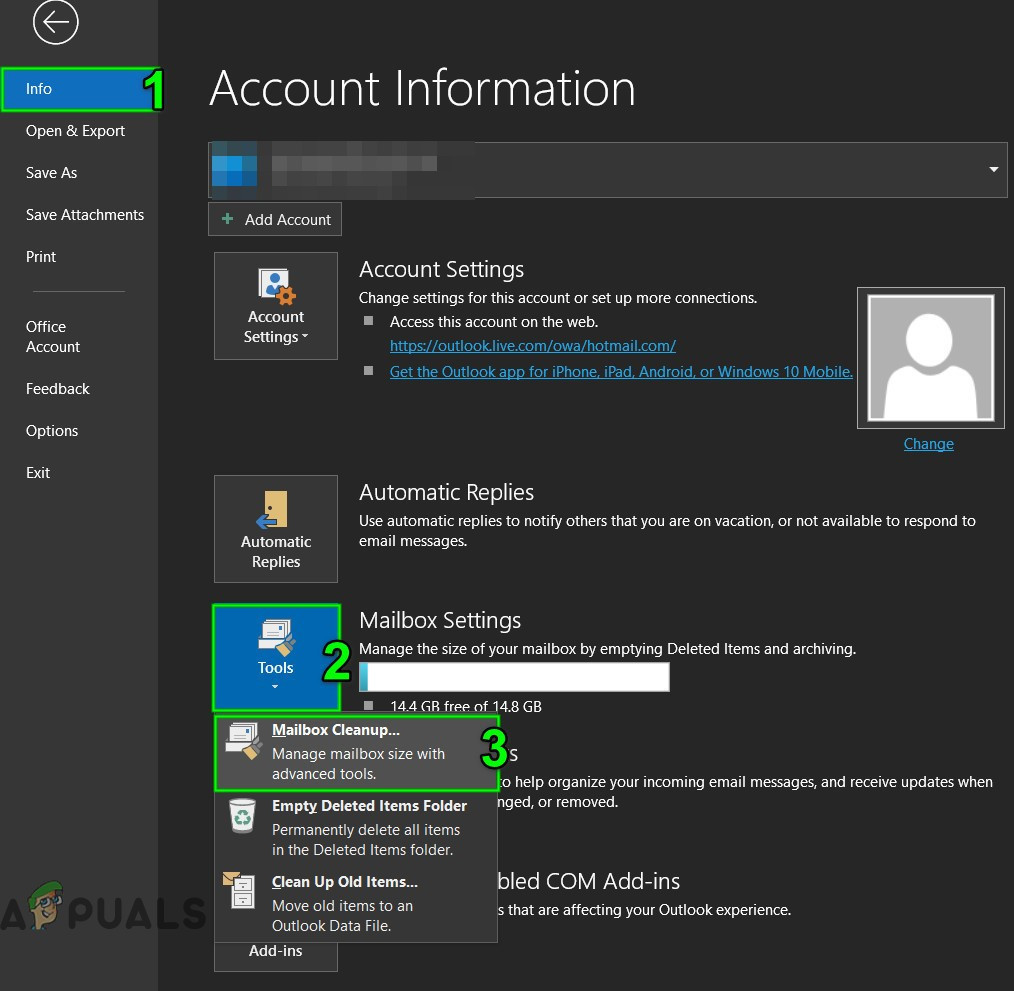
  1. Click on the File tab and in the Info tab click on Tools.
  2. In the drop-down list, click on Mailbox Cleanup.
    Mailbox Cleanup Tool
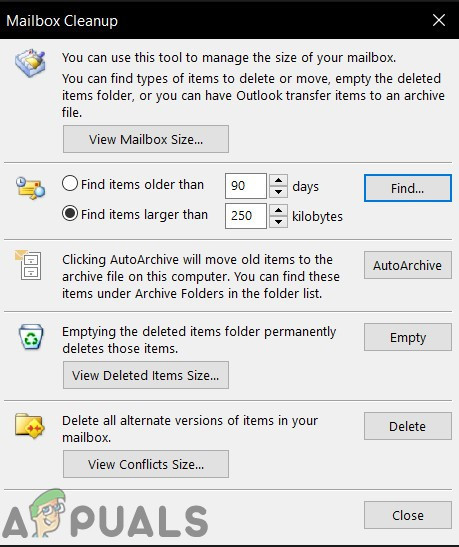
  3. Here you can manage individual Mailbox Size, find old emails, empty deleted items folder and remove all the alternate versions of items in your mailbox.
    Manage Mailbox Cleanup
  4. Now relaunch Outlook and check if it has started to function correctly.

8. Use Outlook Import/Export

Import/Export wizard is a built-in Outlook utility to move data files to and from MS Outlook. We can use this utility to split the PST file into smaller files in MS Outlook which will decrease the size of the PST file and thus may solve the problem.

  1. Launch MS Outlook, click the File
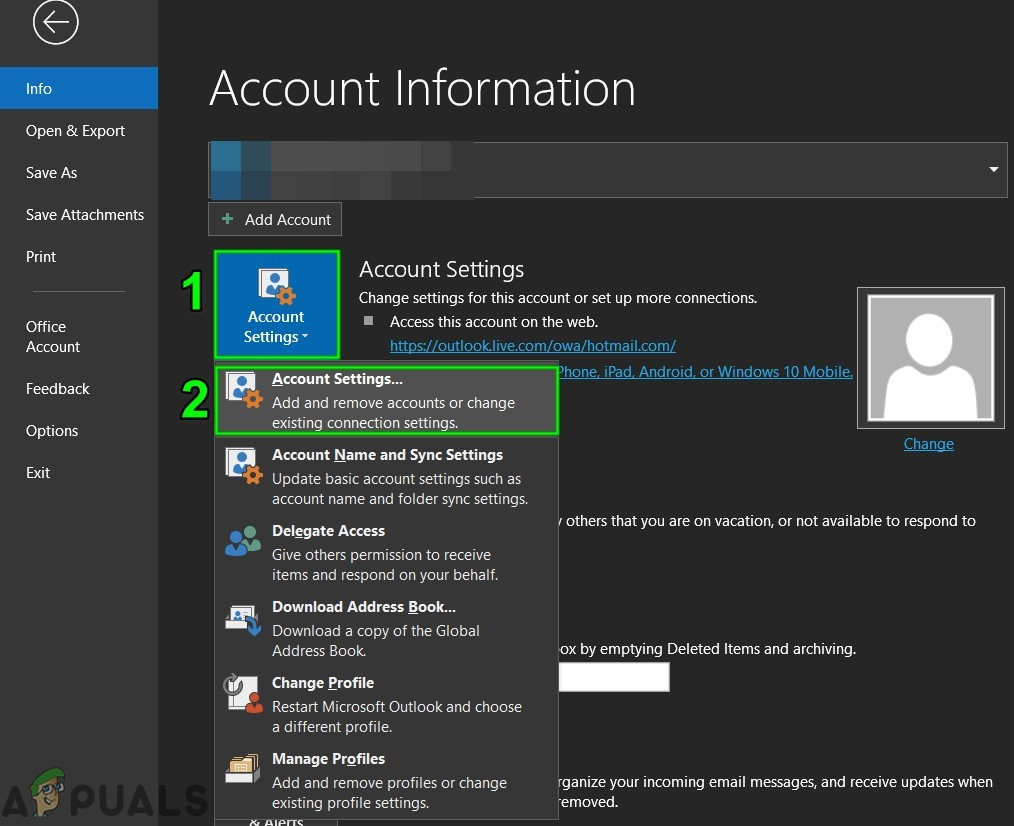
  2. Now in Info click on Account Settings and then in the drop-down list click on Account Settings.
    Account Settings of Outlook
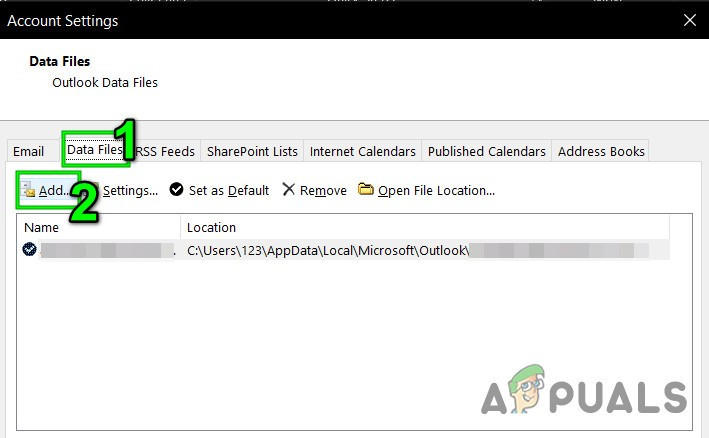
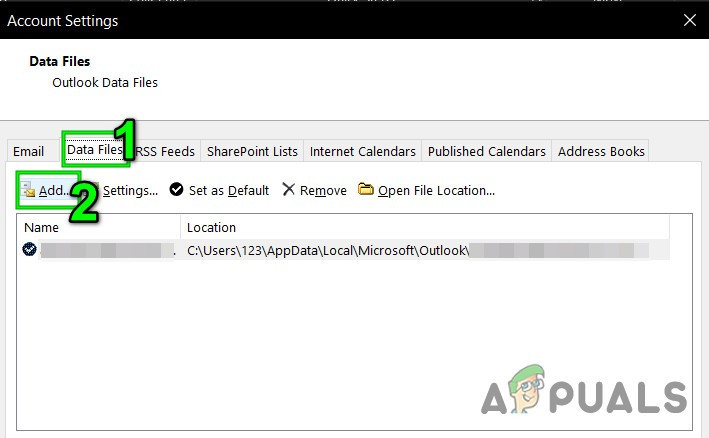
  3. Click on the Data Files tab and then click on the Add
    Add New Data File
  4. Now enter a name and type as Outlook data file (.pst)and click OK to create a new PST.
  5. Now you can view the new PST under Data Files. Close the Account Settings windows.
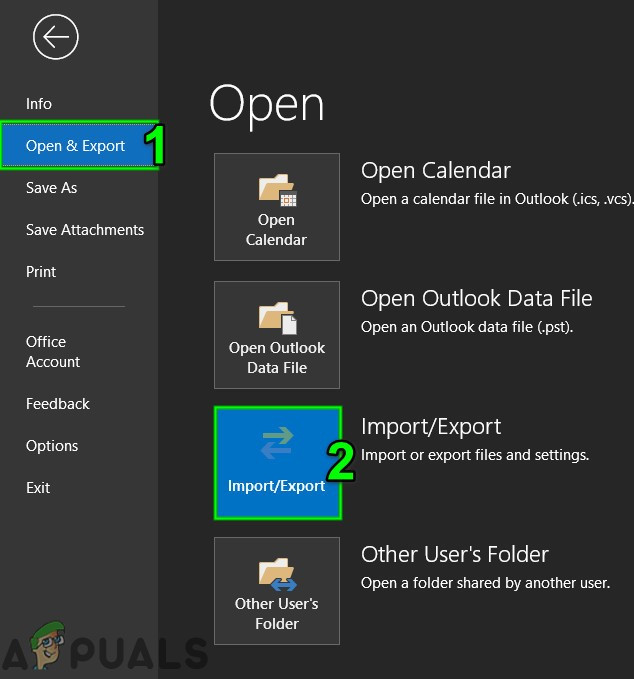
  6. Now in the Outlook main window, click the File tab and then click on Open & Export.
  7. Now click on Import/Export.
    Import Export Outlook
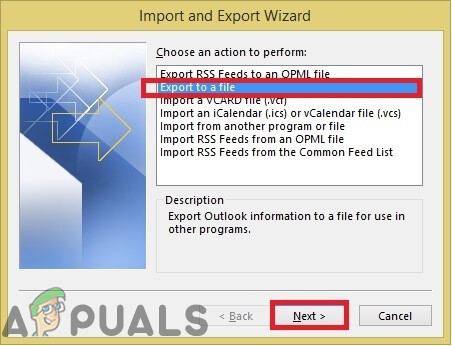
  8. Now in Import and Export Wizard, choose Export a File and then click on the Next.
    Export to a File in Import and Export Wizard
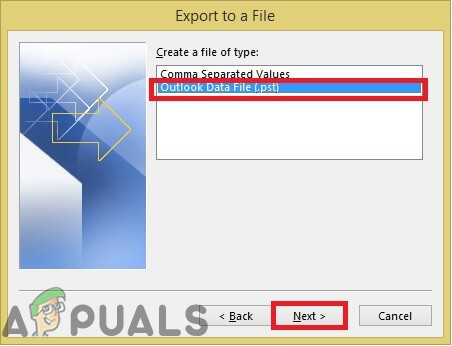
  9. Now in Export File window, select Outlook Data File (.pst) and click Next.
    Export to Outlook Data File PST
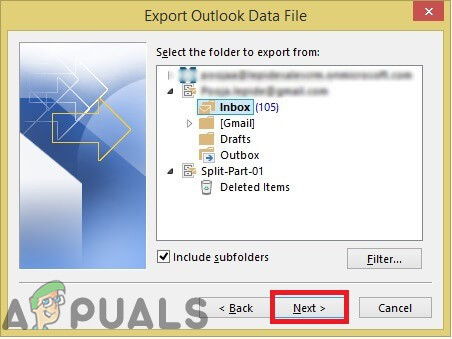
  10. Choose folders to export and check the Include Subfolders option if you want to export subfolders.
    Select Folders to Export
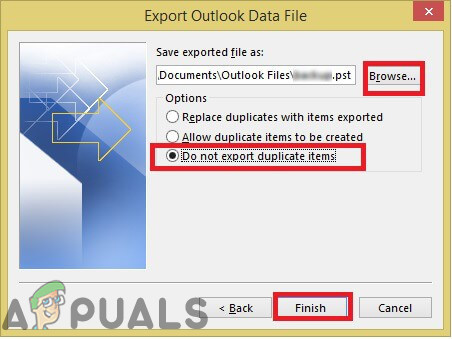
  11. Now, browse to select the saving location of the exported file and choose from options to disallow exporting duplicates items. And, click Finish.
    Do Not Export Duplicate Items
  12. If you want to, you can set up a password for the exported PST file.
  13. Now delete the exported folders from the main PST file to reduce its size and check if Outlook is clear of the Outlook error 0x8004060c.

9. Use Move to Folder Option

Outlook’s Move to the Folder option is quite helpful when moving data between Outlook folders. We can use the same functionality to move data from one PST file to another which will decrease the size of the PST file and thus may solve the problem.

  1. Launch Outlook and then click on the File
  2. Now click on Account Settings and then in the drop-down list click on the Account Settings.
    Open Outlook Account Settings
  3. Now in the Account Settings window, click on Data Files and then on the Add.
    Add New Data File in Outlook
  4. Now enter a name and type as Outlook data file (.pst)and click OK to create a new PST.
  5. Now the new PST file will be shown under Data Files. Close the Account Settings windows.
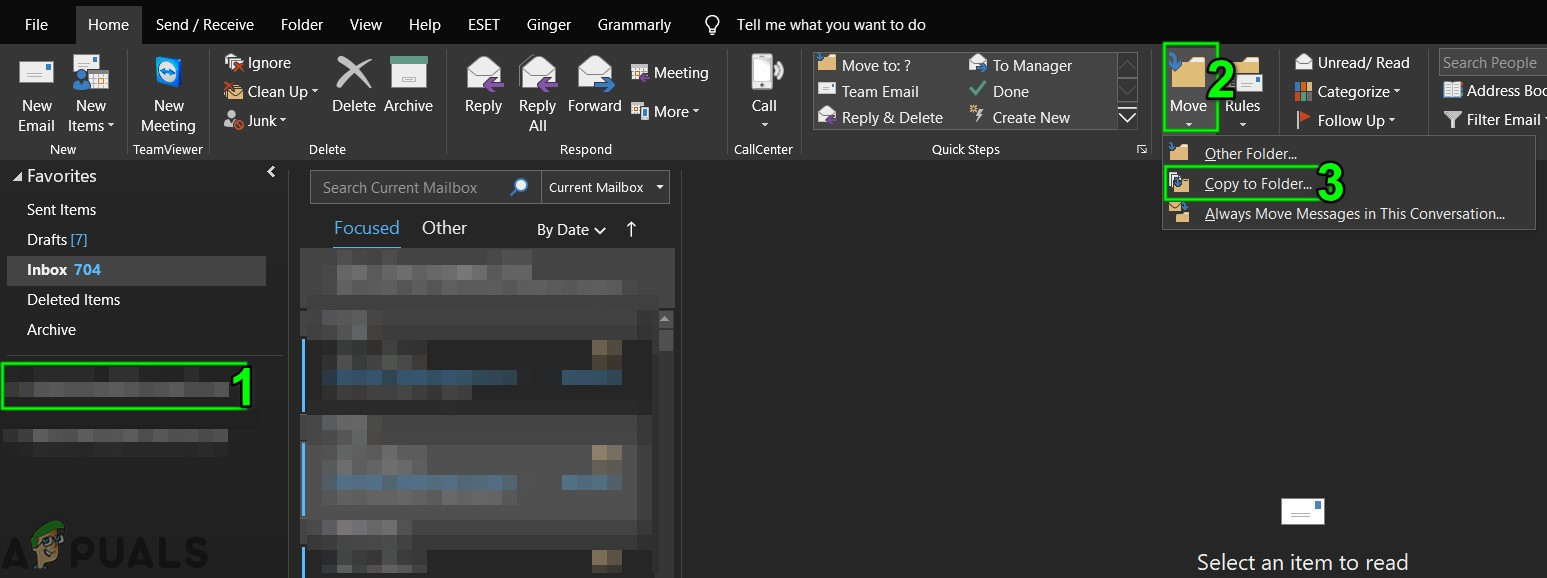
  6. Go to the Home tab of Outlook and open the default PST file of your Outlook profile and select the items you want to move to a new PST file you created in the previous step.
    Copy to Folder
  7. Choose the PST file, so that all the selected data items from the default PST file can be moved to the new PST file.
  8. Now delete the copied items from the default PST file so that its size gets reduced.
  9. Relaunch Outlook and check if it is functioning normally.

10. Use Outlook Archive Wizard

Emails get accumulated over time and usually, the user wants to keep them as a record. With the archiving technique, the size of the PST file can be reduced and older data items are saved to the desired location one by one within Outlook and can be used when required. In that case, using the Outlook Archive Wizard may solve the problem.

  1. Start MS Outlook and click on File tab
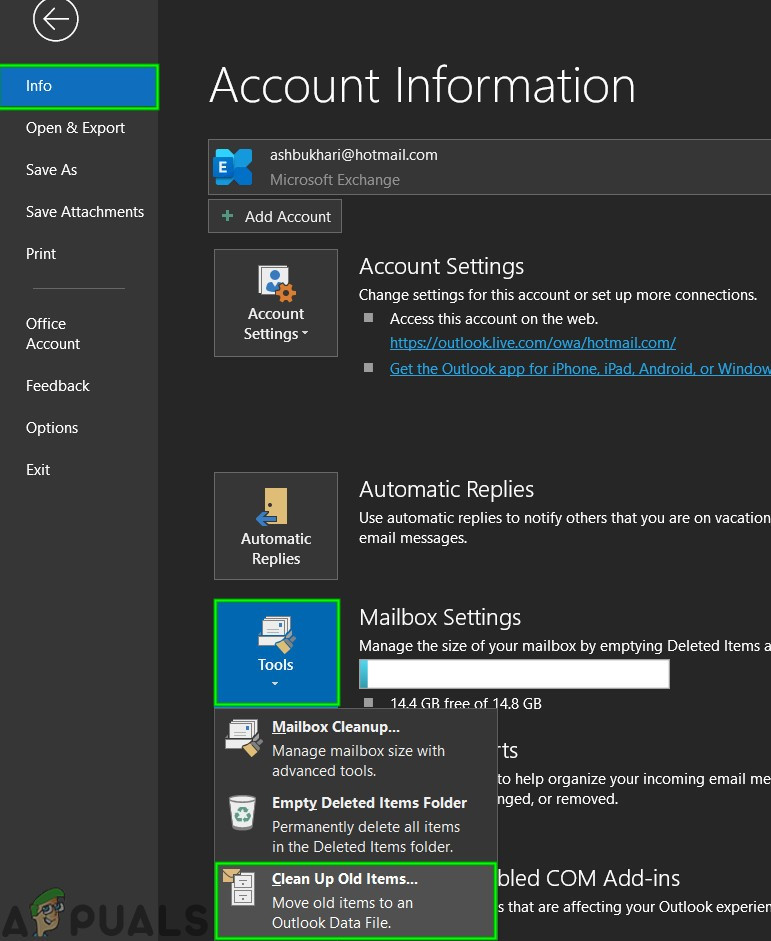
  2. Then in the Info, click on Tools and then click on Clean Up Old Items.
    Clean Up Old Items
  3. Now select a folder to Archive, choose a date to Archive older items and click Browse to save the Archive file to the desired location.
  4. Relaunch Outlook and if it is working fine.

11. Create a New Outlook Data File

Outlook uses different types of files to hold different types of data. The data file of Outlook holds key components for Outlook. If the current Outlook data file has corrupted then it can force the Outlook error 0x8004060c. In that case, creating a new Outlook data file and using it as default may solve the problem.

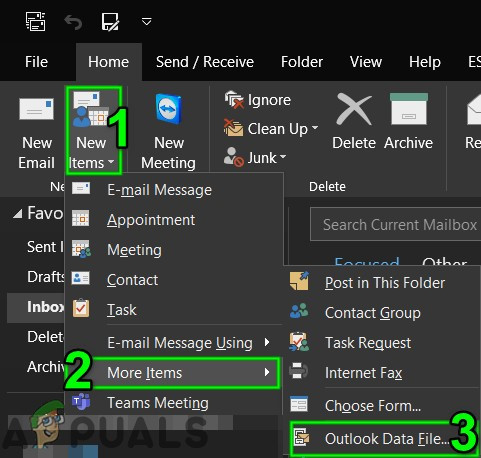
  1. Open Outlook and on the Home tab click on New Items.
  2. In the drop-down list click on More Items and in the sub-menu click on Outlook Data File.
    Create a New Outlook Data File
  3. Enter the name of the file.
  4. If you want to use a password (if you set a password, you must enter it every time that the data file is opened e.g. when Outlook starts or when you open the data file in Outlook), then check the Add Optional Password and Type a password in both the Password and Verify Password text boxes and select OK.
  5. After creating the new data file, open Outlook and click on File tab,
  6. And then click on Account Settings and in the drop-down list click on the Account Settings.
    Open Outlook Account Settings
  7. Now click on the Data Files tab and select the newly created Outlook data file and then click on the Set as Default.
    Set Outlook Data File as Default
  8. Now Restart Outlook and check if outlook has started to function properly.

12. Increase Maximum Storage Size of Outlook PST File

Microsoft has limited the maximum size a PST file can hold and when this size limit is reached it can force Outlook error 0x8004060c. This limit can be increased by using Registry Editor and thus may solve the problem.

Warning: Extreme caution be taken while making changes in Registry as it needs expertise and follow guidelines strictly as mentioned because any wrongdoings may corrupt the entire OS.

  1. Exit Outlook.
  2. Press the Windows button and type Registry Editor and in the resulting list, Right-click on the Registry Editor and then click on Run as Administrator.
    Open Registry Editor as Administrator
  3. Now in Registry Editor, navigate to the limit settings for Outlook which depends upon your version of Outlook as mentioned below:
  • Outlook 2016, 2019 & 365:
HKEY_CURRENT_USER\Software\Microsoft\Office\16.0\Outlook\PST
  • Outlook 2013:
HKEY_CURRENT_USER\Software\Microsoft\Office\15.0\Outlook\PST
  • Outlook 2010:
HKEY_CURRENT_USER\Software\Microsoft\Office\14.0\Outlook\PST
  • Outlook 2007:
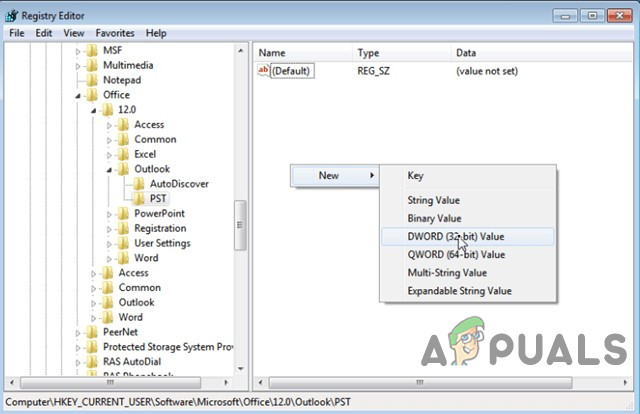
HKEY_CURRENT_USER\Software\Microsoft\Office\12.0\Outlook\PST
  • Outlook 2003:
HKEY_CURRENT_USER\Software\Microsoft\Office\11.0\Outlook\PST
  1. Right-click on the right pane, and create two DWORD
    Create New DWORD Key
    • MaxLargeFileSize: It is the maximum file size of the PST file
    • WarnLargeFileSize: Warning message when the file size of the PST file reaches a certain limit.
    Add Registry Values
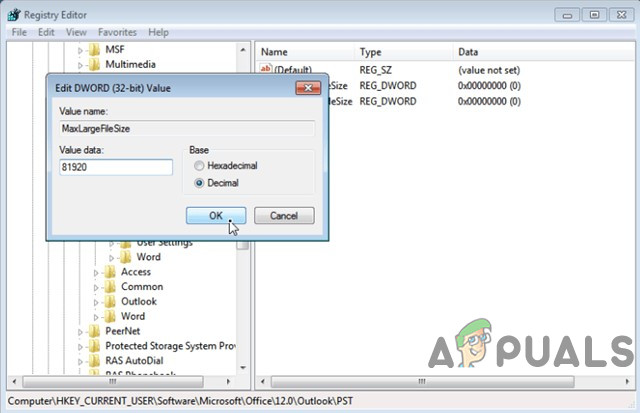
  2. Double click to open MaxLargeFileSize value and Select Decimal.
  3. Then at the Value data: box type the new maximum size limit (You need to enter the value in terms of MB) for the Outlook message store (PST file) according to the following:
  • For the Outlook 2003 & 2007: Default message store maximum limit is 20GB, specify a size over 20GB.
  • For the Outlook 2010, 2013, 2016, 2019 and Office 365: Default message store maximum limit is 50GB, specify a size over 50GB.
  • For example. If you are using Outlook 2019 which has the maximum size limit of 50GB. In that case, you should specify a size greater than 80GB. To achieve this, you have to enter the number “81920”(without the quotes) in the Value data box.
Maximum Size of PST File
  1. Select Ok.
  2. Then double click to open the WarnLargeFileSize value and Select Decimal.
  3. Now at the Value data: box type the new warning size limit (You need to enter the value in terms of MB) for the Outlook message store (PST file) according to the following:
  • The Warning size should be 95% of the MaxLargeFileSize value you entered before.
  • For example: If MaxLargeFileSize value was”81920″ at then the WarnLargeFileSize value would be: 81920 X 95% = 77824
Warning Size of PST File
  1. Select Ok.
  2. Close Registry Editor.
  3. Restart the System and then launch Outlook and check if Outlook has started to function properly.

13. Run Microsoft Support and Recovery Assistant

The Microsoft Support and Recovery Assistant runs tests to figure out what’s wrong and offers the best solution for the identified problem. It can currently fix Outlook as well as Office/Office 365. If the Microsoft Support and Recovery Assistant can not fix a problem then it will suggest the next steps in troubleshooting the problem. So, running the Microsoft Support and Recovery Assistant may solve the problem.

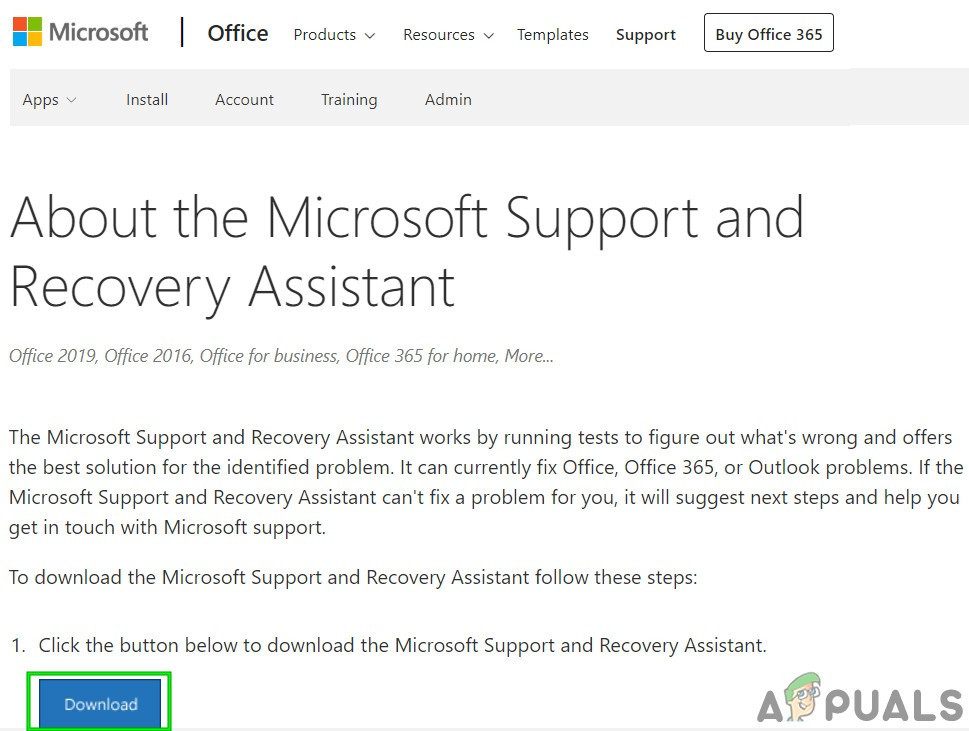
  1. Download Microsoft Support and Recovery Assistant from Official Microsoft Website.
    Microsoft Support and Recovery Assistant
  2. Launch the downloaded file after completion of the download.
  3. Click I Agree to agree after reading & understanding the Microsoft Services Agreement.
  4. Choose the app you are having problems with, in this case, select Outlook and then click Next.
  5. Choose the problem you are facing having from the list and click Next.
  6. Follow the directions displayed by the Microsoft Support and Recovery Assistant provides.

The post Fix: Outlook Error 0x8004060c appeared first on Appuals.com.
Cannot Add or Create New Cells in Excel

$
0
0

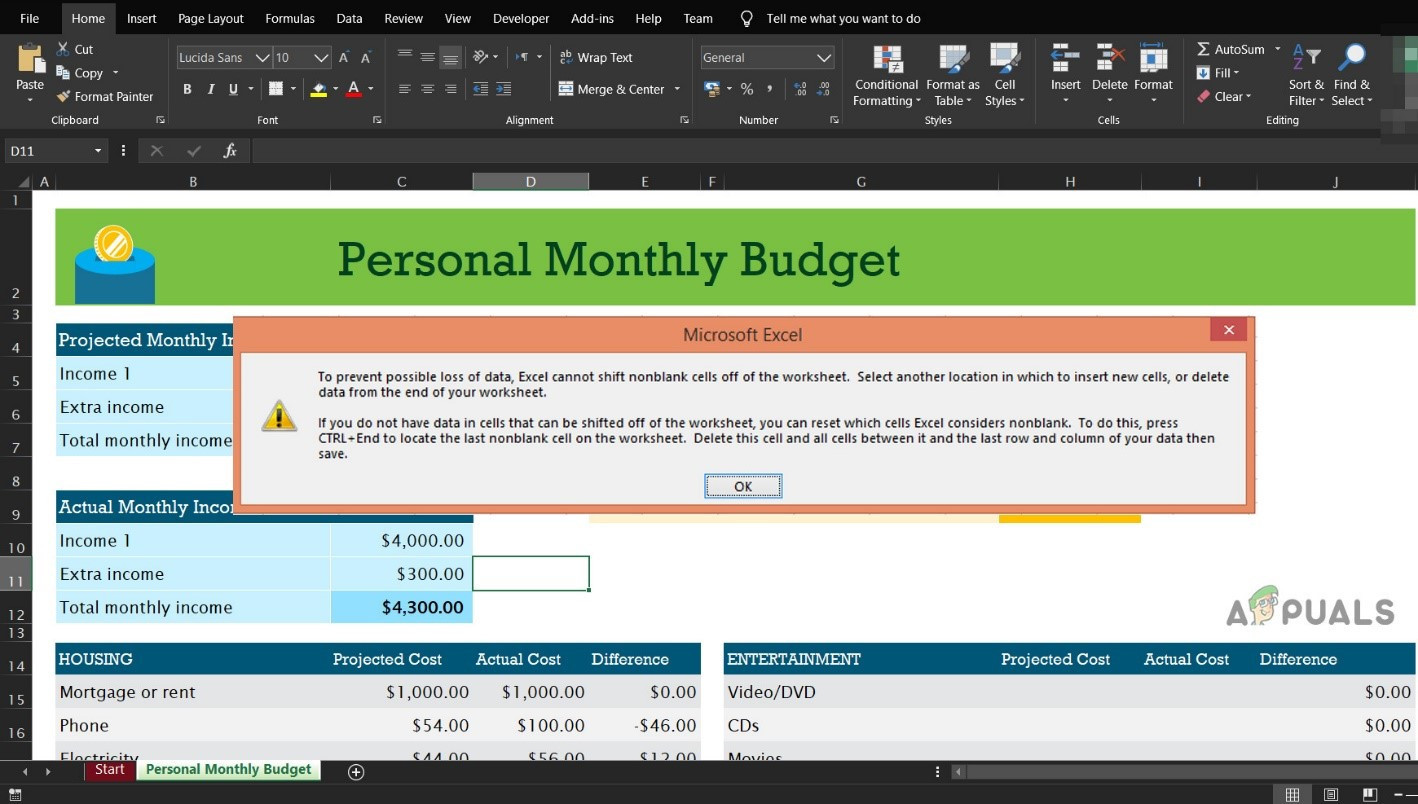
Microsoft Excel causes issues when adding new ceels because of cell protection, too long filename path, merged rows/columns and because of other internal Excel components. This is a very common phenomenon and can be resolved by following some very simple steps as listed below.

Microsoft Excel cannot add new cells

What causes Microsoft Excel Not to Add New Cells?

  • Cell Protection: Users apply different types of cell protection to protect their data and sheets/files. If any type of cell protection is applied to the sheet/file, then it can cause the current issue.
  • Applied Formatting to the Whole Row/ Column: Users tend to unintentionally apply formatting to the whole row/column which isn’t allowed by Excel.
  • Contents in the Last rows/columns: If the last row/column of the sheet holds some content which you are trying to replace, then to avoid data loss, Excel will restrict you from adding new cells.
  • Too Long File Name Path: The filename path is the address of your file for Windows and if it is too long, then it can cause the issue you are facing.
  • Merge Rows/Columns: If the users merges the whole row/column into a single cell, then Excel will not let you insert new rows/columns and show the current problem.
  • Freeze Panes: Freeze panes on the sheet help a user in data insertion and management. If a user has applied freeze panes, then the user will face the current problem.
  • Range Format as Table: Numerous cases have come forward where adding new cells in a selected area which involved blank space and a table causes the issue of not being able to add new cells.
  • File Format Limitations: Excel has different file formats for different versions and different purposes, and each format has its limitations. If you are using a version that has limited functionality then you may encounter the current problem.
  • Untrusted Source: Excel by default restricts the execution of files from untrusted sources. If the file you are using is not from a trusted source, then it can force Excel into the current error.

How to Fix not being able to Add new Cells in Excel?

Before trying the solutions, unhide rows and columns that are hidden in the sheet. Also, if you are using any macros on the sheet that is reporting to another hidden spreadsheet then make sure that the hidden sheet has not reached the max number of rows/columns.

1. Remove Cell Protection

Excel has built-in cell protection functionality which enables users to protect their data and sheet. If there is any type of protection applied to the sheet, then it can cause Excel to prevent adding of new cells to preserve the existing data. In that case, removing the protection of the cells may solve the problem.s

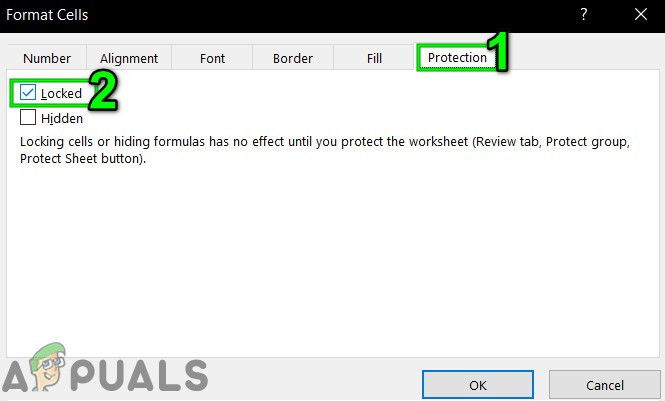
  1. Press Ctrl+A to select all the cells of the sheet and then on the Home tab click on Format and then in the drop-down menu click on Format Cells.
  2. Now click on the Protection tab and then uncheck on the Locked
    Uncheck Locked Cells in Protection
  3. Now click on the Review tab and click on Protect Sheet or Protect Workbook and enter the desired password to unprotect the sheet or workbook.
  4. Save and close the file and reopen the file and check if you can insert new rows/columns.

2. Reduce Long File Name Path

The filename path is the address of a file in Windows. If the Excel file name pathname is too long then it can force the Excel to restrict you from adding new cells. In that case, saving the file to a place where the filename path is not too long may solve the problem.

  1. Open the problematic file.
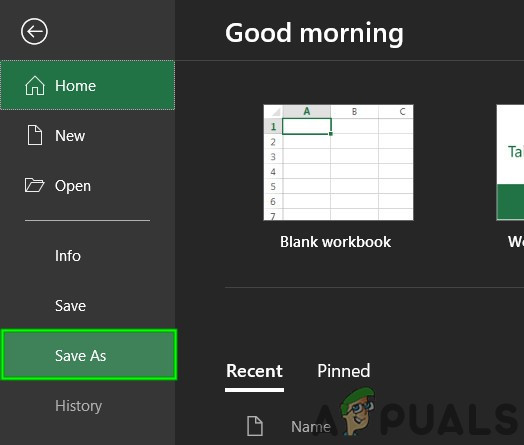
  2. Click on the File tab and then in the right pane click on Save as.
    Save As Excel File
  3. Now in the save as dialogue box, go to a convenient location, for testing preferably to the desktop.
  4. Close the Excel and open the file saved to the newer location and check if you can insert rows/columns to the sheet.

3. Unmerge the Rows/Columns

Users tend to unintentionally merge the complete row and column to a single file whereas they want to merge just a few cells. This merging of whole row/column can cause the Excel to restrict the adding of new cells with a justification of “To prevent possible loss of data” because when you have merged all cells in one row (then another column could not be added) or you have merged all cells in one column (then another row could not be added). In that case, unmerging the row/column may solve the problem.

  1. Find the merged rows/columns. You might have to look through your worksheet to find the merged column/row.
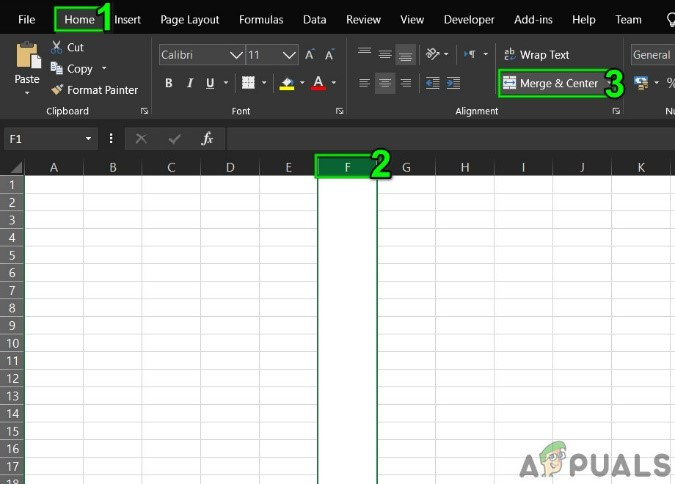
  2. For column, click on the top Heading cell of the merged column and then on the Home tab click on Merge and Center, which will un-merge the column. Repeat the process on any other merged columns.
    UnMerge Column
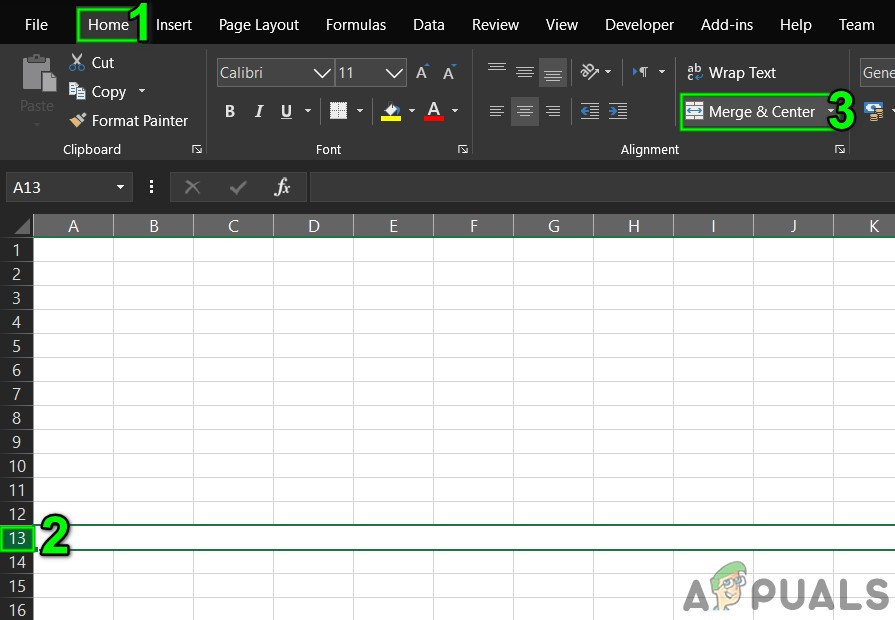
  3. For row, click on the left Heading cell of the merged row and then on the Home tab click on Merge and Center, which will un-merge the row. Repeat the process on any other merged rows.
    Unmerge Rows
  4. Now save and close the file. Then open the file and check if you can insert new rows/columns in the sheet.

4. Unfreeze Panes

Freezing panes help user in achieving greater results with their data. If you are using freeze panes functionality of Excel then it will not let insert new rows and columns to the sheet. Unfreezing the panes may solve the problem.

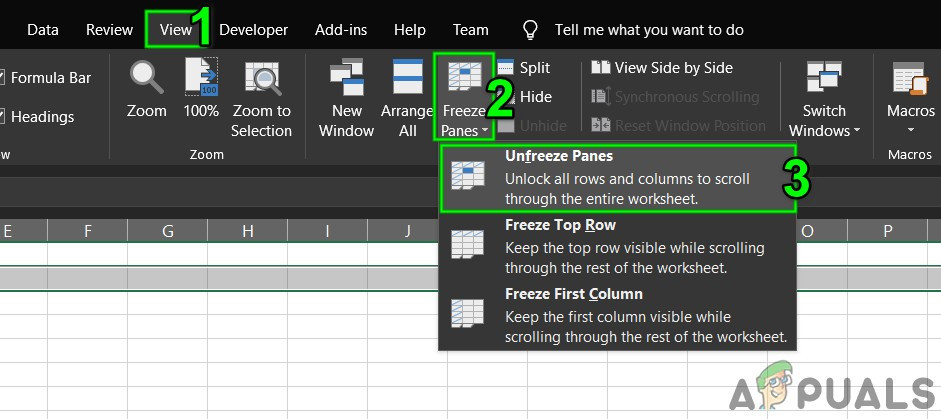
  1. Click on the View tab and then on the Freeze Panes.
  2. Now in the drop-down list, click on Unfreeze Panes.
    Unfreeze Panes
  3. Save and close the file.
  4. Reopen the file and check if you can insert new rows/columns.

5. Format Table as Range

Tables are a great way to store data in Excel. If you are using Table in the Excel sheet then in some scenarios the user cannot add or delete the rows/columns in the sheet. In that case, converting the table to the range may solve the problem.

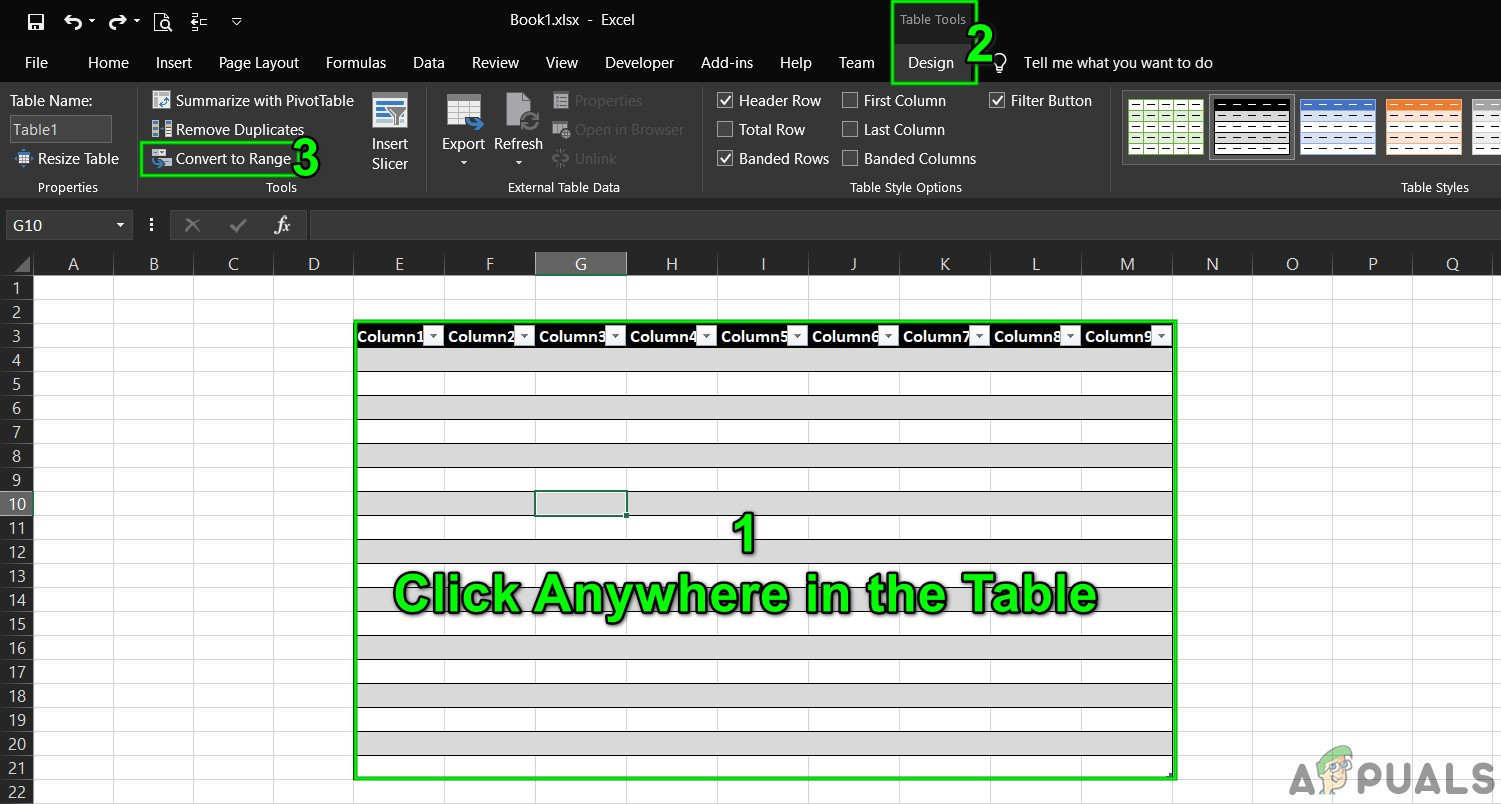
  1. Click anywhere in the table than in the Table Tools click on Design.
  2. Now in the Tools group, click Convert to Range.
    Convert Table to Range
  3. Save and close the file.
  4. Reopen the file and check if you can insert new rows/columns without any problem.

6. Clear Content and Formats From Non Used Rows/Columns

Although you think you have no data in the last row/column, Microsoft Excel does not “think” that way. Users sometimes unintentionally block the whole row/column by clicking the “Row/column Number” on the left/top side of the worksheet and then applying formatting either changing color or by applying a border etc. And when users try to insert a new row/column then the current issue occurs. This happens because of formatting used on the whole row/column as Excel is forced in “thinking” that this row/column is not empty. In that case, clearing the formatting from the whole rows/columns may solve the problem.

For column insertion

  1. Open the problematic workbook.
  2. Click at the heading cell (The heading cell is the first cell in each column, and indicates which column you are in).of the column next to your last data column and then press Shift+Ctrl+Right Arrow to make selection up to the last column of the sheet.
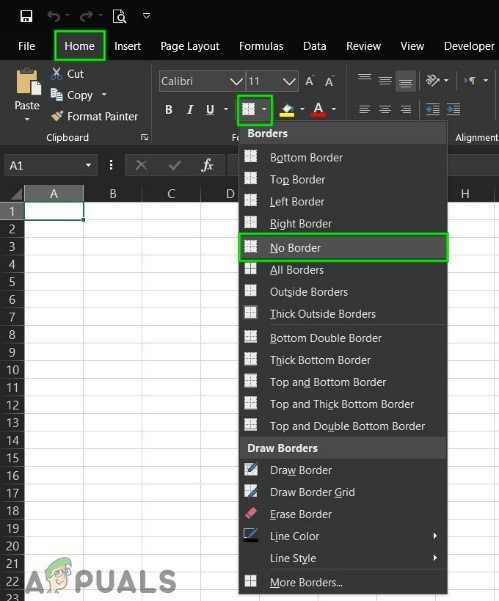
  3. On the Home tab, click on Borders and then click on “No Border“.
    Applied No Border Formatting
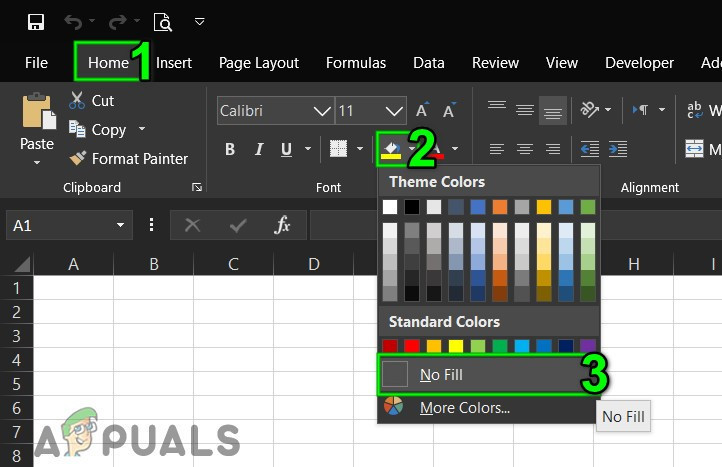
  4. On the Home tab, click on Theme Colors and then click on “No Fill“.
    Applied No Fill to the Cells
  5. Press “DELETE” in the keyboard to clear any value from cells.
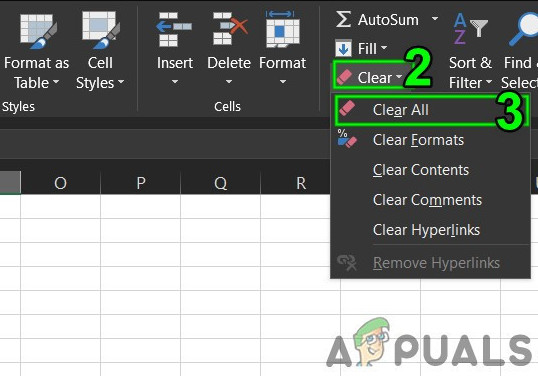
  6. On the “Home” tab, click on the Clear and then click on Clear Formats.
  7. Again, click on the Clear and then click on Clear All.
    Clear Formats and All
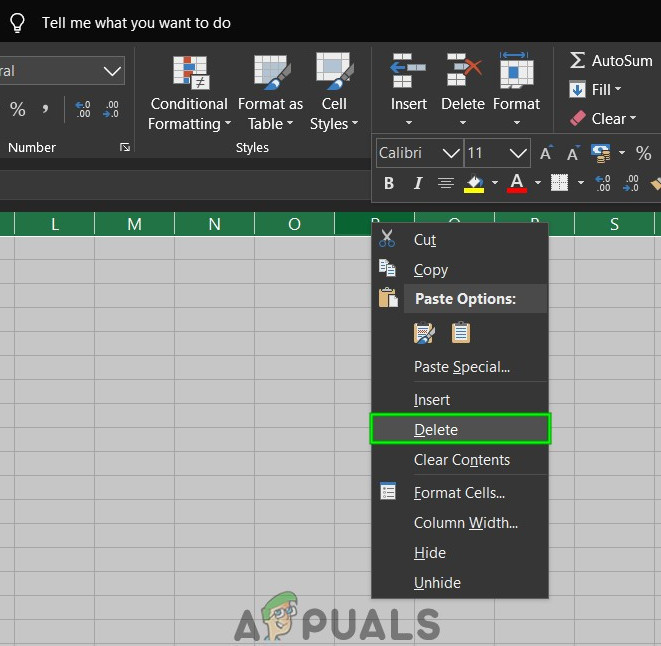
  8. Now right-click on top of any column so that the selection remains intact. And in the resulting menu, click on the Delete.
    Delete Columns
  9. Save and close the file and then open the file again.

For Row insertion

  1. Open the problematic sheet.
  2. Click at the left heading cell (which indicates which row you are in) of the row next to your last data row and then press Shift+Ctrl+Down Arrow to make selection up to the last row of the sheet.
  3. Follow step 3 to step 7 of the column insertion method.
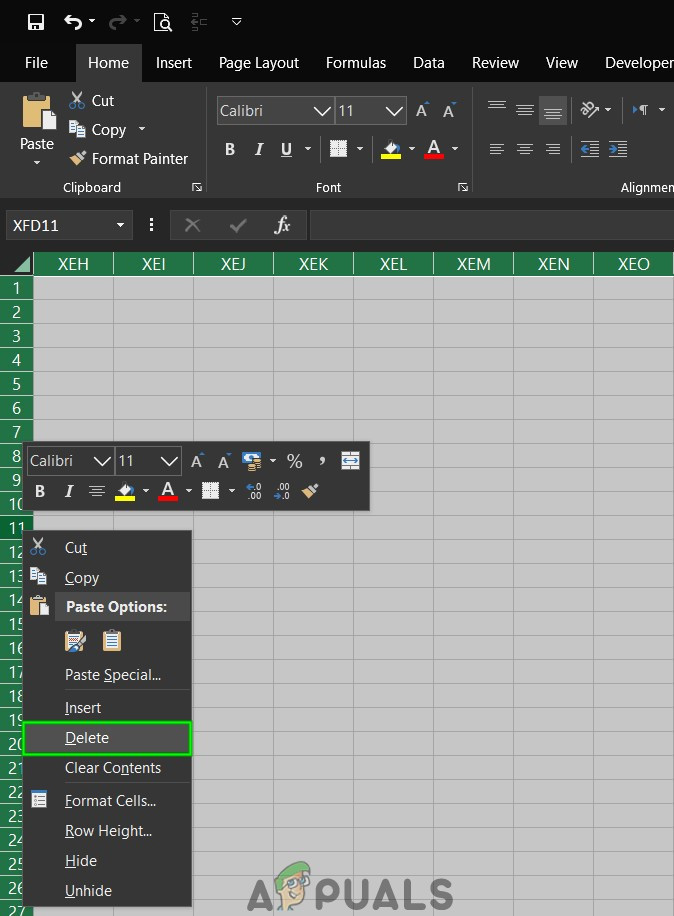
  4. Now right-click on Left of any row so that are selection remains intact. And in the resulting menu, click on the Delete.
    Delete Rows Contents
  5. Save and close the file and then open the file again. And check if you can insert the new row/column in the sheet.

Also, to avoid problems of similar nature, it is always a good idea to not paste data in a spreadsheet using Ctrl + V if feasible otherwise. Then follow the steps below:

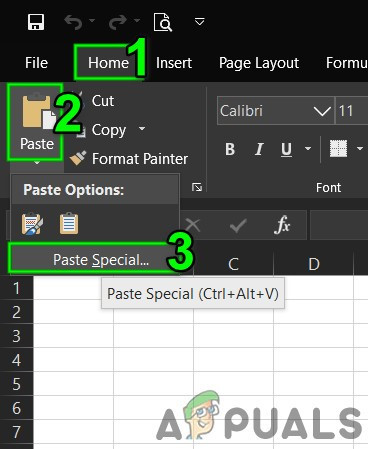
  1. On the Home tab, click on Paste
  2. Now click on Paste Special
  3. Then click on Values.
    Paste Special
  4. Press OK

7. Change the File Format

This error may also be occurring due to the format limitation of the Excel file you are using for example if you are using XLS, then convert it to XLSX, XLSM or CSV or vice versa. Thus, changing the Excel file format may solve the problem.

  1. Open the problematic file.
  2. Click on the File tab and then in the right pane of the window click on Save as.
  3. In Save as dialogue box, click on Save as Type drop-down and then select a different file format that the file is currently using for example if you are using XLS then choose XLSX file format and then click on Save button.
    Select File Format to Save As
  4. Now close the file and Excel and then open the newly saved file and check if you can insert new rows/columns in the sheet.

8. Trust the Source

Excel has a built-in functionality to stop the execution of Excel files from untrusted sources. If the file you are using is from the Untrusted source then Excel’s built-in security functionality will display the error message when the user will try to insert new rows/columns. In that case, adding the location of the file in the Trusted location may solve the problem.

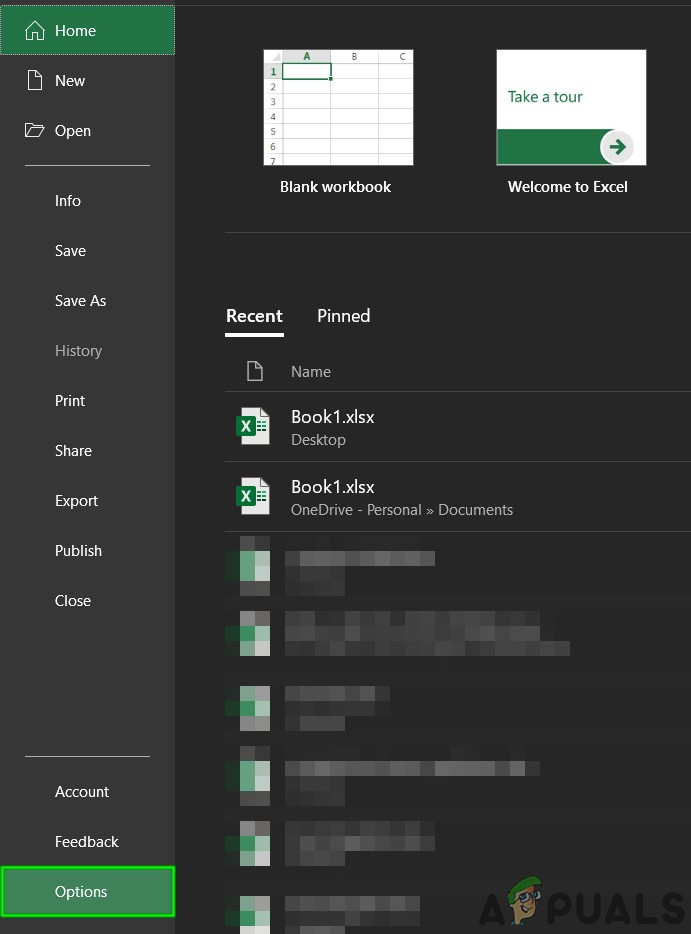
  1. Open the problematic file and click on the File tab and then click on Options.
    Open Excel Options
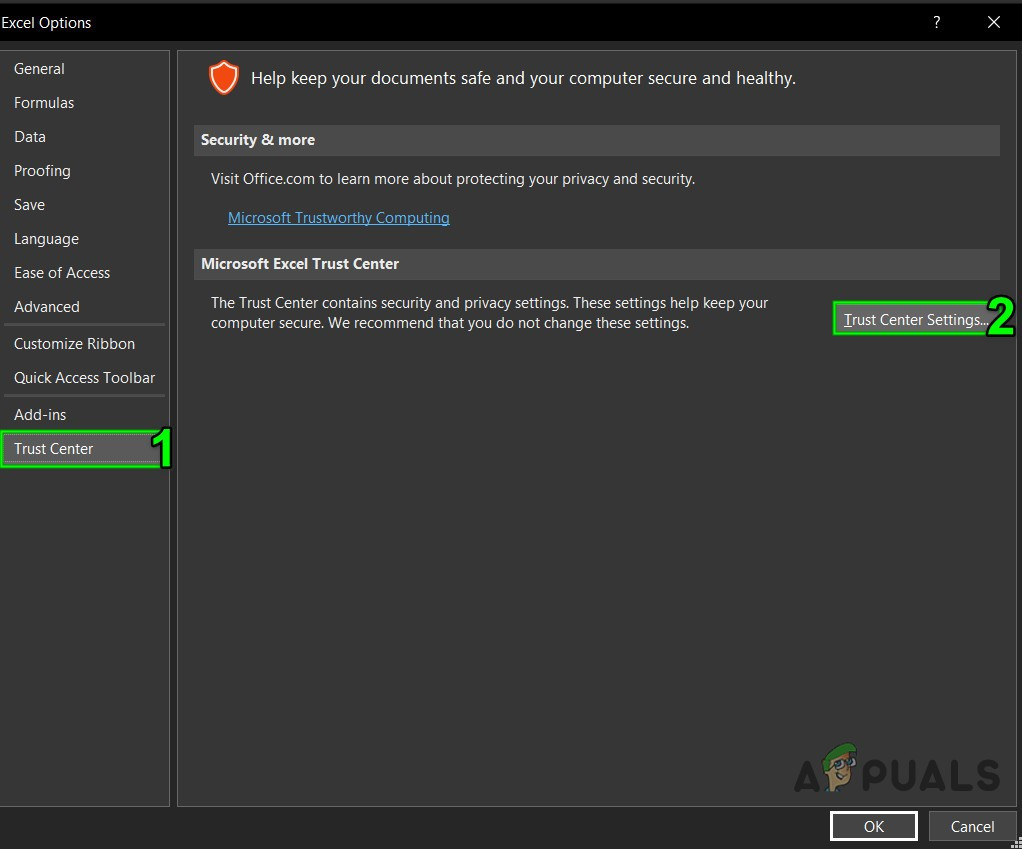
  2. Now click on Trust Center and then click on Trust Center Settings.
    Trust Center Settings
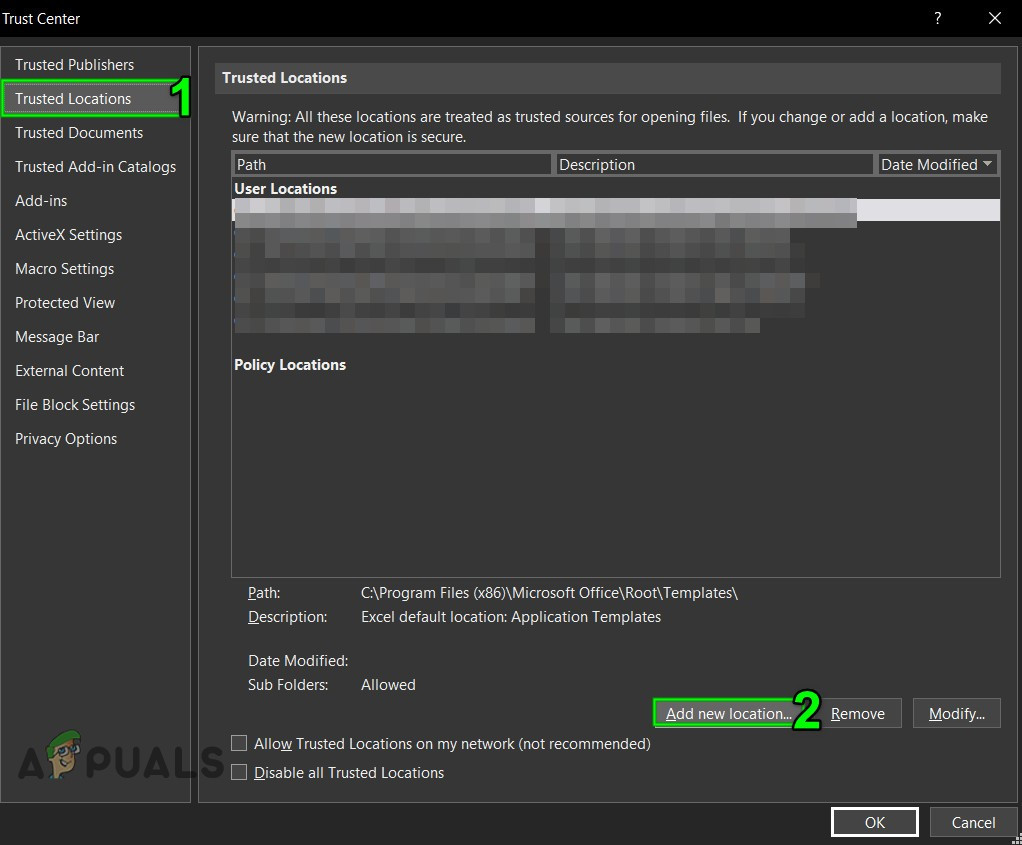
  3. Now click on the Trusted Locations and then click on Add New Location.
    Add New Trusted Location
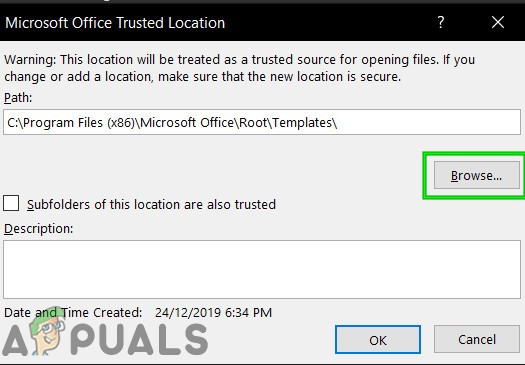
  4. Now in the Trusted Location window, click on Browse.
    Browse to Location
  5. Now navigate to the location of the Excel file and then click Ok.
  6. Again, click Ok and once again click Ok.
  7. Now close the file and Excel and then Reopen the file and check if you can add new rows/columns to the sheet.

9. Use VBA to Force Used Range

If due to a glitch, Excel is not able to add new rows or columns and nothing has helped us so far, then it is time to get our hand dirty with some VBA. Do not worry! Steps are quite simple and straight forward.

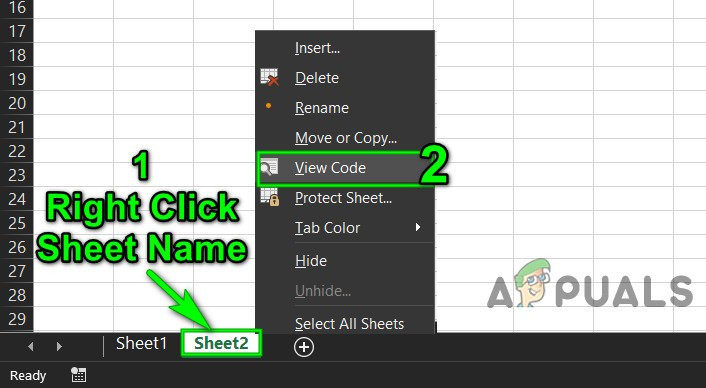
  1. Open the worksheet where you cannot add new rows/columns and then Right-click on the worksheet tab (name of the sheet at the bottom) and in the resulting menu click on View Code.
    View Code after Right Click Excel Sheet Name
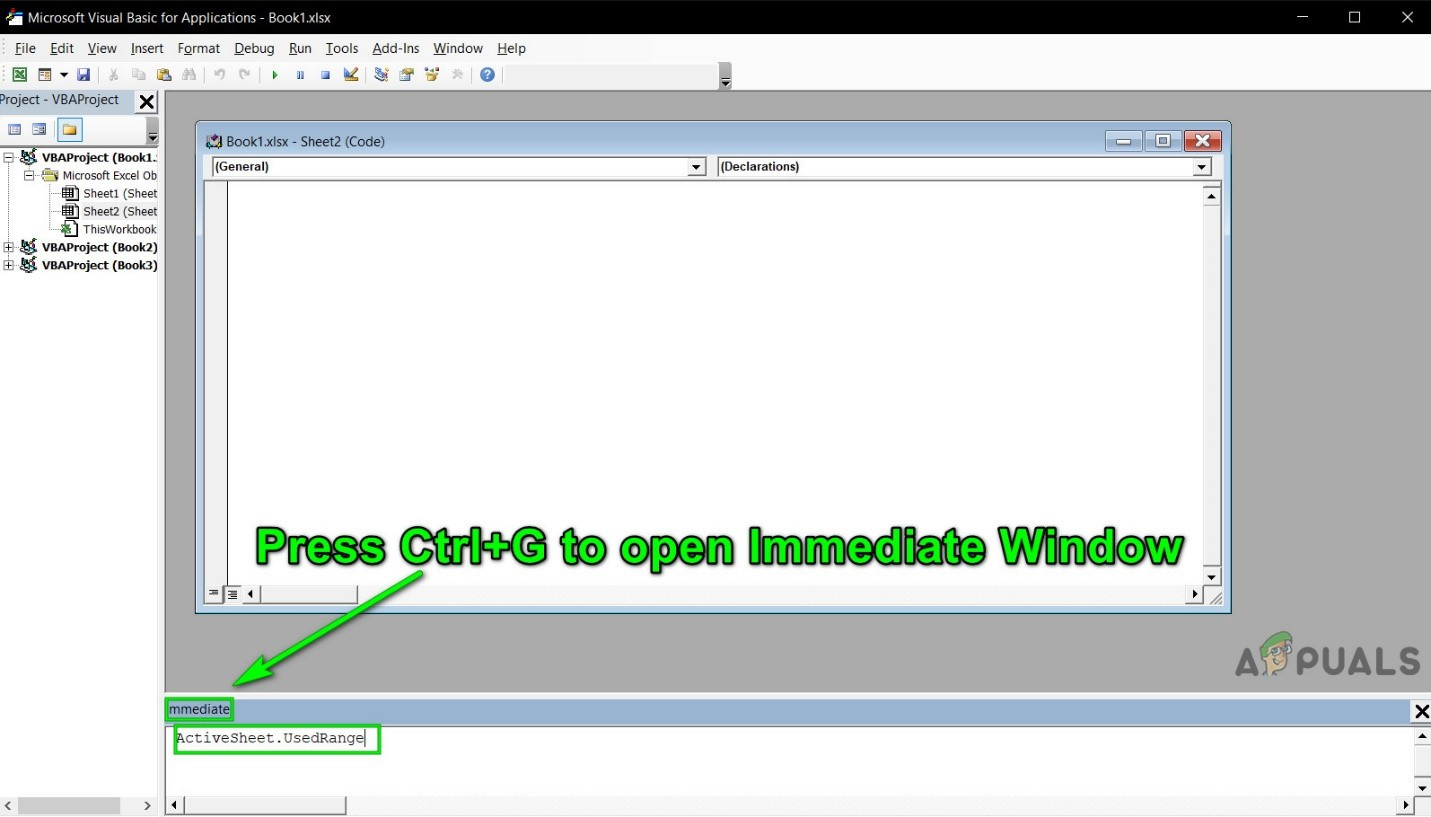
  2. In VBA Editor, press Ctrl+G, which will show the Immediate window.
  3. In the Immediate window, type UsedRange and then press Enter.
    Open Immediate Window
  4. Although nothing will be shown after running the above command, it forces Excel to change the Used Range of the problematic worksheet to conform to just the area where the user data is.
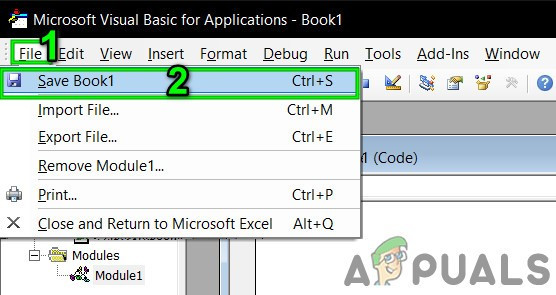
  5. Now click on File and then click on Close and Return to Microsoft Excel.
    Save the VBA File
  6. Save and close the file and Excel and then reopen the file and check if you can add new rows or columns to the file.

10. Copy to the New Sheet

If nothing has helped you, then most probably, the file you are editing is corrupt. In that case, copying data from this file to a new one is the solution left for us.

  1. Open the problematic sheet and select and copy your required data.
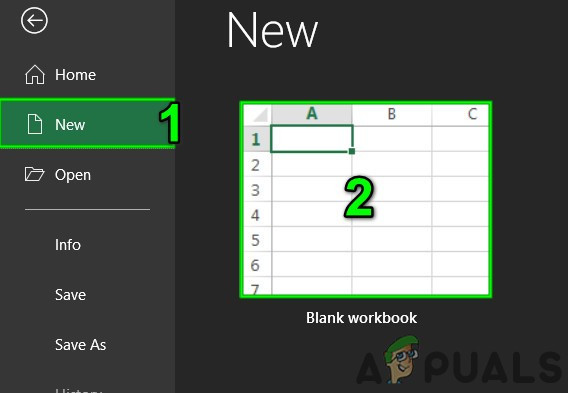
  2. Now click on the File tab and click on New and then click on Blank Worksheet.
    Create New Blank Workbook
  3. Now paste the copied data.
  4. Save and close the new file and reopen the new file and check if you can insert new rows/columns to the sheet.

11. Use the Office Online

If none of the above methods worked for you, then using Office Online may solve the problem as the problem may be due to some issue with your system.

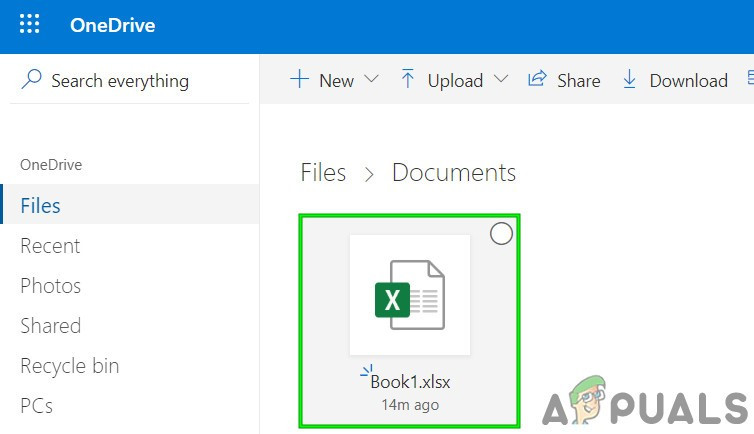
  1. Open and log in to your OneDrive in an internet browser.
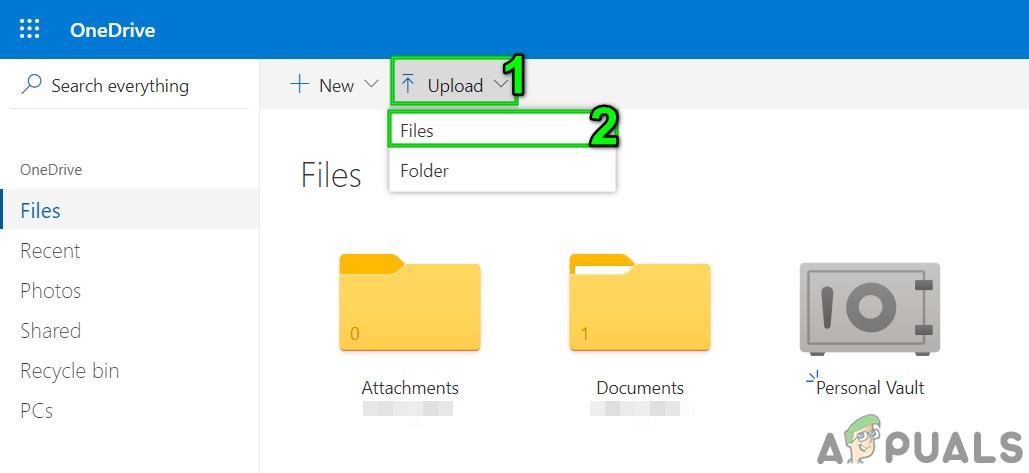
  2. Click on the Upload button and then click on files.
    Upload File to OneDrive
  3. Now navigate to and select your problematic Excel file and then click on Open.
  4. Now in OneDrive, click on your recently uploaded Excel file to open it in Excel Online.
    Open Excel File in OneDrive
  5. Now try to add new rows/columns to the file.
  6. If succeeded, then download the file and use it on your system

The post Cannot Add or Create New Cells in Excel appeared first on Appuals.com.

Fix: Microsoft Excel is Trying to Recover Your Information

$
0
0

‘Microsoft Excel is trying to recover your information’ error occurs because of antivirus false positive, preview pane conflicts, conflicting applications, outdated Excel version, outdated Windows and corrupted Office installations. The user gets stuck in this error message for an indefinite period of time.

Microsoft Excel is trying to recover your information error

What Causes Microsoft Excel is Trying to Recover Your Information Error?

  • False Positive by Anti-virus: Antivirus keeps your system safe from malicious attacks. Sometimes Excel or any of its Add-ins/Macros are detected as malware by antivirus (false positive) and the antivirus will restrict different required features of Excel and thus cause the current error.
  • Preview Pane Conflicts: Excel is known to have issues with the preview pane functionality of File Explorer in  Windows and this incompatibility can be the root cause of the current problem.
  • Conflicting Applications: Certain applications conflict with the legitimate operation of Excel. If any of these applications are installed on your system then you may encounter the current problem.
  • Outdated Excel Version: Microsoft releases frequent Excel updates to keep it bug-free and improve its functionality. If you are using an outdated version of Excel then you are inclined to face many problems including the one at hand.
  • Outdated Windows: Frequent updates of Windows by Microsoft are quite essential for the proper operation of your system. If you are using an outdated Windows build then you are prone to many issues including the current one.
  • Corrupted Office Installation: If Office/Excel installation has corrupted, then it can cause the current Excel error.
  • Conflicting Add-Ins: Add-ins add great functionality to Excel. If there are corrupted add-ins or add-ins which are conflicting with the regular operations of Excel, then you may face the current problem.
  • Incompatible Default Printer: Excel at startup communicates with the default printer of the system. If Excel cannot communicate with the printer or the default printer is not compatible with Excel, then it can force Excel into the current error.
  • Corrupted User Files: Corrupted user files or wrong user configuration can cause Excel to show the current problem.
  • Conflicting Macros: Macros are quite helpful in performing the repeated operations by the user. But the outdated or corrupted Macros can cause the current Excel error.
  • Wrong Region Settings: Wrong region settings of your system or usage of not recommended Regional Format then you may face the current Excel problem

Pre-Requisites before proceeding to Solutions

  1. Check whether the issue is related to a single file or other files are showing the same error. If the problem is related to a single file, then try to open and repair that particular file. If the issue is a general one, then follow the solutions.
  2. If you are editing an Excel file stored on the network, then download the Excel file locally from the network and, then try to edit.
  3. Make sure no external links in the workbook either from formulas, range names, charts, shapes, hidden sheets or queries.
  4. Minimize the number of shapes in the file.
  5. Use only one workbook in Excel and run only one instance of Excel.
  6. File should not be password protected.
  7. If the file is generated by a third party application then the generated files may be corrupted. Test the generated files on another system outside the third-party application.
  8. If Microsoft Excel is in use by another process, this information will be displayed in the status bar at the bottom of the Excel window. If Excel is being used and another action is going on then, Excel may not respond. Let the running task to complete before attempting another action.
  9. Excel files can grow very large when a lot of shapes and formatting are added to it. In that case, you should make sure that the PC has enough memory/RAM to run the application. Try to open the problematic file on a PC with better specs. Also, make sure that your system meets minimum system requirements.
  10. Do not change any excel file name from File Explorer. Use Excel’s Save as command instead.
  11. If you have more than one graphics card, then use the graphics card which is not being used.

1. Temporarily Disable Your Antivirus Program

Antivirus application plays a vital role in the security of your system. Many anti-virus applications are known to have issues with Microsoft Excel by detecting it, Macros or any add-ins of Excel as malware and restricting their access to certain required features and thus cause the current error. In that case, disabling anti-virus temporarily may solve the problem.

  1. Turn off your Anti-virus.
  2. Launch Microsoft Excel and open the problematic files and check if Microsoft Excel has started to work properly.
  3. If it is working fine then you have to create an exception for the Excel or the problematic file in the antivirus or otherwise replace it with another non-conflicting antivirus application.

Warning: Change your antivirus settings at your own risk as this step makes your system vulnerable to fraudulent, viral or malicious attacks.

2. Disable the Preview Pane in File Explorer

For a better user experience, Windows has different panes like Preview pane, the Details pane, and the Navigation pane. Preview pane, as the name implies, is used to preview the contents of certain types of files while staying in File Explorer. For example, if you select an image file in File Explorer, you can see a preview of it; if you select an Excel file, you can also preview its contents. But Excel is known to have issues with this preview pane functionality. In that case, disabling Preview pane may solve the problem.

  1. Press WindowsE to open File Explorer
  2. In the View tab, click on Preview Pane.
    Disable Preview Pane
  3.  Open Excel and check if Excel is functioning without any problem.

3. Run Excel in Safe Mode

Your Excel might get stuck in the ‘recovering information’ Window because of certain add-ins and Excel startup settings. Excel has a built-in Safe Mode to open Excel without certain types of add-ins and startup settings. When Excel is launched in Safe Mode, it will bypass functionality and settings like changed toolbars, alternative startup location, the xlstart folder, and Excel add-ins (COM add-ins are excluded).

  1. Press Windows+ R to open the Run command box.
  2. In the Run command box type and then click Ok,
    excel.exe/safe
Run Excel in Safe Mode

Now check if Excel has started to operate normally. If so, then try to find out the problematic Excel Setting that is causing the issue either by disabling add-ins or repairing Excel.

4. Disable Excel Add-ins

Excel add-ins add a great deal of functionality to it. However, sometimes, poor written add-ins or add-ins written for an older version of Excel start to interfere in the regular operation of Excel and thus goes in an endless loop of ‘trying to recover your information’. In that case, disabling Excel add-ins may solve the problem.

    1. Open the problematic Excel file. If you can not open Excel then boot the system into Safe Mode or launch Excel in Safe Mode.


  1. Click on the File menu and then click on Options.
    Open Excel Options
  2. Click on Add-ins and then in the Manage dropdown box select the type of add-ins you want to disable for example click on Excel add-ins and then click on the Go
    Manage Excel Add-ins
  3. Uncheck all boxes and click OK
    Uncheck all Add-ins
  4. Now save and close the file and reopen
  5. Now check if Excel has started to perform normally. If so, then enable the add-ins one by one and restart Excel after each enabling of add-in till you single out the problematic add-in and then keep that add-in disabled. Then look and install the updated version of that problematic add-in.

5. Tweaks with Macros

A macro is a sequence of instructions that Excel executes when you tell it to. The possibilities of Macros are endless. Sometimes Macros conflict with the operation of Excel and cause trouble with its normal operations. For troubleshooting purposes, we can recompile the Macros and see if it solves the problem.

  1. Open Excel and then press Alt+F11 to open Microsoft Visual Basic for Applications.
  2. Now on the menu bar, click on Tools menu and then in the drop-down menu click on Options.
  3. Now in the Options window, click on the General tab and uncheck the option “Compile on Demand” and press Ok.
    Uncheck Compile on Demand
  4. Now in the Visual Basic, click the Insert menu and then click on Module.
    Insert New Module in Visual Basic
  5. Now click on the Debug menu and click on Compile VBA Project.
    Compile VBA project
  6. Now click on the File menu and click on Save.
    Save the VBA File
  7. Now click on the File menu and then click on Close and Return to Microsoft Excel.
    Close and return to Microsoft Excel
  8. Save and close the file and Excel.
  9. Now reopen Excel and then check if Excel has started to function normally.

6. Disable Macros

Macros developed for the older versions of Excel can sometimes have compatibility issues with Excel and the application security can force Excel to go into the endless loop under discussion. In that case, disabling the Macros may solve the problem.

  1. Open Excel. If you cannot open Excel normally then use Excel in safe mode.
  2. Click the File menu and then click on Options.
    Open Excel Options
  3. In the left pane of Window Click on Trust Center and then in the right pane of the window, click on Trust Center Settings.
    Trust Center Settings
  4. Click on Macro Settings and then click on Disable all macros without notification.
    Disable All Macros without Notification
  5. Now click on Trusted Documents and Uncheck Allow Documents on a Network to be trusted and check on Disable Trusted Documents and click Ok.
    Disable Trusted Documents
  6. Save and close the file and Excel.
  7. Open Excel and check if Excel has started to function properly.

7. Change the Default Printer

When Excel starts up, it communicates with your system’s default printer. And if this communication fails, Excel sometimes go in the endless loop of ‘Trying to recover your information’. In that case, changing the default printer may solve the problem. You can use any printer as default but a soft printer like Microsoft XPS Document Writer is recommended for testing purposes.

  1. Exit Excel
  2. Press the Windows button and type Printers and in the resulting list click on Printers & Scanners.
    Open Printer & Scanners
  3. Now in Printers & Scanners windows, click on “Microsoft XPS Document Writer” and then click on Manage.
    Manage Microsoft XPS Document Writer
  4. Now in Microsoft XPS Document Writer management window, click on Set as default.
  5. Now open Excel and check if Excel has started to function normally.

8. Change Region Settings and Regional Format

If the region and language settings are different from your actual location and Regional Format is not as per the recommended one, then it can cause Excel to go into the endless loop. In that case, correcting the region and using the recommended Regional Format may solve the problem.

  1. Press Windows key and type Region and in the resulting list click on Region Settings.
    Open Region Settings
  2. Now in the right pane of the window, select Country or region which matches your location.
    Change Country or Region as per your location
  3. Now under the Regional Format, select the option which has Recommended with it.
    Change Regional Format to Recommended
  4. Now restart the system.
  5. After the system is restarted, launch Excel and check if Excel has started to work normally.

9. Update Microsoft Excel to the Latest Version

Microsoft releases new updates for Excel to improve performance, add new features and fix bugs in Excel. If you are using an outdated version of Excel, it can cause trouble with normal operations of Excel which includes the situation under discussion. In that case, updating Excel may solve the problem.

  1. Open Microsoft Excel and click on the File tab.
  2. Select Account and then click on Update Options
  3. Now click Update Now
    Update Microsoft Excel
  4. Let the updates complete.
  5. Restart your PC and launch Excel and check if Excel has started to operate normally.

10. Update Windows to the Latest Version

Microsoft frequently releases Windows updates to improve Windows, add new features to it and to patch software/hardware loopholes. Outdated Windows versions are known to cause several problems with Excel itself. In that case, updating Windows to the latest version may solve the problem.

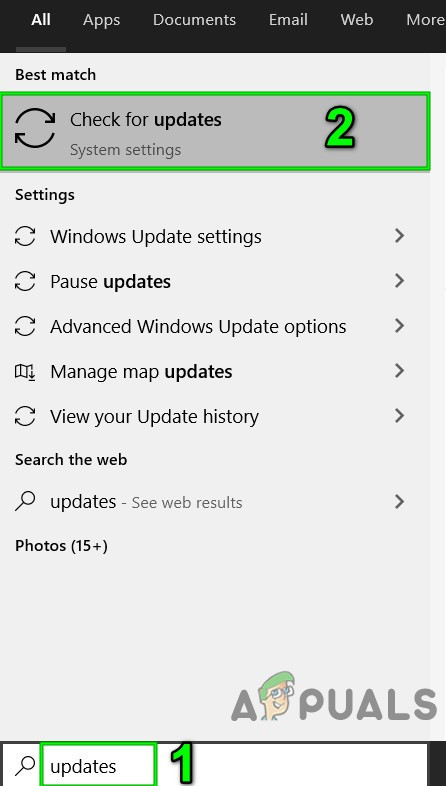
  1. Press Windows key and type updates.
  2. In the resulting list, click on Check for Updates.
    Check For Updates in Windows Search
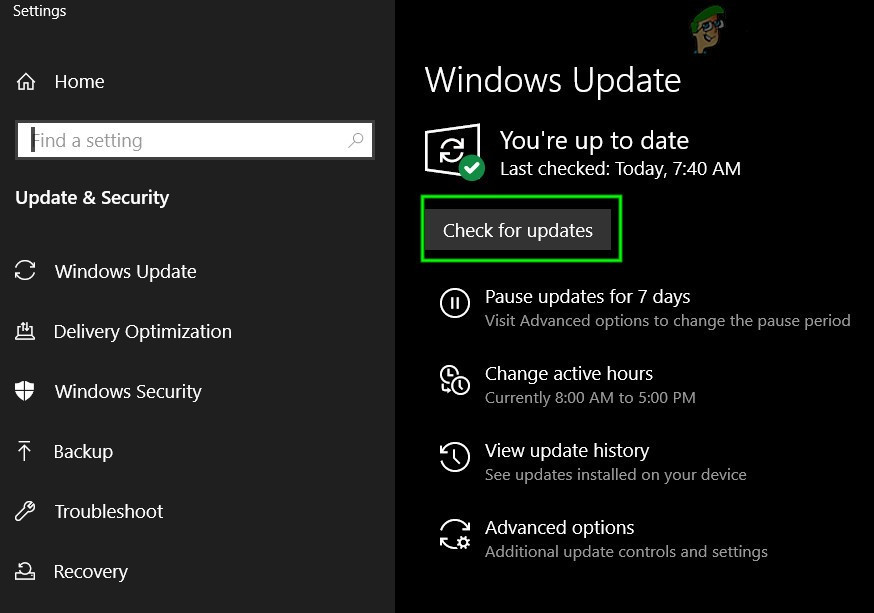
  3. Now in the Windows Update, click on Check for Updates.
    Check for Updates in Windows Update
  4. After completion of updates, Restart the system.
  5. After the system is restarted, open the Excel and check if Excel has started to function properly without any problem.

11. Use Safe Mode or Clean Boot Windows

When Windows is started, several applications and services start automatically and then run in the background. These applications and services can interfere with the regular operation of Excel and cause unexpected issues (they conflict with the mechanics involved in running Excel). You can boot your system into Safe Mode or clean boot Windows to check if there are any conflicting application exists.

  1. Boot system into Safe Mode or Clean Boot Windows.
  2. Launch Excel and open problematic file.

Now check if Excel has started to function normally.

12. Create a New User Account

Conflicting user configurations or corrupted user files can force the user to face the endless loop of Excel is trying to recover your information. Here, creating a new user with administrator privileges may solve the problem.

  1. Create a new local administrator account.
  2. Navigate to the following path
    c:\windows\temp.
    Open Windows Temp Folder
  3. Press Ctrl+A to select all the items of the folder and press Shift+Delete to delete all the items (do not worry! You will not be able to delete some of the items, ignore them).
  4. Restart the system and then launch Excel and check if Excel has started to operate properly.

13. Repair Microsoft Office/Excel

If none of the above methods work, there is a high probability that your Excel installation itself is somehow corrupt or has missing files. Running the Microsoft Office built-in repair tool will clear any issues with the installation and thus may clear the problem.

  1. Press the Windows button and type Control Panel.
    Open Control Panel
  2. Click Programs.
    Open Programs
  3. Now click on Programs and Features.
    Open Programs and Features
  4. Click the Office you want to repair, then click Change.
    Click Change Microsoft Office
  5. If UAC prompts, click yes.
  6. Now select Quick Repair and click Ok.
    Quick Repair Office
  7. Click Repair, then click Continue.
  8. Wait for the completion of the repair process and then restart your computer. And check if Excel has started to function properly.
  9. If not, then repeat step-1 to step-5.
  10. Now in Control Panel, select Online Repair and click Ok.
    Online Repair Office
  11. Click Repair, then click Continue.
  12. Wait for the completion of the repair process and then restart your computer.
  13. Launch Excel and check if Excel is operating without any problem.

Note: This will repair the whole Office suite even if you want to repair just Excel. If you have a standalone version of Excel, then in the control panel search for Excel by name and repair it following the above steps.

Hopefully, now you can use Excel without any problem. If you still are facing the problem, then try to uninstall and reinstall Excel. Also, if you are using the 64-bit version of Excel then try using the 32-bit version of Excel to see if it helps.

The post Fix: Microsoft Excel is Trying to Recover Your Information appeared first on Appuals.com.
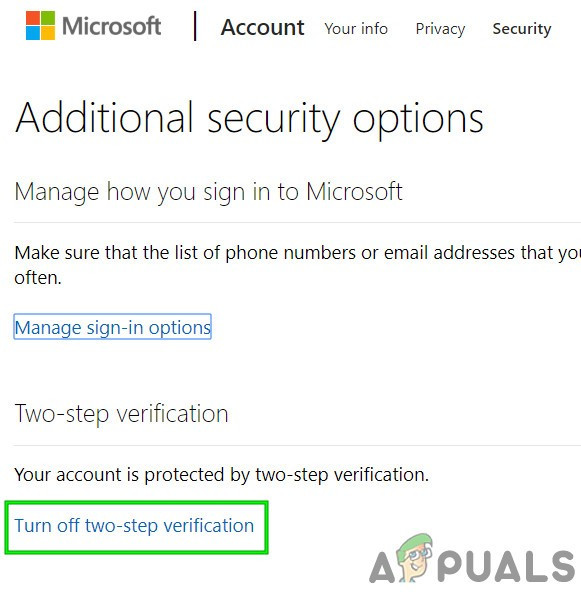
Samsung TV: Standby Light Flashing Red (Fix)

$
0
0

According to some recent reports users have been encountering issues with their Samsung TV where it doesn’t turn on and flickers the red light for some time. This issue is usually caused by a bad power supply but it can also occur in some cases due to a glitched HDMI link.

Samsung TV Won’t Turn on issue.

What Prevents the Samsung TV from Turning on?

  • Bad Power Supply: In some cases, the TV might have shorted its power supply due to an excessive inflow of electric current. This might have damaged either the whole power supply or some components on it such as capacitors, transistors, etc. This is a fairly common occurrence with many electric components because a power surge can seriously put a strain on the efficiency and the restraint of the components.
  • Incorrect Launch Configurations: It is also possible that the launch configurations of the TV might have been corrupted due to which it is facing this issue while trying to start up. Launch configurations are stored by the television to decrease the startup time and save certain information while the TV is being shut down. However, if corrupted, it can prevent it from being able to startup altogether. This can also sometimes cause an issue where the TV doesn’t connect to Wifi.
  • HDMI Glitch: In some cases, it was observed thadddddt the Samsung TV was facing issues with the startup because the user was previously using a PS4 or an Xbox with it. After using the console, you might have turned it off directly without switching the HDMI source and now the console might be preventing the TV from turning on.
  • Surge Protector: If you are using a surge protector device with the TV and it isn’t connected directly into the power outlet, the issue might be with the surge protector. Because, in some cases, the surge protector might have worn out over time and it might not be supplying enough voltage to the TV for it to turn on.
  • Source Selection: In some cases, the correct source might not be selected from the TV due to which it is facing issues while launching. This is a fairly common mistake that most users make and it prevents the TV from turning on because it can’t receive the signal correctly from the source.

1. Identifying the issue

It is very important that first, we try to identify the issue and isolate the reason behind its occurrence. For this, we will be trying some basic checks to uncover whether the issue is with the hardware or the software of the television. For that:

  1. With your TV on, check if the standby Light under the lower right side of the TV is on.
    Location of the Standby LED.
  2. If it is, press the “Power” button on your remote to turn it On and check if the LED is turned off.
    The power button on the Samsung TV
  3. If it turns off, it means that the TV is connected properly to the power supply.
  4. Also, make sure that the screen is being powered by tapping your finger lightly on the screen.
  5. If the screen blinks it means that the screen is also functioning properly.
  6. If the screen doesn’t blink or the LED doesn’t turn off it means that either there is an issue with your remote, the power supply or the screen is faulty. There is also a possibility that you are experiencing a black screen on the Samsung TV.
  7. You can continue trying to fix your TV with the methods below.

2. Powercycle the TV

In some cases, corrupted launch configurations can prevent the TV from being able to power on correctly. Therefore, in this step, we will be power-cycling the TV to completely get rid of the launch configurations which will be regenerated by the TV automatically. For that:

  1. Unplug the TV completely from power and remove the power cable from the wall outlet.
    Unplugging Power from the TV
  2. Press and hold the “Power On” button on the TV for at least 15 seconds.
  3. Plug the TV back in and power it on.
  4. Check to see if the issue persists after turning on your TV.

3. Unplugging Extras

It is also possible that the HDMI source selection on your TV has been glitched due to which it is facing problems while turning on. Therefore, it is recommended to unplug any devices that you have plugged into your TV’s HDMI slots. Be it your PS4, Xbox, cable box or any other device. Once unplugged, launch the TV and check to see if it launched correctly. If it does, change its source to HDMI 1 and connect the extra console in the HDMI 2 slot. After that, you can select HDMI 2 to go into the console’s view and remember to change back to HDMI 1 before turning off the TV.

Unplugging cables from the HDMI slots on the Samsung TV

4.Contacting Customer Support

If the above workarounds didn’t fix your issue, it is most likely a hardware one. Therefore, it is recommended that you contact Samsung’s customer support as soon as you can and get the TV in for service. If it is under warranty, you can also file a claim with Samsung’s customer care center.

The post Samsung TV: Standby Light Flashing Red (Fix) appeared first on Appuals.com.
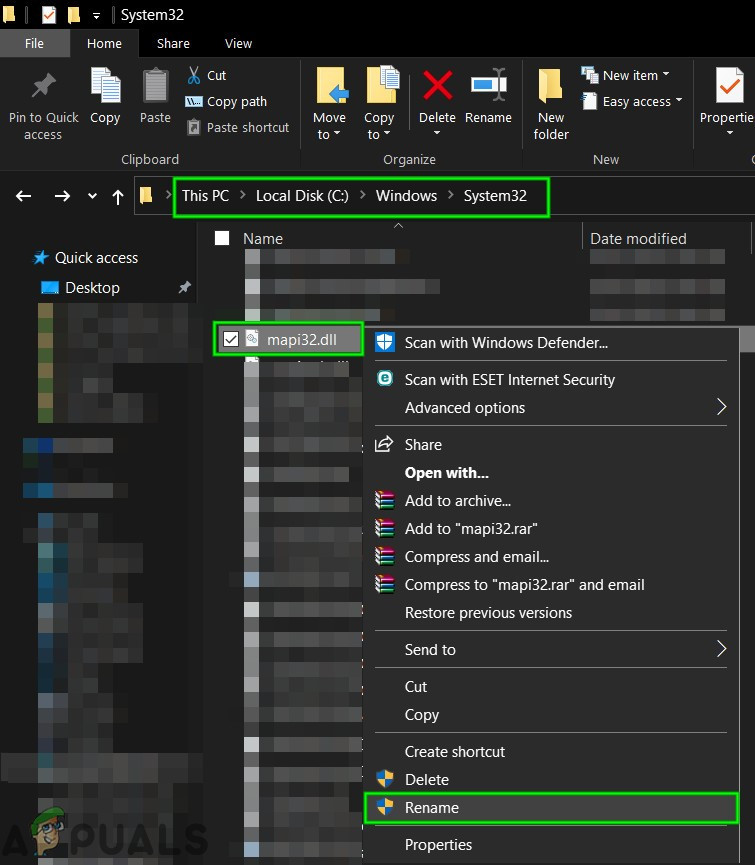
How to use Mouse and Keyboard on PlayStation 4

$
0
0

Mouse and keyboard are the input devices for a computer. It provides easy and better performances than a controller of a PlayStation. However, you can also use a mouse and keyboard on PlayStation just as you can use a controller on PC. PlayStation supports the keyboard for several applications, as it is hard to type with a controller. In this article, we will show you the methods of connecting a mouse and keyboard to your PS4.

Using the mouse and keyboard on PlayStation 4.

How to Use Mouse and Keyboard on PlayStation 4?

Most keyboards and mice will work the same as they work on a normal PC. Normally, it will be a plug and play for any keyboard and mouse, but there are some rare cases where the user needs to pair the device to PS4. However, by directly connecting, you will only be able to play some of the games on PS4 and not all. That is because some games do not support mouse and keyboard. If a user wants to play all games on PS4 with mouse and keyboard, then they can use the adapters specially made for mouse and keyboard converting. It can convert the mouse and keyboard inputs into a controller output for the game to make it work.

1. Connecting Wired Mouse and Keyboard to PlayStation 4

Wired devices will require fewer steps to connect to your PlayStation. Most of the wired mouse and keyboard will not require the pairing and connect directly as plug and play. It works the same as connecting a controller to your PlayStation.

  1. Sign in to your PS4. Plug-in your mouse and keyboard to PS4 USB ports.
    Note: You can use a USB hub to connect multiple devices because PS4 has only 2 slots.
    Plug-in mouse and keyboard in PS4 USB ports.
  2. Wait for 5 seconds to get the notification on screen for connecting. It will start working right away.
    Note: It may ask for who is using the device. Choose the profile that you want to use the device for.
    Notification for the connected devices.
  3. Some keyboards will require the pairing keys to be pressed before it works depending on the keyboard.
  4. You can also check the Settings for your keyboard. Press the PS button on the controller, then press the UP button. Now open Settings and choose Devices. You can find External Keyboard there to check settings for it.
    Opening external keyboard settings for modifications.

2. Pairing Wireless Mouse and Keyboard to PlayStation 4

The pairing of the device will connect it to your PS4 for use. Most controllers on PS4 already work wirelessly. You can add the mouse and keyboard the same way as controllers to make it work. Some wireless devices like Headphone, Controller, Keyboard, and Mouse also use Bluetooth to connect to PS4.

Important: Make sure your wireless devices are turned on.

  1. Connect your wireless dongle receiver unifying USB adapters for mouse and keyboard to PS4.
    Note: You can use the USB hub to connect multiple devices because PS4 just has two USB ports.
    Connecting wireless USB dongle to USB ports.
  2. PS4 will recognize the mouse and keyboard within 30 seconds and show the notification on your screen. It will be ready to work right away.
  3. If you are using a Bluetooth mouse or keyboard, you need to pair it to your PS4.
  4. Press the PS button on the Controller. Press the UP button and go to Settings, then select Devices option. Open Bluetooth Devices and you will find your device there, select your device to use.
    Finding your device in the Bluetooth devices list.

    Note: You need to put your device in pairing mode to find it in the list.

The post How to use Mouse and Keyboard on PlayStation 4 appeared first on Appuals.com.
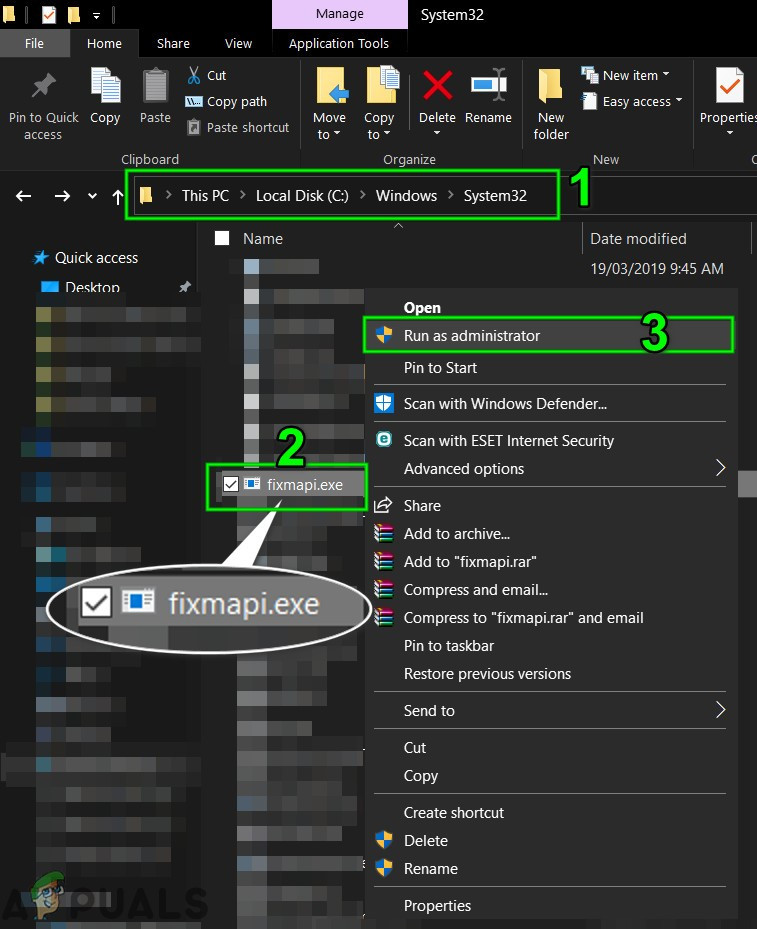
How to Reset your Samsung TV to its Factory Default Settings?

$
0
0

The Televisions of this era contain numerous additional features and come packed with software that comes pre-installed. They also include the option to customize many settings and allow you to install third-party applications. However, sometimes, there might be a need to reset the television to the factory defaults because of incompatibility and we will be doing exactly that in this article.

Samsung TV

Reset Samsung TV

You need to be careful before proceeding with these steps because they will cause you to lose all of your stored data and you might also need to install some firmware updates afterwards. There are two types of Samsung Interfaces and we have included the steps for both of them. Follow the ones that relate to the interface of your TV.

1. Reset Steps for Interface 1

This type of interface includes the reset options in the main menu. In order to reset the TV:

  1. Get ahold of your TV remote and get into the settings.
  2. Select the “General” option and select the “Reset” button.
    Opening General Settings
  3. Enter in the Pin that you have configured.
    Note: The default pin is 0000 for most TVs and unless it has been manually changed, this should allow you to bypass this setting.
  4. Select the “Reset” again and click on “OK”.
  5. Wait for the reset process to complete and power on your TV.

2. Reset Steps for Interface 2

The second type of interface includes a more sophisticated setting arrangement to reset the TV.

  1. Grab your TV remote and navigate to settings.
  2. Click on the “Support” button in the menu and select the “Self Diagnosis” option.
  3. Select “Reset” and enter your Pin number.
    Selecting the “Reset” option in “Self Diagnosis”.

    Note: Unless you changed this setting manually the Pin number should be “0000”.

  4. Select the “Reset” option again and select the “OK” option.
  5. Wait for the reset process to be completed and power on the TV.

How To Reset the TV Pin if Forgotten

In some cases, you might have forgotten the PIN after changing it manually. Not to worry, there is a convenient method to reset this back to the default. In order to do so:

  1. Turn off your TV.
  2. Now press the following keys in succession to reset the TV PIN.
    Mute > 8 > 2 > 4 > Power
  3. Power the TV back on and the PIN should now be reset back to “0000”.

The post How to Reset your Samsung TV to its Factory Default Settings? appeared first on Appuals.com.
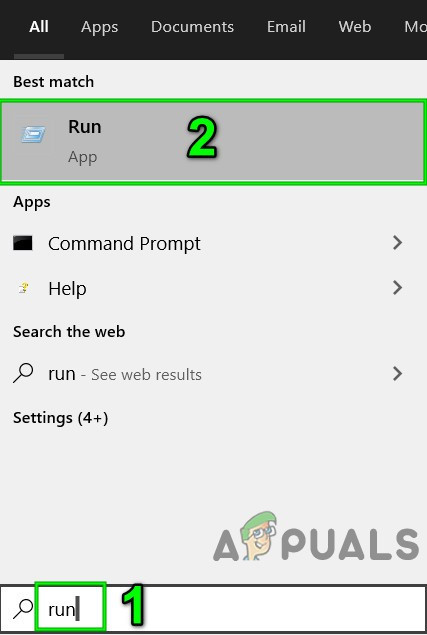

(Fix) Netflix not Working on Roku

$
0
0

There have been quite a few reports recently where users are unable to use Netflix on their Roku devices and this is mainly occurring due to faulty internet connections. This issue might also be triggered due to the build-up of corrupt launch configurations on the devices.

Netflix

What Prevents Netflix from Working on Roku?

  • Internet Issues: The problem is mainly encountered due to an issue with the internet that the device is using to establish a connection with the Netflix servers. The connection might either be unstable or slow which prevents it from being able to stream the service properly. This issue can occur due to the Error Code 009 which prevents Roku from connecting to the internet.
  • Outdated App: In some cases, the problem might be encountered due to an issue with the application being outdated. It is important that the Netflix app is updated regularly to accommodate the new protocols to which the servers are updated too, in order to match the new configurations.
  • Outdated Device: There might be an incompatibility between the device and the application due to which the issue is being encountered. The device needs to be updated to the latest firmware version to eradicate any incompatibilities between the app and the Roku device. An outdated device might also throw the Error Code 003 which prevents users from achieving the complete functionality of the device.
  • Netflix Account Restriction: The Netflix account that you are using might be placing restrictions on it which are preventing it from being able to sign in to multiple devices. Either the account might be limited to be able to run in only one device or it might be signed in to more devices than allowed by the service.

1. Check Service Status

In some cases, it is possible that the Netflix service might be temporarily down due to which the issue is being encountered. Therefore, we will be checking to see if there are any service outages on Netflix’s end. For that:

  1. Open your browser and click this link.
  2. Check for the “Netflix is Down” or the “Netflix is Up” option.
    Checking Service Status
  3. If there aren’t any issues with the status of the service, proceed with the steps below.

2. Power Cycle Devices

In certain scenarios, the devices involved in the process might have cached corrupt launch configurations due to which the error is being triggered. Therefore, in this step, we will completely power cyce the devices to get rid of this corrupt cache. For that:

  1. Unplug your devices from the power outlet.
    Unplugging power from the equipment
  2. Press and hold the power button for at least 30 seconds.
  3. Plug the devices back in and wait for internet access to be granted.
  4. Check to see if the issue persists.

3. Update Device

It is possible that an outdated firmware is causing the issue on your device. Therefore, in this step, we will be updating it manually. For that:

  1. Press the “Home” button on your device and click on “Settings”.
  2. In settings, select the “System” option and click on “System Update”.
    Selecting System Update in Settings
  3. Click on “Check Now” to check for available updates.
  4. Wait for the checking process to be completed.
    Waiting for the check process
  5. Click on the “System Update” and you will be informed of the status of the device.
  6. If new updates are available, you will be prompted to download them.
  7. After installing the new updates, run Netflix and check to see if the issue persists.

Note: Roku will automatically install updates to any application installed during this process.

The post (Fix) Netflix not Working on Roku appeared first on Appuals.com.
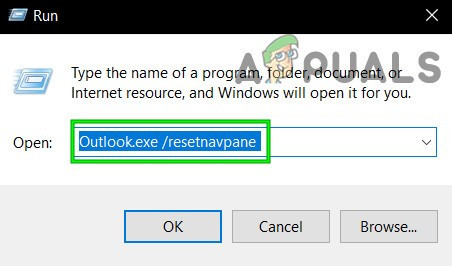
How to Enable Dark Mode on Google Chrome

$
0
0

After the surprising absence of any kind of a Dark Mode option from the world’s leading internet browser, Google finally added a Dark Mode to Chrome. Dark Mode for Google Chrome is available across all devices, with the feature being known as Dark Mode on the desktop version of Chrome and Dark Theme on its mobile counterpart. Be it on your personal computer or your phone/tablet, if you want Chrome to go dark, it is now not only possible but also fairly easy.

Dark Mode on Google Chrome

As of Chrome 73 and Chrome 74, Dark Mode is available for both, MacOS and Windows respectively. With these updates, Chrome had a dark theme that responds to the currently configured system-wide theme built into it. Chrome’s Dark Mode is automatically triggered and enforced when the system-wide theme on Windows 10 or MacOS 10.14 and later is changed to Dark. If, however, you want to enable Dark Mode specifically for Chrome and leave the rest of your computer’s color palette unchanged, that too can be arranged. Here’s two different ways you can use Chrome in Dark Mode without changing your computer’s system-wide color theme:


1. Force Google Chrome to Enable Dark Mode on launch

Google Chrome does have a dark theme built into it – there just isn’t an interface for you to enable it from within the program. But, with a bit of very simple tinkering, you can force Chrome to always launch with Dark Mode enabled. This option is only going to work for those of you using Windows 10.

  1. Locate a Chrome shortcut – this could be on your Desktop, your Taskbar, or anywhere else on your computer, and right-click on it. If you’re using a Taskbar shortcut, you’re going to have to perform the added step of right-clicking on Google Chrome in the resulting context menu before you proceed.
  2. Click on Properties in the resulting context menu.
    Right-click on the Google Chrome shortcut in the Taskbar, right-click on Google Chrome, and click on Properties
  3. In the Target field, type the following, separated from what already existed in the field with a space:
    --force-dark-mode

    The Target field should now look something along the lines of:

    "C:\Program Files (x86)\Google\Chrome\Application\chrome.exe" --force-dark-mode
    

    Note: What’s in the field may vary slightly depending on the directory Chrome is installed in on your computer.

    Add “–force-dark-mode” to the Target field
  4. Click on Apply.
  5. Click on OK.
    Click on OK
  6. Launch Google Chrome and feast your eyes on the glorious darkness!

Hot Tip: The change only takes effect once you’ve restarted Chrome, so to save yourself some trouble and confusion, close Chrome before you begin.


2. Install a theme that’s Dark

One of the most appealing features Google Chrome has brought to the table since way back in the day is the ability to download and install themes that completely transform the way the internet browser looks. While a dark theme will leave some parts of Chrome (such as the Settings page) untouched, it will be applied to all of the parts you see the most, turning them dark (possibly even darker than Chrome’s actual Dark Mode). For someone on MacOS who can’t force-enable Dark Mode for Chrome or someone using an older version of Windows like Windows 7, that’s as good as it gets – and it’s good enough. To install a reasonably dark theme on Chrome, you need to:

  1. Launch Google Chrome.
  2. Make your way to the Chrome Web Store page for the Just Black theme.
    The Just Black theme’s Chrome Web Store page
  3. Click on Add to Chrome.
    Click on the Add to Chrome button
  4. Wait for the theme to be downloaded and applied to the internet browser.

The change will take effect immediately, and the Just Black theme is actually a fair bit darker than Chrome’s actual Dark Mode. To top it all off, Just Black comes directly from the people behind Chrome and not a third-party! You can also alternatively search the Chrome Web Store for other dark themes and pick out one you like more.


How to Enable Dark Theme on an Android device

Google has made Dark Theme available on all Android devices running Android 5.0 or higher. To enable the Dark Theme for Google Chrome on an Android device, simply:

  1. Open the Google Chrome app.
  2. In the top-right corner of your screen, tap on the More icon (represented by three vertically aligned dots).
  3. In the resulting menu, tap on Settings.
    Tap on Settings
  4. Tap on Themes.
    Tap on Themes
  5. Tap on Dark to switch to the Dark Theme. The System Default option makes it so Chrome only enables the Dark Theme when your device is running low on battery and Power Saver mode kicks in or if the system-wide color theme for your device is changed to Dark.
    Select the Dark option

You will see the change take effect immediately.


How to Enable Dark Theme on iOS and iPadOS

Dark Theme is available on all Apple devices running on iOS 13 (or later) and iPad 13 (or later). Unfortunately, there is no way for the user to activate or deactivate the Dark Theme on Google Chrome independent of their device’s system-wide color theme setting. This means that if you want to enable the Dark Theme for Google Chrome on iOS or iPadOS, you are going to have to enable your iPhone or iPad’s Dark Mode.

There is, sadly, no way for you to force Google Chrome to switch to Dark Theme and disregard your device’s system-wide theme – the two are bound together and there’s no going around it. If you enable Dark Mode on your iPhone or iPad, Google Chrome will switch to its Dark Theme. And if Dark Mode is disabled, Google Chrome will go back to its usual, light self.

The post How to Enable Dark Mode on Google Chrome appeared first on Appuals.com.
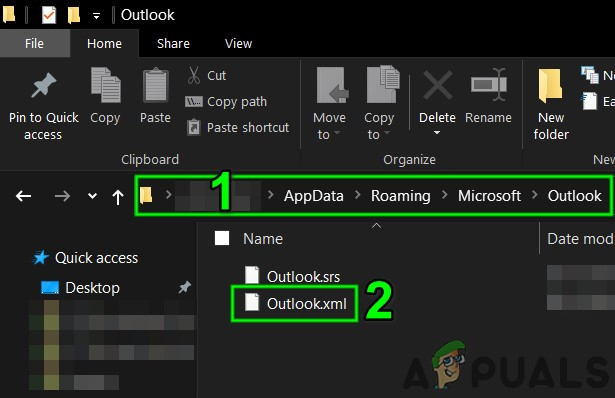
What is eMMC Storage and How is it Different from Other Storage Devices?

$
0
0

eMMC storage can be found as the internal storage for some devices and users wonder what kind of storage it is. We all are familiar with SSD and HDD storage devices, but we have less knowledge about eMMC storage. eMMC can found in PCs, phones, and tablets. In this article, we will discuss eMMC storage and how it is different from other devices.

What is eMMC?

What is eMMC Storage?

eMMC stands for Embedded MultiMediaCard and It is an advanced managed NAND flash storage that is soldered directly to the motherboard or the device.  eMMC storage is more affordable and cheaper than other storage. eMMC is usually found in smartphones, tablets and some budget personal computers. MMC is the predecessor of eMMC and they were used in the earliest MP3 players and digital cameras. eMMC comes in the size of 32GB, 64GB or rarely 128GB. It is made for working on smaller size files. The bigger size of a file will have a problem running on eMMC storage. eMMC was most often used in smartphones and tablets before 2015, however, nowadays you will find eMMC less used than the other storage.

Embedded MultiMediaCard.

What is the Difference Between eMMC and Other Storage Devices?

1. Difference Between eMMC and HDD (Hard Disk Drive)

eMMC is slower than some and faster than some devices. If we talk about the most commonly used storage HDD, then eMMC is faster than HDD. However, HDD comes with greater size, most commonly 1TB (1024GB) is used. The size of eMMC storage is small and cannot contain the larger data, so it works better with smaller files rather than larger ones. eMMC is soldered directly to the motherboard and not changeable, however, you can always change the HDD to increase size.

Difference between eMMC and HDD.

2. Difference Between eMMC and SSD (Solid-State Drive)

When we talk about eMMC and SSD, both of them operate on NAND principles. However, there are many differences between them. SSD is a type of solid-state drive, whereas eMMC is a type of flash storage. eMMC is mostly used for temporary storage and SSD is used for permanent storage. The transfer speed and storage space of SSD are far much bigger than the eMMC. When it comes to NAND gates, eMMC got only one, whereas SSD tends to have more than one. eMMC will be soldered onto the motherboard and SSD will be connected through the SATA interface. Both are made of different components.

Difference between eMMC and SSD.

3. Difference Between eMMC and UFS (Universal Flash Storage)

eMMC and UFS are both used in our smartphones as storage. Both have managed to increase their speed with their latest versions. However, eMMC still lacks in speed from UFS. Latest UFS in our smartphones is similar to an SSD regarding speed and space. However, some budget phones will still use eMMC to provide the latest technology with low budget storage. UFS uses the full-duplex that provides read and write operations simultaneously. eMMC is half-duplex, which only performs a single operation at a time, whether to write or read.

Difference between eMMC and UFS.

The post What is eMMC Storage and How is it Different from Other Storage Devices? appeared first on Appuals.com.
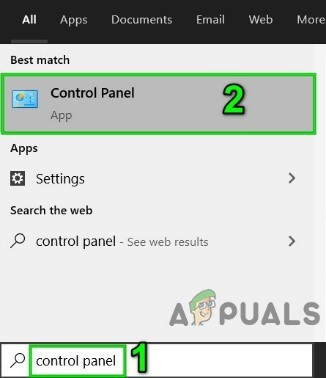
How to Fix Invalid Drive Error 1327

$
0
0

Error 1327 ‘Invalid Drive’ is an installation error that occurs when the drive being used for the installation of the program is not valid. This issue is mainly seen with Microsoft Office installations but can also occur for many other applications.

Error 1327 when Installing Programs

In the vast majority of cases, this particular error will occur due to the fact that the installer is trying to complete the operation on a network location that is not mapped. In this case, you can fix the issue swiftly by mapping the network location that’s not configured.

We have focused on MS Office in this article; but the fixes are not limited to Office only. Depending on your skill-level, you should be able to apply the same approach to just about any application returning this error.

Office installations are prone to force the installation on set drives that might not exist. In this case, you can use a SUBST command to redirect to a correct drive or you can modify the LocalCacheDrive location manually.

Method 1: Mapping the unmapped network path

As it turns out, one of the most common reasons why ‘Error 1327. Invalid Drive’ is a situation in which the drive that’s signalled out in the error message is not actually mapped. It’s very likely that you don’t have permission to install the application on the network drive.

Several affected users that were encountering this problem have confirmed that the issue was resolved after they realized they were running the installer as an administrator even though the drive wasn’t mapped.

In case the same scenario is also applicable in your case, here are the step-by-step instructions on fixing it:

  1. Press Windows key + R to open up a Run dialog box. Next, type ‘cmd’ and press Ctrl + Shift + Enter to open up an elevated CMD prompt. When you are prompted by the UAC (User Account Control) window, click on Yes to grant admin access.
    Running Command Prompt
  2. Inside the elevated CMD prompt, type the following command and press Enter to map the drive that is triggering the error:
    net use DRIVE: PATH

    Note: Keep in mind that both DRIVE and PATH are placeholders that need to be replaced with the values that are applicable in your particular scenario. For example, let’s say I want to create the drive X from a network shared path eBooks – the correct command would be “net use X: \\eBooks

  3. After the command has been successfully processed, close the elevated Command Prompt and restart your computer.
  4. Once your computer boots back up, repeat the installation and see if the issue is now resolved.

Take a look at our article on mapping a network drive in Windows 10.

In case you’re still encountering the Error 1327. Invalid Drive, move down to the next potential fix below.

Method 2: Redirect the operation to your OS drive

If you’re encountering this issue with Office versions that are particularly old, chances are the installer is forcing the copying of file on a non-existent drive. This is typically reported to occur on with Office 2010 (Academic versions).

For some weird reasons, the installer is might force the installation on the ‘F:\’ drive, even if it doesn’t actually exist. This problem was eventually addressed by Microsoft, but if you’re trying to install this specific Office version from a traditional installation media like a CD, you’ll still encounter the issue.

Several affected users that were also struggling with this issue have confirmed that the problem was entirely fixed after they used the SUBST command to substitute the path of the problematic drive.

Here’s a quick guide on how to do this from an elevated CMD prompt:

  1. Press Windows key + R to open up a Run dialog box. Next, type ‘cmd’ and press Ctrl + Shift + Enter to open up an elevated CMD prompt. When you see the UAC (User Account Control), click Yes to grant administrative privileges.
    Running the Command Prompt
  2. Inside the elevated CMD prompt, type the following command, replace the placeholders and press Enter:
    subst X: Y:\

    Note: X is the placeholder for the non-existent drive and Y is the placeholder for your OS drive. So if you’re encountering the Error 1327. Invalid Drive F:\ and your Windows is installed on the C:\ drive, the correct command would be ‘subst F: C:\

  3. Once the command has been successfully processed, close the elevated CMD prompt and restart your computer.
  4. After your computer boots back up, repeat the step that was previously causing the problem and see if the problem is now resolved.

In case the same Error 1327. Invalid Drive’ is still occurring, move down to the next potential fix below.

Method 3: Fixing the Drive Letter via Registry Editor

If you’re encountering the problem with an older Microsoft Office installation or when trying to update your current Office installation to a newer version, the issue can also be caused due to a registry entry called LocalCacheDrive entry that is invalid.

Several affected users that were also encountering this issue have confirmed that they were able to fix the issue by using Registry Editor to changing the entry associated with LocalCacheDrive to a valid letter.

Here’s a quick guide on how to do this:

Note: The instructions below should work regardless of the Windows version that you’re encountering the issue on.

  1. Press Windows key + R to open up a Run dialog box. Next, type ‘regedit’ and press Enter to open up the Registry Editor. When you’re prompted by the User Account Control (UAC), click Yes to grant administrative privileges.
    Open Regedit
  2. Once you’re inside the Registry Editor, use the left-hand section to navigate to the following location:
    HKEY_LOCAL_MACHINE\SOFTWARE\Microsoft\Office\
  3. Next, access to the subfolder associated with your office installation (E.G. 15.0, 16.0, 11.0, etc.), then select the Delivery key.
  4. After you arrive at the correct location, move over to the right-hand section and double-click on LocalCacheDrive.
  5. Inside the Edit String box associated with LocalCacheDrive, set the Value Data to your OS drive (most commonly C) and press Ok to save the changes.
    Changing to the correct lLcalCacheDrive value

The post How to Fix Invalid Drive Error 1327 appeared first on Appuals.com.
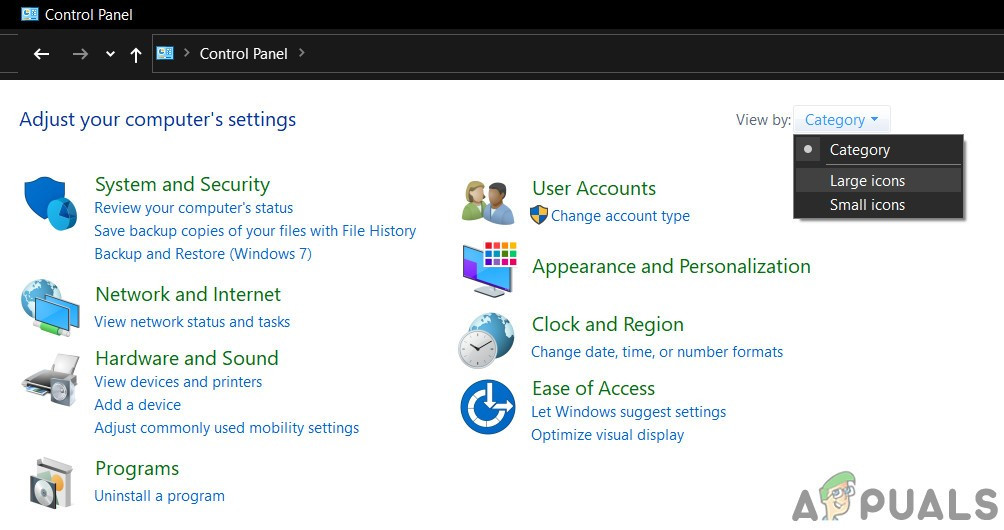
How To Fix VLC Media Player Crashes when Playing .MKV Files

$
0
0

As it turns out, some users are unable to open .MKV files with VCL Media Player. A few seconds after opening the .mkv file, affected users get the ‘Oops: VLC media player just crashed’ error. Retrying the procedure brings about the same outcome, and most affected users are reporting that the issue occurs with any .MKV file that they attempt to play.

VLC Media Player Crash when playing .MCV files

If you’re using an ancient version of VLC Media Player (the build is dated around 2012), the issue can most likely be fixed by uninstalling your current VLC version and migration towards the most recent release.

However, if you are encountering a period of lagging and skipping before your VLC player finally crashes, it’s possible that insufficient processing power is causing the ‘Oops: VLC media player just crashed’ error. In this case, you should try disabling hardware acceleration decoding, switching to DirectX video acceleration or boosting the default file caching value.

In case your machine should be more than capable of playing 4K .MKV files, you should also try forcing the application to skip the loop filter or even enable multi-thread decoding on FFmpeg playback for .MKV files.

Method 1: Installing the latest version of VLC Media Player

As it turns out, one of the most common causes that will cause this particular error when playing .MKV files with VLC Media Player is a bug that used to affect VLC versions released around 2012. If you’re using a severely outdated VLC client, the fix might be as simple as uninstalling your current version of VLC and installing the latest build from the official website.

Note: Keep in mind that the auto-updating feature on VLC is known to break quite often. So don’t dismiss this potential fix just because you haven’t been prompted to update by the application.

several affected users have confirmed that uninstalling their current VLC version via the Programs and Files menus and installing the latest build from the official download page has finally allowed them to fix the ‘Oops: VLC media player just crashed’ error’.

Here are step by step instructions through the whole thing:

  1. Ensure that every instance of VLC media player is completely closed.
  2. Pless Windows key + R to open up a Run dialog box. Inside the text box, type ‘appwiz.cpl’ and press Enter to open up the Programs and Features menu.
    Typing in “appwiz.cpl” in the Run prompt

    Note: If you’re prompted by the UAC (User Account Control) window to provide admin access, click on Yes to do so.

  3. After you manage to get inside the Programs and Features menu, scroll down through the list of installed applications and locate your VLC Media Player installation. Once you manage to locate it, right-click on it and choose Uninstall/Change from the context menu.
    Uninstall VLC via Programs and Features
  4. Once you’re inside the uninstallation screen of VLC media player, follow the on-screen instructions to complete the operation, then restart your computer if you’re not prompted to do so automatically.
  5. Once the next startup sequence is complete, open this link (here) with your default web browser and click on the Download VLC button to download the latest version of the installation executable.
    Downloading the latest VLC build
  6. Once the installation executable is completely downloaded, double-click on it and follow the on-screen instructions to complete the installation.
    Opening the installation executable of VLC
  7. After the process is complete, restart your computer and see if you are able to play .MKV files normally after the next machine startup.

In the event that you’re still struggling with frequent ‘Oops: VLC media player just crashed’ crashes when attempting to play .MKV files, move down to the potential fix below.

Method 2: Disable Hardware acceleration decoding

In case you’re only encountering skipping issues or general crashes on VLC when you attempt to play high-definition .MKV files by streaming them over a network, it’s most likely due to insufficient processing power on your computer.

This issue has been encountered by other users facing the problem in similar circumstances. The way they got this resolved was by disabling Hardware-accelerated decoding from the Preferences menu. This ends up easing the load off your CPU and GPU, making the loading times bigger but also making the application much more stable when running on low-spec machines.

Here’s a quick guide on disabling hardware acceleration on VLC media player:

  1. Open VLC media player with administrative privileges by right-clicking the launch icon and choosing Run as Administrator.
  2. Once you’re inside the main VLC window, use the ribbon bar at the top to access the Tools menu, then click on Preferences.
  3. When you get to the Simple Preferences screen, select the Input / Codecs category from the menu at the top, then move down to the Codecs tab and set the Hardware-accelerated decoding to Disabled.
  4. After you do this, click on the Save button once to make the change permanent.
  5. Restart VLC Media player and see if the issue is now resolved.
Disabling Hardware Acceleration on VLC Media Player

In case you’re still encountering frequent stuttering and crashing when you attempt to play .MKV files with VLC Media Player, move down to the next method below.

Method 3: Enabling DirectX Video Acceleration (DVXA) 2.0

If you’re encountering this issue on a newer PC configuration that runs with a fairly dedicated GPU, but with a low-tier CPU, changing the default hardware acceleration to Direct Video Acceleration (DCXA) 2.0 might be the method that finally fixes the constant VLC crashes when playing .MKV files.

This might be effective because DirectX Video Acceleration allows certain CPU-intensive tasks (iDCT, motion compensation, deinterlacing, etc.) that might cause stuttering, freezes or general instability to be offloaded to the GPU.

If you’re using a modest CPU, this operation might put the heavy rendering tasks on your GPU, which will allow your system to handle playing .MKV files much more efficiently.

Here’s a quick guide on enabling DirectX Video Acceleration (DVXA) 2.0 via the Input & Codecs Settings inside VLC’s Preferences menu:

  1. Start by opening up VLC Media Player with administrative privileges.
  2. Once you’re inside the application, use the ribbon menu at the top to bring up the Tools menu, then click on Preferences from the newly appeared drop-down menu.
  3. After you manage to get inside the Simple Preferences menu, select the Input / Codecs tab from the menu at the top.
  4. Next, scroll down to the Codecs section and change the Hardware-acceleration decoding using the associated drop-down menu to DirectX Video Acceleration (DvXA) 2.0.
  5. Click Save to confirm the change, then restart the VLC application and see if the problem is resolved the next time you attempt to play a .MKV file.
Enabling DirectX Video Acceleration

In case you’re still encountering general stuttering and crashes when playing .MKV files, move down to the next potential fix below.

Method 4: Boosting File caching

If you’re encountering several seconds of general stuttering after the application finally crashes, it’s most likely due to the fact that the application doesn’t have the time to do sufficient file caching. By default, VLC Media Player allocates 300 ms to File Caching, but this might not be sufficient for low-end PC configurations.

If this scenario is applicable, you should be able to resolve this issue by accessing the Advanced Preferences menu of VLC media player and boosting the File caching value 1000 or above. Several affected users that were also encountering this issue have confirmed that this operation has finally allowed them to play .MKV files on VLC without issues.

Here’s what you need to do in order to boost File Caching to a higher value:

  1. Open VLC Media Player with administrative privileges.
  2. Once you’re inside, use the ribbon at the top to click on Tools, then click on Preferences from the drop-down menu that just appeared.
  3. After you manage to get inside the Simple Preferences menu, change the Show Settings toggle in the top-left corner from Simple to All.
  4. After you do this, the menu will change accordingly. From the new interface, use the left-hand side menu to select Input / Codecs.
  5. With the Input / Codecs menu selected, move over to the right-hand side menu and change the value associated with File caching (ms) to 1000.
  6. Click Apply to save the changes, then restart VLC Media Player and see if the problem has been resolved.
Boosting the File Caching Value on VLC Media Player

If you’re still encountering the ‘Oops: VLC media player just crashed’ error when you attempt to play .MKV files, move down to the next potential fix below.

Method 5: Skipping the loop filter

As it turns out, the issue can also be caused by a loop filter that is used before the H 264 decoding begins. This operation is mainly enforced in order to reduce blocking artifacts without reducing the sharpness of the picture. But in certain circumstances, an in-loop filter can effectively stop your VLC installation ability to play certain MKV files.

In case you’re only encountering this issue with a few .MKV files (some .MKV files play just fine), you might be able to get the issue resolved by accessing the FFmpeg audio/video decoder settings and force the loop filter to be skipped for every instance of H.264 decoding.

Note: Here’s how to fix the ‘past duration too large’ error in FFMpeg.

Here’s a quick guide on configuring your VLC Media Player installation to skip the loop filter:

  1. First things first, ensure that VLC Media Player is opened with administrative privileges. You can do this by right-clicking on the launch executable and choose Run as Administrator from the context menu.
  2. Next, use the ribbon bar at the top to expand the Tools category, then click on Preferences from the drop-down menu.
  3. Once you’re inside the Simple Preferences menu, switch the Show Settings toggle (bottom-left corner) to All in order to view the advanced settings menu.
  4. After the Advanced Preferences menu becomes visible, use the left-hand side menu to expand the drop-down menu associated with Video Codecs.
  5. As soon as you do this, select FFmpeg from the list of video codex that appeared below, then move over to the right-hand section.
  6. Inside the FFmpeg audio/video decoder, navigate to the Decoding sub-menu and set the drop-down menu associated with Skip the loop filter for H.264 decoding to All.
  7. Save the modification by clicking on Save, then restart your application and see if the operation is a success.
Skipping the loop filter for H264

In case you’re still encountering the ‘Oops: VLC media player just crashed’ error when attempting to play .MKV files using VLC Media player, move down to the next potential fix below.

Method 6: Forcing multi-thread decoding on FFmpeg playback

If you’re encountering a lot of general stuttering and lag before finally experiencing the ‘Oops: VLC media player just crashed’ error when attempting to play .MKV files that are exceptionally large.

As it turns out, VLC Media Player is configured by default to be as lightweight as possible with the system resources that it’s using – However, this is not necessarily a good thing when having to deal with 4K .MKV files.

If this scenario is applicable, you should be able to get the issue fixed by ensuring that FFmpeg audio and video decoding is done with multi-threading (hyper-threading).

Here’s a quick guide on forcing multi-thread decoding on FFmpeg playback:

  1. Open VLC Media Player with administrative privileges. When you are prompted by the User Account Control (UAC), click on Yes to grant admin access.
  2. Once VLC Media Player opens successfully, use the ribbon menu at the top to select Tools > Preferences.
  3. By default, you will see the Simple Preferences screen. Te changes it to the Advanced Preferences menu, set the Show Settings toggle (bottom-left corner) to All.
  4. As soon as the Advanced Preferences menu becomes visible, use the left-hand section to select Input / Codecs menu.
  5. Then, expand the Video codecs drop-down menu below and select the FFmpeg entry from the list of available subitems.
  6. With the FFmpeg entry selected, move over to the right-hand side section and locate the Threads entry under Decoding.
  7. Change the value of Threads to 2, then click on Save to enforce the change.
  8. Restart your VLC Media Player application and see if the issue is now resolved.
Enabling Multi-Threading decoding on VLC Media Player

The post How To Fix VLC Media Player Crashes when Playing .MKV Files appeared first on Appuals.com.
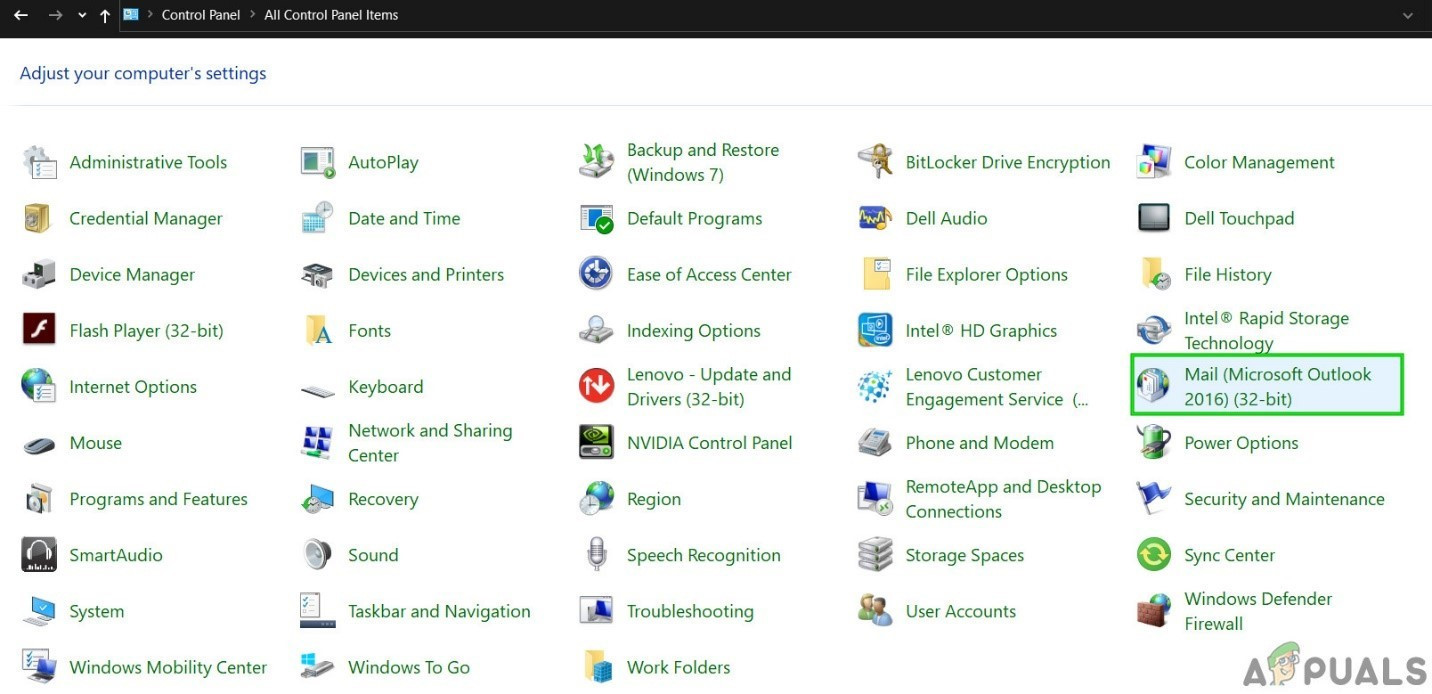
How to Fix ‘System Error 67 Has Occurred’?

$
0
0

The ‘System Error 67 has Occurred‘ issue is encountered when Windows users attempt to run a Network Discover scan or when trying to map a network drive from CMD or Powershell.

System Error 67 Has Occurred

As it turns out, one of the most common causes that will end up triggering this error is an incorrect Syntax. Some users end up using backslashes instead of forwarding slashes, which forces the terminal to look at it as an option supply.

However, a glitched driver can also cause this error. Especially in case you’re using an old driver version that is dated immediately after Windows 10 initially launched. Other potential causes include an enabled ‘Hardened UNC Paths’ policy or an improperly configured IP NAT.

Solution 1: Using the correct syntax (if applicable)

Before trying out any other fix, you should start by ensuring that the syntax that you’re inputting is correct.

In case you want to map a network drive using ‘net use * //*IP Address*’, you see this error message due to the fact that you use forward slashes instead of backslashes. This is is a fairly common mistake that a lot of affected users end up making.

In case you end up using forward slashes, the terminal will think you are supplying an option instead.

The correct syntax in this case is:

net use * \\*IP Address*\sharename

Note: Keep in mind that *IP Address* is simply a placeholder. Replace it with your own address that you’re trying to map.

In case this method wasn’t applicable to your particular scenario or you are already using the correct syntax, move down to the next potential fix below.

Solution 2: Updating the Network driver

As it turns out, one of the most common causes that will end up triggering the’System Error 67 has Occurred‘ error is a glitched Network driver that is stuck between states. In most cases, this issue is facilitated with some kind of bug.

Situations like this one used to be frequent in the initial years after the launch of Windows 10, but now most manufacturers have released revised network versions that will no longer cause this problem. To take advantage of the hotfix, you will need to update your network driver to the latest version available.

Here’s a quick guide on how to update your Network driver via Device Manager:

  1. Press Windows key + R to open up a Run dialog box. Next, type ‘devmgmt.msc’ inside the text box, then press Enter to open up Device Manager. When prompted by the User Account Control (UAC), click Yes to grant administrative privileges.
    Running the Device Manager
  2. Once you manage to get inside Device Manager, scroll down through the list of installed devices and locate the Network adapters section. When you see the correct section, expand the drop-down menu associated with Network adapters, then right-click on your network driver and choose Properties from the context menu.
    Accessing the Properties screen of the Network Adapter
  3. Once you’re inside the properties screen of your Network adapter, select the Driver tab from the list at the top, then click on Update driver from the list of available options.
    Updating the Wireless Network Adapter driver
  4. Once you get to the next screen, click on the button associated with Search automatically for updated driver software.
    Searching automatically for newer driver software
  5. Wait to see if a new version of the same driver is discovered. If it is, follow the on-screen prompts to install the newest driver version.
  6. Once the operation is complete, restart your computer and see if the problem is resolved at the next startup sequence.

Solution 3: Enable ‘Hardened UNC Paths’ via Gpedit.msc

Another common cause that will cause the ‘System Error 67 has Occurred‘ issue and a whole host of other problems on a shared network is an enabled policy called Hardened UNC Paths. As long as it’s enabled, you might encounter this problem when trying to map your drive via Group Policy on Windows 10.

Several affected users that were also struggling with the same problem have confirmed that they managed to fix the issue by opening the Local Group Policy Editor (Gpedit.msc) and disabling the Hardened UNC Paths policy in order to prevent it from creating additional conflicts.

Here’s what you need to do:

  1. Press Windows key + R to open up a Run dialog box. Next, type ‘gpedit.msc‘ inside the text box and press Enter to open up the Local Group Policy Editor.
    Open gpedit.msc

    Note: If you are prompted by the User Account Control, click Yes to grant administrative privileges in order to give the program the necessary access.

  2. Once you’re inside the Local Group Policy Editor, navigate to the following location:
    Computer Configuration > Administrative Templates > Network > Network Provider
  3. Once you expand the Network provider folder, move over to the right-hand side of the Gpedit.msc utility and double-click on Hardened UNC Paths.
    Accessing the Hardened UNC paths policy
  4. Inside the Hardened UNC Paths windows, change it’s status to Disabled and click Apply to save the changes.
    Applying change to the policy
  5. Once the modification has been enforced, restart your computer and see if the problem is resolved at the next system startup.

In case the ‘System Error 67 has Occurred‘ issue is still occurring, move down to the next method below.

Solution 4: Disabling improperly configured IP NAT

Another fairly common problem that will trigger the System Error 67 has Occurred‘ issue is an improperly configured networking device drivers. In most cases, it will occur due to the fact that NAT is installed but it’s not properly configured.

Several affected users have confirmed that they managed to fix this particular issue by using Device Manager to disable the IP NAT driver. This is typically reported to be effective in instances where the user tries to log on to a computer using a domain account and gets the System Error 67 has Occurred‘ error.

Here’s a quick guide on fixing the issue by disabling the improper IP NAT:

  1. Press Windows key + R to open up a Run dialog box. Next, type ‘devmgmt.msc’ and press Enter to open up Device Manager.
    Running the Device Manager
  2. Inside Device Manager, start by clicking on View from the ribbon-menu at the top, then click on Show on hidden devices.
    Show Hidden Devices
  3. Once the hidden devices are visible, scroll down the list of installed devices and expand the drop-down menu associated with Non-Plug and Play Drivers.
    Expanding the Non-Plug and Play Drivers
  4. Next, from the list of available sub-items, right-click on IP Network Address Translator and choose Disable from the context-menu to ensure that the improperly configured NAT is disabled.
  5. Once this modification has been enforced, restart your computer and see if the problem is resolved at the next system startup.

The post How to Fix ‘System Error 67 Has Occurred’? appeared first on Appuals.com.
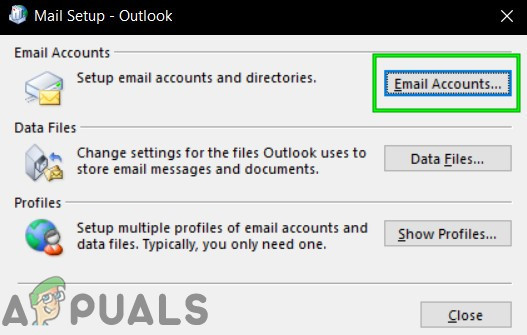
Fix: Cannot Open File for Writing’ with VLC Media Player

$
0
0

The ‘Cannot Open File for Writing‘ error occurs when Windows users attempt to install or update VLC media player. In most cases, the issue occurs on machines that already have or have had VLC Media Player installed at some point.

VLC Media Player Error “Cannot open file for writing”

Most commonly, the ‘Cannot Open File for Writing‘ error is caused by multiple instances of VLC or other applications using LibVLC. To fix this, you can use Task Manager to close any conflicting VLC instance while the installation or updating sequence is taking place. However, some browsers also have the potential to interfere with the legacy way of updating the VLC Media Player application.

And under certain circumstances, some type of system file corruption can be the determining factor why your VLC Media Player installation is no longer able to update.

Method 1: Closing all VLC Instances

As it turns out, the most common cause that will cause the ‘Cannot Open File for Writing‘ error is a situation where multiple VLC instances (or any other applications that are also using LibCLC) are actively running on your machine.

If this scenario is applicable, you can fix the issue swiftly by opening Task Manager and terminating all running instances of applications using LibVLC. Several affected users have confirmed that the issue was resolved as soon as every running instance was closed.

Note: If you don’t want to use Task Manager, you can simply restart your computer and repeat the action that’s currently causing the issue as soon as the next startup is complete.

Here’s a quick guide on closing all VLC instances that might end up causing the ‘Cannot Open File for Writing‘ error:

  1. Close the setup screen where you encounter the error.
  2. Press Ctrl + Shift + Esc to open up Task Manager. Once you’re inside, select the Processes tab from the menu at the top, then scroll down through the list of processes and right-click on the process associated with VLC media player.
  3. Once you see the context menu, click on End Task.
    Ending all associated instances with VLC media player

    Note: If you confirm that no additional instances of VLC Media Player are running, look specifically for other applications that are using LibVLC.

  4. Once every relevant instance is closed, repeat the action that was previously causing the ‘Cannot Open File for Writing‘ error and see if the problem is now resolved.

In case this scenario wasn’t applicable or it didn’t resolve the issue, move down to the next potential fix below.

Method 2: Close all browser instances

One unlikely cause that might contribute to the apparition of the ‘Cannot Open File for Writing‘ error is an installation interference caused by your default browser.

As several affected users have reported, VLC’s ability to update itself can be also interrupted by an open instance of Chrome, Firefox or Brave browser.

If this scenario is applicable, you should be able to fix the issue by using Task Manager to close any active browser instance that might be causing the issue.

Here’s a quick guide on how to close any browser instance in order to resolve the ‘Cannot Open File for Writing‘ error:

  1. Close the setup that is causing the ‘Cannot Open File for Writing‘ error.
  2. Open up a Task Manager instance by pressing Ctrl + Shift + Esc. Once you’re inside Task Manager, choose the Processes tab from the ribbon menu at the top.
  3. Inside the Processes tab, scroll down through the list of active processes, right-click on your active browser instances and choose End Task from the newly appeared context menu.
    Ending the Browser tasks using Task Manager
  4. Once every browser process is closed, repeat the VLC update or VLC installation and see if the problem is now fixed.

In case you’re still encountering the same ‘Cannot Open File for Writing‘ error, move down to the next method below.

Method 3: Running SFC and DISM scans

As it turns out, the issue can also occur due to some kind of System File Corruption that ends up affecting your operating system’s ability to install new software. If this scenario is applicable, you should be able to fix the issue by running a couple of native utilities (DISM and SFC) that were designed to find, fix or replace corrupted instances.

Although the two utilities have similar functionality, they do things differently. For example, DISM (Deployment Image Servicing and Management) relies heavily on a subcomponent of WU to replace corrupted data with healthy equivalents.

On the other hand, SFC (System File Checker) is an entirely local tool that uses locally cached data to fetch healthy files when corrupted instances are found.

Since both utilities have their own strong suits, we recommend that you run both in quick succession in order to maximize your chance of resolving the ‘Cannot Open File for Writing‘ error:

  1. Press Windows key + R to open up a Run dialog box. Next, type ‘cmd’ inside the text box, then press Ctrl + Shift + Enter to open up an Elevated Command Prompt. If you get prompted by the User Account Control (UAC), click Yes to grant admin access.
    Running Command Prompt
  2. Once you manage to get inside the elevated CMD prompt, type the following command and hit Enter to initiate an SFC scan:
    sfc / scannow

    Note: It’s very important that you don’t interrupt this process once you get this started. Doing this might create bad sectors that might facilitate the apparition of similar issues in the future.

  3. After the scan is complete, restart your computer once again and wait for the next startup to complete.
  4. Once your computer boots back up, follow step 1 once again to open up another elevated CMD prompt. When you return to the elevated CMD window, type the following command below to initiate a DISM scan:
    dism /online /cleanup-image /restorehealth

    Note: To complete this scan without issues, you will need to ensure that your Internet connection is stable. This is important because DISM uses WU to download healthy copies for broken systems that need to be replaced. If you get a DISM error when you try to launch the utility, here’s how to fix it.

  5. As soon as the operation is complete, reboot your computer once again and see if the issue is resolved at the next startup.

The post Fix: Cannot Open File for Writing’ with VLC Media Player appeared first on Appuals.com.
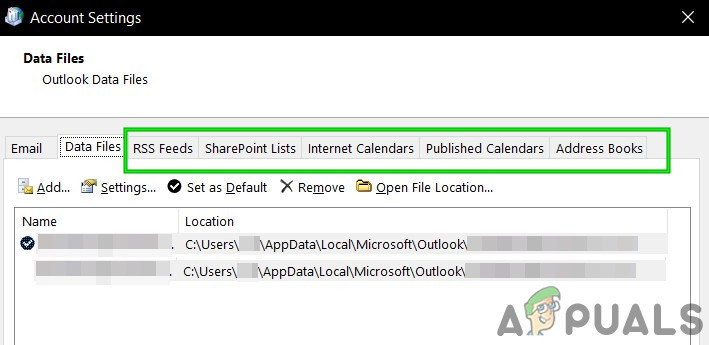

Fix: Lifecam.exe Fails to Initialize ‘cannot continue’

$
0
0

The Lifecam.exe Initialization error is typically encountered when Windows users attempt to launch or install LifeCam HD-5000, Lifecam VX-6000, VX-3000 and VX-2000 models. Upon investigating the Windows Event Viewer for more detailed error log information, affect users have discovered a “Faulting application name error” pointing towards the LifeCam.exe executable.

Startup error when launching the Lifecam.exe software

As it turns out, the issue is most likely being caused by an outdated firmware version of LifeCam facilitated by an incompatibility with the user’s OS version. To resolve this, you will need to install the latest firmware supplied by Microsoft according to your LifeCam webcam model. You can also try updating the main Lifecam driver manually.

However, a lot of affected users have reported certain conflicts between Lifecam and ASUS AI Suite. To work around this inconvenience, you will need to update ASUS AI Suite to the latest build or uninstall it altogether.

Other potential causes that might cause the “Faulting application name error” is a severely outdated JAVA version or a startup error caused by a USB 2.0 port.

Method 1: Installing the latest firmware for LifeCam

If you see that the issue is inconsistent (it only happens when launching LifeCam executable, but the functionality of the camera works fine in Skype and other apps) it’s probably due to an outdated firmware version.

Most affected users that we’re trying to get the Lifecam.exe Initialization error resolved have confirmed that they managed to fix the issue by uninstalling their current software via Programs and Features and then installing the latest firmware update for Lifecam from Microsoft’s official download page.

Here’s a quick guide on how to do this and resolve the Lifecam.exe Initialization error or Faulting application name error: 

  1. Press Windows key + R to open up a Run dialog box. Next, type ‘appwiz.cpl’ inside the text box and press Enter to open up the Programs and Features menu.
    Type appwiz.cpl and Press Enter To Open Installed Programs Page
  2. Once you manage to get inside the Programs and Features screen, scroll down through the list of installed applications and locate the LifeCam HD installation. When you see it, right-click on it and choose Uninstall from the newly appeared context menu.
  3. Inside the uninstallation screen, follow the instructions to complete the uninstallation, then restart your computer.
  4. After the installation is complete, restart your computer and access this link here after the next startup sequence is complete.
  5. From the list of firmware revisions available for LifeCam, download the one associated with your LifeCam model.
    Downloading the appropriate LifeCam firmware version
  6. Once the installation executable has been downloaded, open it and follow the on-screen instructions to complete the installation.
  7. Once the installation is complete, restart your computer and see if the issue is resolved at the next system startup.

In case you’re still encountering the same ‘Lifecam.exe fails on Initialization’ error, move down to the next potential fix below.

Method 2: Updating the drivers with Device Manager

If you noticed that the Lifecam webcam doesn’t work in different circumstances (when launching Skype or other apps that use the webcam), it’s most likely due to a driver issue. This is typically encountered right after the user tries to install an older Lifecam driver via a traditional media such as a CD or DVD.

If you’re using Windows 7, Windows 8.1 or Windows 10, you can correct this issue automatically by using Device Manager to force the WU component into updating the webcam driver to the latest version compatible with your OS.

In case the issue is being caused by some kind of driver incompatibility, this issue should be resolved automatically after a computer restart.

Here’s a quick guide with you to update the Lifecam.exe drivers in order to fix the ‘Lifecam.exe fails on Initialization’ error:

  1. Press Windows key + R to open up a Run dialog box. Next, type ‘devmgmt.msc’ and press Enter to open up Device Manager.
    Running Device Manager

    Note: In case you’re prompted by the UAC (User Account Control), click Yes to grant administrative privileges.

  2. Once you’re inside Device Manager, scroll through the list of installed devices and expand the drop-down menu associated with Cameras. With the menu expanded, right-click on the entry associated with LifeCam and click on Update driver from the newly appeared context menu.
    Updating the LifeCam camera driver
  3. Once you get to the next menu, click on the entry associated with Search automatically for updated driver software.
    Searching automatically for newer driver software
  4. Wait until the scan is complete. If a new driver version is found, follow the on-screen prompts to download and install the update.
  5. Once the operation is complete, restart your computer and see if the issue is resolved at the next computer startup.

In case the issue was not resolved after updating to the latest LifeCam driver or your driver version was already the latest, move down to the next potential fix below.

Method 3: Update / Uninstall ASUS AI Suite (if applicable)

As it turns out, this particular issue can also occur due to some kind of conflict between the LifeCam camera driver and older versions of the ASUS AI Suite.

In case this scenario is applicable and you have ASUS AI suite installed on your computer while trying to use Microsoft LifeCam, you need to eliminate the conflict one way or another.

To do this, you can either remove the piece of software from ASUS altogether or you can ensure that you’re using the latest version available (ASUS released a patch that fixes the inconsistency).

Here’s a quick guide on uninstalling the current ASUS AI Suite and then downloading and installing the latest version in order to eliminate the conflict with Microsoft LifeCam:

  1. Press Windows key + R to open up a Run dialog box. Next, type ‘appwiz.cpl’ inside the text box and press Enter to open up the Programs and Features window.
    Typing in “appwiz.cpl” in the Run prompt
  2. Once you’re inside the Programs and Features screen, scroll down through the list of installed applications and locate your ASUS AI Suite installation. When you see it, right-click on it and choose Uninstall from the context menu to begin the uninstallation procedure.
    Uninstalling the current ASUS AI suite
  3. Inside the uninstallation screen, follow the on-screen instructions to complete the uninstallation, then restart your computer.
  4. If you want to install the patched version of ASUS AI Suite (the version that doesn’t conflict with Microsoft LifeCam) visit this link (here), select the appropriate OS and download the latest version.
  5. Once the download is complete, open the installation executable and follow the on-screen prompts to complete the installation of the latest version of ASUS AI Suite.

In case this method didn’t resolve the issue for you, move down to the next potential fix below.

Method 4: Plugging the camera into a USB type 3 slot (if applicable)

As it turns out, newer LifeCam models might trigger startup errors when forced to work with USB 2.0 slots when USB 3.0 is available.

If you’re encountering this issue when the camera is plugged into a USB2 Slot on a computer with USB3, try unplugging the camera and plugging it into the newer USB format (USB 3.0). After you do this, let the driver installed on that USB hub, then restart your computer.

Plugging the keyboard into a 2.0 or 3.0 USB port

After the next computer startup is complete, launch the LifeCam application once again and see if the issue is now fixed.

In case the issue is still occurring (even when the camera is plugged into USB 3.0) or this scenario wasn’t applicable, move down to the next method below.

Method 5: Update Java version

As some affected users have reported, this issue can also be caused by some outdated JAVA elements that are not compatible with the newer LifeCam version.

Some affected users that we’re encountering the same issue have reported that they were able to fix this particular issue by using the Verify Java and Find Out-of-Date utility. After running this web-based check, installing the update Java environment and restarting their computer, most affected users have confirmed that they no longer had issues launching the Microsoft LifeCam.exe.

Here’s a quick guide on updating the Java environment to the latest version using the Verify Java and Find Out-of-Date utility:

  1. Open your default browser and visit the following link (here).
  2. Once you get to the correct location, click on Agree and Continue.
    Continuing with the Java update installation
  3. If you have any outdated versions of Java that need to be uninstalled, the setup will prompt you to uninstall them. To do so, simply follow the on-screen prompts, then restart your computer.
  4. Once the next startup is complete, visit this link (here) and download the latest available version of Java by clicking on Agree and Start Free Download.
    Download the latest version of Java
  5. Once the installation executable is downloaded, open it and follow the on-screen prompts to complete the installation of the latest Java version.
    Install the latest Java version
  6. When prompted, restart your machine and see if the issue is resolved at the next machine startup.

In case the same ‘Lifecam.exe fails on Initialization’ error is still occurring, move down to the final potential fix below.

Method 6: Using a System Restore point

If none of the methods below have allowed you to bypass the ‘Lifecam.exe fails on Initialization’ error, it’s very likely that a recent machine change such as a driver installation, installed update or an AV scan has ended up interfering with the main Lifecam.exe application.

If you suspect this scenario is applicable but you have no way of pinpointing the issue, the easiest way to resolve the problem is by using the System Restore utility to revert your computer back to a state when this problem was not occurring.

By default, every recent Windows version (Windows 7, Windows 8.1 and Windows 10) is configured to create and store new restore snapshots regularly (during important system events). Unless you modified the default behavior (or a 3rd party did it for you), you should have plenty of System Restore points to choose from.

But before starting this process, it’s important to understand that once you go through with it, every change that you made to your system since that restore snapshot was created will also be lost. This includes any installed applications, games and any other system updates that might have got installed during that period.

If you are aware of the consequences and you are prepared to use System Restore, here’s a quick guide on using it to restore your computer back to a healthy state when this problem was not occurring:

  1. Press Windows key + R to open up a Run dialog box. Next, type ‘rstrui’ and press Enter to open up the System Restore menu.
    Opening the System Restore wizard via Run box
  2. Once you get past the initial System Restore screen, click on Next to advance forward to the next menu.
    Using System Restore
  3. Once you get to the next screen, start by checking the box associated with Show more restore points. Next, start by comparing the dates of each saved restore point and select one that is dated before the apparition of this issue.
    Restoring your system to a previous point in time

    Note: Avoid selecting restore points older than 1 month to avoid a lot of data loss.

  4. Once the correct system restore point is selected, click Next to advance to the final menu.
  5. When you get to this step, the utility is ready to go. To launch it, simply click on Finish and wait for the process to start. After a couple of seconds, you will be prompted to restart. When you see this prompt, follow through and wait for the next startup to complete.
    Starting the System Restore process
  6. After the next startup is complete, the new state should already be mounted. Repeat the action that was previously causing the ‘Lifecam.exe fails on Initialization’ error and see if the issue is resolved.

The post Fix: Lifecam.exe Fails to Initialize ‘cannot continue’ appeared first on Appuals.com.
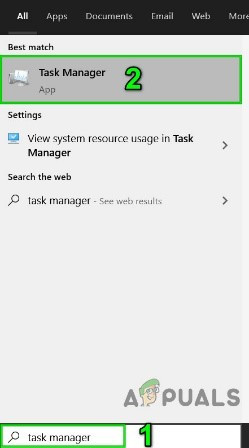
Fix: Firefox Error ‘SEC_ERROR_OCSP_FUTURE_RESPONSE’

$
0
0

The SEC_ERROR_OCSP_FUTURE_RESPONSE error code appears when Firefox users attempt to access certain files that contain CSS elements. As it turns out, the issue is frequent with secure websites (HTTPS).

SEC_ERROR_OCSP_FUTURE_RESPONSE in Firefox

If you’re using an outdated Firefox issue older than build 47, the issue is most likely being caused by a Mozilla Firefox bug that affects certain CSS elements. In this case, you can fix the issue by updating your browser to the latest version.

In case you’re already using the latest version of Firefox, you should investigate whether your date & time are not outdated. And in case you update them to the correct value but the modification doesn’t last in between restarts, you should replace your CMOS battery with a healthy equivalent.

However, if you’re trying to visit a website with legitimate OCSP concerns, the only way you will be able to access it without encountering the SEC_ERROR_OCSP_FUTURE_RESPONSE error is to disable OCSP verifications.

Method 1: Update Firefox to the latest version

As it turns out, the issue is much more common on Firefox version v47 or under. As it turns out, the issue can be caused by a Mozilla Firefox bug that affected the rendering of certain CSS elements. Fortunately, Mozilla has already addressed the issue with a hotfix released with version 51.

If this scenario is applicable and you’re using an outdated Firefox version, here’s a quick guide on updating Firefox to the latest version:

  1. Open Firefox and click on the action button located in the top-right corner of the screen.
  2. Next, from the newly appeared context menu, click on the Help tab, then choose About Firefox from the sub-menu.
    Updating Firefox to the latest version
  3. Inside the next window, wait until the scan is performed. If a new update is available, click on Restart to update Firefox to start the updating process.
    Updating Firefox
  4. Once the update is installed, your browser should automatically restart, giving you the chance to test and see if the issue is resolved.

In case the same SEC_ERROR_OCSP_FUTURE_RESPONSE error code is still occurring, move down to the next potential fix below.

Method 2: Set the correct date & time

As it turns out, the error code SEC_ERROR_OCSP_FUTURE_RESPONSE is often times associated with an OSCSP response that is not valid due to the fact that the machine is set to a date in the future.

In order words, chances are the issue is appearing due to the fact that the computer clock or time is not set correctly.

In case you’re date & time settings are set to a future date and that’s responsible for the SEC_ERROR_OCSP_FUTURE_RESPONSE, you should be able to fix the issue by changing the date & time settings to the correct values. Here’s a quick guide on how to do this:

Note: The steps below are universal and should allow you to change the date & time values on Windows 7, Windows 8.1 and Windows 10.

  1. Open up a Run dialog box by pressing Windows key + R. Next, type ‘timedate.cpl’ and press Enter to open up the Date and Time window.
    Opening the Date and time window
  2. Once you manage to get inside the Date & Time window, then go to Date and Time window and click on Change date and time.
    Setting the correct date and time
  3. After you’ve made your way to the Date and Time Settings menu, use the calendar (under Date and Time) to select the appropriate values according to the timezone that you live in.
    Modifying Time & date
  4. Once the settings have been changed, restart your computer and repeat the action that was previously causing the SEC_ERROR_OCSP_FUTURE_RESPONSE error to see if the problem is now fixed.

In case the same error is still occurring and you notice that the date & time has reverted back to the previous values, move down to the next method below.

Note: I case the date & time value remained saved in between restarts but you’re still encountering the SEC_ERROR_OCSP_FUTURE_RESPONSE error, skip Method 3 and move directly to Method 4.

Method 3: Changing the CMOS battery

If the date & time values that you enforced during Method 2 didn’t remain saved in between restarts, it’s clear that you have a problem with your CMOS (Complementary Metal-Oxide Semiconductor) battery. This component is responsible for keeping track of certain BIOS preferences including the system-wide date and time.

If this scenario is applicable, you should be able to fix the issue by clearing the CMOS battery or replacing it if necessary. Here’s a quick guide on resolving the issue:

  1. Start by turning off your computer and unplugging it from a power source.
  2. Once your computer is disconnected from a power outlet, remove the side cover and equip yourself with a static wristband in order to ground yourself to the frame and avoid unpleasant events where static electricity will end up producing damage to your PC components.
  3. Once you manage to expose your motherboard, identify the CMOS battery, then use your fingernail or a non-conductive screwdriver to remove it from the slot.
    Removing the CMOS battery
  4. After you manage to remove the CMOS battery clean it with a soft cloth dipped in isopropyl alcohol. You should also clean the slot to make sure that there’s no lint or dust inhibiting the connection.
    Note: In case you have a spare CMOS battery lying around, use the newer one instead.
  5. Put the cover back in, then plug your computer back to a power source and start it up to see if the issue is now resolved.
  6. Start your computer back up and see if the problem is not fixed.

In case you’re still encountering the same SEC_ERROR_OCSP_FUTURE_RESPONSE error, move down to the final fix below.

Method 4: Disabling OCSP verifications

If none of the methods above has allowed you to fix the issue, there’s always the option to disable OCSP query altogether. While this will undoubtedly fix the issue since the OCSP check will no longer be performed, it also opens up your computer to some security risks.

In case you understand the consequences and you want to go ahead with disabling OCSP verifications, follow the instructions below to do so:

  1. Open your Firefox browser and access the action button in the top-left section of the screen.
  2. Then, from the newly appeared context menu, click on Options to bring up the preferences menu.
  3. Once you’re inside the Preferences menu, click on Privacy & Security from the left-hand section, then scroll all the way down to the bottom of the screen.
  4. When you see the Certificates menu, ensure that the box associated with ‘Query OCSP responder servers to confirm the current validity of certificates’ is disabled.
  5. Restart your Firefox browser and load the web page that was previously failing.
Disabling OCSP verification

The post Fix: Firefox Error ‘SEC_ERROR_OCSP_FUTURE_RESPONSE’ appeared first on Appuals.com.
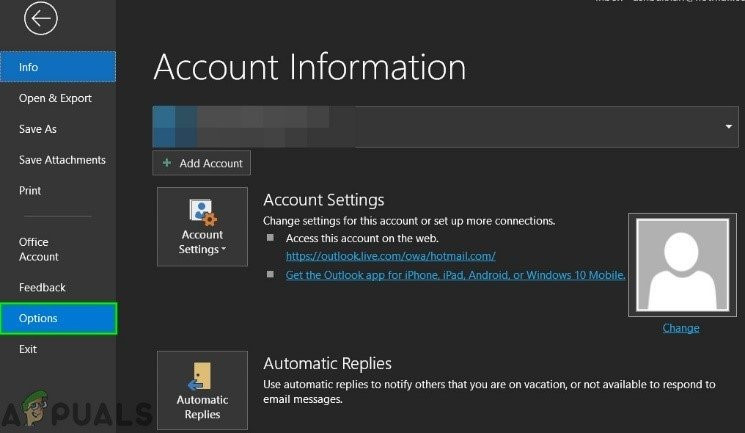
How to Resolve ‘Halo CE DX Fatal Error’ on Windows 10?

$
0
0

The Halo CE DX Fatal Error is encountered when Windows 10 users attempt to play the legacy version of Halo: Combat Evolved. The sub error suggests that the issue happens due to a missing DirectX 9 installation, but in most cases, this is not actually the source of the error.

Halo CE DX Fatal Error on Windows 10

If Direct X 9.0b is not installed, you will encounter this issue due to some missing DLL (Dynamic Link Library) files. The easiest way to fix the issue, in this case, is to run the runtime installer of DirectX web.

But in the vast majority of cases, the problem occurs due to the game’s incompatibility with Windows 10. To get around this, you can either install Bungie’s patch, run the executable in compatibility mode or install the Custom edition of Halo Combat Evolved (Halo CE CE).

Method 1: Install Direct X 9.0b

Even though this is probably not what’s causing the issue, it’s still recommended that you start this troubleshooting guide by ensuring that your machine has all the DLL (Dynamic Link Library) files necessary for this game to run.

There are several ways that will allow you to this, but the easiest route is to simply run the DirectX web installer and install everything that it recommends. This web utility will scan your system and automatically install the DirectX packages that are missing from your installation.

Here’s a quick guide on updating the DirectX versions to the latest:

Note: Keep in mind that this is a cumulative installation, meaning it will install every previous version of DirectX, not just the latest one.

  1. Visit this link (here), select an appropriate language, then click on the Download button.
    Downloading the DirectX End-User Runtime Web Installer
  2. After you get to the next screen, make sure to uncheck the Microsoft bloatware recommendations by clicking on No thanks and continue with DirectX End-user Runtime Web installer button.
  3. Wait until the dxwebsetup.exe installer is downloaded, then double-click on it and accept the UAC (User Account Control) prompt if needed. Next, follow the on-screen prompts to complete the installation.
    Installing DirectX End-User Runtime
  4. After the installation is complete, restart your computer and launch the game after the next startup to see if the issue is now resolved.

In case you’re still encountering the same Halo CE DX Fatal Error, move down to the next potential fix below.

Method 2: Install Bungie’s patch for Windows 10

Since Halo Combat Evolved is a legacy game that wasn’t originally built for the new Windows infrastructure present on Windows 8.1 on Windows 10, you might experience a series of issues caused by incompatibility (including the Halo CE DX Fatal Error).

Fortunately, the studio behind this game (Bungie) has released a patch by working closely with some community members that allows the legacy game to run smoothly on Windows 10.

The patch is extremely light-weight and it automatically installs over your existent game files.

Here’s a quick guide on how to download & install it in order to fix the Halo CE DX Fatal Error issues:

  1. Open your default browser and visit this link (here) to download the patch.
  2. After the download is complete, double-click on the executable and click on the UAC (User Account Control) prompt to grant admin access.
  3. Next, the installer should automatically find your Halo CE game files and override them with the new patch, making it compatible with Windows 10.
  4. Once the operation is complete, restart your computer and see if the issue is resolved after the next computer startup.

In case you’re still encountering the Halo CE DX Fatal Error when trying to launch Halo Combat Evolved, move down to the next potential fix below.

Method 3: Running Halo CE in compatibility mode

One quick workaround that might work for you if you’re encountering the issue on Windows 10 is to force the launch executable to run in compatibility mode with Windows XP.

While several users have found this workaround to be effective in allowing them to launch the game, it doesn’t fix the issue entirely. As several affected users have reported, this issue can cause certain maps to trigger a crash during the loading period.

But if you want to try this, here’s a quick guide on forcing the Halo CE executable to launch in compatibility mode:

  1. Right-click on the launch shortcut of HALO CE and choose Properties from the context menu.
    Accessing the Properties screen of Halo
  2. Inside the Properties screen of Halo CE‘s executable, select the Compatibility tab from the ribbon bar at the top.
  3. Next, check the box associated with Run this program in compatibility mode and select Windows 7 from the drop-down menu.
    Using Compatibility Mode with Windows 7
  4. Save the modification, then launch the game to see if the issue has been resolved.

In case the same Halo CE DX Fatal Error is still occurring, move down to the next potential fix below.

Method 4: Installing Halo CE Custom Edition

Keep in mind that the standard version of Halo CE is not designed to work on either Windows 10 or Windows 8.1. This is mainly because these newer operating systems have replaced parts of Direct Draw and Direct 3d with newer, performance-enhanced CPU software emulation.

Some Halo players are saying that with the newer Windows 10 builds, this is the only way to run Halo CE to run on Windows 10 since it’s the only game version equipped with a transition layer that converts Direct Draw and Direct 3D calls into Open GL.

Here’s a quick guide on how to install this version and configure it to run on your Windows 10 computer:

  1. Visit this link (here) to begin the installation of Halo CE CE (Custom Edition).
  2. Wait until the download is complete, then double-click on the installation executable and click Yes at the User Account Control prompt to grant admin access.
  3. Next, agree with the License Agreement and choose a location to start the installation of Halo CE CE (Custom Edition).
    Installing Halo CE CE
  4. Hit Install to begin the installation, then wait for the process to complete.
    Installing Halo Combat Evolved (Custom Edition)
  5. Input your license key and complete the installation, then restart your computer.
  6. After the next startup sequence is complete, launch the game and install every update that has since become available.

The post How to Resolve ‘Halo CE DX Fatal Error’ on Windows 10? appeared first on Appuals.com.
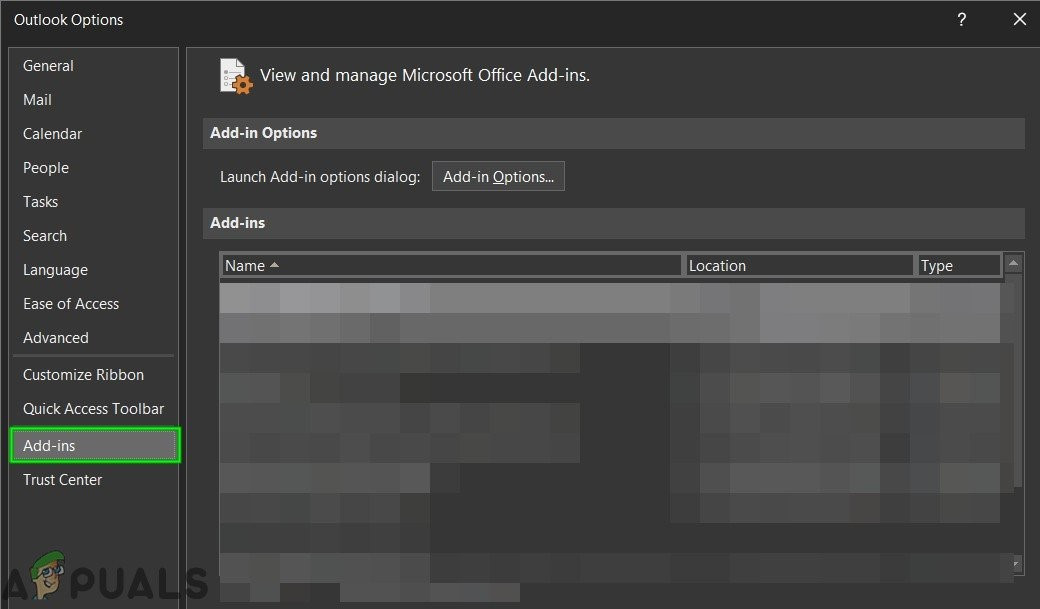
Error 0x800f0831 Installation Failure, Windows Failed to Install the following updates

$
0
0

The 0x800f0831 error is typically discovered by affected users in the WindowsUpdate.log using the Event Viewer after the conventional installation of a cumulative update fails. Although the issue is mostly occurring in relation to Windows Server Update services, it’s also confirmed to appear on end-user Windows versions.

Windows Update Error 0x800f0831

As it turns out, the most popular cause that will trigger this error message is a missing manifest of the previous update package. In other words, the WU (Windows Update) component is not aware of what was last installed, so it refuses to install new update packages. If this scenario is applicable, you can get the issue resolved by installing the missing update manually.

Another potential cause that will lead to the 0x800f0831 error is a scenario in which your end-user machine cannot communicate with Windows Update servers. This can either be facilitated by system file corruption or VPN connections or Proxy servers.

However, the issue can also be caused by a disabled WU service or a missing .NET 3.5 Framework. In this case, you’ll need to enable the framework from the Windows Features menu or you can install it from a compatible installation media.

In rare circumstances, Windows updates might fail with the 0x800f0831 error due to some type of system corruption. This can either be resolved by using System Restore, performing SFC & DISM scans, or by refreshing the components of your OS (via Clean install or Repair install).

How to Troubleshoot and Fix Error 0x800f0831 during Windows Update?

Method 1: Install the missing update manually

If you’re looking for a quick way to expedite the issue, your best chance at getting the problem fixed in one shot is to install the failing update manually. As it turns out, there is one failing update that is mostly reported to cause this issue (KB4512489).

If this scenario is applicable, you can use the Microsoft Update Catalog to find and install the missing package manually. This is effective in those situations where the issue is being caused by a corrupted WU dependency. Several affected users have confirmed that this operation worked for them.

Here’s a quick guide on using the Microsoft Update Catalog to fix the 0x800f0831 error:

  1. Use your default browser and access this link (here) to access the Microsoft Update Catalog.
  2. Once you manage to land in the correct location, use the search function in the top-right corner of the screen to search for the update that refuses to install conventionally.
    Searching for the update that you want to install manually
  3. When you see the result list, look for the appropriate driver and decide which one to download according to your CPU architecture and affected Windows version.
    Choosing the right Windows Update
  4. After you manage to find the correct Windows update for your situation, click on the Download button associated with it and wait for the process to be complete.
  5. As soon as the download is complete, navigate to the location where you downloaded it, then right-click on the .inf file and choose Install from the newly appeared context menu.
    Installing the Inf driver
  6. Inside the driver installation screen, follow the on-screen instructions to complete the installation process, then restart your computer.

In case this operation didn’t allow you to circumvent the 0x800f0831 error or you’re looking for a method that will fix the component that is causing the issue, move down to the next potential fix below.

Method 2: Disable VPN or Proxy server (if applicable)

The second largest cause that might trigger the 0x800f0831 error is some kind of interference that ends up blocking communications between your Windows end-user version and the Windows Update server. In the vast majority of reported cases, this problem was either created by a VPN client or a Proxy server.

Some users that were struggling to fix this problem have confirmed that they managed to fix the issue by uninstalling their VPN client or by disabling the Proxy server (depending on the scenario that was applicable).

We created two separate guides to accommodate both scenarios that might be applicable, so follow whichever one applies to your current situation.

Note: If you use neither a VPN connection or  Proxy server, skip the sub-guides below and move directly to Method 3.

Disable a VPN Connection

  1. Press Windows key + R to open up a Run dialog box. Next, type ‘appwiz.cpl’ and press Enter to open up the Programs and Features menu.
    Type appwiz.cpl and Press Enter to Open Installed Programs List
  2. Once you manage to get inside the Programs and Features screen, scroll down through the list of applications that you have installed and located a 3rd party VPN that you suspect might be causing the issue.
  3. When you locate the 3rd party VPN solution that you suspect might be causing the issue, right-click on it and choose Uninstall from the newly appeared context menu.
    Uninstalling a VPN tool
    Uninstalling a VPN tool
  4. Once you get to the uninstallation screen, follow the on-screen instructions to complete the process, then restart your computer.
  5. After the next startup sequence is complete, attempt to install the failing update again and see if you’re still encountering the same issue.

Disable a Proxy server

  1. Press Windows key + R to open up a Run dialog box. Inside the text box, type ”ms-settings:network-proxy’ and press Enter to open up a Proxy tab of the native Settings menu.
    Running dialog: ms-settings:network-wifi
  2. Once you’re inside the Proxy tab, scroll down to the Manual proxy setup section, then simply disable the toggle associated with ‘Use a proxy server‘.
    Disabling the use of a proxy server
  3. After you successfully manage to do this modification, restart your computer and see if the problem has been fixed at the next computer startup.

If none of these two scenarios where applicable, move down to the next potential fix below.

Method 3: Set the status of Windows Update to Automatic

If the computer that’s experiencing the failed Windows Update installation is part of a shared domain, it’s possible that a network policy or a 3rd party system optimizer tool has ended up disabling the main service responsible for the updating function.

If this scenario is applicable, you can get the issue resolved by accessing the Services screen, set the Startup Type to Automatic and start the Windows Update service forcefully.

Here’s a quick guide on how to do this:

Note: The steps below should be universal, so you should be able to follow it regardless of the Windows version that you’re using.

  1. Press Windows key + R to open up a Run dialog box. Next, type ‘services.msc’ inside the text box and press Enter to open up the Services screen.
    Type “services.msc” into the Run dialog and press Enter

    Note: If you are prompted by the UAC (User Account Control), click Yes to grant administrative privileges.

  2. Once you’re inside the Services screen, scroll down through the list of local services and identify the Windows Update service. Once you see it, either double-click on it or right-click and choose Properties from the context menu.
    Windows Update Properties
  3. After you manage to get inside the Windows Update Properties screen, select the general tab and start by setting the drop-down menu associated with Startup type to Automatic.
    Setting the Startup type of Windows Update service to Automatic
  4. Click on Apply to save the changes, then restart your computer and see if the issue is resolved at the next computer startup.

In case the startup type of Windows Update was already set to Automatic and this didn’t resolve the issue, move down to the next method below.

Method 4: Enabling .NET Framework 3.5

If you’re encountering the issue when trying to install a cumulative update, you should explore the possibility of a disabled .NET 3.5 framework. The installation process of cumulative updates is more complex and might fail unless every needed dependency is enabled.

Several affected users have confirmed that they managed to fix the issue by using the Windows Features menu to ensure that .NET 3.5 framework is disabled.

Here’s a quick guide on ensuring that .NET Framework is enabled on your Windows computer:

  1. Press Windows key + R to open up a Run dialog box. Inside the text box, type ‘appwiz.cpl’ and press Enter to open up the Programs and Features menu.
    Type appwiz.cpl and Press Enter to Open Installed Programs List
  2. Once you’re inside the Programs and Features menu, click on Turn Windows features on or off (from the left-hand section of the screen).
    In Programs and Features, click on Turn Windows Features On or Off
    In Programs and Features, click on Turn Windows Features On or Off
  3. Inside the Windows features screen, ensure that the checkbox associated with .NET Framework 3.5 (includes .NET 2.0 and 3.0) and click on Ok to save the changes.
    Enabling the .NET Framework 3.5
  4. Click Yes at the confirmation prompt, then wait for 3.5 .NET Framework to be enabled. Once it is, restart your computer and see if the issue is resolved after the next computer startup.

In case you’re still encountering the same 0x800f0831 error, move down to the next potential fix below.

Method 5: Installing .NET Framework 3.5 via CMD

In case the method above triggered an error once you tried to enabled .NET Framework 3.5 or the option wasn’t available inside the Windows Features screen, you might force the installation yourself by installing the missing framework from an elevated CMD terminal.

We are going to create a custom CMD script that will force the installation of .NET Framework 3.5 and enforce the commands automatically.

But keep in mind that in order to do this, you will need a compatible Windows installation media. If you don’t have one at the ready, you will need to create one.

Note: Here’s how to create compatible installation media for Windows 7 (here) and Windows 10 (here).

Once you got the installation media at the ready, follow the instruction below to force the installation of .NET Framework 3.5 from an elevated CMD prompt:

  1. Press Windows key + R to open up a Run dialog box. Next, type ‘notepad.exe’ and press Ctrl + Shift + Enter to open up an elevated Notepad window. When you’re prompted by the UAC (User Account Control), click Yes to grant administrative privileges.
    Opening an elevated Notepad window
  2. Inside the elevated Notepad window, paste the following code:
    @echo off 
    Title .NET Framework 3.5 Offline Installer 
    for %%I in (D E F G H I J K L M N O P Q R S T U V W X Y Z) do if exist "%%I:\\sources\install.wim" set setupdrv=%%I 
    if defined setupdrv ( 
    echo Found drive %setupdrv% 
    echo Installing .NET Framework 3.5... 
    Dism /online /enable-feature /featurename:NetFX3 /All /Source:PLACEHOLDER:\sources\sxs /LimitAccess 
    echo. 
    echo .NET Framework 3.5 should be installed 
    echo. 
    ) else ( 
    echo No installation media found! 
    echo Insert DVD or USB flash drive and run this file once again. 
    echo. 
    ) 
    pause

    Note: Replace PLACEHOLDER with your letter of the drive that’s currently holding the installation media.

  3. Once the code is successfully inserted, go to File > Save As and select an appropriate location where you want to save the file.
    Saving the script in a custom location
  4. You can name the fix however you want, but it’s crucial that you end it with the extension *.cmd*. Next, click on Save to create the script that will hopefully fix the 0x800f0831 error.
    Creating the CMD fix
  5. Navigate to the location where you saved the .cmd file, then right-click on it and choose Run as administrator from the context menu. Next, click Yes at the confirmation prompt and wait for the process to complete.
  6. Once the .NET 3.5 Framework is installed, restart your computer and see if the issue is resolved at the next computer startup.

In case you’re still encountering the same 0x800f0831 error, move down to the next potential fix below.

Method 6: Performing SFC and DISM Scans

If none of the methods below have allowed you to fix the 0x800f0831 error, it’s very likely that the issue is actually being caused by some kind of system file corruption. In case this scenario is applicable, you should start by running a couple of utilities (DISM and SFC) that are equipped to fix and replace corrupted instances.

DISM (Deployment Image Servicing and Management) is a tool that’s heavily reliant on a sub-component of WU. It requires an internet connection in order to fix corrupted system files.

On the other hand, SFC (System File Checker) is 100% local and uses a locally cached archive to replace corrupted data with healthy equivalents.

Because the two utilities operate differently, we encourage you to run both in quick succession in order to maximize your chances of success.

Here’s a quick guide on performing SFC and DISM scans from an elevated CMD prompt:

  1. Press Windows key + R to open up a Run dialog box. Next, type ‘cmd’ and press Ctrl + Shift + Enter to open up an Elevated Command Prompt. When you see the UAC (User Account Control), click Yes to grant admin access.
    Type “cmd” into the Run dialog
  2. Once you’re inside the elevated CMD prompt, type the following command and press Enter to initiate an SFC scan.
    sfc / scannow

    Note: This utility will use locally cached data to replace any bad Windows files with a healthy equivalent. But once you initiate this scan, do not close it early – Doing this leaves your system exposed to bad sectors that might create different problems.

  3. Once the SFC scan is complete, restart your computer and wait for the next startup to complete.
  4. At the next startup, follow step 1 again to open up another elevated CMD terminal. This time, run the command below to initiate a DISM scan:
    dism /online /cleanup-image /restorehealth

    Note: Before you initiate this procedure, ensure that your Internet connection is stable. DISM uses Windows Update to download healthy copies for the broken system files that need to be replaced.

  5. Once the operation is complete, restart your computer and see if the problem is fixed at the next computer startup.

In case you’re still dealing with the same 0x800f0831 error, move down to the final fix below.

Method 7: Using System Restore

If you only started noticing this issue recently after a driver or update installation or after an unexpected machine shutdown, and none of the pending updates are installed, it’s likely that a recent system change has brought about this inability to install updates.

If this scenario is applicable, you should be able to fix this issue by using the System Restore utility to revert your computer back to a healthy state when this issue wasn’t occurring.

Keep in mind that by default, Windows 7, Windows 8.1 and Windows 10 are configured to save new restore snapshots regularly (at important system events). So unless you’ve modified this default behavior (or a 3rd party application did it for you), you should have plenty of restore snapshots to choose from.

But keep in mind that using a System Restore snapshot means that any change you made after the snapshot was created will also be lost. This includes any installed applications, games, and any other system changes that you made during that time period.

If you are aware of the consequences, here are the step-by-step instructions to using System Restore to restore your computer back to a healthy state:

  1. Press Windows key + R to open up a Run dialog box. Next, type ‘rstrui’ and press Enter to open up the System Restore menu.
    Opening the System Restore wizard via Run box
  2. Once you’re inside the initial System Restore screen, click on Next to advance forward to the next menu.
    Using System Restore
  3. At the next screen, start the operation by checking the box associated with Show more restore points. Next, start by comparing the dates of each saved restore point and select one that is older than the apparition of this issue.
    Restoring your system to a previous point in time

    Note: But don’t select a restore point that’s too old so you don’t lose that much data.

  4. With the correct system restore point selected, click on Next to advance to the next menu.
  5. Once you get this far, the utility is configured and ready to go. To enforce this fix, simply click on Finish to start the process. After you do this, your computer will restart and the old state will be enforced at the next system startup.
    Starting the System Restore process

In case the 0x800f0831 error is still occurring or this method wasn’t applicable, move down to the next potential fix below.

Method 8: Performing a clean install/repair

If you’ve come this far and none of the methods above have allowed you to fix the issue, it’s most likely due to some kind of system corruption that cannot be resolved conventionally. If this scenario is applicable, your only chance of fixing the issue is to reset every Windows component.

When it comes to doing this, you have two choices:

  • Clean install – This is the easiest solution out of the two. You don’t need an installation media and you can deploy this fix directly from the GUI of Windows 10, Windows 8.1 and Windows 7. However, unless you back up your data in advance, expect total personal data loss.
  • Repair install – If you’re looking for a more focused approach, you should go for this method instead. You will need a compatible installation media, but the major advantage is that you will be able to keep all your personal data including apps, applications, personal media, and even some user preferences.

Follow whichever method you find more comfortable with.

The post Error 0x800f0831 Installation Failure, Windows Failed to Install the following updates appeared first on Appuals.com.
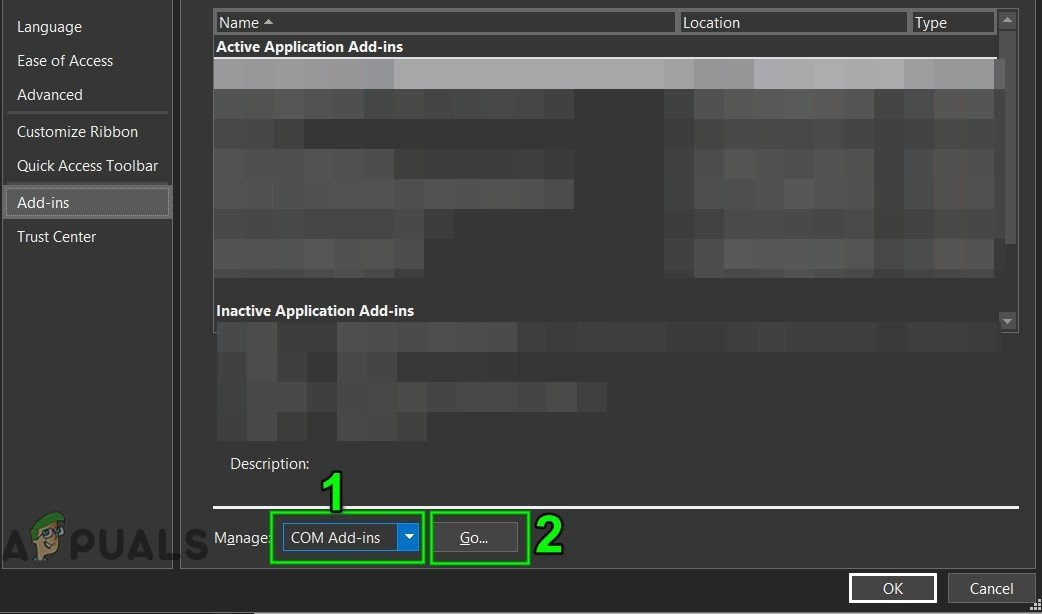
How to Fix CDVD READ ERROR in PCSX2 Emulator

$
0
0

The Black Screen Error (CDVD READ ERROR) occurs in the PCSX2 emulator when users attempt to use this piece of software to play PS2 games. This issue occurs with multiple games and with several different configurators of this emulator. The error message can only be visible in the program log.

PCSX2 CDVD Read Error

In most cases, this particular error will occur when you attempt to play a PAL version of a game with a version of the PCSX2 emulator older than 1.4. This happens because previous versions built around playing NTSC games, which made a lot of PAL ISOs unplayable.

In case you have an AMD CPU, chances are the problem will occur due to an incorrect renderer that was auto-assigned. To fix the issue in this case, you will need to access the Video (GS) settings of your emulator and set the Renderer to Direct3D9 (Hardware). But if you have a GPU with DirectX11 support, you should set the Renderer to Direct3D11 (Hardware).

Finally, PCSX2 is notoriously known for its inability to play games directly from a DVD drive. So in order to work around this inconvenience, you need to create an ISO out of your game disk and either mount it conventionally or use the internal feature to load the ISO into PCSX2.

Method 1: Install Version 1.4 of PCSX2

As it turns out, in most cases the issue occurs whenever users attempt to play a PAL version (Made for Europe) of a game. Keep in mind that older versions of PCSX2 are mainly built around NTSC, which might lead to the apparition of this issue whenever the user attempts to play the PAL ISOs.

If this scenario is applicable, you should be able to fix the issue by uninstalling your current version and then installing version 1.4 from the official website. Several affected users have confirmed that this operation has successfully allowed them to launch their favorite PS2 games without encountering the Black Screen Error (CDVD READ ERROR).

Here’s a quick guide on uninstalling the current version of PCSX2 and installing the universal version (PAL and NTSC):

  1. Press Windows key + R to open up a Run dialog box. Next, type ‘appwiz.cpl’ and press Enter to open up the Programs and Features menu.
    Typing in “appwiz.cpl” in the Run prompt
  2. Once you’re inside the Programs and Features window, scroll down through the list of installed applications and locate your PCSX2 installation, right-click on it and choose Uninstall from the context menu.
    Uninstalling the old version of PCSX2
  3. Inside the uninstallation window, follow the on-screen instructions to complete the uninstallation, then restart your computer to complete the uninstallation.
  4. After the next startup is complete, visit this link (here), make your way to the Files category and click on the Download button associated with PCSX2 1.4.0 Standalone Installer.
    Downloading the standalone installer of PCSX2 1.4
  5. Once the download is complete, open the installation executable that you just downloaded and follow the on-screen to complete the installation of the latest version of PCSX2 1.4.
    Installing the latest version of PCSX2
  6. Once the installation is complete, proceed with the installation of the missing DirectX Runtime versions if you are prompted to do so.
    Installing the latest version of DirectX
  7. After the operation is completed, close the installer window and restart your computer once again.
  8. At the next startup, open the version of PCSX2 that you just installed, mount the image that was previously triggering the Black Screen Error (CDVD READ ERROR) and see if the issue is now resolved.

In case the same problem is still occurring, move down to the next potential fix below.

Method 2: Using Direct3D9 (Hardware) Renderer

As it turns out, if you have an AMD processor, chances are your PCSX2 Emulator might use a different Renderer technology that will prevent certain games from running. This happens because the PCSX2 emulator has an automated feature that automatically scans for the best render technology according to the CPU configuration.

While it works just fine for INTEL processors, it might go for Open GL(Software) if you have an AMD processor, which will prevent certain games from running.

Several affected users that were also encountering this issue have confirmed that they were able to resolve the issue after they accessed the Video GS Plugin settings and modified the default renderer.

Here’s a quick guide on doing this:

  1. Open your PCSX2 Emulator and load your PS2 BIOS when asked to do so.
  2. Once you get to see the main program interface along with the Program log, use the ribbon bar at the top to access Config > Video (GS) > Plugin Settings.
    Adjusting the Plugin Settings
  3. Once you’re inside the GSdx Settings menu, expand the drop-down menu associated with Renderer and change it to Direct3D9 (Hardware), then click Ok to save the changes.
    Set the default renderer

    Note: If the Renderer is already set to Direct3D9 (Hardware), change it to Direct3D9 (Software) and click ok to save the changes.

  4. Before launching the game again, close & open the PCSX2 1.4 once again. Keep in mind that the program needs to restart in order for this operation to be successful.
  5. Launch the game that was previously causing the Black Screen Error (CDVD READ ERROR) issue and see if the problem is now resolved.

In case the same issue is still occurring or this method wasn’t applicable, move down to the next potential fix below.

Method 3: Creating an ISO of the game DVD

With certain PS2 classics, the Black Screen Error (CDVD READ ERROR) will occur due to PCSX2’s inability to play games directly from a DVD drive. The vast majority of titles need to be re-dumped into an ISO using ImgBurn or a different program before they can become playable.

This might seem like an extra hassle, but a lot of affected users have confirmed that this operation was the only thing that helped them run their PS2 games on their computer using the PCSX2 emulator.

Here’s a quick guide on how to create an ISO out of your Game file using ImgBurn and load it into PCSX2:

  1. Open your default browser and navigate to this link here.
    Downloading the latest version of ImgBurn
  2. Download the installation executable and wait until the operation is complete. Once it is, open it and follow the on-screen prompts to complete the installation of ImgBurn.
  3. After you agree with the license agreement and complete the installation of ImgBurn, restart your computer and wait for the next startup sequence to complete.
    Installing ImgBurn
  4. Open Imageburn and click on Create Image from Disk button from the list of available options.
    Creating an image from disk
  5. Next, choose a destination where you want to create the ISO and click on the Icon below to start the process.
  6. Wait until the process is complete, then open the PCSX2 emulator, select CDVD from the ribbon bar at the top and choose ISO from the list of available options.
  7. After you do this, go to CDVD > ISO Selector > Browse, then browse to the location where you just created the ISO previously with ImageBurn and double-click on it to load it inside PCSX2 emulator.
    Browsing for the correct ISO file
  8. After you successfully manage to load the ISO of the game in the PCSX2 emulator, go to System (using the ribbon menu) and click on Boot CDVD from the drop-down menu.
    Booting the game using the BootCDVD function
  9. If all goes well this time, the application should start without any issues.

In case you’re still encountering the same Black Screen Error (CDVD READ ERROR) issue, move down to the next potential fix below.

Method 4: Changing the GSDX Renderer to DirectX11

If you’re using a newer dedicated GPU, the default Renderer that PCSX2 assigns will most likely produce this issue by default. In order to work around it, you will need to access the GSdx Settings of your emulator and change the default Renderer to DirectD11 (Hardware).

A lot of users that encountered this problem have confirmed that this operation is what finally allowed them to launch PS2 games without encountering the Black Screen Error (CDVD READ ERROR). 

Note: This method will not work unless you have a dedicated GPU card that supports DirectX11. Doing this on an integrated or older GPU with no DirectX11 support will trigger a different error.

Here’s a quick guide on changing the GSdx Renderer to DirectX11:

  1. Open your PCSX2 emulator and click on Config from the ribbon bar at the top.
  2. Once you get there, select Video(GS) and then click on Plugin Settings.
  3. When you get to the GSdx Settings, expand the drop-down menu associated with Renderer and set it to Direct3D11 (Hardware).
  4. Click Ok to save the changes, then close your PCSX2 emulator before opening it up again and launching the game.
  5. This startup should occur without the annoying Black Screen Error (CDVD READ ERROR). 
Using DirectX113D inside the PCSX2 emulator

The post How to Fix CDVD READ ERROR in PCSX2 Emulator appeared first on Appuals.com.
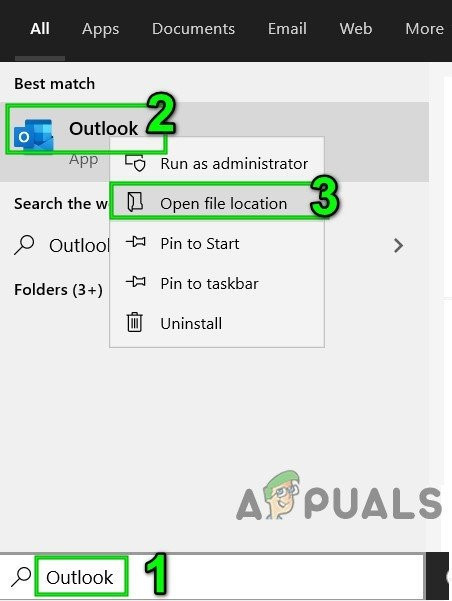
Viewing all 4499 articles
Browse latest View live