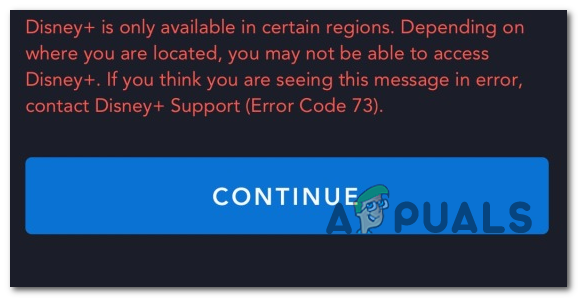
Some users have been encountering the Error Code 73 when trying to watch media on Disney+. The error is reporting location availability issues. However, it seems to be impacting some Disney Plus users that live in countries where this service is already available.
Disney Plus Error Code 73
Keep in mind that Disney+ is rolling out worldwide via a staggered rollout plan that has been widely criticized. At the beginning of 2020, there were only a handful of countries where this service was available in:
Canada
Netherlands
United States
Australia
New Zealand
Puerto Rico
A select list of European lists will be added next.
If your country of residence is not yet supported by Disney+, that’s most likely the reason why you’re encountering the Error Code 73. Fortunately, there are a couple of ways that will allow you to watch content on Disney+ even if your country is not yet supported (via a VPN service or Proxy server).
But keep in mind that not every VPN and Proxy server will work with Disney+. As a lot of affected users have reported, Disney+ is capable of detecting certain VPN solutions and prevent you from accessing the service until you access the service without any anonymity solution.
Method 1: Removing the VPN client or Proxy server (if applicable)
Keep in mind that there are only a select number of VPN clients and Proxy service that Disney+ is not smart enough to detect. The internet is filled with reports from users living in countries where the service already launched that are still getting Error Code 73.
The reason? They have previously installed a VPN client or they’re filtering their Internet connection through a proxy server. Keep in mind that Disney+ (similar to Netflix) will detect your VPN even if it’s not active (it can identify it by looking at your configuration).
So if you’re encountering the issue in a country that already supports Disney+, see if you have ExpressVPN (or other equivalents) or if your internet connection goes through a proxy server.
To help you with this investigation, we’ve created two separate guides that will allow you to remove your VPN or proxy server from your computer.
Removing the VPN client
Note: Keep in mind that when it comes to a VPN client, it does not have to actively hide your identity in order for Disney+ to detect it. The streaming service will detect some VPN clients simply by analyzing the network configuration.
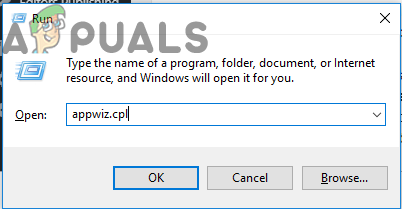
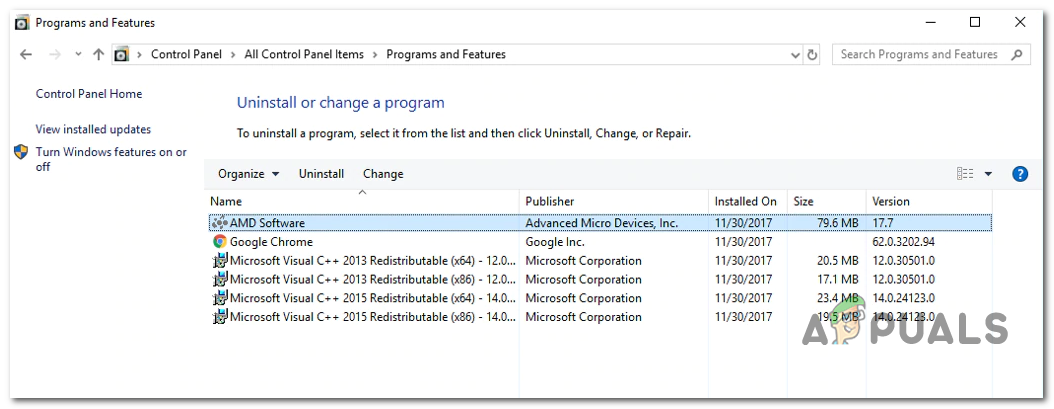
Press Windows key + R to open up a Run dialog box. Next, type ‘appwiz.cpl’ and press Enter to open up the Programs and Features screen.
Type appwiz.cpl and Press Enter to Open Installed Programs List
Once you’re inside the Programs and Features screen, scroll down through the list of applications and locate the VPN client that you’re currently using.
Right-click on the VPN client that you wish to uninstall and click on Uninstall from the newly appeared context menu. Next, follow the on-screen prompts and complete the uninstallation.
Uninstalling the VPN client
After the operation is complete, restart your computer and attempt to access Disney+ once the next startup sequence is complete.
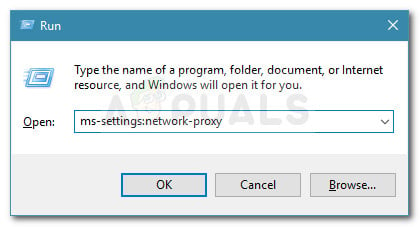
Removing Proxy server
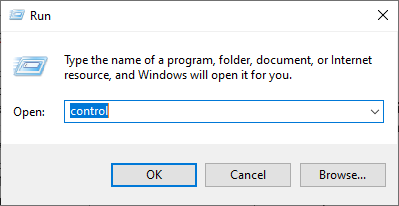
Open up a Run dialog box by pressing Windows key + R. Next, type ”ms-settings:network-proxy’ inside the text box and press Enter to open up the Proxy tab of the Settings app.
Run dialog: ms-settings:network-proxy
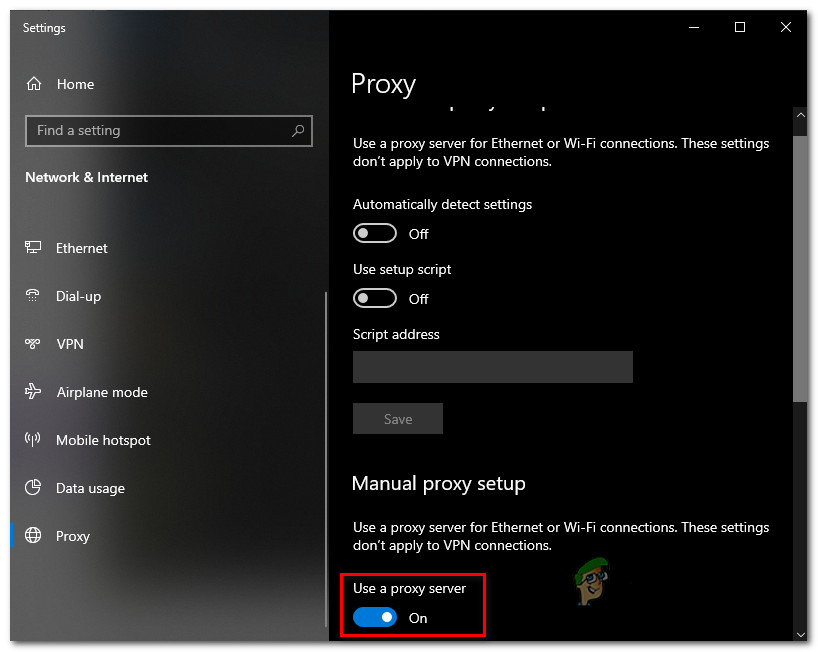
Once you find your way inside the Proxy tab, move over to the right section and scroll all the way down to the Manual Proxy setup section. When you get there, disable the toggle associated with ‘Use a proxy server‘.
Disabling the use of a proxy server
Once your proxy server is disabled, close the Settings menu and restart your computer.
After the next startup sequence is complete, access Disney+ again and see if the issue is resolved at the next system startup.
Method 2: Using a Safe VPN client
If you are not living in a country that supports Disney+, the only way you are going to play it is by using a VPN client in order to make it seem like you’re accessing the streaming service from a supported location.
As of now, there are only a handful of VPN services that work fine with Disney+. Here’s a list of user-verified VPN clients that play Disney+ without issues:
Hide.me (All Platforms)
HMA VPN (All Platforms)
Surfshark (PC)
Super Unlimited Proxy (iOS)
Unlocator (All Platforms)
Cloudflare (Android)
Keep in mind that this list is subjected to change. Disney+ bans VPN clients all the time, and new VPN clients manage to get around the VPN detection feature that the streaming service has.
IMPORTANT: Most of these VPN solutions will not work on a Smart TV. As of now, there are few options that will allow you to play Disney+ on a Smart TV OS. Before investing in a VPN for something like this, do your research right and see if other users have been able to set it up without issues.
If you are not certain about how to set up a VPN client, we’ve got you covered. We’ve created a step-by-step guide that will show you how to set up Hide.me VPN and configure it for a Windows PC:
Note: Hide.me VPN will install at a system level, which will bypass the VPN verifications that Disney+ is currently doing. Also, you can use any browser you want when watching the streaming service.
Open your default browser and visit this link (here) and click on the Download Now button to initiate the download.
At the next screen, click on the Register button once (the one associated with the free account), then download the free version of Hide.me for Windows PC.
Downloading the VPN solution
Once you get to the next screen, type your email address and hit Enter to complete the registration.
Registering for the service
Note: At this point, you will need to insert a valid email address that you have access to – You will need to validate it during the next steps.
Once you manage to complete the registration, access your email box and look for the verification email you received from Hide.me – in our case, it took more than 5 minutes.
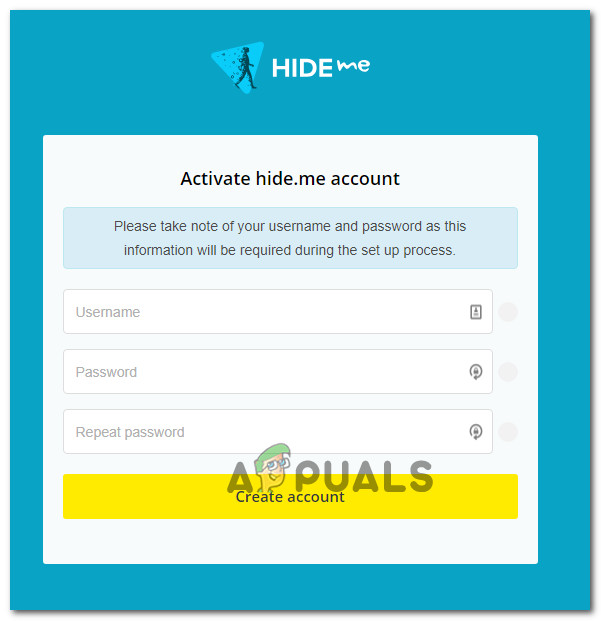
Click on the verification link, then insert an appropriate user and password that you want to use for Hide.me. After everything is set up, click on Create Account.
Creating an account with Hide.me
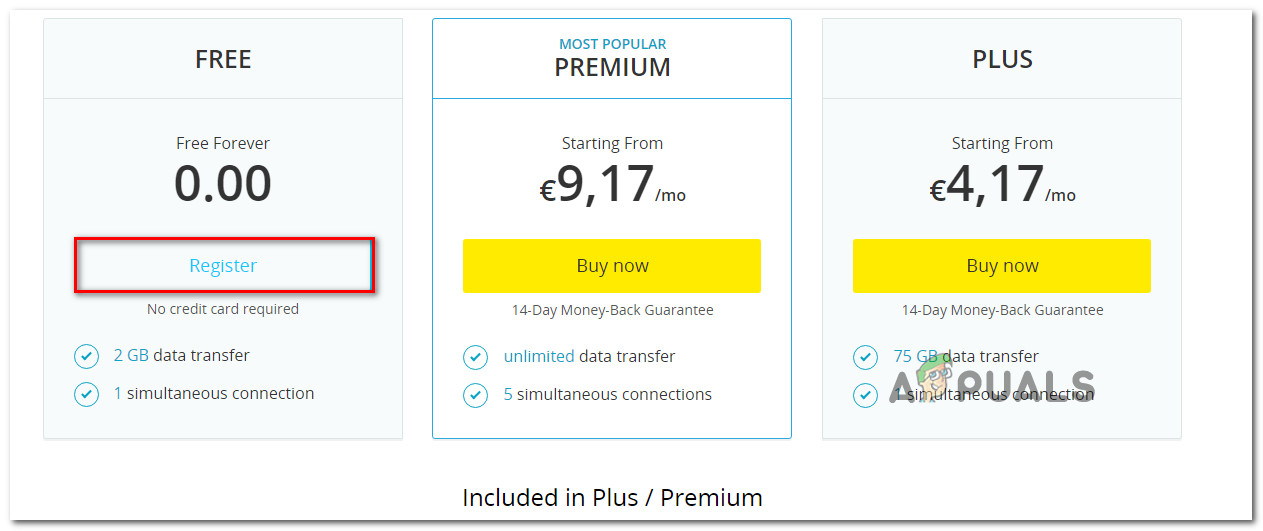
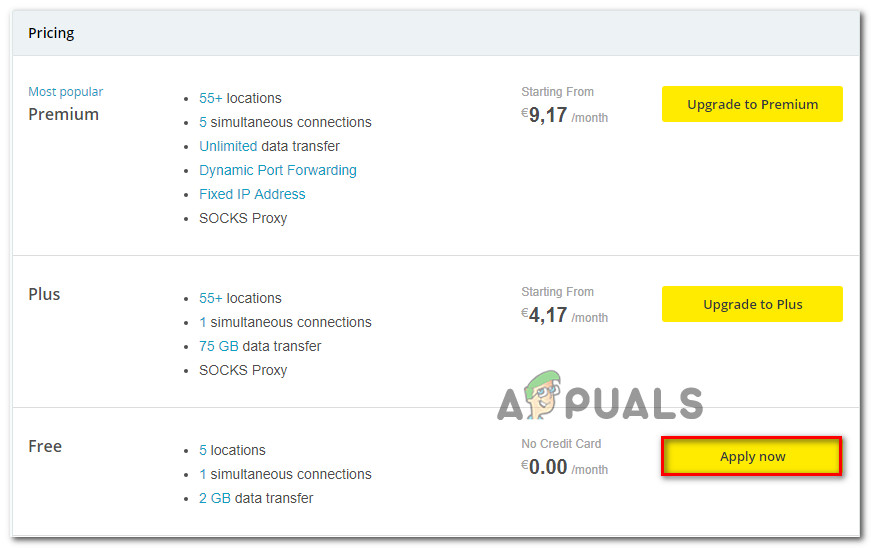
After you manage to successfully sign in to the account that you have just set up, make your way through Pricing > Free and click on the Apply Now button to activate the free plan.
Apply for the free account
Note: We recommend starting with a free plan and only go for the Premium plan after you confirm that the VPN service works for you when playing Disney+.
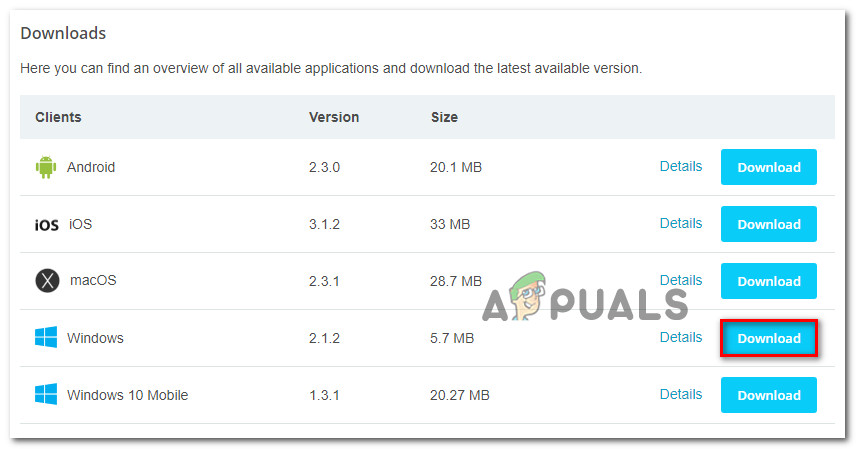
Once you get this far, the free plan is successfully enabled. All that’s left to do now is to access the Download clients tab and click on the Download Now button corresponding with your operating system version in order to initiate the download.
Downloading the Windows client of Hide.me
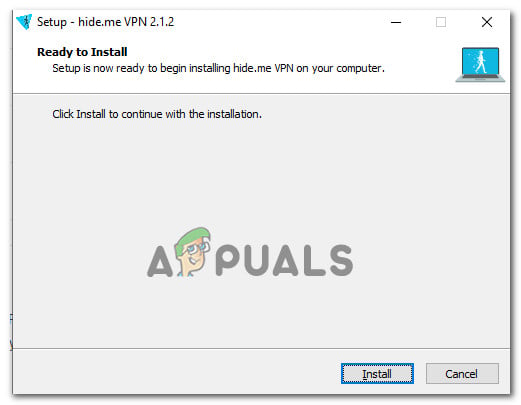
After the operation is complete, double-click on the newly-downloaded executable, then follow the on-screen prompts to complete the installation.
Installing the Hide.Me VPN application
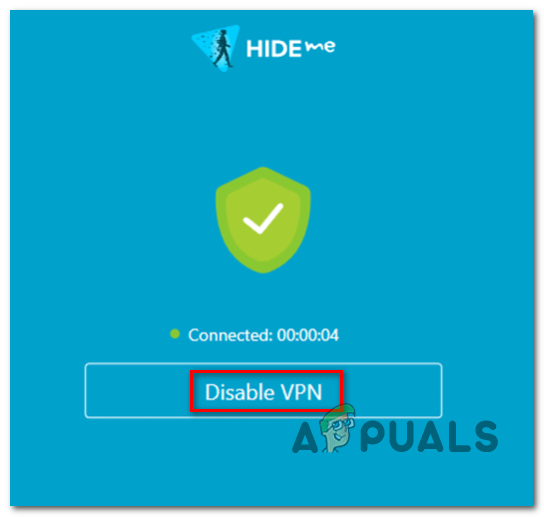
Once Hide.me is installed on your computer, use the credentials you previously validated at step 4 and click on Log in. Finally, click on Start your free trial, then select a location supported by Disney+. Here’s a list of supported countries: Canada, Netherlands, United States, Australia, New Zealand, and Puerto Rico.
After you activate the Hide.me VPN, launch Disney+ and see if you’re still encountering the same issue.
Some Windows users are trying to run a speed test on their Internet connection, but every online tool that they try to use will end up displaying the ‘Socket Error‘ message. In most cases, this issue is reported to occur with SpeedTest.
Socket Error On SpeedTest
As it turns out, one of the most common instances that will produce the Socket Error is an outbound rule (Connected Devices Platform – Wi-Fi Direct Transport (TCP-Out)) belonging to Windows Firewall. If it’s disabled, you AV might not allow connections with speed test utilities. In this case, you can resolve the problem by enabling the outbound rule from the Advanced settings of the Windows Firewall.
But if you’re using a 3rd party AV or Firewall, you might need to whitelist the domain of the SpeedTest tool that you’re using in order to allow the test to complete. Additionally, you should look to disable the real-time protection or uninstall the 3rd party suite altogether.
However, cloud solutions like Onedrive or Google Drive are also reported to trigger the ‘Socket Error‘. If this scenario is applicable, disable the real-time syncing feature of your cloud solution and see if the issue is resolved.
If all else fails, you should consider using a different speed testing tool that is more permissive with your Internet connection.
Method 1: Enabling Connected Device Platform rule in Windows Firewall
As it turns out, the ‘socket error’ when running an Internet speed test with your browser can be caused by your firewall – even if you’re using the built-in firewall (Windows Firewall). This scenario is most encountered on a Wi-Fi connection.
According to some affected users, this particular issue can occur due to an Outbound rule called ‘Connected Devices Platform – Wi-Fi Direct Transport (TCP-Out)‘.
Some affected users have managed to fix the issue by accessing the Advanced Security suites of Windows Firewall and enabling the problematic outbound rule. But keep in mind that the outbound rule that needs to be enabled will be different if you’re encountering the issue with an ethernet connection.
Here’s a quick step by step guide that will allow you to access the Advanced built-in Firewall settings and enabling the correct outbound rule:
Press Windows key + R to open up a Run dialog box. Next, type ‘firewall.cpl’ inside the text box and press Enter to open up the Windows Firewall settings window.
Once you’re inside the Windows Defender Firewall settings, click on the Advanced settings menu from the left-hand side menu bar.
After you manage to land inside the Windows Defender Firewall andAdvanced Security, click on Outbound Rules from the menu on the left.
With the Outbound Rules menu selected, move down to the right-hand section and scroll down through the list of available Outbound Rules and locate ‘Connected Devices Platform – Wi-Fi Direct Transport (TCP-OUT)‘. Once you see it, double-click on it. Note: If you’re encountering the issue with an ethernet connection, access the Connected Devices Platform (TCP-Out) outbound rule instead.
Inside the Properties screen of the outbound rule that you want to modify, select the General tab from the menu at the top, then ensure that the box associated with Enabled is checked.
Click on Apply to save the changes, then close every window and restart your computer.
Once the next startup is complete, repeat the speed test once again and see if the issue is now resolved.
Enabling the problematic outbound rule
In case the same ‘Socket Error‘ is still occurring, move down to the next potential fix below.
Method 2: Pause OneDrive or Drive Syncing (if applicable)
If you’re using OneDrive or the desktop version of Google Drive as the primary cloud solution, keep in mind that these two can be huge Internet bandwidth hoggers if you’re they are actively syncing files while you are trying to run a speed test.
Several affected users have reported that they got this error consistently until they realized that their cloud solution (Onedrive or Google drive) was uploading files in the background, effectively taking up all the available bandwidth.
If this scenario is applicable, you can fix this issue by pausing the syncing sequence of Ondrive or Google Drive – depending on the tool that you’re using.
Since we don’t discriminate, we created two separate guides that will help you disable active syncing regardless of the cloud application that you’re using.
Pausing Active Syncing on OneDrive
Right-click on the taskbar icon associated with OneDrive (an icon resembling a cloud).
Next, from the OneDrive context menu, click on More, select Pause Syncing and select 2 Hours from the list of available options.
Pausing Syncing on OneDrive
Note: Two hours is more than enough to complete the speed test – no need to stop the active syncing feature indefinitely.
Once the OneDrive syncing feature is disabled, repeat the speed test and see if the ‘Socket Error‘ has been resolved.
Pausing Active Syncing on Google Drive
Go to your taskbar and look for the icon associated with Google Drive.
If you see that the utility is actively syncing files, click on the action button (top-right corner) and click on Pause from the newly appeared cotext menu.
Pausing Google Drive Sync
Now that the active syncing is disabled, repeat the speed test and see if the problem is resolved.
Once the operation is completed, return to the same Google Drive menu and click on Resume to reestablish real-time syncing.
In case you’ve already done this with no success or this scenario was not applicable, move down to the next potential fix below.
Method 3: Whitelist Speedtest domain (if using 3rd party AV)
As it turns out, there are some overprotective suites that will simply flag the speed test as a suspicious activity – which will end up triggering the ‘Socket Error‘. Avast Antivirus, Kaspersky and Comodo AV are commonly signaled out for blocking communications between computer and Speedtest server.
If this scenario is applicable, you should be able to resolve the issue by whitelisting the domain in order to allow the speed test to run. But keep in mind that this operation will be different depending on the AV suite that you’re using.
In Avast, you can establish a whitelisting rule by going to Settings > General > Exclusions > URL. Once you get there, simply paste ‘https://www.speedtest.net/‘ and save the modifications.
White-listing the Speed test domain in 3rd party AV settings
Note: Keep in mind that these steps will be different depending across multiple 3rd party suites.
Additionally, you can simply disable the real-time protection while you perform the speed test. In most cases, you can do this directly from the taskbar menu. Simply right-click on the icon associated with your AV and look for an option that will disable the real-time protection.
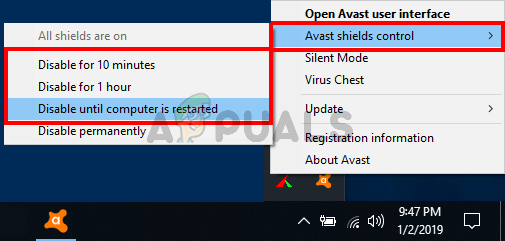
Right Click Avast Icon From System Tray To Disable Avast Temporarily
In case the same problem is persisting and you’re using a 3rd party security suite, move down to the next potential fix below.
Method 4: Uninstalling 3rd party suite (along with remnant files)
If the method above didn’t resolve the issue but you are using a 3rd party suite that you suspect might be causing this problem, the only way to test the theory out is to uninstall the 3rd party suite and ensure that you’re not leaving behind any leftover files that might still cause the same type of behavior.
In case you suspect that a false positive triggered by your 3rd party AV is causing the issue, here’s a quick step-by-step guide on uninstalling the 3rd party suite or firewall and ensuring that you’re not leaving behind any remnant files that might still produce the error:
Press Windows key + R to open up a Run dialog box. Next, type ‘appwiz.cpl’ and press Enter to open up the Programs and Features menu.
Type appwiz.cpl and Press Enter to Open Installed Programs List
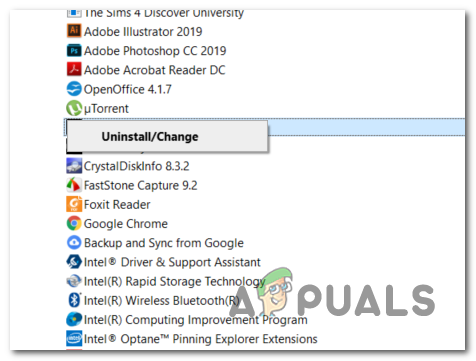
Once you manage to get inside the Programs and Features menu, scroll down through the list of installed applications. Do so until you locate the 3rd party A/V or firewall that you suspect might be causing the issue.
When you see it, right-click on it and choose Uninstall from the newly appeared context menu.
Uninstalling Avast Firewall
Inside the uninstallation wizard, follow the on-screen prompts to complete the process of uninstalling the 3rd party AV app.
Once the uninstallation is complete, restart your computer and follow this article (here) once the next startup is complete in order to ensure that you also remove any leftover files that might still produce this type of behavior.
Run the speed test again and see if the issue is still resolved.
In case the same problem is still occurring, move down to the next potential fix below.
Method 5: Using a Different Testing Tool
If none of the methods below have allowed you to fix the ‘Socket Error’ and perform a SpeedTest, it’s time to consider the alternatives. Keep in mind that SpeedTest.net is not the only reliable tools that will allow you to test your Internet connection.
We’ve created a list with 5 Alternatives that you can use in case Speedtest.Net is consistently showing the same error message:
Feel free to use any of the alternatives featured above. They are just as reliable as the most popular option (SpeedTest.Net) and will most likely not trigger the same ‘Socket Error’.
Steam Music Player allows users to play music on steam without opening another application. Steam also has the game soundtracks DLC that users can listen, if they own the game and DLC. This is really useful on a machine where you don’t have any media player but just a Steam application. However, some users are still unaware of how to add local music to their Steam music library. In this article, we will show you the methods for adding music to your Steam Music Player.
Adding Music to Steam Music Player
Adding Music to the Steam Music Player
When it comes to adding music to your Steam Music library, it is similar to adding music to any other media player. The user just needs to point the Steam music player to the folder where local music is located and Steam will do the rest. There are several different ways through which users can add music to their Steam Music Player.
Method 1: Adding Library in Music Settings on Steam
The most common and default method is to add the music directory to your Steam Music library. You can find this option in your Steam music settings. You can also add multiple different directories to your Steam Music library. Follow the below steps:
Open your Steam by double-clicking the shortcut or by searching Steam in the Windows search feature.
Click on the Steam menu on the top menu bar and choose the Settings option.
Opening Steam settings
Select the Music in the list on the left side. Click on the Add button to select your music folder, and then click Ok button. Note: It will ask automatically to restart, if not you need to restart Steam to sync the folder to your Steam Music Player.
Adding music directory to Steam Music library
Click on View and choose Music Player option to open the Steam Music Player.
Opening Steam Music Player
You will find the music list and all the music in Steam. Double-click on any music file to play it in the Steam Music Player.
Method 2: Adding Music Library in Steam Big Picture
This is similar to the first method, but this is in the Big Picture mode. This is because if you are not using a computer but some other device with Big Picture mode, then the interface will be a bit different. However, you are adding the music directory to the Steam music library in this method too. Follow the below steps to add your music through Big Picture Mode:
Note: If you are already using the Big Picture mode in other devices, then skip the first step.
Open the Steam application by double-clicking the shortcut or by searching Steam in the Windows search feature.
Click on the Big Picture Mode icon at the top right corner.
Opening Big Picture mode
Click on the Settings icon in the Big Picture Mode.
Opening settings in the Big Picture mode
Select the Music option in the Settings. Now click on the Setup music library option.
Opening setup music library
This will open a small window where you can add a directory of your music folder to your Steam Music Library.
Adding a directory to Steam Music library
Once you add the music folder, click on the Library on the main menu of Big Picture Mode.
Opening Library
Now select Local Music and you can find all the albums and songs there. Double-click on any music file to play it.
Method 3: Copying Playlist in the Steam Music Folder
Try this method only if the above two methods do not work. That is because in this method you need to overwrite your playlist on the Steam music playlist. First, you need to create the playlist of the local music in one of the media players. Then copy that playlist file in the Steam music folder as shown below:
Note: You must have a media player such as VLC, through which you can create and save the playlist file.
Right-click on your music folder and choose Add to VLC media player’s Playlist option.
Adding music to a playlist in VLC
Click on File in the menu bar and choose Save Playlist to File option.
Change the file type to the M3U8 playlist and give the file name as ‘queue.m3u8‘. Click on the Save button to save the playlist.
Saving playlist
Copy the newly saved playlist file and paste it in the following location to replace the old file: Note: Your Steam directory can be on a different drive.
D:\Program Files (x86)\Steam\music\_database
Copying the playlist in Steam Music folder
Restart your Steam if it was running. Now click on View in your Steam menu bar and choose the Music Player option.
You will find your playlist added to Steam Music Player.
When you install the Steam client on your system, be it Windows or macOS, one of the default features that comes with it is the automatic initiating during startup. Now, this feature may be a neat one for some users, while for others, it tends to be a nuisance. That is because as you have more services that run during the startup phase of your computer, the more time it will consume while booting up. So in theory, more startup services mean longer boot time.
Steam
What happens is whenever you boot into your computer, the Steam Client Bootstrapper starts automatically as a startup service would. Thus, it saves the user the trouble of opening it up manually. That, however, is preferred by some consumers while others try to avoid it. In this article, we will show you how to stop Steam from running at startup.
Stopping Steam from Running via the Steam Settings
The most obvious place to start with would be the option provided in the Steam settings panel. When you install the client on your system, this particular option “Run Steam when my computer starts” is checked by default. Thus, the client automatically runs when the system boots. To stop it from doing so, you can simply uncheck this option and you will be good to go. Here’s how to do this:
First of all, open up the Steam client.
Once it has gone through its regular updates check, you will be prompted with the Steam window.
At the top-left corner, click on the Steam menu.
From the drop-down list, move your cursor to the Settings option and click it.
Once the Settings window pops up, on the left-hand side, navigate to the Interface section.
Now, from the list of checkboxes, locate the ‘Run Steam when my computer starts’ option and uncheck it by clicking the respective checkbox.
Steam Interface Settings
Once done, click OK to close the Settings window.
After that, you won’t be seeing any more of Steam when you boot into your computer unless you choose to run it.
Disabling Steam from Running at Startup via Task Manager
Alternatively, you can also stop steam from starting up via the Windows Task Manager. By doing this, the Steam Client Bootstrapper will be forced to stop during startup even if the said option in the previous solution is checked. Here’s how to stop Steam via the Task Manager:
Right-click on your taskbar and then choose Task Managerfrom the list provided. Alternatively, you can also press Ctrl + Alt + Delete at the same time and then choose Task Manager from the list of options.
Once the Task Manager opens up, switch to the Startup tab.
There, right-click on the SteamClient Bootstrapper entry and select Disable from the drop-down menu.
Disabling Steam during Startup
Or, you could just highlight the Steam Client Bootstrapper option and hit the Disablebutton provided at the bottom left.
This will prevent Steam from starting during startup.
Stopping Steam from Running at Startup on a macOS
If you are using a macOS, you can do the same thing from the System Preferences window. To do this, follow the below instructions:
Click on the Apple logo on the top-left of your computer screen.
After that, choose the System Preferences option.
macOS System Preferences
Once the System Preferences window shows up, at the bottom, click on the Usersand Groups option.
Now, click on the lock button at the bottom-left of the window and then enter your password so that you are able to make changes.
Once done, switch to the LoginItems tab located at the top.
Highlight the Steam entry from the menu and then at the bottom left of the menu, click on the ‘–‘ button to remove it from startup.
Stopping Steam From Startup
That is it, you have successfully stopped Steam from running during startup.
Steam FAQs
Can i close steam while playing a game?
You can minimize the steam app, but if you close the steam app the game will close too.
Certain PS4 users are encountering the ‘Cannot Communicate Using SSL‘ error when attempting to access the Store or certain online game features through a firewall. In most cases, affected users are saying they only see this problem when using a SonicWall model or a different manufacturer with similar functionality.
Ps4 Cannot Communicate using SSL error
How to Fix the ‘Cannot Communicate Using SSL‘ error?
As it turns out, this issue can be caused by a local network glitch that prevents your console from connecting to PSN. In this case, you can fix it by resetting the console.
In case,f you’re using a Sonic Firewall device, the issue can only be resolved if you enable Consistent NAT in your SonicWall settings. In some circumstances, you’ll need either disable SSL Control or set the associated policy violation to log the event instead of blocking the connection.
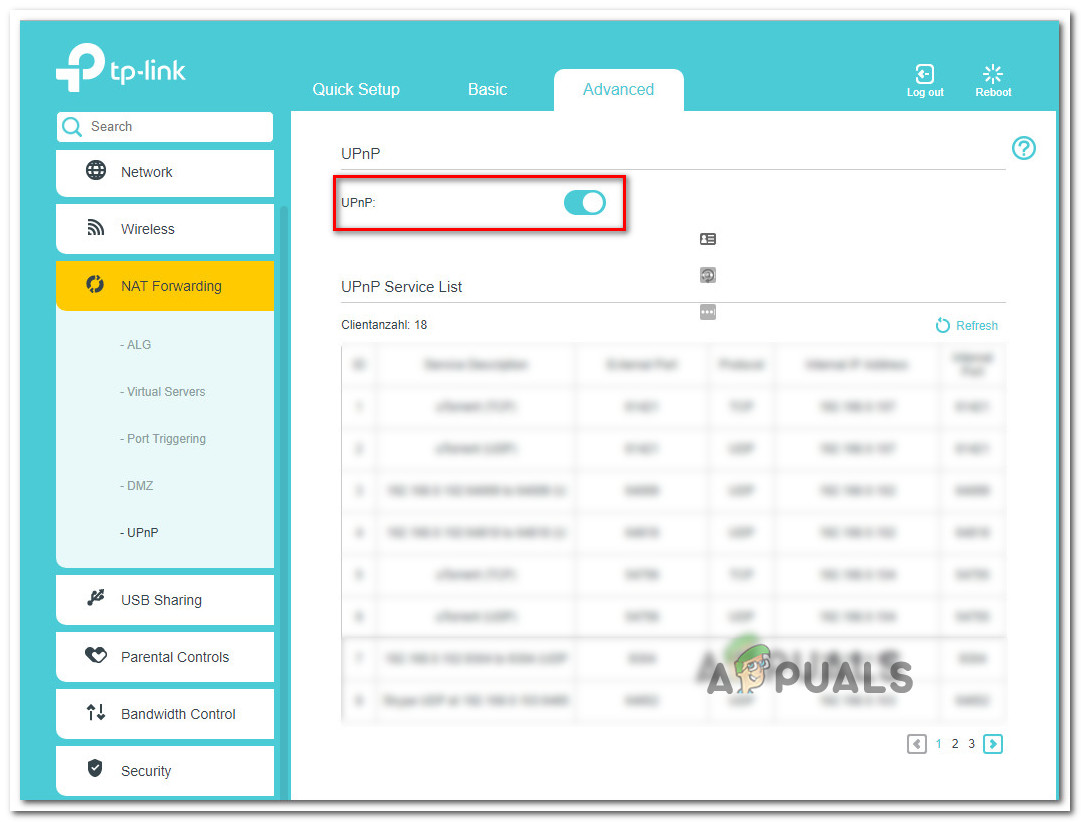
If no dedicated firewall device is involved, you might want to investigate if UPnP (Universal Plug and Play) is enabled. If it isn’t you’ll need to enable it from your router settings in order to ensure that every relevant port used by your game console is forwarded.
In case you only see this issue while attempting to use the integrated web browser while connected to a public WiFi, you will need to switch from HTTPS to HTTP in order to get the pages to load.
However, in some rare circumstances, the problem can originate from a corrupted firmware (mostly caused by an unexpected shutdown during the installation of an update). In this case, you should try installing the new firmware via Safe mode and perform a power-cycling procedure.
Method 1: Restart or Reset router
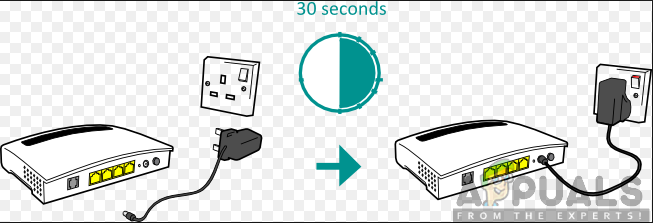
One of the most common issues that will trigger this inconsistency is a network glitch that might prevent your console from connecting to Playstation Network. Most users that we’re struggling to get past the ‘Cannot Communicate Using SSL‘ error managed to do so by forcing their home network to reset or restart.
If this scenario is applicable, you should definitely start with a simple network refresh since it’s the less intrusive method and it will not make any changes to your network credentials and network settings.
To perform a simple network restart, simply push the power button on your router to turn it off. Then wait a full minute before turning the networking device back on. You can assure yourself that the process is completed successfully by removing the power cable from your power outlet and waiting for several seconds in order to drain the power capacitors.
If that doesn’t work, you should proceed by resetting your network. But keep in mind that this operation might also reset custom login credentials and custom network settings.
Resetting Router
To perform this operation, you’ll need a sharp object since reset buttons are typically built inwards. Keep that button press for about 10 seconds until you notice that all LEDs start blinking at once.
If you already restarted or reset your router to no avail, move down to the next potential fix below for other methods of getting the ‘Cannot Communicate Using SSL‘ error issue resolved.
Method 2: Enable consistent NAT
As it turns out, one of the most pressing requirements that will trigger the ‘Cannot Communicate Using SSL‘ error if not enabled is Consistent NAT. This feature enables standard NAT policy in order to provide greater compatibility when it comes to peer-to-peer applications that need to work with consistent IP addresses that they need to connect to.
This is precisely the case with Playstation Network and the VoIP integration. By enabling Consistent NAT, the SonicFirewall (or a similar device) will be forced to consistently assigned the same mapped public IP address and UDP Port to each internal private IP address.
Important:Playstation Network is built on older security principles and because of this, it’s dependent on VOIP for communication.
A lot of affected users that have encountered ‘Cannot Communicate Using SSL‘ error have managed to fix the issue after they accessed their SonicFirewall settings menu, enabled consistent NAT and restarted the network security device.
Here’s a quick guide on enabling consistent NAT on SonicWall:
Note: In case you’re encountering the issue with a different firewall device, search online for specific steps on getting the issue resolved.
Access your SonicFirewall settings by opening your default browser and pasting the following IP address inside the navigation bar:
https://192.168.168.168
Note: Keep in mind that the device where you’re accessing the router address needs to be connected through the SonicWall device.
At the next step, you will be prompted to insert your user credentials. Unless you changed your login to custom values, you can find the default password and username inside the SonicWall user manual.
Once you’re inside the SonicWall settings menu, select Manage at the very top from the list of available main menus.
Accessing the Managed menu of SonicWall
Once you’re inside the Managed menu, use the newly appeared menu in the left-hand side to select VOIP from under System Setup. Next, move over to the right-hand section and check the box associated with Enable consistent NAT.
Once this modification has been enforced, restart your computer along with your networking device and see if the issue is now fixed.
After your PlayStation 4 boots back up, attempt to connect it again and see if the issue is now resolved.
In case this method didn’t allow you to fix the issue or the steps weren’t applicable to your current situation, move down to the next potential fix below.
Method 3: Disable SSL Control
As it turns out, if you’re encountering this issue with a PS3 or with an older SonicWall model, you might also need to disable SSL Control on SonicWall settings (under Firewall Settings > SSL Control) – or at least set the option to Log instead of Block.
On PS4 you might be able to get by with this option enabled when it comes to certain games ports, but PS3 will refuse to connect to a PSN.
Several affected users have confirmed that this operation was about the only thing that allowed them to conned through to PlayStation Network with their game console.
Here’s a quick guide on disabling SSL Control on Sonic Firewall (or at least changing the SSL policy violation action to ‘Log the event‘ instead of ‘Block the connection and log the event‘:
Ensure that the device you’re trying to access Sonic’s firewall settings from is connected to the same network.
Next, proceed by accessing your Sonic Firewall device settings. You can do this by opening your default browser and pasting the following IP address inside the navigation bar:
https://192.168.168.168
At the next step, you will be prompted to insert your user credentials. Unless you changed your login to custom values, you can find the default password and username inside the SonicWall user manual.
Once you’re inside the SonicWall settings menu, select Manage at the very top from the list of available main menus.
Accessing the Managed menu of SonicWall
With the Manage menu selected, use the left-hand menu to click on Firewall Settings (under Security Configuration). Next, click on SSL Control from the list of sub-items belonging to Firewall Settings.
Accessing the Firewall settings menu in SonicWall Settings
Once you’re inside the SSL Control screen, either disable SSL Control (under General Settings) or change the default Action for policies violation from Block the connection and log the event to Log the event.
Disabling SSL control or changing the default policy violation action
After this modification has been enforced, restart your device and see if the issue is resolved at the next computer startup.
In case you’re still encountering the same ‘Cannot Communicate Using SSL‘ error, move down to the next potential fix below.
Method 4: Enabling UPnP
According to some affected users, this issue can also occur due to the fact that the Network Address Translation (NAT) is not actually opened on the network that your PS4 console is connected to. If this scenario is applicable, you can fix the ‘Cannot Communicate Using SSL‘ error by opening the status of your NAT.
This procedure will ultimately ensure that any type of connectivity issues caused by NAT inconsistency will no longer occur, which might end up fixing this issue.
Although the steps of doing so ar different depending on your router/modem model, the core steps presented below are the same, regardless of the platform.
Here’s a quick step by step guide on enabling UPnP (Universal Plug and Play) on the router that you’re connected to in order to allow the networking device to forward every required port automatically in order to avoid issues like the ‘Cannot Communicate Using SSL‘ error:
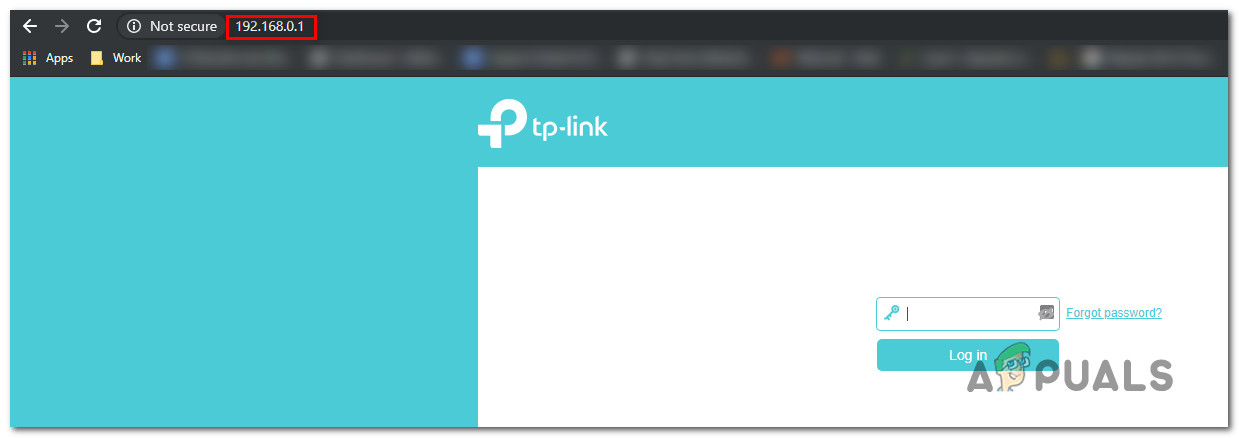
First things first, ensure that your PS4 console is connected to the same router that is mediating the Internet connection. Once you’ve made sure of this, type 192.168.0.1 or 192.168.1.1 and press Enter to open up the Settings page of your router.
Accessing the Settings page of your router
Note: One of these two default addresses should work, but just in case they don’t search online for specific steps on accessing your router settings.
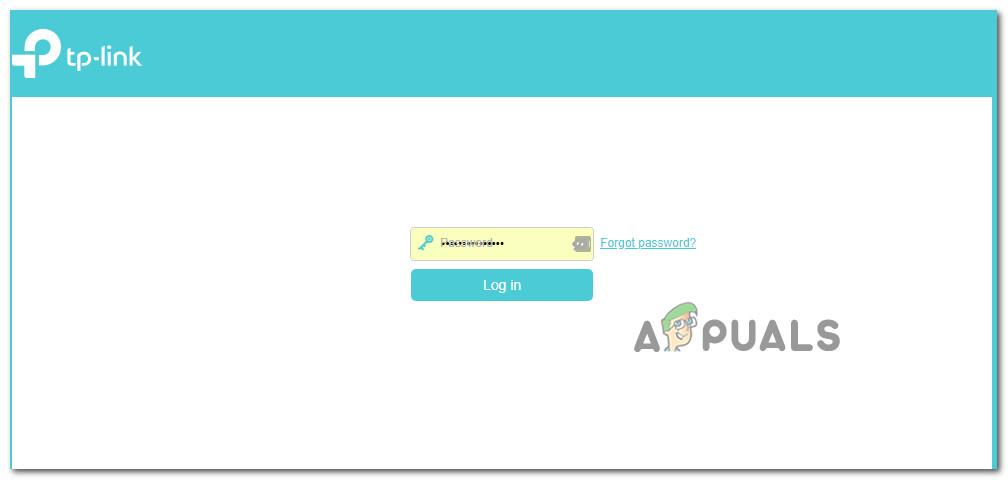
Once you’re at the initial login page, insert the credentials for your router settings (these are different than your network credentials). Unless you changed your default username and passwords, the default values should either be ‘admin‘ or ‘1234‘.
Accessing your router settings
Note: In case these credentials don’t work for you, search online for specific steps on resetting your router model back to the default values.
Once you’re finally inside your router settings, start looking for the Advanced settings menu. After you manage to locate it, go to the NAT forwarding tab and look for the UPnP sub-menu.
Enabling UPnP from your Router settings
Note: Of course, depending on your manufacturer, this menu might look way different and the UPnP settings might be located elsewhere. If you can’t find them, search online for specific steps on enabling UPnP according to your networking device model.
Once you manage to enable UPnP, restart both your router/modem and your game console so that every necessary port is opened.
After the next console startup is complete, attempt to connect your PS4 to the same network and see if the ‘Cannot Communicate Using SSL‘ error is resolved.
In case the same problem is still occurring, move down to the next potential fix below.
Method 5: Using HTTP instead of HTTPS
If you’re encountering the ‘Cannot Communicate Using SSL‘ error when attempting to use the built-in PS4 web browser to visit a web page when connected to a public network (Hotel WIFI, Schol Network, etc.) there is one quick fix that a lot of affected users have successfully used in order to get the issue resolved.
As it turns out, you might be able to manually adjust the web address to use the unsecured version of that page.
Some users encountering the same issue have discovered that the ‘Cannot Communicate Using SSL‘ error can be avoided by pressing up on the Dpad and just removing the s out of ‘http(s)’.
Removing the secured encryption (HTTPS)
Once you removed the S from HTTPS, load the page again and see if the problem is now resolved.
Method 6: Updating firmware version in Safe Mode
If none of the methods above have allowed you to resolve the issue, you should start considering the fact that you might be dealing with some type of firmware issue that has compromised your PS4 console from establishing a secure network. This can be another reason why you’re seeing the ‘Cannot Communicate Using SSL‘ error when you’re trying to connect to a network.
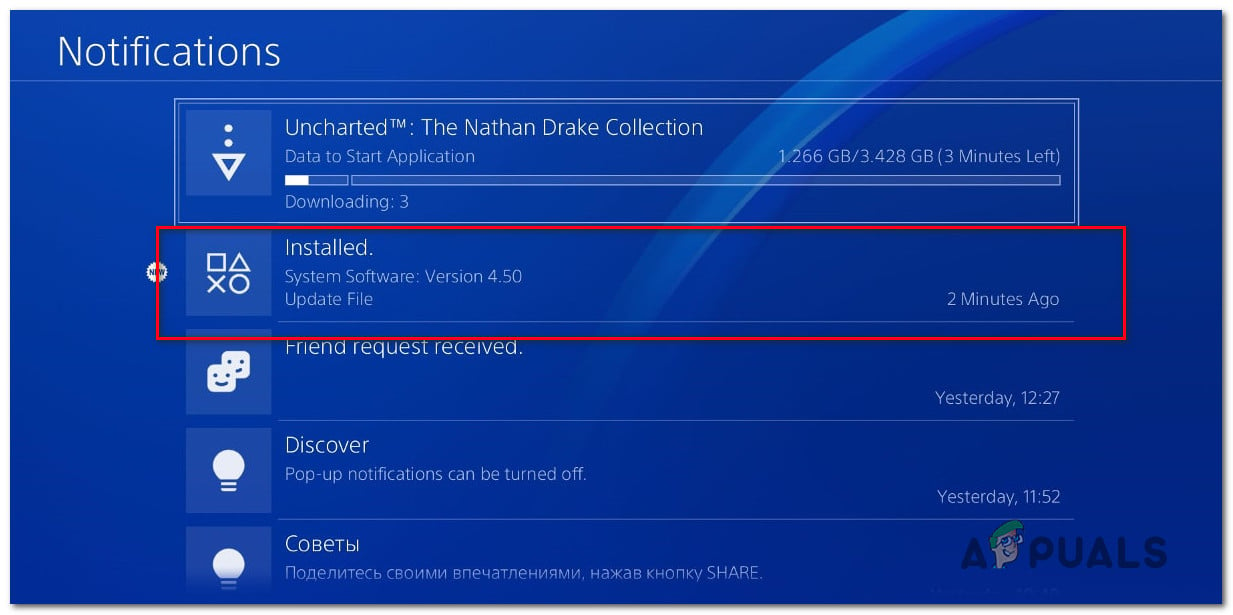
In case this scenario is applicable, and you have some pending System Software updates that aren’t installing conventionally, here are some step by step instructions with what you can do to fix the issue:
First, start your PS4 and access the Notifications panel from the main dashboard. Once you do this, select the update notification and press the Options button to delete every pending update from the Notification panel.
Deleting the update notification
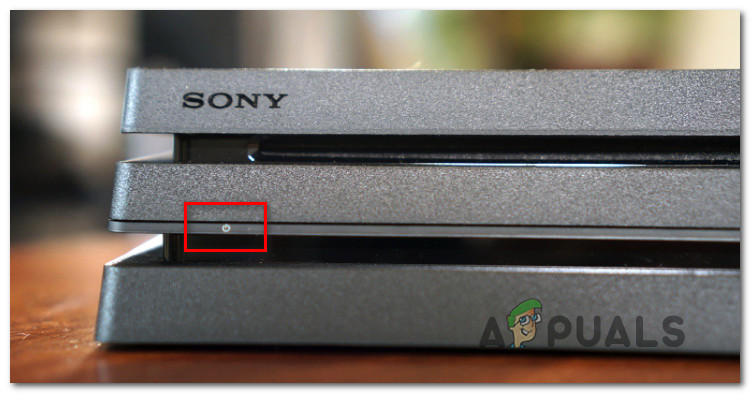
Once you manage to delete the notification, turn off your PS4 completely and wait until it’s fully turned off. Note: Keep in mind that putting your PS4 in hibernation mode will break this procedure.
After your computer is completely turned off, press and hold the power button until you hear 2 beeps (for about 10 seconds). You should hear the first one immediately after you start holding the button and the second one about 7 seconds later.
Power cycling PS4
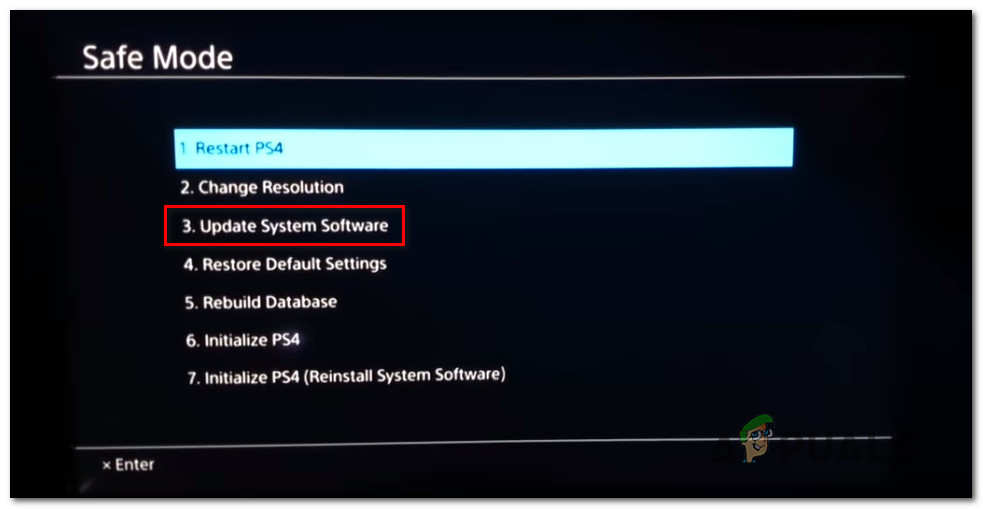
After the second beep is heard, your computer will automatically enter Safe Mode. Once you see the next screen, connect your DualShock4 controller to your console via the USB cable and press the PS button on the controller.
Once your controller is connected to the Safe Mode interface, use it to select Option 3: Update System Software. Update PS4 software via Safe Mode
Wait until the new software is downloaded and installed, then follow the on-screen instructions to install the newest version on your console.
After the process is complete, your PS4 will restart and the new firmware version will be enforced.
In case you’re still encountering the same issue, move down to the next potential fix below.
Method 7: Changing the default DNS
As it turns out, several affected users that we’re also encountering the ‘Cannot Communicate Using SSL‘ error have managed to fix the problem by changing the default DNS addresses to Google’s equivalents or IPV6 defaults.
Several affected users have confirmed that after doing this and restarting their computer, the issue was finally resolved.
Here are the step-by-step instructions on changing the default DNS addresses on a PS4 console:
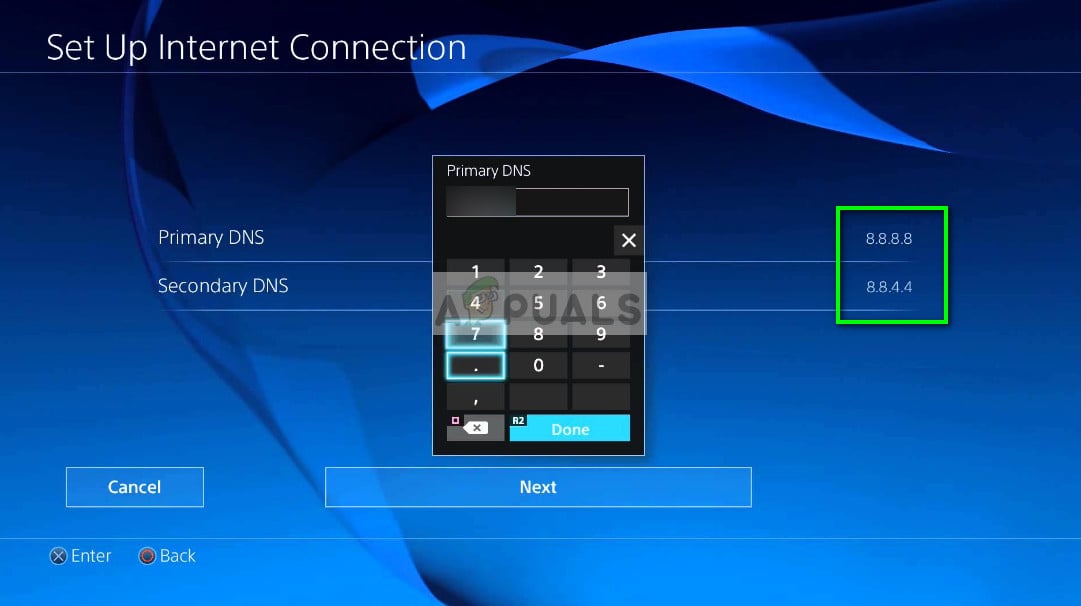
Open your PS4 console and navigate to the main dashboard menu. Once you get there, go to Settings > Network > Set Up Internet Connection.
After you do this, choose either Wi-Fi or LAN, depending on the type of network that you’re using.
Next, choose Custom when prompted by the next menu and set the IP Address to Automatic.
When asked to specify the DHCP Host Name, choose Do Not Specify.
Next, set the DNS Settings to Manual, then set the Primary DNS to 8.8.8.8 and the Secondary DNS to 8.8.4.4. This is the default DNS address for Google. Note: If you want, you can also consider using the IPV6 defaults: Primary DNS – 208.67.222.222 Secondary DNS – 208.67.220.220
Once the default DNS has been changed, repeat the action that was previously triggering the issue and see if the problem is now fixed.
Google DNS settings – PS4
In case the same issue is still occurring, you can jump to the next potential fix below.
Method 8: Hard resetting PS4
If you’re still encountering the same ‘Cannot Communicate Using SSL‘ error and none of the potential fixes featured above have worked for you, it’s possible that you’re also dealing with some type of corrupted data that is being temporarily stored.
In case this scenario is applicable, you can get this issue resolved by performing a hard reset on your PS4 console.
Here’s a quick guide on how to do this:
With your PS4 turned on, press and hold the PS button and bring up the Power options menu.
Next, from the list of available Power Options, select the Turn off PS4 option and press the X button.
Turning OFF PS4
Note: It’s important that you don’t put in in rest mode.
Once the lights go completely off, unplug the console power cable and wait for 10 seconds or more.
Plug the power cable back into your console and press the power button again to start it up.
Repeat the action that was previously causing the ‘Cannot Communicate Using SSL‘ error and see if the problem has been resolved.
Nowadays, many applications and commercial companies are using QR codes to increase their customers. QR codes are the easiest way to share the information with others without telling them the detail by yourself. It became much more popular these years since everyone owns a phone with a camera to scan the QR code. However, many users are still wondering about how to make their own QR codes for several different things. In this article, we will show you how you can create QR codes on different platforms.
Creating QR Codes
What is a QR Code?
The term QR stands for a quick response. QR is a square-shaped black and white logo that people can use for scanning. Through scanning, it provides the information saved in that QR code. Each and every QR code will have a different pattern and different information. They are used for product details, direct mails, commercials and for websites/profiles links.
Creating QR Code on Windows 10
There can be several methods to create a QR code on a PC. If users have access to the internet they can use the website to generate the QR code and if not, then they can use some third-party application for offline use. Down below you will find both methods and how they work.
Method 1: Creating QR Code through Online Website
There are many websites for QR code generating. Every website will have different features for QR code making. The online website provides the QR generators to save the time of users. It does not need downloading or installation of the software. This method is both time saving and memory saving. You can follow the below steps to create your own QR code:
Note: You can Google search for another website or use the website that we use in this method.
You will find many options available for QR making. Choose the option for what you are making QR and provide the details after selecting.
Selecting the QR type and providing information
Once you are done, the QR code will automatically generate on the right side of the page. You can further choose the frame, shape, color or logo and click on the Download JPG button.
Generating and Downloading the QR Code
Your QR code will be downloaded to your system.
Method 2: Creating QR Code through Third-party Software
This method is best for offline users who do not have access to the internet all the time. It is also best for those who need to create multiple QR codes. The third-party software will also have multiple features, where users can create QR codes for different things. Follow the below steps to create QR codes through third-party software:
Open your browser and download the QR Code Studio for your operating system.
Click on the Download button that is in front of the software name.
Downloading the QR Code Studio
Once the file is downloaded, install the software and open it.
You can click the Input Assistant to choose the option for what you are making the QR code.
Choosing the QR Code type
Provide the information for your QR Code. You can also adjust the size and resolution of your QR code.
Providing information and choosing the settings for QR Code
Click on File and choose Export Barcode. Provide the name and choose the image format option to save it.
Saving the QR Code as an image file
You will have your own QR code ready for use.
Creating QR Code on Android Smartphone
Now QR codes can also be generated by using your smartphones. There are many applications on Google play store through which users can easily create and scan QR codes. Users can also use an online website to create QR codes just as we used in the Windows method. Follow the below steps to create QR codes on Android:
Go to Google Play Store and download the QR Code Generator application.
Open the application on your device, tap on the Text button and select the content type for which you are creating QR Code.
Downloading application and opening
Provide the information for your QR Code and tap on the Generate button.
This will create the QR Code for you. Tap on the Save icon to save the QR Code.
Creating a QR Code and saving it
Creating QR Code on iPhone
There are also many applications on the iPhone for making QR codes. Just like Android, you need to download an application from your app store and try creating the QR code through that. You can also use the online websites to create QR codes just like we showed in the Windows method. Follow the below steps to create your own QR code on iPhone:
Go to your app store and download the QR Reader for iPhone by TapMedia Ltd.
Open the QR Reader application, tap on the arrow icon at the top and select QR Creator.
Opening QR Scanner application and choosing Creator mode
Tap on the ‘+’ (plus) button at the top left and choose your type for QR code.
Creating a new QR Code and choosing the type
Provide the information for your QR code and tap on the Create button at the top right.
Creating the new QR Code
Now you can tap on the QR Code to share or save it to your camera roll.
Sometimes users will need to record the audio of their PC for different reasons. Audacity is one of the best audio applications for recording and editing. However, recording PC audio is different from recording voice through a microphone. There are different methods that can help to record PC audio with Audacity.
Record PC audio with Audacity
Recording Audio with Audacity
Users may need to record a Skype call, music from another mp3, or recording a process that is running on the PC. Several different features can be used for recording PC audio with Audacity. You can choose the method that is available on your PC.
Recording PC Audio Using Stereo Mix
Stereo Mix allows users to record the output of their speakers and it is also known as ‘What you hear’. This feature is only supported by specific hardware. However, nowadays it’s not as common as it was before. Depending on your hardware, if you have Stereo Mix, then follow the below steps:
Right-click on the Volume icon in the system tray and choose Recording Devices option.
Opening Recording devices
In the Recording Device window, right-click on the empty space and choose Show Disabled Devices option.
Showing disabled devices
Find the Stereo Mix device, right-click on it and select Enable option.
Enabling Stereo Mix device
Select Stereo Mix and click on the Properties button. Navigate to the Listen tab and uncheck the ‘Listen to this device‘ option. Click Ok to close the Properties window.
Unchecking the listen to this device option
Open your Audacity application. You will find the menu bar for audio input and output at the top.
Click on the Recording (Mic) option and select the Stereo Mix option.
Selecting Stereo Mix as the recording device
Now click on the Record button and Audacity will be recording every sound on the PC.
Recording PC Audio Using WASAPI
If you don’t have Stereo Mix available on your PC, then you can use the WASAPI. The Windows Audio Session API is used for talking through audio devices. It allows Audacity to control the flow of audio between the application and audio playback devices. WASAPI is the best alternative for Stereo Mix in Audacity. Follow the below steps to record PC audio through WASAPI:
Open Audacity application by double-clicking the shortcut or searching Audacity in the Windows search feature.
Click on the first option in the audio input/output menu bar and choose the Windows WASAPI as shown below:
Choosing the Windows WASAPI option
Select your audio output device to whatever you are using. Select the microphone device that should be the same as the output device, but the name will have a loopback in the last.
Selecting output and microphone options
Once you are done with the settings, click on the Record button and it will start recording your PC audio.
FAQs about Recording PC Audio with Audacity
Can audacity capture streaming audio?
Yes, Audacity can capture the streaming audio in the same way as it record the PC audio.
Can i record without stereo mix?
Yes, you can record audio by using the WASAPI feature that is available in Audacity.
Can I record audio from my computer using Audacity Windows 10?
Yes, by using the Stereo mix or WASAPI, you can easily record audio coming from the computer.
The newly arrived addition to the ever-increasing list of Battle Royale games, Call of Duty Warzone is being reported for having a few issues. One of the issues users experience is the random crashing of the game. As per the users, the game crashes for them in the main menu, while others get to experience this during the Training tutorial. Some users are even getting a blue screen of death while playing the game. Nonetheless, we will be showing you how to resolve this issue in this article so you can get back to your gaming session.
Call of Duty Warzone
Before we get into the possible fixes for the issue, let us first talk about the causes of the said issue. The issue doesn’t seem to be triggered by a specific reason, rather it can be caused by different possibilities. First of all, the most obvious cause that has been reported is graphics drivers. As it turns out, the issue happens to be due to an obsolete version of the graphics drivers that is present on your computer. Updating your driver to the latest version available seems to fix the issue for some users. Furthermore, the priority of the Call of Duty Warzone’s process can also set off the issue. Setting the priority to normal has fixed the issue for some people. Other than that, the issue can also be caused due to NVIDIA overlay as well as an issue with your Blizzard account in which case logging out and back in seems to be a resolution.
It is recommended that before you dive into the possible fixes provided below, make sure that your third-party antivirus software is not causing an issue. Therefore, we recommend that you turn off your antivirus for a while if you have any on your system. This will eliminate the possibility of the game crashing due to an intervention initiated by your antivirus suite. If you are not sure about how to turn off your antivirus, please head to the turn your antivirus off article present on our site that will guide you through.
Updating Graphics Drivers
As it turns out, one of the most reported causes of the crash seems to be an outdated driver that you are operating your system with. Graphics drivers bring stability fixes and improvements so that you can enjoy your newer games without any interruption. Therefore, the first thing you need to do when you face the said issue is to download the latest driver available for your GPU and install it.
If you are using Nvidia, you can easily update your graphics driver to the latest version via the GeForce Experience software. In case you do not have that installed on your system, head to their site and download the latest driver available from there.
Nvidia Driver Update
For AMD users, you can update your driver from the AMD Radeon Software. If you do not have it installed, head to their official site and download the latest driver for your GPU from there.
Lower the Process’s Priority
Another cause of the crash seems to be a higher priority in the game process. Having high priority lets a process utilize more CPU and memory than the normal processes. However, for some reason, this is causing the game to crash at times. By default, the game is set to have high priority in the task manager. To resolve this issue, you will have to lower the priority of the game’s process in the Task Manager. Here’s how to do so:
Right-click on the taskbar and select Task Manager from the list.
Once you open up the Task Manager, you will be shown the list of Processes that are currently running. Switch to the Details tab.Task Manager
Find the game’s process and then right-click on it. Move your cursor to the Set Priority option and then select Normal.Setting Priority
Click Change Priority once asked for the confirmation.Changing Priority
Done, you have successfully changed the priority of the game. Close the game and launch it again to see if it works (make sure the priority is still set to Normal after you open up the game again).
Disable Nvidia In-game Overlay
It turns out the Nvidia in-game overlay is also causing the game to crash for now. Therefore, until it is fixed, you will have to disable the in-game overlay in the Nvidia GeForce Experience settings. This is pretty easy to do, here’s how:
Open up the GeforceExperience on your system.
Once the software loads up, click on the Settings icon in the top right corner (left to your profile’s avatar).
This will take you to the General settings tab.
There, below the Language heading, you will be shown the In-game Overlay option.Disabling In-Game Overlay
Turn it off by clicking on the slide.
Once the in-game overlay has been disabled, close the window.
Close your game and then open it up again.
See if it works.
Increase the Virtual Memory Size
In some cases, the issue can be due to insufficient virtual memory size of the drive where your game is installed. Virtual memory is basically the specific size of the hard disk that the computer uses as if it were RAM. This is called a paging file. Therefore, you will have to increase the paging size of the drive where the game is installed. Here’s how to do this:
Go to your Desktop, right-click on the My Computer icon and click Properties from the list.
On the left-hand side, click the Advancedsystemsettings option to be taken to the advanced settings.System Properties
Now, in the System Properties window, switch to the Advanced tab.
Under Performance, click the Settings button.Advanced System Properties
There, once again, switch to the Advanced tab.
Now, under Virtual Memory, click the Change button.
Make sure the ‘Automaticallymanagepagingfilessize for all drives’ option is unchecked.
Also, highlight the drive where your game is installed. After that, click on the Customsize option.
Make sure that the difference between the Initial size and Maximum size is more than 2GB i.e 2048MB.Changing Virtual Memory Size
Click the Set button and then click the OK button.
Click the OK button again and then restart your system.
Once your computer boots up again, launch your game and see if the issue persists.
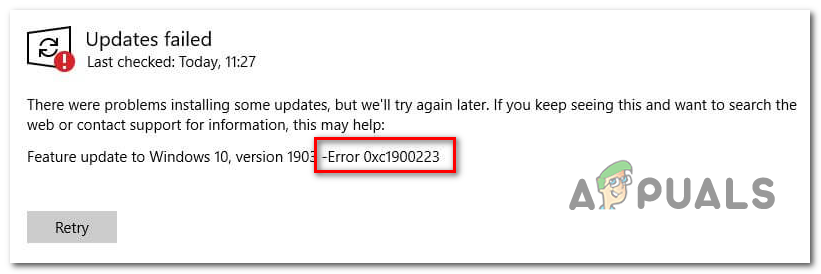
Some Windows 10 users are encountering the error 0xc1900223 whenever they try to install a Windows Update conventionally. In most documented cases, the problem occurs when the user attempts to install the 1903 update, and typically, the error appears when the update reaches 97%.
Error 0xc1900223
In case you’re only encountering the issue with the 1903 update, you should attempt to install the update again via the $GetCurrent folder. If that doesn’t work, another convenable method that might allow you to circumvent the issue is to use the Upgrade this PC Now feature of the Media Creation Tool. Another way to circumvent the built-in WU component is to install the update manually via the Microsoft Update Catalog.
However, this issue can also be caused by a network-wide adblocker like Pi-Hole. If you’re using one, you can either disable it temporarily (while installing the update) or uninstalling the utility altogether.
In some cases, the issue can also occur due to some kind of glitch or system file corruption that ends up affecting the Windows Update component. In this case, you can try to refresh every Windows Update component or run a couple of utilities capable of fixing system file corruption (SFC, DISM or Clean Install).
Method 1: Forcing the update via $getcurrent folder
Whenever you try to install a pending Windows update, Windows 10 will automatically create a $GetCurrent and $SysReset folders in your C:\ drive. This folder will contain log files about the latest Windows Update process, but might also contain installation files from that update.
In case you’re dealing with a failed windows update (which is the case if you’re encountering the error 0xc1900223) you might be able to force install the update by accessing the media subfolder of the $getcurrent folder and re-doing the installation that way.
However, keep in mind that the $getcurrent folder is hidden by default. So, you’re either going to need to access directly via the address bar or by enabling Hidden folders from File Explorer.
Here’s a quick step by step guide on forcing the update via the c folder:
Open File Explorer, paste the following command inside the navigation bar at the top and press Enter:
C:/$getcurrent
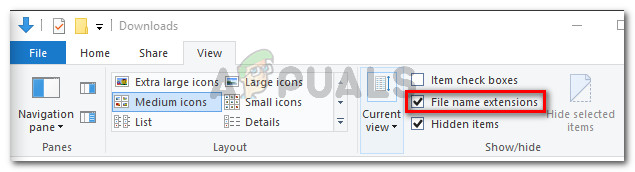
Note: Keep in mind that you might need to change C to the letter corresponding to your current OS drive. Note 2: Additionally, you can access this location manually by enabling hidden items first (In File Explorer, go to View and check the box associated with Hidden Items.
View Hidden Items option is checked
After you do this, access the media folder from the list of subfolders and double-click on the Start executable.
Once you’re inside the update installation screen, follow the on-screen prompts to install the update via the dedicated executable.
After the update installs successfully, restart your computer and see if the issue is resolved at the next system startup.
In case the $getcurrent folder is not visible, it’s very likely that the WU component wasn’t able to update the files necessary for the installation. If this is applicable, move down to the next potential fix below.
Method 2: Updating via Media Creation Tool
If the automated WU function is not able to update to version 1903 on its own, you might be able to force the installation by using the Media Creation tool. On top of allowing you to clean install Windows 10, this tool also includes an Upgrade this PC Now feature that will convenable allow you to fix the 0xc1900223.
Several affected users have confirmed that this operation allowed them to bring their Windows 10 build up to date.
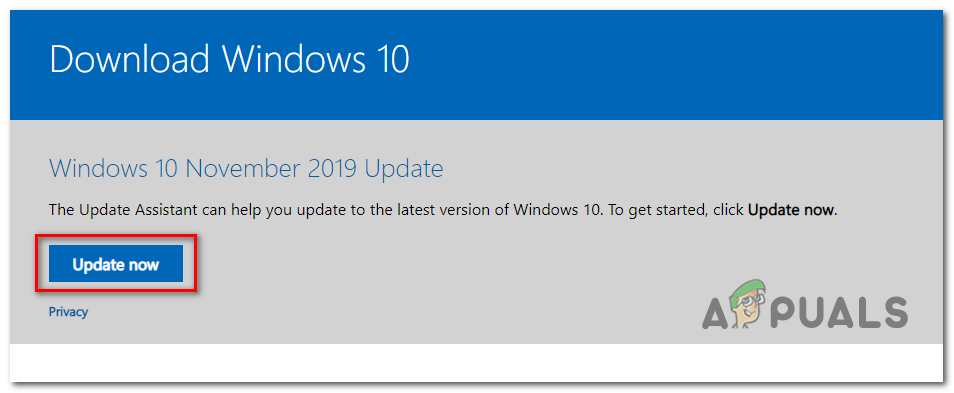
Here’s a quick guide on updating to Windows 10 version 1903 via the Media Creation Tool:
visit this link (here) and click on the Update Now button in order to download the Windows 10 upgrade assistant.
Downloading the updating executable
After the executable is downloaded successfully, double-click on it and click Yes at the UAC (User Account Control) to grant administrative privileges.
Next, follow the on-screen prompts to complete the installation.
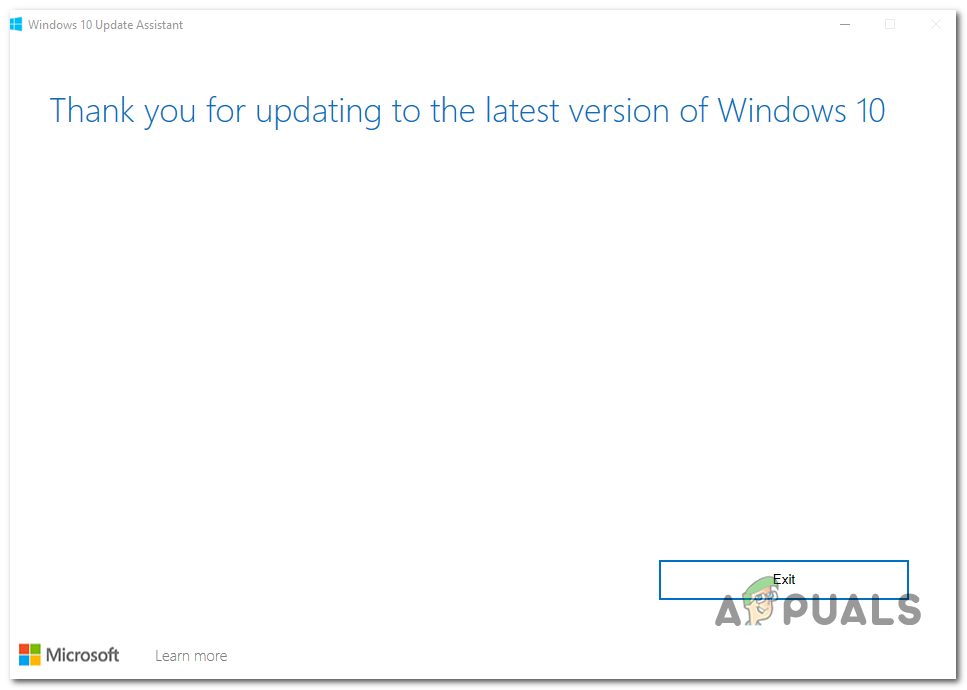
Once the operation is complete, restart your computer and see if the issue is resolved at the next computer startup.
Updating to the latest version using Windows 1 Update Assistant
Once your computer boots back up, see if the issue is now resolved.
In case the Windows update installation attempt fails with the same 0xc1900223, move down to the next potential fix below.
Method 3: Disabling Pi-Hole (or a different network-wide adblocker)
As it turns out, the 0xc1900223 error code when installing a Windows 10 update can also be triggered by Pi-Hole or a similar network-wide adblocker. According to other affected users, this issue can be caused by a DNS blocklist that might end up stopping the update from completing.
Users that found themselves in a similar situation have confirmed that they managed to install the update without the same error by disabling or uninstalling Pi-Hole while the updating is taking place.
Disabling Pi-Hole Temporarily
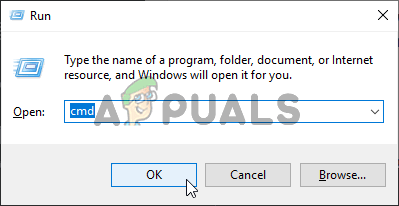
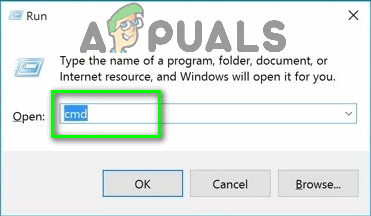
Press Windows key + R to open up a Run dialog box. Next, type ‘cmd’ and press Ctrl + Shift + Enter to open up an elevated CMD prompt with admin access. When you’re prompted by the UAC (User Account Control), click Yes to grant administrative privileges.
Running the Command Prompt
Once you’re inside the elevated CMD prompt, type the following command to invoke the Pi-Hole utility:
pihole
Once Pi-Hole has been invoked, type the following command and press Enter to disable it:
pihole disable
Now that the Pi-Hole adblocker utility is disabled, attempt to install the update that was failing again and see if you can install it without getting the 0xc1900223.
If the update is installed successfully, run the following command in the same elevated terminal in order to enable Pi-Hole again:
pihole disable
Uninstalling Pi-Hole
Open up a Run dialog box by pressing Windows key + R. Next, type ‘cmd’ in the text box and press Ctrl + Shift + Enter to open up an elevated CMD prompt. At the UAC (User Account Control) prompt, click Yes to grant administrative privileges.
Type “cmd” into the Run dialog
Inside the elevated CMD prompt, type the following commands and press Enter in order to commence the uninstallation of Pi-Hole:
pihole uninstall
Once the command is successfully processed, restart your computer.
At the next update, attempt to install the update that was previously failing with the 0xc1900223 error and see if the operation is complete.
In case this method wasn’t applicable or it didn’t resolve the issue, move down to the next potential fix below.
Method 4: Flushing the DNS cache
As it turns out, this particular issue can also occur due to a network inconsistency that can be resolved by flushing your computer’s DNS cache. The easiest way to do this is via an elevated CMD prompt.
After doing this and restarting their computer, some affected users have confirmed that they were finally able to complete the Windows Update installation without encountering the 0xc1900223 error.
Here’s a quick guide with the steps you need to take in order to flush your DNS cache from an elevated Command Prompt window:
Open up a Run dialog box by pressing Windows key + R on your Keyboard. Then, inside the text box, type ‘cmd’ and press Ctrl + Shift + Enter to open up an elevated CMD window.
Running Command Prompt
Note: When you’re prompted by the UAC (User Account Control), click Yes to grant administrative privileges.
Once you’re inside the elevated CMD prompt, type the following commands in order and press Enter after each command:
After each command is processed successfully, restart your computer and attempt to install the update that was previously failing at the next computer startup.
If this method didn’t allow you to fix the 0xc1900223 error, move down to the next potential fix below.
Method 5: Installing the update via the Microsoft Update Catalog
If none of the methods above have allowed you to fix the issue so far, you might be able to complete the installation of 1903 by doing it manually via the Microsoft Update Catalog. This procedure will install the update directly (without involving the local WU component). This means that every corrupted dependency that might cause this issue will circumvent.
Here’s a quick guide on installing the 1903 update manually via the Microsoft Update Catalog:
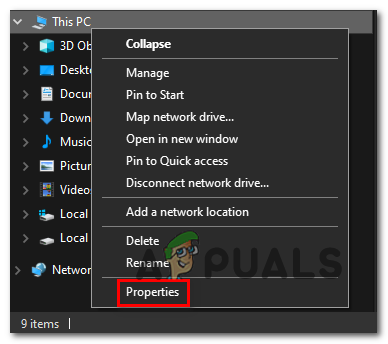
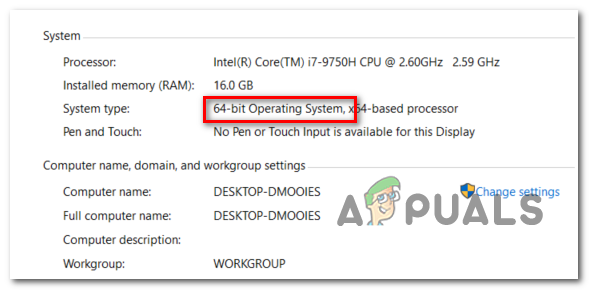
First things first, you need to know your OS architecture (if it’s 32-bit or 64-bit). If you don’t know it, open File Explorer, right-click on This PC and choose Properties from the newly appeared context menu.
Opening the System Properties screen
Once you’re inside the System Properties screen, take a look at the System Type category. If it says 64-bit, you will need to download the 64-bit update and if it says 32-bit, you need the 32-bit version.
Verifying your OS architecture
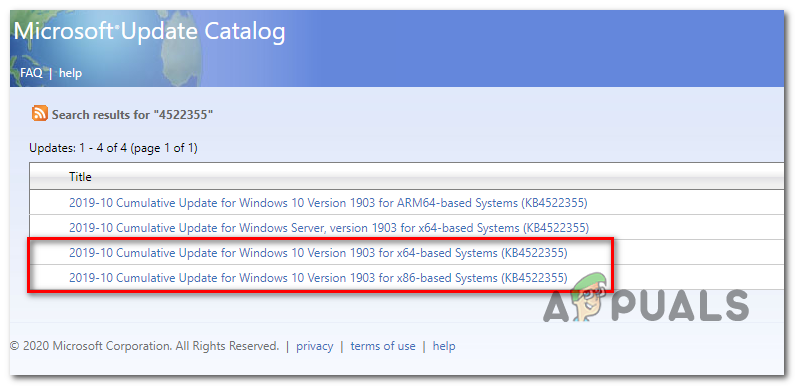
Once you are certain of your OS architecture, visit this link (here) and use the search function in the top-right corner of the screen to search for ‘4522355‘ and press Enter.
After the result page is generated, look for the correct version corresponding to your Windows 10 version (x64-based or x86-based) and click on the Download button associated with the correct Windows Update.
Downloading the correct Windows update manually
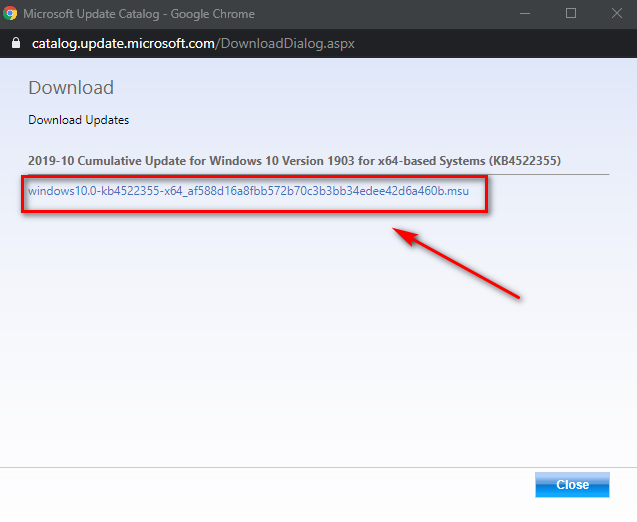
On the confirmation page, click on the link once again to initiate the download.
Downloading the correct Windows update
Wait patiently until the download is complete, then open the .msu installation package and follow the on-screen prompts to complete the installation.
After the installation is complete, restart your computer to allow the remaining files to install.
In case the same issue is still occurring, or you can’t find the update that is failing conventionally using Microsoft Update Catalog, move down to the next potential fix below.
Method 6: Refresh every Windows Update component
If none of the methods so far have allowed you to resolve this issue, it’s very likely that you’re encountering this particular issue due to a Windows Update glitch that ends up inhibiting WU’s ability to install new updates. This is apparent if multiple updates are failing with this same error code (0xc1900223 error).
Several Windows users that encountered the same issue have confirmed that the issue was resolved and the 1903 build installed successfully after they followed a series of steps capable of resetting every component associated with WU (Windows Update).
Here’s a quick step-by-step guide on resetting every involved Windows Update component manually from an elevated CMD prompt:
Open up a Run dialog box by pressing Windows key + R. Next, inside the text box, type ‘cmd’ and press Ctrl + Shift + Enter to open up an elevated Command Prompt window.
Running the Command Prompt
Note: When you’re prompted by the UAC (User Account Control), click Yes to grant administrative privileges.
After you manage to open the elevated CMD prompt, type the following commands in order and press Enter after each one in order to stop every essential WU service:
net stop wuauserv
net stop cryptSvc
net stop bits
net stop msiserver
Note: These commands will automatically stop the services associated with Windows Update, MSI Installer, Cryptographic and BITS services.
Once you manage to disable every essential service, paste the following commands (in whichever order) and press Enter after each one to rename the two folders that Windows users to store update files (SoftwareDistribution and Catroot2):
Note: If you didn’t know, SoftwareDistribution and Catroot2 are two folders responsible for storing update files that are actively being used by the Windows Updating component. Since the two cannot be deleted conventionally, the only way to limit the damage of a corrupted file is to force your OS to create new healthy copies that will take their place.
Once you manage to delete the two folders, type these final commands and press Enter after each command to restart the same services (the same ones that we disabled at step 2):
net start wuauserv
net start cryptSvc
net start bits
net start msiserver
After each service is restarted, attempt to install the same update that was previously filing again and see if it installs successfully now (without the 0xc1900223 error).
In case the same error code is still preventing you from installing the update, follow the final method below.
Method 7: Running DISM & SFC scans
If no potential fixed worked for you, it’s very likely that you’re dealing with some type of system file corruption that has rendered your WU component inoperable. There are multiple ways to fix it, but most affected users have managed to get the issue resolved by using a couple of built-in utilities (SFC and DISM).
Both of these tools are capable of fixing system file corruption, but they operate differently – SFC uses a local cache to replace corruption with healthy equivalents while DISM relies on a subcomponent of WU to download healthy files that will replace corrupted files.
Our advice is to run both utilities in quick succession and doing a system restart in between them.
Start by performing an SFC scan, then restart and perform a DISM scan once the next startup is complete.
If you’re still having issues, consider performing an in-place-repair (or a clean install if your data is already backed up)
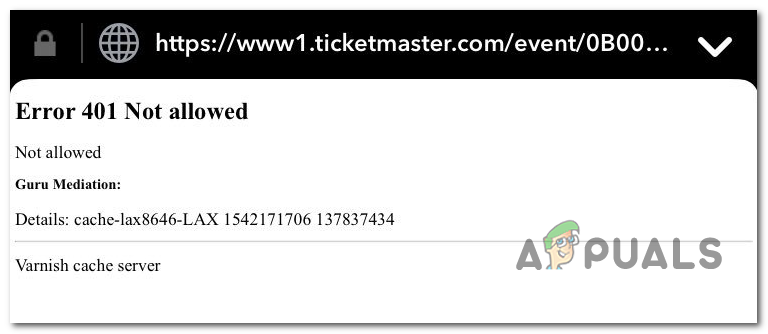
Some Windows users are encountering the Error 401 Not Allowed when attempting to purchase tickets with the TicketMaster platform. In most cases, affected users can search for tickets just fine, but the error appears as soon as they attempt to select a date to complete the purchasing process.
Ticketmaster Error 401 Not Allowed
In most user-documented cases, Error 401 Not Allowed will appear due to a temporary cached file or cookies that were created by the TicketMaster system. To fix it, all you need to do is to follow a set of instructions to clear your browser cache & cookies.
Keep in mind that TicketMaster is very strict with users that are using Proxy servers or VPN clients. If you’re using one, you might need to disable the surfing anonymity solution before being able to access the TicketMaster platform again.
In other cases, affected users have reported that a network inconsistency was responsible for triggering the Error 401 Not Allowed. Most users have managed to fix the issue in this case by restarting the networking device.
However, the error that you’re seeing can also be the result of a temporary ban that was enforced on your account. If this scenario is applicable, you’ll need to wait 24 hours for the ban to expire or you’ll need to create a different account (if you can’t afford to wait).
Method 1: Cleaning your Browser Cache & Cookies
As it turns out, this particular issue can very well be caused by a temporary cached file or a cookie created by the TicketMaster service. Since there are a lot of user reports of this kind, it’s very likely that TicketMaster has a tendency of creating corrupted cookies that will end up blocking the user’s ability to book and purchase tickets from within the platform.
Fortunately, several affected users that encountered this issue have confirmed that they managed to resolve the issue by accessing the browser’s settings and clearing the cookies & cache folders. However, the steps of doing so will be different depending on the type of browser that you’re using.
To accommodate every possible scenario, we’ve compiled several sub guides that will allow you to clear the cache & cookies of Chrome, Firefox, Edge, Internet Explorer, and Opera. Follow whichever guide is applicable depending on the browser that you’re using.
Cleaning the Cache & Cookies of Chrome
Open Google Chrome and ensure that every other tab is closed (aside from the active one).
Next, click on the action button (three-dot icon) in the top-right section of the window.
After you manage to get inside the Settings menu, scroll down all the way to the bottom of the screen and click on Advanced to bring up the invisible menu. This will end up revealing the hidden items.
Once the hidden menu becomes visible, scroll all the way down and click on the Privacy and Security tab.
After you manage to access the Privacy and Security tab, click on Clear browsing data.
Next, select the Basic tab and ensure that the boxes associated with Cached images and files and Cookies and other side data are enabled.
Now, select the Time range to All time using the drop-down menu, then start the process by clicking on Clear data.
Wait until the cookies & cache cleaning process is complete, then attempt to use the TicketMaster platform to see if the issue is resolved.
Cleaning the Cache & Cookies of Firefox
Start by checking every additional Firefox (except for the one that is currently active).
Next, click on the action button in the top-right corner of the screen, then click on Options from the newly appeared menu.
Once you’re inside the Settings menu, click on Privacy & Security from the left-hand table. Next, scroll down to Cookies and Site Data and click on Clear data to bring up the temp built-in cleaning utility.
Inside the Clear data menu, check the boxes associated with Cookies and Site Data and Cached Web Content.
Once the cleaning process is ready to go, click on Clear to begin the process of cleaning your web content data.
After the process is complete, restart your browser and check to see if the problem is now resolved and you are able to use the TicketMaster platform properly.
Cleaning the web cache of Firefox
Cleaning the Cache on Opera
Open Opera and click on the icon in the top-left corner of the screen.
From the newly appeared context menu, click on Settings.
Once you’re inside the Settings menu, click on Advanced, then select the Privacy & security tab from the vertical menu on the right.
With the Privacy & security menu selected, move over to the right-hand menu and scroll down to the Privacy tab. When you get there, click on Clear browsing data.
Inside the Clear browsing data tab, set the mode to Basic, then put the Time range to All Time.
After the Clear browsing data window opens up, check the boxes associated with Cookies and other site data and Cached images and files.
Now that the cleaning utility is configured, click on Clear browsing data and see if the problem is resolved.
Once the cookies & cache are cleaned, restart your browser and see if the Error 401 Not Allowed is no longer appearing when you try to use the TicketMaster platform.
Cleaning the Cache on Opera browser
Cleaning the Cache on Internet Explorer
Note: The instructions below will apply regardless of the version of Internet Explorer that you’re using.
Open your Internet Explorer application and click on the Settings icon in the top-right corner.
Once the Settings context menu appears, expand the Safety sub-menu and click on Delete browsing history. Note: Additionally, you can go to Settings > Internet Options, select the General tab and then click Delete under Browsing history to reach the same menu.
Once you’re inside the Delete Browsing History tab, check the boxes associated with Temporary Internet files and website files and Cookies and website data (while unchecking everything else).
Now that the utility is ready to go, click on Delete and wait for the operation to complete.
After the process is complete, restart your computer and see if the TicketMaster issue has been resolved.
Cleaning the cache & cookies on Internet Explorer
Cleaning the Cache on Edge
Open Microsoft Edge and click on the hub icon (top-right section of the screen).
Next, select the History tab from the newly appeared vertical menu, then click on the Clear Icon hyperlink.
Once you’re inside the Clear Browsing data tab, check the boxes associated with Cookies and saved website data and Cached data and files while unchecking everything else.
When you are ready to start the cleaning process, click on Clear and wait for the process to complete.
After the process is complete, attempt to use the TicketMaster platform and see if the issue is resolved.
Cleaning the Cache on Edge
In case you’ve cleared your browser cached data\ & cookies and you’re still encountering the Error 401 Not Allowed, move down to the next potential fix below.
Method 2: Disabling VPN client or Proxy server (if applicable)
If clearing your browser didn’t resolve the issue for you, keep in mind that the TicketMaster Platform doesn’t play well with Proxy servers or VPN clients. And as it turns out, a lot of anonymity services are outright being blocked by this ticketing platform.
Several affected users have reported that they’ve only been able to resolve the issue by disabling their proxy server or VPN client that they were using. The good news is, you only need to disable it while you use the Ticketing platform (you can then enable it again).
We created two separate guides that will help you disable your VPN or proxy server in case you’re using one.
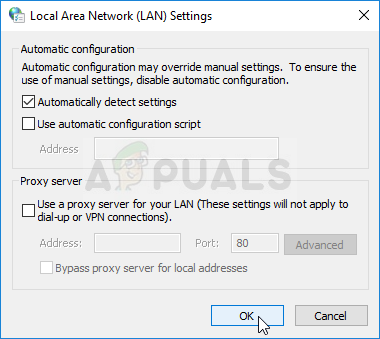
Disabling Proxy server
Open up a Run dialog box by pressing Windows key + R. Next, type ”ms-settings:network-proxy’ and press Enter to open up the Proxy tab of the Settings app.
Run dialog: ms-settings:network-proxy
Once you arrive inside the Proxy tab of the Settings menu, move down to the Manual Proxy Setup section. Next, go to the right-hand section of the screen and uncheck the box associated with Use a proxy server.
Disable the use of Proxy Servers
After you manage to disable the Proxy server, restart your computer and see if the problem is resolved at the next computer startup by attempting to access the TicketMaster platform again.
Disable / Uninstall VPN client
The steps of disabling your VPN client are dependent on the type of implementation that you’re using. If you installed a desktop VPN client, you will need to access the specific settings menu and disable the VPN connection from there.
Disabling the VPN client
However, if you have set up a VPN connection through the Windows 10 built-in feature, here’s a quick guide on disabling it:
Press Windows key + R to open up a Run dialog box. Next, type ‘ms-settings:network-vpn’ and press Enter to open up open up the VPN tab of the Settings app.
Accessing the VPN client
Inside the VPN connection tab, move over to the right-hand side section and click on your VPN, then click Remove from the context menu to prevent it from interfering with the TicketMaster platform.
Removing the VPN client
Method 3: Restart your Router/modem
As it turns out, the Error 401 Not Allowed might also be resolved by restarting your networking device (router or modem). It’ s possible that a network inconsistency ends up preventing some information packets from being sent to the server.
If this scenario is applicable and your ISP has no issues currently, you should be able to fix the issue by forcing a network restart.
To perform this procedure, simply press the On/Off button once and wait for 30 seconds or more before pressing it again. Additionally, you can simply disconnect the power cable from the power outlet, wait for half a minute and then plug it in again.
A demonstration of restarting the router
If you already did this and the Error 401 Not Allowed is still appearing when you try to use the TicketMaster platform, move down to the final method below.
Method 4: Wait 24 hours
As it turns out, the TicketMaster platform might trigger the Error 401 Not Allowed in instances where the filtering algorithm things that you are a bot. In most cases, this will happen if you refresh too many times or you access the same page with multiple devices that end up pinging TM with your code.
If this scenario is applicable and the filtering algorithm has triggered the lock, you have no alternative but to wait for the temporary ban to expire. In this case, the issue will be automatically resolved after 24 hours.
Keep in mind that bypassing the temporary ban is risky and hard to do since blockage is enforced on your account rather than your IP. The best way to resolve the issue, in this case, is to simply wait for the time period. And in case you can’t afford to wait, create a different account and get your tickets with that one.
Some Xbox One users are encountering the Error Code 0x82d40004 when they try to launch certain applications or games. In some cases, affected users are reporting that the issue is reported to occur with every game – even after they insert the game disc.
Xbox Error Code 0x82d40004
One of the most common instances that will end up producing the 0x82d40004 error is a power mode & startup setting called Energy-Saving. Some users that were struggling with the same issue have managed to fix it by changing the option to Instant-on.
If that doesn’t work, check the current status of the Xbox Live servers and see if the Purchase and Content usage service is currently experiencing problems. If there are issues, your console might be unable to check if you have the right to play that library item. In case you confirm a server problem, switching your console mode to Offline mode will allow you to validate your game library locally.
However, the 0x82d40004error can also occur due to a firmware inconsistency or a corrupted local profile. In this case, performing a power-cycling procedure or re-adding your Microsoft account should clear any temporary data that might cause this issue.
In case you’re only seeing this error only while inserting a physical game disk, start by clearing the persisting cache of your Xbox One console. Additionally, you should try cleaning the disk with isopropyl alcohol and take some steps to distinguish if your optical drive is failing.
Method 1: Changing Power mode to Instant-On
As it turns out, for a lot of affected users that are encountering the Error Code 0x82d40004 on Xbox One, this problem ended up being caused by a power mode & startup setting. Keep in mind that this is not the only problem that is being caused by the energy-saving features implemented on Xbox One.
If this scenario is applicable and the power mode is set to Energy-saving, you should be able to fix the issue by changing the option to Instant-On.
A lot of affected users have reported that the issue was entirely resolved after they enforced this change. Here’s a quick step-by-step guide on how to do this:
From the main dashboard menu of your Xbox One console, press the guide menu on your controller and wait for it to appear.
Once the guide menu (on the left) becomes visible, use it to select the Settings tab (gear icon), then access the Settings entry.
Accessing the Settings menu on Xbox One
Once you’re inside the settings menu, select the General tab from the vertical menu on the left, then move over to the right section and access the Power mode & startup options menu.
Accessing the power mode menu
Inside the Power mode & startup menu, access the drop-down menu associated with Power mode and change it from Energy-saving to Instant-on.
Changing the default Power Mode to Energy-Saving
After you do this, simply perform a regular console restart and wait for the next startup to complete.
Attempt to launch the same game that was previously triggering the 0x82d40004error code and see if the issue has been resolved.
If your Xbox One console is still showing the same error code, move down to the next potential fix below.
Method 2: Checking for server issues
As Microsoft has confirmed, the 0x82d40004 error code might also be the result of a server issue that is preventing end-user consoles from checking usage rights. This is even more likely if you’re only encountering the problem with digital purchases.
As it turns out, several affected users that encountered this issue in the past have confirmed that the issues were a direct result of a problem with one Xbox Live service (Purchase and Content Usage). A scheduled maintenance period or a different unexpected problem might end up inhibiting usage rights checking.
In case this scenario seems like it could be applicable, proceed to investigate the status of the Xbox live servers by accessing this link (here) and see if any core services are not operational.
Verifying the status of the Xbox live services
If the investigations you just performed didn’t reveal an issue with the Purchase and Content usage service, you can cross a server issue of the potential culprit list.
Note: In case you have discovered that there’s indeed a problem with an Xbox Live service, wait an hour or so and check back to see if the issue is resolved. Additionally, follow Method 3 to switch your console to offline mode.
If the same 0x82d40004 error code is still occurring and you’ve discovered that there are no issues with any Xbox Live services, skip the next method below and move directly to Method 4.
Method 3: Switching your console to Offline Mode
If you’ve previously confirmed that the Purchase and Content usage Live service is currently encountering issues and you’re unable to access your digital purchases due to the 0x82d40004 error code, one way to circumvent the problem is to switch your console mode to Offline.
This operation will bypass some online ownership verifications that are heavily-reliant on the Purchase and Content usage service, which might allow you to access your game library normally.
However, keep in mind that you will end up losing the ability to play multiplayer games and access any type of content that requires a connection with the Xbox Live server.
If you are prepared to switch your console to Offline Mode while the Xbox Live affected service is being fixed, here’s what you need to do:
Press and hold the Xbox button on your controller to open up the guide menu. Next, select the gear icon to access the Settings tab.
Clicking on “All Settings”
Once you’re inside the settings menu, access the Network sub-menu. Next, select the Network settings menu and tap on Go offline.
Going Offline on Xbox One
After you do this, your console should handle purchase verifications locally and you should be able to access your digital purchases without issues. Note: Once the server problem is resolved, reverse engineer the steps above in order to allow your console to connect to the Xbox Live service again.
In case this method wasn’t applicable or you’re still encountering the 0x82d40004 error code even after you’ve enabled Offline Mode, move down to the next potential fix below.
Method 4: Performing a power cycling procedure
If none of the methods above have helped you discover the culprit causing the 0x82d40004 error, it’s likely that you’re seeing the error due to some kind of firmware inconsistency – particularly if this issue started appearing after the installation of an update (or a failed update).
If this scenario seems like it could be applicable, you might be able to fix the issue by performing a power cycling – This operation will end up draining the power capacitors of your Xbox One console, which will end up eliminating the vast majority of firmware-related issues that might cause this particular behavior.
Here’s a quick guide that will allow you to perform a power-cycling procedure on your Xbox One console:
Start by ensuring that your console is turned on (not in hibernation) and fully booted.
Next, press and hold the On/Off Xbox button (on your console). Keep it pressed for over 10 seconds or until you see that the front LED stops flashing. Once you see this occurring, let go of the button.
Perform a hard reset on Xbox One
After the shut down is completed, disconnect the power cable physically from the power outlet and wait for a full minute before plugging it back in.
Turn your console back on conventionally and wait for the net startup to complete. If you see the initial animation logo appearing, the power-cycling procedure was a success.
Once the booting sequence is complete, attempt to launch the game or application that was previously triggering the 0x82d40004 and see if the issue is now resolved.
In case the same problem is still occurring, move down to the next potential fix below.
Method 5: Re-adding Xbox account
Another potential culprit that might end up causing the 0x82d40004 error code is a corrupted Xbox profile (the temporary data saved for the connected Xbox account). If this scenario is applicable, you should be able to fix the issue by deleting your local profile and signing with it again in order to clear the temp data and re-sync all files.
Several affected users have confirmed that this operation finally allowed them to access their game library normally.
Here’s a quick guide that will allow you to re-add your Xbox account:
Make sure that you’re seeing the main dashboard of Xbox One.
Press the Xbox button on your controller to bring up the guide menu, then select your active profile and use the Sign Out option.
Signing out from your active Xbox account
Once you have successfully signed out from your account, you need to take the steps to remove it. In order to do this, access the Settings menu once again and go to the Accounts tab from the vertical menu (on the left-hand side). Next, move over to the right section of the screen and use the Remove accounts option from the list of options (under Account).Accessing the Remove accounts menu
At the next screen, select which account you want to remove, then confirm by using the Remove button.
Removing the connected account
Once you manage to successfully remove your account, go back to the sign-in page, re-add your account and set the appropriate security preferences.
Establishing Sign-in & security preferences
Wait until the sign-in process is complete, then launch the same game or application that was previously triggering the 0x82d40004 error. Note: This operation might take longer than usual since every bit of data needs to be synced.
In case the same error message is still persisting, move down to the next potential fix below.
If you’re encountering the issue exclusively when trying to play content that is stored on Blu-Ray disks, chances are you are encountering the 0x82d40004 error due to corrupted data present in the Persistent Storage folder that Xbox One maintains for physical media.
If this scenario is applicable, you should be able to fix the issue by accessing your console’s settings and clearing the persistent storage cache. Keep in mind that the Persistent Storage mainly contains temporary data that needs to be readily available, so clearing the cache will not make you lose any data or settings.
Here’s a quick guide on clearing the persistent storage on Xbox One:
From the main Dashboard of Xbox One, press the guide menu on your controller and access the Settings menu (gear icon).
Accessing the Settings menu on Xbox One
Inside the Settings menu, go to Console settings and access the Disc & Blu-Ray option from the right section of the screen.
Accessing the Disk & Blu-Ray menu
Inside the Disc & Blu-Ray menu, access the Persistent storage menu (under Blu-Ray).
Accessing the Persistent Storage menu
Next, use the Clear Persistent storage option and wait for the operation to complete.
Restart your console and see if the issue is resolved at the next system startup.
In case you’re still encountering the 0x82d40004 error, move down to the next potential fix below.
Method 7: Cleaning dirty Blu-ray disk
If none of the methods above have allowed you to fix the issue and you’re only encountering physical games, chances are you’re either dealing with a dirty or damaged disk or your optical drive is malfunctioning.
If the disk used to work, consider cleaning it for dust that might be preventing the optical block from reading it. The ideal way to do it is with isopropyl alcohol and a soft cloth. Since isopropyl alcohol dries up very fast, you don’t have to worry about leaving behind any by-products that might produce damage to your optical drive.
But keep in mind that if the issue is being caused by a deep scratch, this operation will not be effective.
Here’s a quick guide on cleaning a Blu-Ray disc of dust:
Start by sprinkling some isopropyl alcohol on a soft cloth and start rubbing the disc with a circular movement (from the inside to the outside).
Cleaning the Blu-Ray disk
Once you finished the cleaning process, air dry it for a maximum of 10 seconds in a non-dusty area.
Insert the disk back into your Xbox One console and see if the optical drive manages to read it.
In case the same problem is still occurring, it’s very likely that you’re dealing with a failing optical block. Some users encountering the same issue have managed to get past this issue by tilting the front of the Xbox console a bit so the front is in the air – This will force the disk to drop back a bit more into the drive.
Additionally, you can try holding the disc with your hand for a second or two while it’s trying to pull it in.
IMPORTANT: If any of these last to operation work for you, you should start considering replacing your optical drive. Eventually, your disc drive will die out.
Some users are encountering the 995f9a12 Error code when they’re trying to access the Twitch App from an Xbox One console. The issue is specific to Xbox One, as affected users are reporting that the same error doesn’t occur when they try to use the Twitch app from a different platform (PC, mobile, etc.).
995f9a12 Twitch Error Code
In some cases, this particular error can occur due to the fact that the Stream key currently assigned to your Twitch account is not consistent. In this case, resetting it should allow you to resolve the issue.
However, some users have reported that they only managed to fix the 995f9a12 Error after they accessed their Twitch account from a PC and disconnected the Xbox One Integration. After doing so and signing in again from the Xbox One console, the problem was resolved.
A network inconsistency facilitated by the alternate MAC address can also trigger this issue. If this scenario is applicable, you should be able to resolve this issue by clearing the MAC address from your Xbox One Network settings.
If everything else fails, you can perform a power-cycling procedure on your Xbox one console. This will help you with the vast majority of issues originating from a software or firmware inconsistency.
Method 1: Resetting the Twitch Stream Key
Keep in mind that in order to be able to stream with the Twitch platform, you will need a Stream Key that is unique to your account. This can easily be found on your dashboard.
However, the Xbox One Twitch app requires the stream key by default (even though you have no intention of streaming). But as it turns out, automatically assigned Stream keys have a tendency to break, ending up triggering the 995f9a12 Error code.
If this scenario is applicable, you should be able to resolve this issue by resetting the Stream key by accessing the Twitch.tv official website. After you manage to do this, signing back into the Xbox One Twitch error should allow you to resolve the issue.
Here’s a quick guide on resetting the Twitch Stream key from the official website:
Open the Twitch website (here) from a laptop, computer or mobile device – Don’t use the default Xbox One browser.
Next, sign in with the same Twitch account that you’re trying to use on your Xbox One console.
Once you are successfully signed in, click on your Account icon (top-right section of the screen), then choose Settings from the newly appeared context menu.
Accessing the Settings menu of Twitch
Once you’re inside the Settings menu, click on the Chanel and Video tab from the horizontal menu.
Channel and Video Settings
Inside the Channel settings menu, go to the Stream key & preferences menu, look for the Primary Stream key entry and click on the Reset button associated with it.
Resetting the Stream key
Once the Stream key is reset, wait for a few minutes until the change is propagated.
Return to your Xbox One console, and attempt to sign in with your Twitch app again to see if the problem is now resolved.
In case you’re still encountering the same 995f9a12 Error code, move down to the next potential fix below.
Method 2: Re-establish Xbox One Connection
As it turns out, you might be able to fix the 995f9a12 Error code by signing into your Twitch account from a PC / Mac and disconnecting the Xbox One integration from the Connections tab. As a lot of affected users have reported, this operation will fix the error if it’s being caused by some type of cache issue. Upon reconnecting again, you should no longer encounter the same error when trying to launch the Twitch app on Xbox One.
Here’s a quick guide on disconnecting the Xbox One connection:
Start by accessing the official Twitch website (here) from a PC or Mac.
Sign in with the same Twitch account that you use on your Xbox One console.
Once you are successfully signed in, click on your Account icon (top-right section of the screen), then choose Settings from the newly appeared context menu.
Accessing the Settings menu of Twitch
Once you’re inside the Settings menu, click on the Connections tab from the horizontal menu at the top.
Accessing the Connections tab on Steam
Inside the Connections tab, scroll through the list of services where your Twitch account is integrated with and look for an entry associated with Xbox One. When you see it, click on the Disconnect button associated with the Xbox One entry.
Disconnect the Xbox One account integrated with Twitch
Next, return to your Xbox One Twitch app and attempt to reconnect again. You should no longer encounter the same issue.
In case the same 995f9a12 Error code is still occurring, move down to the next potential fix below.
Method 3: Clearing the Alternate MAC Address
As it turns out, the 995f9a12 Error code can also occur due to an improper alternate MAC address. This is a fairly common inconsistency that typically appears if you have the habit of switching from WiFi to ethernet connections frequently.
If this scenario is applicable, you should be able to fix the issue by accessing the Network menu and cleaning the alternate MAC address. This should work for users that are using an ISP that’s providing a dynamic IP.
Here’s a quick guide on clearing the alternate MAC address from the Settings menu of Xbox One:
With your console turned on, press the Xbox button on your controller, then access the Settings icon from the newly appeared guide menu. Next, access the All Settings.
Clicking on “All Settings”
From inside the Settings menu, access the Network settings menu.
Accessing the Network Settings tab
From the Network tab, access the Advanced Settings menu from the left-hand side of the screen.
Accessing the Advanced settings menu of the Network tab
With the Advanced Settings menu selected, select the Alternate MAC address from the list of available options. Next, hit the Clear button and confirm by choosing the Restart button to apply the changes.
Clearing the Alternate Wired MAC address
Once the procedure is complete, attempt to sign in with Twitch once again and see if the issue is now resolved.
In case the same 995f9a12 Error issue is still occurring, move down to the next potential fix below.
Method 4: Performing a Power Cycle Procedure
If none of the methods below have allowed you to resolve the 995f9a12 Error, it’s possible the issue is facilitated by a firmware or software glitch.
In case this scenario is applicable, you should be able to fix the issue by doing a power-cycling procedure. This operation will ensure that the power capacitors are completely drained, which will end up eliminating the majority of issues that might be caused by corrupted cached data.
Here’s a quick guide on performing a power-cycling procedure on Xbox One:
From the main dashboard, press and hold on the power button on the front of your console (not your controller). Keep it pressed for about 10 seconds or until you see that the front LED stops flashing. When you see this behavior occurring, let go of the power button.
Performing a hard reset
Note: Additionally, you can also physically disconnect the power cable from the power outlet in order to ensure that the power capacitors are fully charged.
After the procedure is complete, wait for a full minute before turning the device back on. During the next startup sequence, look for the initial startup animation. If you see it, it’s confirmation that the power-cycling procedure was successful.
Xbox One starting animation
Once the next startup is complete, attempt to access the Twitch app again and see if the 995f9a12 error.
Wi-Fi Security Protocols were developed to protect the network from unwanted parties. WEP, WPA, and WPA2 are different, but they also serve the same purpose. It encrypts the private data of the user that is transmitted over the airwaves. However, many users are unaware of what each protocol does and which one is better than others. In this article, we will tell you about each Wi-Fi security protocol and the different options available when choosing the security option.
Wi-Fi Security Protocols
Wired Equivalent Privacy (WEP)
Wired equivalent privacy was developed in 1999 and it’s the earliest security protocol that we used for wireless networks. WEP is meant to supply the security to wireless networks similar to the wired networks. WEP used the 40-bit encryption key for security. However, after some time, the encryption used for this was found out as not secured and vulnerable. Nowadays WEP is no longer used and that is why the latest Wi-Fi routers don’t have an option for WEP anymore.
WEP security option in old routers
Wi-Fi Protected Access (WPA)
Due to the lack of WEP for the security protocol, Wi-Fi Protected Access was introduced as the upgrade to WEP. WPA is far better than WPE that is because it uses the encryption that is stronger than the 40-bit encryption. WPA uses encryption methods called TKIP that stand for the Temporal Key Integrity Protocol. TKIP dynamically changes its keys as it’s being used which makes it a bit safer than WEP. However, it is still not the safest because TKIP has some vulnerabilities.
WPA security still available in modern routers
Wi-Fi Protected Access 2 (WPA2)
WPA2 was developed with stronger security to take care of the flaws of WPA. This uses the AES known as the Advanced Encryption Standard for the encryption. AES encryption uses the symmetric encryption algorithm that makes it strong enough against the security attacks. AES encryption is even used by the government to secure sensitive government data.
WPA2 with AES encryption
Difference Between WEP, WPA, and WPA2
Now that you have the basic knowledge about these three you might already know some differences. However, choosing them as an option in your router or devices is another story. Most of the modern modem/router will no longer have an option for WEP since that is the worst protocol for security. You can find the WPA and WPA2 options available in the list of the wireless security page. All of them use different encryption technology and the AES technology of WPA2 is safer.
There is also an option for WPA/WPA2 mixer in the security menu for most devices and routers. This option means that it will allow both WPA and WPA2 at the same time. It will use both AES and TKIP security. This option is provided for compatibility purposes due to some older devices still using WPA. However, if a user is using both TKIP and AES then the network will be left more vulnerable. If all devices are using WPA2 then the best option is to choose WPA2 in the list of wireless security.
HTC Vive is a headset developed by HTC and Valve for virtual reality experience. It uses the room-scale tracking technology that makes it possible for users to move and interact with the 3D environment. However, many users are unable to connect the HTC Vive headset to the SteamVR. The most common errors they are getting are Error 108 and Error 208. In this article, we will show the methods to solve these errors on your HTC Vive.
HTC Vive Error 108 & Error 208 on SteamVR
Fixing HTC Vive Error 108 and Error 208 on SteamVR
Both the Error 108 and Error 208, points to the connection problem between the HTC Vive and PC. After looking at the issues of many users, we can say that Error 108 indicates the problem of the USB and Power problem between HTC Vive and PC. The Error 208 issue can happen when the problem is with the display port in between.
Before starting any method, make sure every cable is connected correctly. Also, make sure that Link Box is not connected backward. The HTC Vive headset side will have the power port in the middle and all the cable will be near. The PC side will have the power port on the corner and there will be a space between HDMI and USB port.
Make sure Link Box is not connected backward
Restarting the Devices and Applications
The most common solutions for these two errors that fix the problem for many users were by restarting one of the devices or applications. Most of the time when new devices or drivers are installed, a restart is needed for them to work properly. Make sure to restart the computer, SteamVR or HTC Vive headset and check if it resolves the problem. Another thing to try is running your Steam in an administrator mode. You can right-click on Steam shortcut and choose Run as administrator option to run steam as admin.
Running the Steam application as an administrator
Connecting HTC Vive Headset Directly to PC
Sometimes the Link Box can be the issue for the connection problem between HTC Vive headset and your PC. You can try to bypass the Link Box and connect the USB and HDMI direct to PC. However, do not disconnect the power cables from Link Box, as your headset needs the power to run. Before applying the below steps make sure all the cables are connected.
Unplug the USB and HDMI cables from your PC. Now unplug the HDMI and USB cables from Link Box.
Unplugging USB and HDMI cables from the PC and Link Box
Do not unplug the Power cable from both sides of the Link Box.
Now plug the USB and HDMI cable of the HTC Vive headset directly into your PC. Note: Try connecting the USB cable in USB 2.0 port rather than USB 3.0.
Connecting HTC Vive headset cables directly to PC ports
Reboot your computer and then check if the problem is solved.
Checking the HTC Vive Headset Connections
Most of the time the USB cable inside the headset is connected to the wrong port. The new HTC Vive headset will have the USB cable connected to the side port by default. You can open the headset top part and change the cable as shown in the below steps:
Take the top part of the HTC Vive headset off. Change the USB cable port from the side port to the middle port (USB 2.0).
Changing the USB cable to THE other port in the headset
If that doesn’t work, then make sure to unplug all the other cables connected to the HTC Vive headset and plug it back again.
Unplugging all cables on the headset and then plugging it back
Check if this will solve the error 108 and error 208 issues.
Some Windows users are seeing an ‘Unknown Error 0x80040600‘ message every time they send or receive emails via Outlook. Other affected users are saying that the issue only appears when they try to download email attachments from their Inbox.
‘Unknown Error 0x80040600’ on Outlook
In most cases, the 0x80040600 error is a signal that you’re dealing with a partially corrupted .PST or .OST files. In this case, one way to resolve the issue would be to use the Inbox Repair Tool.
Under special circumstances, you might need to resort to removing the Outlook profile and re-adding it again in order to resolve the error message.
But keep in mind that depending on the gravity of the corruption, you might not be able to remove it conventionally – In this case, you’ll need to navigate to the location of the PST or OST file and either rename the Outlook data file or deleting it completely in order to force the program to create a new file from scratch.
Using the Inbox Repair tool
One of the most common causes that will ultimately cause the 0x80040600 error is an inconsistency with the Outlook (.PST or .OST file). This is a critical email file that stores important information that Outlook needs in order to sync your files in real-time.
If this file is corrupted, the email application that you’re using (Outlook in this case) will be prevented from communicating with the email servers.
In case this scenario is applicable to your current situation, you should be able to fix the issue by repairing the corrupted .PST or .OST files with the Inbox Repair Tool utility. Several affected users have confirmed that after performing this procedure and restarting their computer, the ‘Unknown Error 0x80040600‘ stopped appearing when they tried to send email or download email attachments.
Note: Depending on the Outlook version that you’re using, the location of this repair tool will be different (it’s included with every recent Outlook version). But the instructions below were tested and should work for Outlook 2013 and below.
Here’s a quick guide on repairing the Outlook file (.PST or .OST) using the Inbox Repair Tool:
Ensure that Outlook and any associated process is completely closed.
Visit this link (here) and download the Inbox Repair tool. Wait patiently until the download is complete, then double-click on the executable.
Once you get to the first link, click on the Advanced hyperlink and ensure that the box associated with ‘Apply repairs Automatically‘ is checked. After you do this, click on Next to move forward.
Applying repairs automatically
Note: If the program doesn’t open with Administrative privileges by default, click on Run as Administrator and click Yes at the User Account Control (UAC) prompt.
Start the utility by clicking Next and wait until the operation is complete. If a problem is identified, the utility will automatically recommend a viable repair strategy.
Resolving the issues with your .PST file
Once you’re inside the Microsoft Outlook Inbox Repair menu, click on Browse, then navigate to the location where your .PST / .OST file is stored.
Selecting the .PST file using the Browse menu
Note: The default location of your Outlook file is C:\Users\ \AppData\Local\MicrosoftOutlook. But it will be different if you have previously set a custom location.
Once the operation is complete, restart Outlook again and see if the problem is now fixed.
In case you’re still encountering the same 0x80040600 error, move down to the next potential fix below.
Removing the Outlook profile
If repairing the PST / OST files didn’t fix the 0x80040600 error, you should try re-creating the email profile that Outlook uses by default. This should end up resolving the issue in case some kind of temporary data that is stored locally is causing the issue.
But keep in mind that by following through with this method, you will also lose any data that is currently stored on your Outlook profile.
If you decide to go through with this method, follow the steps below. The instructions should be applicable regardless of the Windows version that you’re using.
Close Outlook and any associated service.
Open up a Run dialog box by pressing Windows key + R. Next, type ‘control.exe’ and press Enter to open up the Classic Control Panel window.
Accessing the Classic Control Panel interface
Once you’re inside the classic Control Panel menu, use the search function in the top-right corner to search for ‘mail’. Next, click on Mail from the list of results.
Opening up the Mail app
From the main Mail Setup window, start by clicking on Show Profiles button associated with Profiles.Accessing the Profiles menu
Inside the Mail menu, select the Outlook profile that you’re actively using (and encountering issues with) and click on the Remove button.
Removing any additional Outlook email profile
When asked the confirm the removal of the profile, click Yes to complete the operation.
Start Outlook once again and configure your email from scratch. Because you previously deleted the old profile, the email client will create a new .OST or .PST profile and attach it to the new profile as soon as you finish signing in with your email credentials.
Attempt to send an email again and see if you’re still encountering the same 0x80040600 error.
In case you’re still encountering the same issue, move down to the next potential fix below.
Renaming or Deleting the .PST / .OST file
Keep in mind that is the Outlook data file that is attached to your email account is corrupted, the email client might not be able to delete it conventionally. If this is the case in your situation, you will still encounter the same error since Outlook will resume using the same .PST or .OST file the next time you connect Outlook with your email account.
If this scenario is applicable, you should try to delete the Outlook data file or rename it manually in order to force the program to create a new instance from scratch.
Here’s a quick guide on deleting or renaming the Outlook data file manually:
Open File Explorer and navigate to the following location manually or by pasting the entire address in the navigation bar and pressing Enter:
Note: Keep in mind that *YourUser* is simply a placeholder. Replace it with your own username. Note 2: If you want to navigate to the location manually, keep in mind that the App data folder is not visible by default. In order to make it visible, access the View tab from the ribbon bar at the top and ensure that the box associated with Hidden Items is checked.
View Hidden Items option is checked
Once you get to that location, you have two options – The easier option is to simply right-click on the PST / OST file and choose Delete from the context menu to get rid of it.
Deleting the PST / OST data file
Note: Additionally, you can rename the file with the ‘.Old‘ extension in order to force Outlook to create a new profile from scratch. But keep in mind that in order to be able to view the extensions, you need to enable File name extensions from the View tab.
Enabling File Name Extensions from File Explorer
Connect your email account with Outlook once again and see if you are able to send or receive emails without encountering the 0x80040600 error.
A hex editor is a tool through which users can open any type of file and display its contents. From time to time, a normal user will come across a file that cannot be opened with a normal text editor. They will require the hex editor to open the binary file to find the information in it. Another popular reason to use the hex editor is to change and edit the saved files of the game. However, most users wonder if there is any hex editor pre-installed in Windows or there is any good third-party hex editor to install. In this article, we will tell you the most used hex editors by the community and how it works.
Hex Editor for Windows
Do Windows have a Hex Editor?
Windows do not have any pre-installed hex editor in their operating systems. Hex files can be stored in the text format or binary format. If you have a text-based hex file, then it can be opened with text editors like notepad. However, if you have a binary hex file, then the only option to open them is by using the third-party hex editing programs.
However, there are many free or open-source hex editor for Windows. Some hex editors come in the form of a plugin for the famous programs like Notepad++. These are some of the free best-known hex editors that you can use for Windows:
We are going to show you how to install and use some of the above-mentioned hex editors on Windows. Down below some of the latest and outdated hex editors are demonstrated to give you the idea about using them on Windows.
Using HxD Freeware Hex Editor and Disk Editor
HxD is one of the fast and large file handler hex editors for Windows. It also provides the modifying of RAM and raw disk editing. The editing in HxD is similar to the editing in a normal text editor. The data can be viewed in ANSI, DOS, EBCDIC, and Macintosh character sets. It’s one of the updated hex editors among many other hex editors. To try the HxD hex editor follow the below steps:
Open your browser and download the HxD hex editor in your language.
Downloading HxD hex editor
Extract the zip folder and open the setup file to install the HxD hex editor.
Extracting the zip file
Open the installed folder and then double-click the HxD64.exe to open the HxD hex editor. Note: You can also open the HxD32.exe if you want to open it in 32-bit.
Click on the File menu in the menu bar and choose the Open option. Search and select your hex file to open in HxD.
Opening your hex file in the hex editor
Now you can view and edit the hex file by using the different features of the HxD hex editor.
You can find and use the Option menu features to edit the file
Using Free Hex Editor (Frhed)
Frhed is a hex or binary file editor for the Windows platform. The stable version of this was released back in 2009 and it still is available up to that version. This editor is written in C++ and it is open-source software. Even though it’s outdated, but many users are still using it because of the good performance. Follow the below steps to try Frhed for Windows:
Download and Install the Frhed application.
Downloading Free hex editor
Open the Frhed application by double-clicking the shortcut. Click on File and choose the Open option. Search and find the hex file to open it in Frhed.
Opening application and hex file
You can see the hex file a bit different in this outdated application but it still works.
You can view and edit the file now
Skype for Business is the leading communication and collaboration platform available for businesses today. From audio and video meetings to the ability to work together on projects, Skype4B provides the average office worker with all the tools they could possibly need to effectively communicate and work with their coworkers. However, that is not to say that Skype for Business is perfect, because it isn’t. One specific issue that is reported by Skype for Business users quite often is the program displaying blatantly incorrect names for contacts in the Address Book.
The Skype for Business Contacts list
What causes Skype for Business to display incorrect contact names?
The existence of proxy addresses in the Skype for Business Address Book: If the Skype for Business Address Book for your workplace is configured to include proxy addresses, contact names in the Address Book may get messed up beyond recognition.
How to fix Skype for Business displaying incorrect names for contacts
While Skype for Business users may experience a wide variety of different problems, for those affected by this issue, displayed names for contacts are so overtly incorrect that the chances of the user being able to recognize them are slim to none. This might not be the end of the world for a Skype4B user with half a dozen or a dozen contacts in their Address Book, but when your workplace has 750 people on its Skype4B Address Book, some or all of the contact names being laughably incorrect is, simply put, a nightmare.
As grave a problem as it may seem, however, there is no need to resort to extreme measures such as uninstalling Skype for Business and then reinstalling it to try and sort this issue out. This issue can be fixed, and the right names for all of your contacts restored, by simply removing proxy addresses from your Skype for Business Address Book. In order to do so, you need to:
On your workplace’s Front End server (the one that deals with the Skype4B Address Book service), go here and click on Download to download the installer for Microsoft’s Skype for Business Server 2015 Resource Kit. You are going to need the resource kit and the tools it contains installed on your computer if you are going to remove proxy addresses from the Skype4B Address Book.
Click on the Download button
Once the download has completed, go to where the installer was downloaded to, launch it and follow the onscreen instructions to install the Microsoft Skype for Business Server 2015 Resource Kit and the tools it contains on your computer.
When the Microsoft Skype for Business Server 2015 Resource Kit has been installed, navigate to its installation directory (%Program Files%\Skype for Business Server 2015\ResKit by default), locate a program named ABSConfig.exe, and double-click on it to run it.
In ABSConfig, scroll down to the entry titled proxyAddresses in the AD Attribute Name column usually found at the very bottom of the list and drop it there.
Scroll down to the entry titled “proxyAddresses”
Open the dropdown menu under the Type of Attribute section and click on the ProxyAddresses – Tel Only option to select it.
Click on the “ProxyAddresses – Tel Only” option in the dropdown menu
Click on Apply Changes at the very bottom of the ABSConfig screen.
Click on Apply Changes
Once you’re done making the required changes to Skype for Business’ Address Book configuration, launch a fresh instance of the Skype for Business Server Management Shell.
Type Update-CSuserDatabase -verbose into the shell and press Enter. This command, once processed, will refresh the Skype for Business user database and manually re-sync it with the server.
Once the command from the previous step has been successfully executed, type update-CSAddressbook -verbose into the Skype for Business Server Management Shell and press Enter. This command will regenerate the Address Book.
When the command has been processed, close the Skype for Business Server Management Shell, go back to your workplace computer and fire up Skype for Business – all of your contacts should now have the right names – finally putting this crisis to bed.
Some Windows users are encountering the VKEnumeratePhysicalDevices Failed with Error (VK_Error_Initialization_Failed) fatal error when attempting to launch certain games that are actively using the Vulkan computing API technology. In most documented cases, this error is reported to occur with Wolfenstein titles and Doom titles – typically games released by Bethesda.
Fatal Error: VkenumeratephysicalDevices Failed with Error (VK_Error_Initialization_Failed)
If you’re encountering this error, start by ensuring that your GPU is capable of supporting Vulkan. Generally, GPUs that were released after 2018 all support the Vulkan API. If you confirm that your GPU supports Vulkan, see if your current PC configuration is capable of meeting the minimum requirements of the game that you’re trying to run.
In some cases, the VK_Error_Initialization_Failed error can also occur due to a faulty graphics card driver. in this case, you should be able to fix the issue by reinstalling every GPU driver supply by your graphics card manufacturer.
If you’re encountering the issue on a hybrid-GPU laptop or computer, you might see the error due to the fact that your operating system is trying to run the game with the integrated GPU. In this case, either disable the integrated GPU or set the more powerful GPU as the preferred graphics card for the executable that you’re trying to run.
In case you’re encountering the issue with an Nvidia GPU, ensure that the Vulkan environment is installed on your computer. If it isn’t installed already, you can install it from the folder where Nvidia stores your latest installed driver.
However, this game startup error can also be a direct consequence of some type of system file corruption that cannot be resolved conventionally. In this case, you should be able to resolve the issue by resetting every Windows component via clean install or via a repair install.
Verifying if Vulkan is supported by your GPU
Keep in mind that not every dedicated GPU is build to support the Vulkan API. While every newer dedicated GPU gaming that was released after 2018 should support Vulkan, this is not a set rule.
Note: If you have a dedicated GPU (most likely from Intel), there’s a very high chance that Vulkan is not supported.
Most Nvidia and AMD GPUs are build to accommodate the Vulkan API. Below you’ll find two separate lists of graphic cards that should work with Vulkan API.
If the GPU that you’re encountering the VK_Error_Initialization_Failed error is not on this list, it’s probably because your GPU doesn’t support Vulkan – in this case, the only viable fix that will allow you to run the game is to upgrade to a newer GPU.
Here are two separate lists of GPUs that are build to support Vulkan API:
If your GPU is not on this list, Vulkan is not supported – If this scenario is applicable, it’s also the reason why you’re seeing the VKEnumeratePhysicalDevices Failed with Error (VK_Error_Initialization_Failed) fatal error every time you attempt to launch the game.
If the investigation you did above has revealed that the GPU that you’re using is built to support the Vulkan API, move to the next section below to check if you meet the minimum requirements for the game you are attempting to play.
Checking if your PC meets the minimum requirement
If you previously verified that the GPU you are using supports Vulkan, it’s time to verify if the game you are attempting to can actually be played on your current PC configuration. If you are tech-savvy and you know your components, you can search online for ‘minimum requirements + *Game Title that is triggering the error*’ and compare the results with your current configuration.
However, there are also some services that will automatically analyze your computer against the minimum recommended specs and determine if your computer is determined to run that game or not. On service of this kind is Can I Run It.
Here’s a quick step by step guide on using Can You Run it in order to determine if you’re seeing the VKEnumeratePhysicalDevices Failed with Error (VK_Error_Initialization_Failed) fatal error due to the fact that your system doesn’t meet the minimum requirements:
Visit this link (here) from your default browser. Once inside, start typing the name of the game that you’re encountering issues with (in the Search for a game bar) and select it from the newly appeared context menu.
Leading the game into the CYRI service
Note: It’s important to select the game from the context menu – unless you do it, the service will not lead up that game’s minimum requirements.
Once the correct game is loaded, simply click on the Can You Run It button and see if the issue has been resolved.
Analyzing the game’s minimum requirement against your current configuration via CYRI service
After a couple of seconds, your browser will begin downloading the Detection.exe file. Once the executable is downloaded, double-click on it and follow the on-screen prompts to install it on your system.
Downloading & using the detection executable
Note: Upon running this executable, the utility will automatically scan your PC configuration and put it against the minimum requirements of the game you are trying to run in order to determine if you can actually run it.
After the scan is finished, return to the Can You Run It page and take a look at the results. If you see a green checkmark under Minimum, your rig is strong enough to run the game (so the error appears due to a different cause).
Analyzing the results of the CYRI service
Note: If the scan didn’t pass the Minimum requirements, scroll down to the Minimum tab and see which component is preventing the game from running properly.
In case the analysis above has confirmed that your computer configuration is strong enough to run the game, but you’re still encountering the VK_Error_Initialization_Failederror, move down to the next potential fix below.
Reinstalling every GPU driver
If you’ve previously confirmed that your PC does meet the minimum requirements of the game that’s triggering the error, it’s likely that the issue is being caused due to a faulty graphics card driver. If this scenario is applicable, you should be able to get the issue resolved by reinstalling the GPU drivers that you’re actively using.
Of course, the steps of doing so will be different depending on your GPU manufacturer. In order to accommodate both AMD and Nvidia users, we created two separate guides that will help you uninstall and reinstall your GPU – whether you’re using AMD or Nvidia graphics cards.
Follow whichever guide is applicable to your current scenario:
Reinstalling the GPU drivers on Nvidia
Press Windows key + R to open up a Run dialog box. Next, type ‘appwiz.cpl’ inside the text box and press Enter to open up Programs and Files menu.
Typing in “appwiz.cpl” in the Run prompt
Once you’re inside the Programs and Features menu, click on the Publisher tab to order the list of installed programs by their publisher.
After you manage to order the programs accordingly, find the entries published by NVIDIA Corporation and systematically right click > Uninstall every item using the context menu. Next, follow the on-screen prompts to complete the uninstallation process.
Uninstall every Nvidia driver
Note: Do this systematically with every driver that shows up as published by Nvidia Corporation.
Once every Nvidia driver is uninstalled, restart your computer and wait for the next startup to complete.
At the next startup, visit this link (here) and install GeForce Experience by clicking on the Download Now button and following the on-screen instructions.
Downloading GeForce Experience
Note: This utility will automatically recommend the drivers that you need to uninstall according to your GPU model.
Open Nvidia Experience, sign in with an account and then install the recommended drivers from the Drivers page.
Sign in with Nvidia Experience
Once every recommended driver is installed, reboot your computer once again and see if the issue is resolved at the next computer startup.
Launch the game that was previously triggering the VKEnumeratePhysicalDevices Failed with Error (VK_Error_Initialization_Failed) fatal error and see if the issue is now resolved.
Reinstalling the GPU drivers for AMD
Visit this link (here) from your default browser in order to download the AMD Cleanup Utility.
Once the AMD Cleanup utility is downloaded, double-click on it’s executable and click Yes at the confirmation prompt to run the utility in safe mode and uninstall every AMD driver.
Launching the AMD Cleanup Utility
Note: This utility is designed to thoroughly remove any installed AMD drivers, registry entries and driver store signatures. This will spare you from searching and uninstalling every driver manually. To ensure that you’re not leaving behind any leftover files, ensure that you run the utility in safe mode.
To start the utility, click Ok at the second prompt to start the AMD cleanup process (it will run in the background).
Uninstalling the AMD drivers via the Cleanup AMD Utility
Note: During this operation, your display might flicker or turn black for a couple of seconds. This is absolutely normal as the display components are being removed.
Once you see the success message, click on Finish, then restart your computer manually if you’re not prompted to do so automatically.
Uninstalling the AMD cleanup utility
After the next startup sequence is complete, visit this link (here), scroll down to to the Auto-Detect and Install Radeon Graphics Drivers for Windows and click on Download Now.
Downloading the Auto-detect utility
Once the executable is downloaded, open it by double-clicking and follow the on-screen instructions to install Radeon Adrenalin.
Downloading AMD Adrenalin
Note: You can change the default destination folder again, but this is not recommended.
Once the download is complete, the utility should automatically launch itself in an attempt to detect the installed AMD graphics product and operating system. Wait patiently until this process is complete.
Waiting for the detection process to complete
After the tool successfully detects your system configuration and the drivers that you need, install both the Recommended and Optional driver packages by selecting both and clicking on Install.Installing the AMD recommended drivers
Accept the End User License Agreement after reviewing the terms and conditions, then click on Install to start the installation.
Once every needed driver is installed, restart your computer and attempt to launch the game once the next startup is complete to see if the issue is now resolved. If the VKEnumeratePhysicalDevices Failed with Error (VK_Error_Initialization_Failed) fatal error appeared due to a driver issue, the operation above should have resolved it.
Disabling the Integrated GPU or set Dedicated GPU as Preferred
Keep in mind that if you’re encountering this issue on a laptop or PC that has both an integrated and a dedicated GPU, you might end up seeing the VK_Error_Initialization_Failed error due to the fact that your PC ends up using the integrated GPU instead of the dedicated option.
If this scenario is applicable, you should be able to fix the issue by disabling the Integrated GPU solution, ensuring that your computer is forced to use the more powerful GPU.
In case you’re not exactly sure how to disable the Integrated Graphics card, follow this guide (here). It contains to separate guide that will allow you to do it via Device Manager or directly from your BIOS or UEFI settings.
On Windows 10, you can set the preferred GPU from the Settings menu – if possible this operation is preferred since it will not effectively stop the usage of the Integrated GPU.
Here is some step by step instructions that will allow you to set the dedicated GPU as the preferred one for the game that is triggering the VK_Error_Initialization_Failed error:
Press Windows key + R to open up a Run dialog box. Next, type ‘ms-settings:easeofaccess-display’ inside the text box and press Enter to open up Display tab of the Settings menu.
Once you’re inside the Display screen, move to the right section, scroll down and click on Graphics settings.
Inside the Advanced graphics settings menu, click the Browse button and select the game executable that you’re encountering the error with.
After you manage to load the game’s executable, select it once and click on the Options button from the newly appeared context menu.
Inside the Graphics specification screen, set the default graphics preference to High Performance and click on Save to make the change permanent.
Close the Settings menu and attempt to launch the game again to see if the issue has been resolved.
Forcing the high-performance GPU
In case you’re still encountering the same issue, move down to the next potential fix below.
Ensuring that Vulkan is installed
As some affected users have reported, under certain circumstances, the Vulkan API will not get installed even though the installation package is being stored locally (it’s included with every new driver nowadays). From our investigations, this particular issue seems to be restricted to Nvidia GPUs.
Several affected users have confirmed that they were able to fix the issue after navigating to the location of the latest DisplayDriver that the installed and running the VlulkanRT-Installer.exe in order to install the Vulkan environment.
Here’s a quick step by step guide that will allow you to do this:
Open File Explorer and navigate to the following location:
Note: Keep in mind that both %Drivernumber% and %Winversion% are placeholders. When navigating to that location, select the latest version for %Drivernumber% and your current Windows version for %Winversion%.
Once you arrive at the correct location, double-click on VulkanRT-Installer.exe and follow the on-screen prompts to complete the installation
Installing Vulkan on your computer
Once the installation is complete, restart your computer and see if you’re still encountering the VK_Error_Initialization_Failed error when launching a game that’s using the Vulkan API.
Repair install Windows 10
As it turns out, the VKEnumeratePhysicalDevices Failed with Error (VK_Error_Initialization_Failed) fatal error is often the direct result of some type of system file corruption that cannot be resolved conventionally.
Several affected users that were previously encountering the issue at every attempt of launching a game that was using Vulkan (not just Wolfenstein: The New Colossus), have confirmed that the issue was resolved after they performed a repair install.
This operation will reset every Windows component (including booting-related data). This is to be preferred instead of a clean install since it won’t make you lose any personal files that might trigger this behavior.
However, it is preferred that you take some time to back up your data in advance so that you don’t end up losing any personal files and photos that are being stored on the OS drive.
Some Windows 10 users are encountering the ‘Failed to write core dump. Minidumps are not enabled by default on client versions of Windows‘ error when attempting to join or create a server. This error is occurring with various different Minecraft builds.
Failed to write core dump. Minidumps are not enabled by default on client versions of Windows
If you’re running the game with an integrated Intel graphics card, it’s likely that the error is triggered by a Dynamic Link Library file (ig9icd64.dll). In this case, you should be able to fix the issue by using the Intel Update Assistant utility to install the latest drivers compatible with the integrated GPU.
On the other hand, if you’re using a high-end Nvidia GPU, you might need to force Vsync and Triple buffering directly on javaw.exe in order to make the game run in a stable matter.
In case you’re using an AMD card, try reinstalling the Catalyst or AMD Software. A partially corrupted installation might be facilitating the apparition of this issue.
Updating to the latest Intel Graphics Card Driver (if applicable)
If you’re using an integrated Graphics card supplied by Intel, chances are you’re dealing with an issue originating from the ig9icd64.dll. This file belongs to the OpenGL Driver for Intel Graphics Accelerator.
In case this scenario is applicable to your current situation, you will be able to fix the issue by updating the entire set of Graphics drivers using the Intel Update Assistant utility.
A lot of affected users that were previously unable to join and create Minecraft servers have confirmed that this operation finally made the game stable.
Here’s a quick guide on updating your Intel Graphics drivers to the latest version:
Visit this link (here) and click on the Get Started button.
Starting the Intel Auto-Update utility
After you do this, wait until the initial scan is complete. Once the process is finished, click on the Download All button and wait for the download to complete.
Downloading every compatible Intel driver update
Once every download is complete, double-click on each installation executable and follow the on-screen prompts to complete the driver installation.
After you manage to install every new update, restart your computer and see if the ‘Failed to Write Core Dump’ is resolved by trying to join or create a Minecraft server.
Forcing Vsync & Triple Buffering on Minecraft (Nvidia Only)
If you’re using a medium to high-end Nvidia GPU, it’s very likely that you’re seeing the ‘Failed to Write Core Dump’ error due to the fact that your current graphics card settings are not enforcing VSync when you’re playing Minecraft.
This setting can also be enforced from the Game settings, but the ideal way to do it is from the Nvidia Control Panel. In order to fix the issue, you will need to navigate to your Java path and add Javaw.exe to the list of managed items.
After you do this, you can force the two settings to be used by every program that makes use of Javaw.exe (including Minecraft).
Here’s a quick step-by-step guide on enabling VSync and Triple Buffering from the Manage 3D Settings menu of Nvidia Control Panel:
Right-click on an empty space on your desktop and click on Nvidia Control Panel from the newly appeared context menu.
Access Nvidia Control Panel.
Once you’re inside Nvidia Control Panel, use the left-hand menu to select Manage 3D settings (under 3D Settings).
Next, move over to the right-hand side menu and select the Program Settings menu. Inside, click on Add > Browse and navigate to the location of your Java installation, select the javaw.exe file and click on Open.
Leading up javaw.exe in Nvidia Control Panel
Note: Here’s a list of default locations depending on which Java version you’re using:
Java 7
- C:/Program Files/Java/jre7/bin/
OR
- C:/Program Files (x86)/Java/jre7/bin/

Java 6
- C:/Program Files/Java/jre6/bin/
OR
- C:/Program Files (x86)/Java/jre6/bin/
Next, once the executable is loaded, scroll down through the list of program settings and locate Vertical Sync and Triple Buffering. Once you see them, use the drop-down menu associated with each one to change the default setting to ON for both.
Changing the default Program Settings for both
Once the two settings are enforced, hit the Apply button to make the changes permanent.
Attempt to join or create a Minecraft server once again and see if the issue is now resolved.
Reinstalling the AMD Catalyst Utility (AMD Only)
If you’re using an AMD GPU, it’s possible that you’re seeing the ‘Failed to write core dump. Minidumps are not enabled by default on client versions of Windows‘ error due to a partially corrupted AMD Software installation.
In case these same circumstances apply to you, you should be able to get the issue fixed by uninstalling your current AMD Software or AMD Catalyst installation and reinstalling the latest version again through the official channels.
Here’s a quick step by step guide that will show you how to do this:
Press Windows key + R to open up a Run dialog box. Next, type ‘appwiz.cpl’ and press Enter to open up the Programs and Features menu.
Typing in “appwiz.cpl” in the Run prompt
Once you’re inside the Programs and Features screen, scroll down through the list of installed applications and locate the AMD installation that you wish to uninstall. When you locate your AMD installation, right-click on it and choose Uninstall from the context menu.
Uninstalling the AMD Software
At the confirmation prompt, click Ok and follow the on-screen prompts to complete the uninstallation process.
Restart your computer and wait for the next startup to complete.
Visit this link (here) and download the latest version of AMD Catalyst. Once the download is complete, open the installation executable and follow the on-screen prompts to complete the installation.
Once the new version is installed, reboot again and see if the issue is resolved at the next startup by attempting to join or create a Minecraft server.
A lot of macOS users are encountering unable to install the Skype for Meetings app in order to join or host meetings inside the Skype for Business Web platform. Affected users are reporting that they are seeing the Application ‘Skype Meetings App’ can’t be opened every time they try to install the plugin needed to join or host live calls.
Skype For Business Web App Plugin Won’t install on Safari
As it turns out if you haven’t updated your Mac version to the latest version, the issue might occur due to a bug that Apple has since patched – the fix is automatically included with versions newer than macOS High Sierra version 10.13.5. If this scenario is applicable, you should be able to fix the issue by updating your macOS firmware to the latest version compatible.
If you’re looking for a quick workaround, then installing the Skype Meetings app and using that to join meetings should do the trick. But keep in mind that this doesn’t solve the root cause of the issue and it will not allow you to host meetings (only join them via email or calendar).
The most effective fix for this issue is to install the standalone version of Skype for Business app for macOS. This will bypass the use of the plugin, and it will allow you to join and host meetings inside the Skype for Business platform.
Updating macOS version to the latest version
According to Apple’s engineers, this issue was fixed via a couple of fixes released right after macOS High Sierra version 10.13.5. In case the issue is occurring due to that bug, you should be able to get the issue resolved by updating your macOS firmware to the latest OS version compatible.
Some affected users that were previously encountering the same issue have confirmed that the plugin installed successfully after they installed every pending update from System Preferences.
Here’s a quick guide that will show you how to update to the latest build available:
Use the action bar at the bottom of the screen to click on the System Preferences icon. If you have pending updates, you will likely notice a red circle next to it.
Open System Preferences
Inside the System Preferences menu, scroll down through the list of available options and click on the Software Update icon.
Accessing the Software Update menu
After you open the Software Update menu, the utility will start to scan for new available updates. Wait until the initial scan is complete (don’t close the window until the result is displayed).
Checking for Updates
In case a newer version is found, hit the Update now button.
Updating the macOS version to the latest version
Next, follow the on-screen prompts to complete the installation of the new operating system update.
Once the process is complete, restart your Mac manually and wait for the reboot to complete.
At the next startup, pop open Safari again and see if you’re still encountering the Application ‘Skype Meetings App’ can’t be opened error when you try to download the Skype for Business plugin.
Using the Skype Meetings app
As it turns out, one stable workaround that seems to work for a lot of affected users encountering is to use the Skype Meetings app instead of Skype for Business. Enforcing this workaround is easy since you can do it directly from your email or calendar.
Note: This fix will only work if you’re trying to join a meeting and it will not allow you to host meetings.
While this won’t fix the underlying issue that is preventing some macOS users from joining calls with the Skype For Business Web App Plugin, it servers as a reliable fix if you’re in a hurry.
Here’s a quick guide on using the Skype Meetings app instead of the Skype for Business plugin:
Search for your meeting request in your email or calendar.
Depending on the type of version that you’re using, click on Join Skype Meeting or Join Online Meeting.
Joining the Skype Meeting
You will then be prompted by your browser to install the Skype Meetings app. Do so and wait for the operation to complete.
Once the installation is complete, sign in with your name to join inside the Skype Meetings App sign-in page and hit Join to enter the live meeting.
Joining the meeting
Downloading the Skype for Business app for macOS
If the Skype for Business plugin refuses to work for you, you can use the Skype for Business standalone app as a viable alternative. A lot of users that we’re unable to join and host Skype meetings have reported that the standalone app allowed them to participate in meetings with no issues.
Keep in mind that the app is not available inside the App store, so you’ll need to download it manually from a Microsoft webpage using your default browser.
Here’s a quick step by step guide on downloading & installing the Skype for Business app for macOS:
Open Safari or another browser that is set as the default and access this link (here). Inside the page, click on the Download Skype for Business button.
Downloading Skype for Business
Next, select the version of Skype for Business that you’re trying to install and confirm to start the download.
Once the download is complete, open the installer and follow the on-screen prompts to complete the installation.
After the installation is complete, put the Skype for Business icon in your Dock for easy access, then open it normally. You should no longer have issues joining or hosting meetings using the Skype for Business platform.